


FCM实现手机
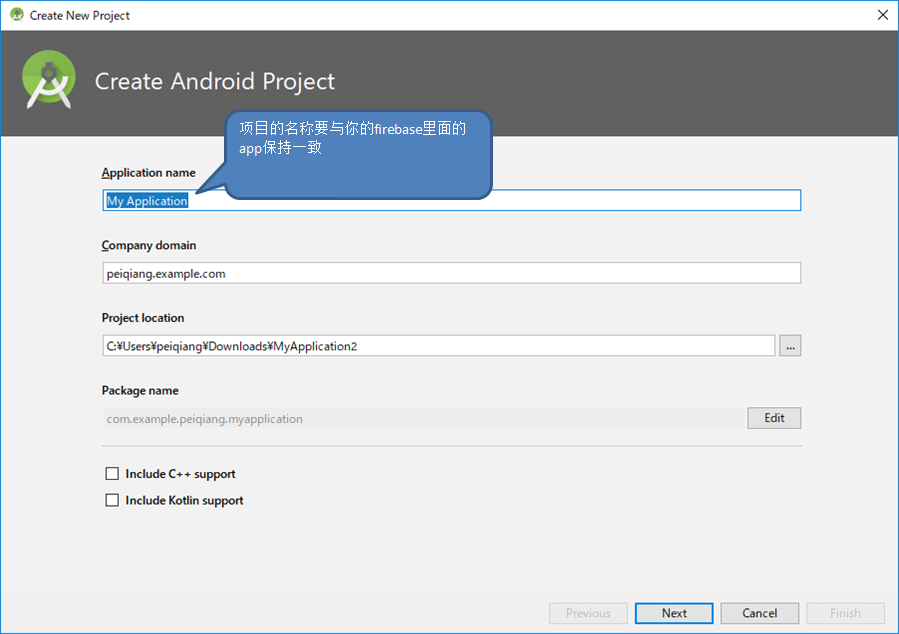
1 下载Androidstudio 3.2 版本,之后新建一个项目
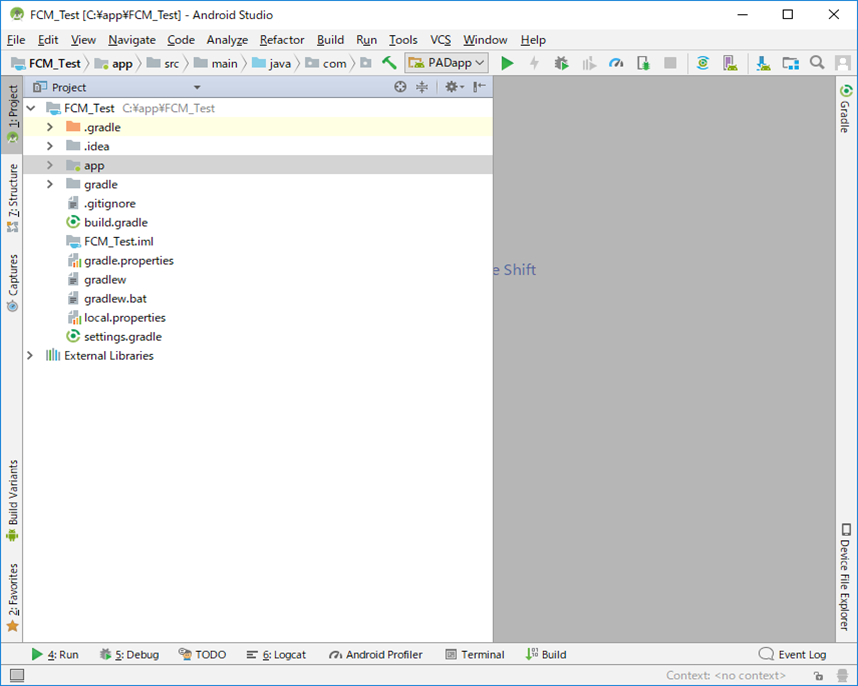
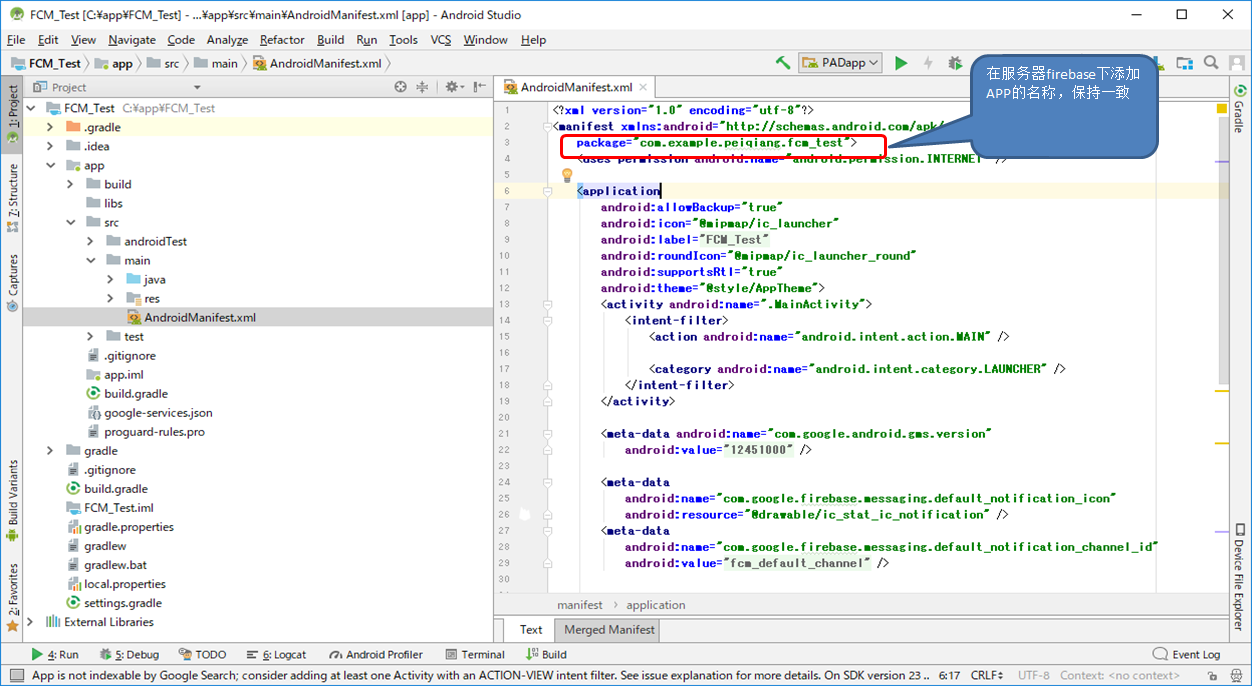
2 创建完项目之后查找文件AndroidMainifest.xml
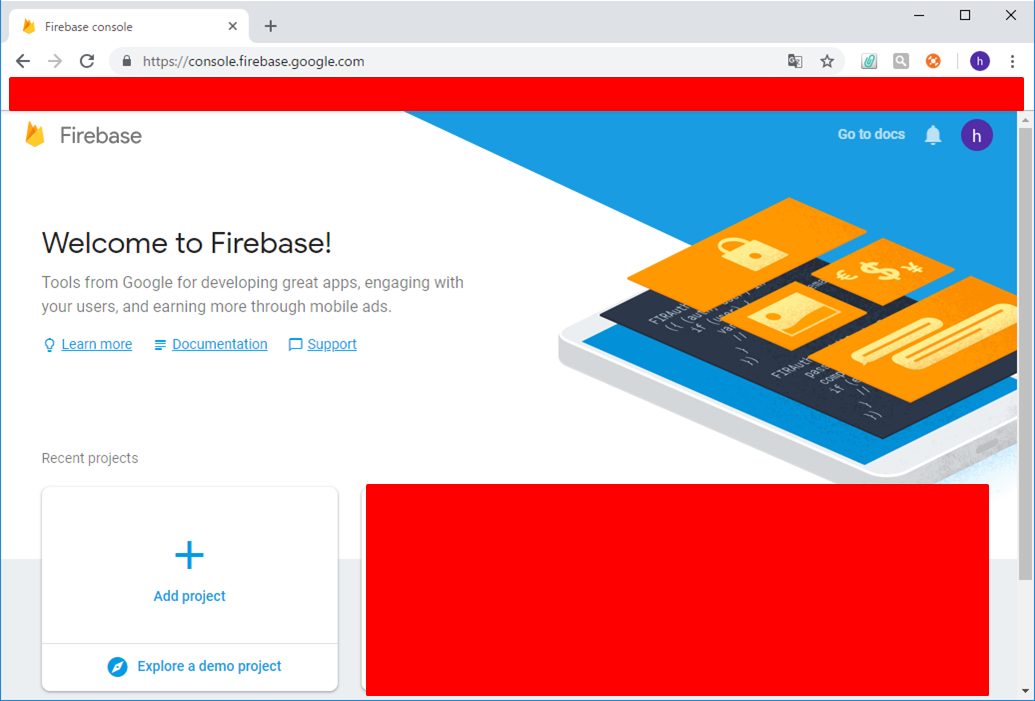
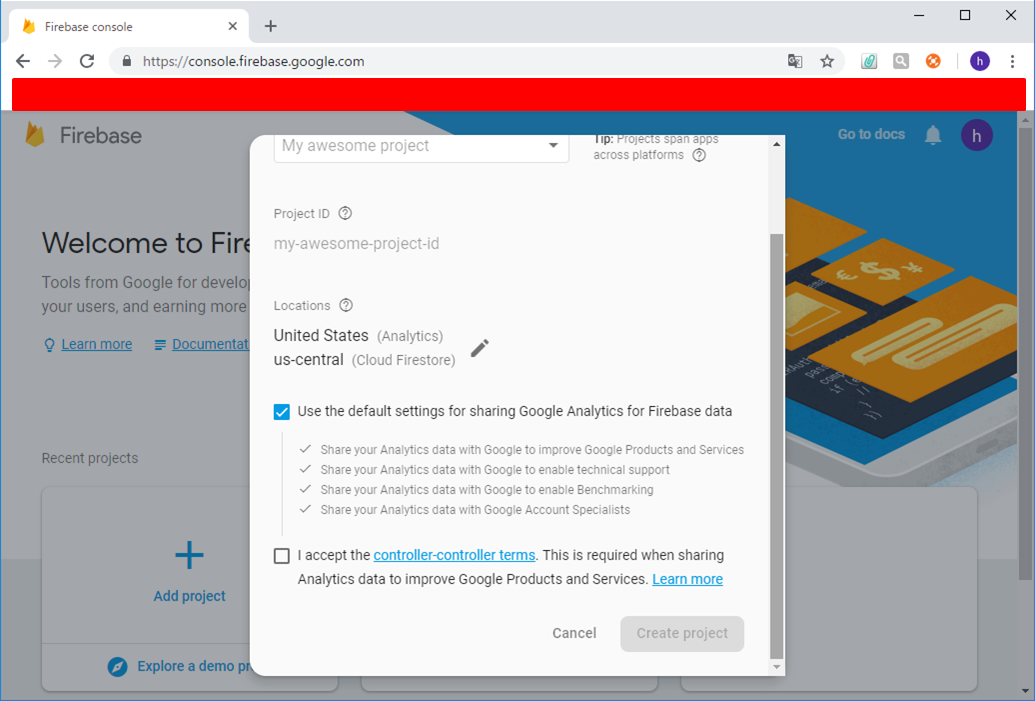
3 访问网站注册一个自己的firebase的账户 https://console.firebase.google.com
5 进入自己的项目当中,之后添加自己的app,可以是Android的也可以是iOS,在这里我们以Android为例子

6 选择Android的APP之后会让你注册这个APP
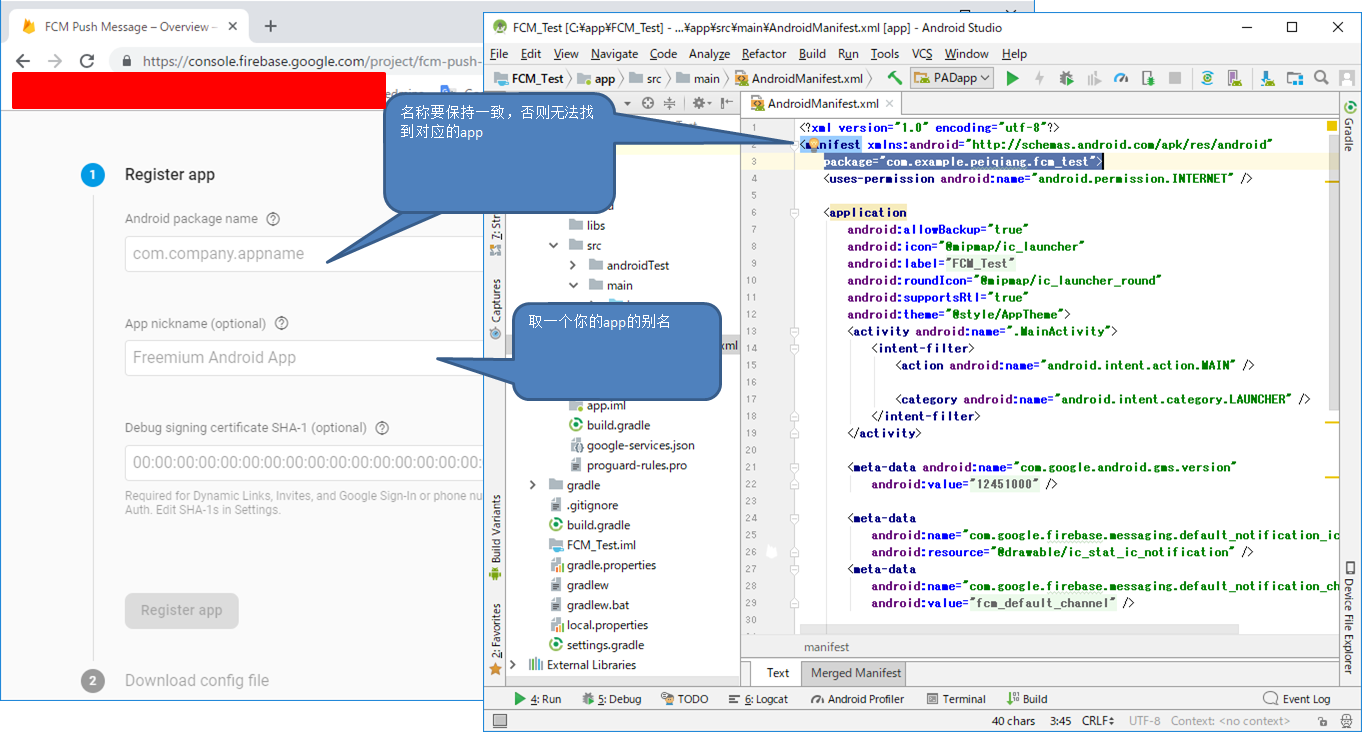
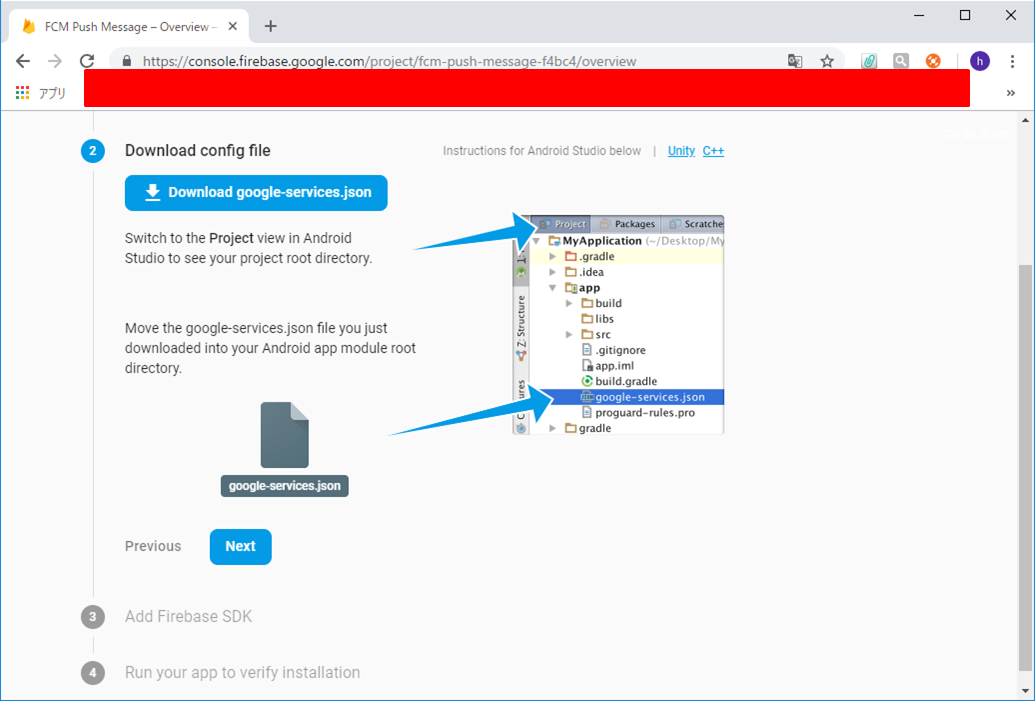
7 点击Register app之后会生成下面的画面,之后点击下载.json文件放到指定的目录下即可
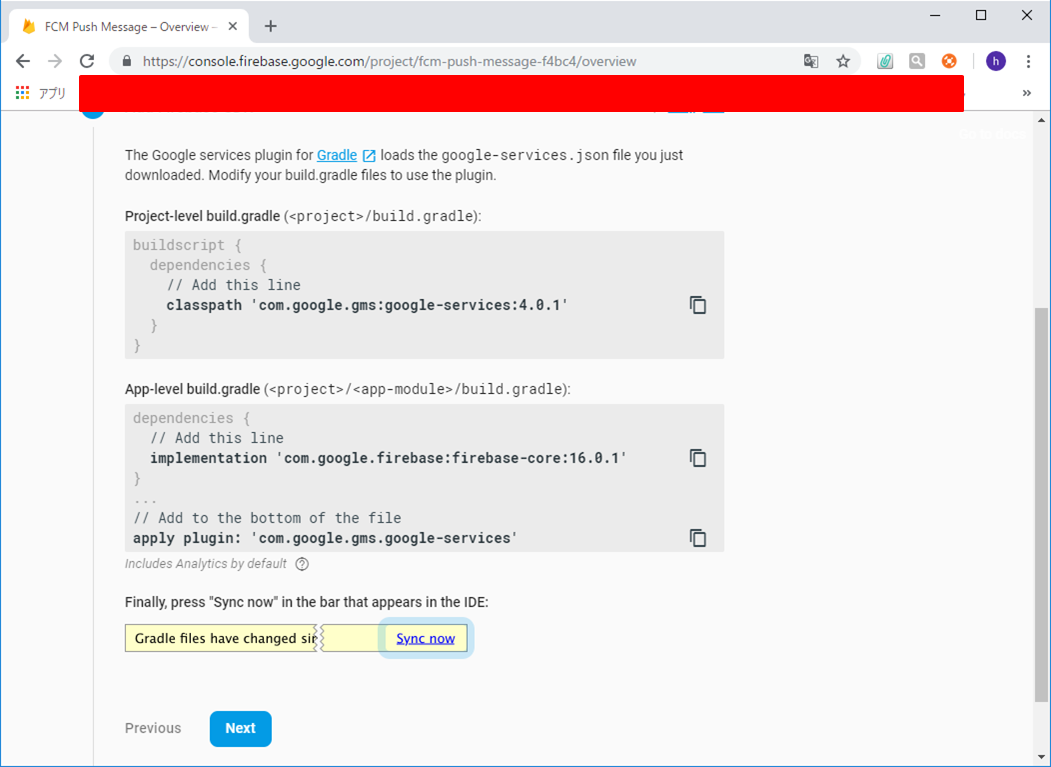
8 按照指定的操作即可,把下面的代码拷贝到指定的文件下,之后点击同步
9 同步是否成功看你是否出错
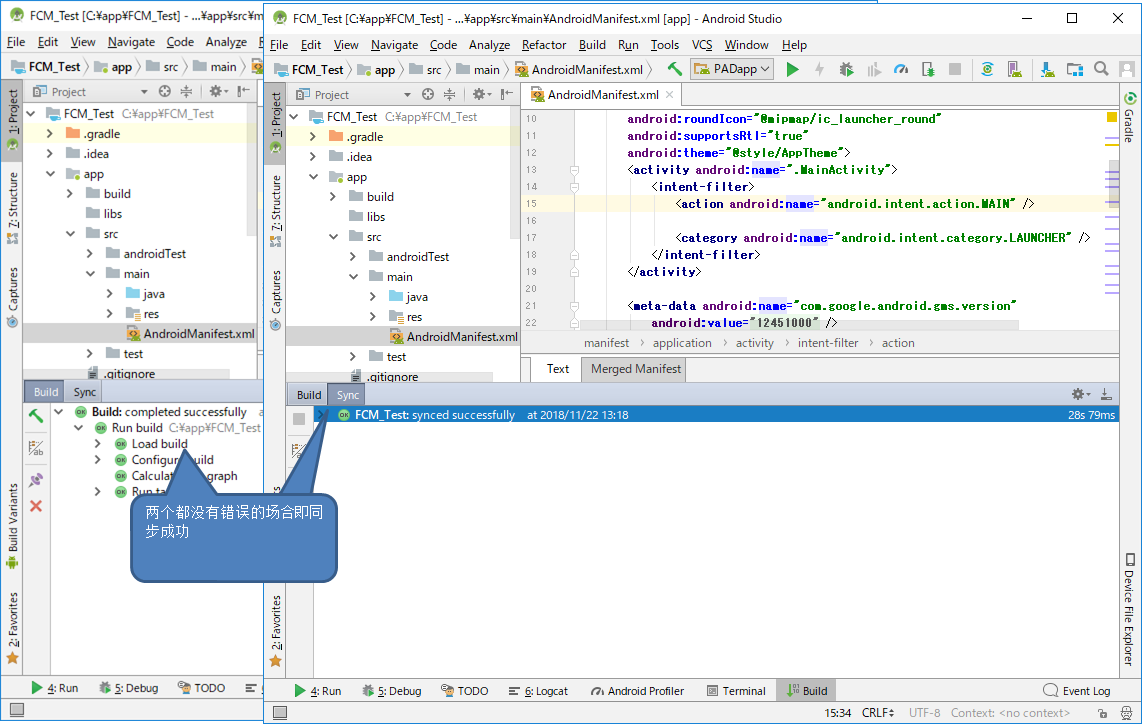
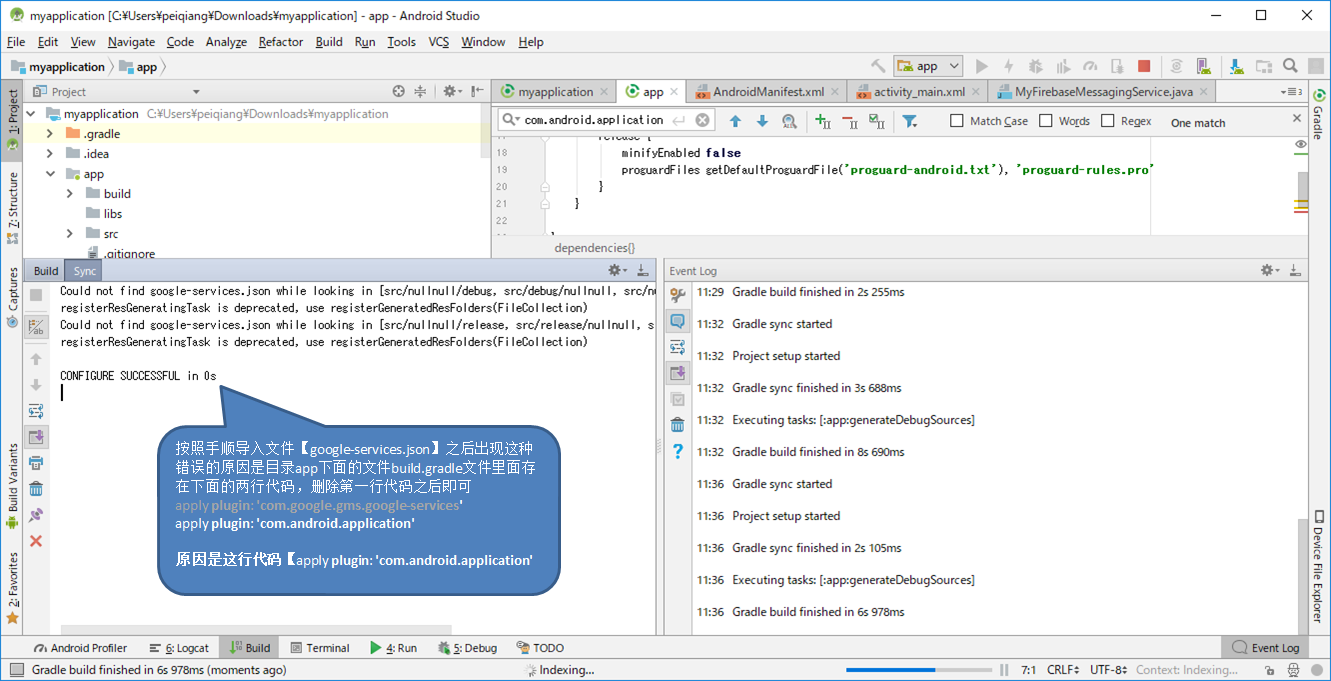
同步的时候可能会出现下面的错误
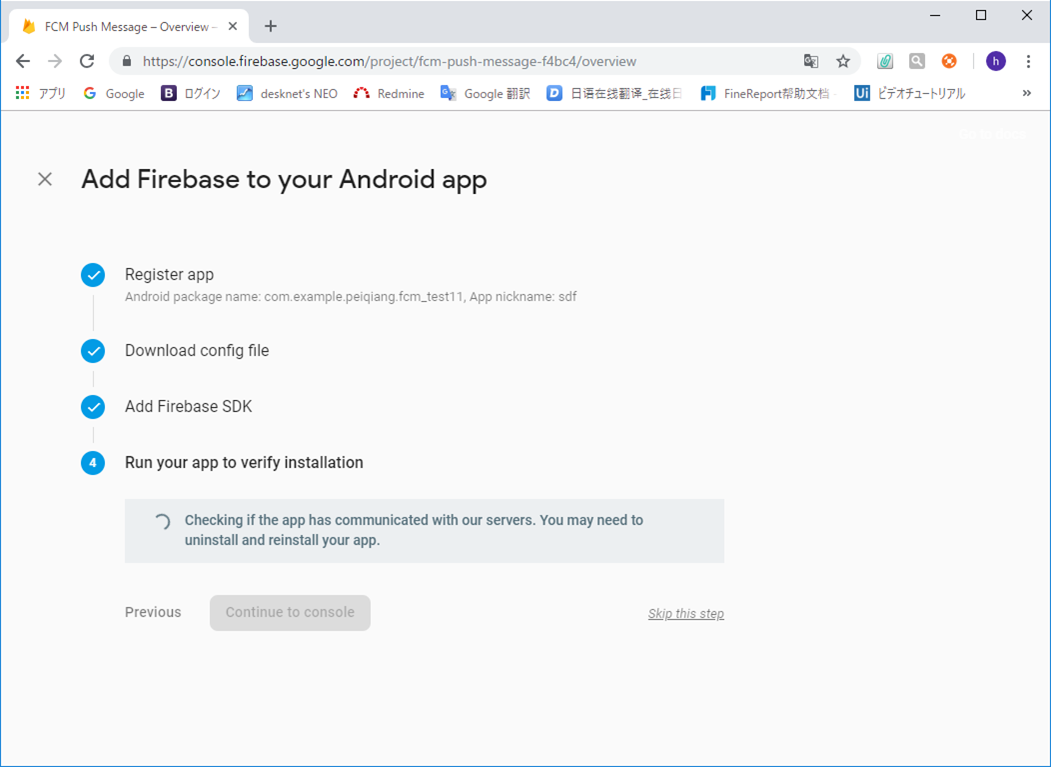
10 在这一步可能会很慢,不用管他,直接点击Skip this step 即可
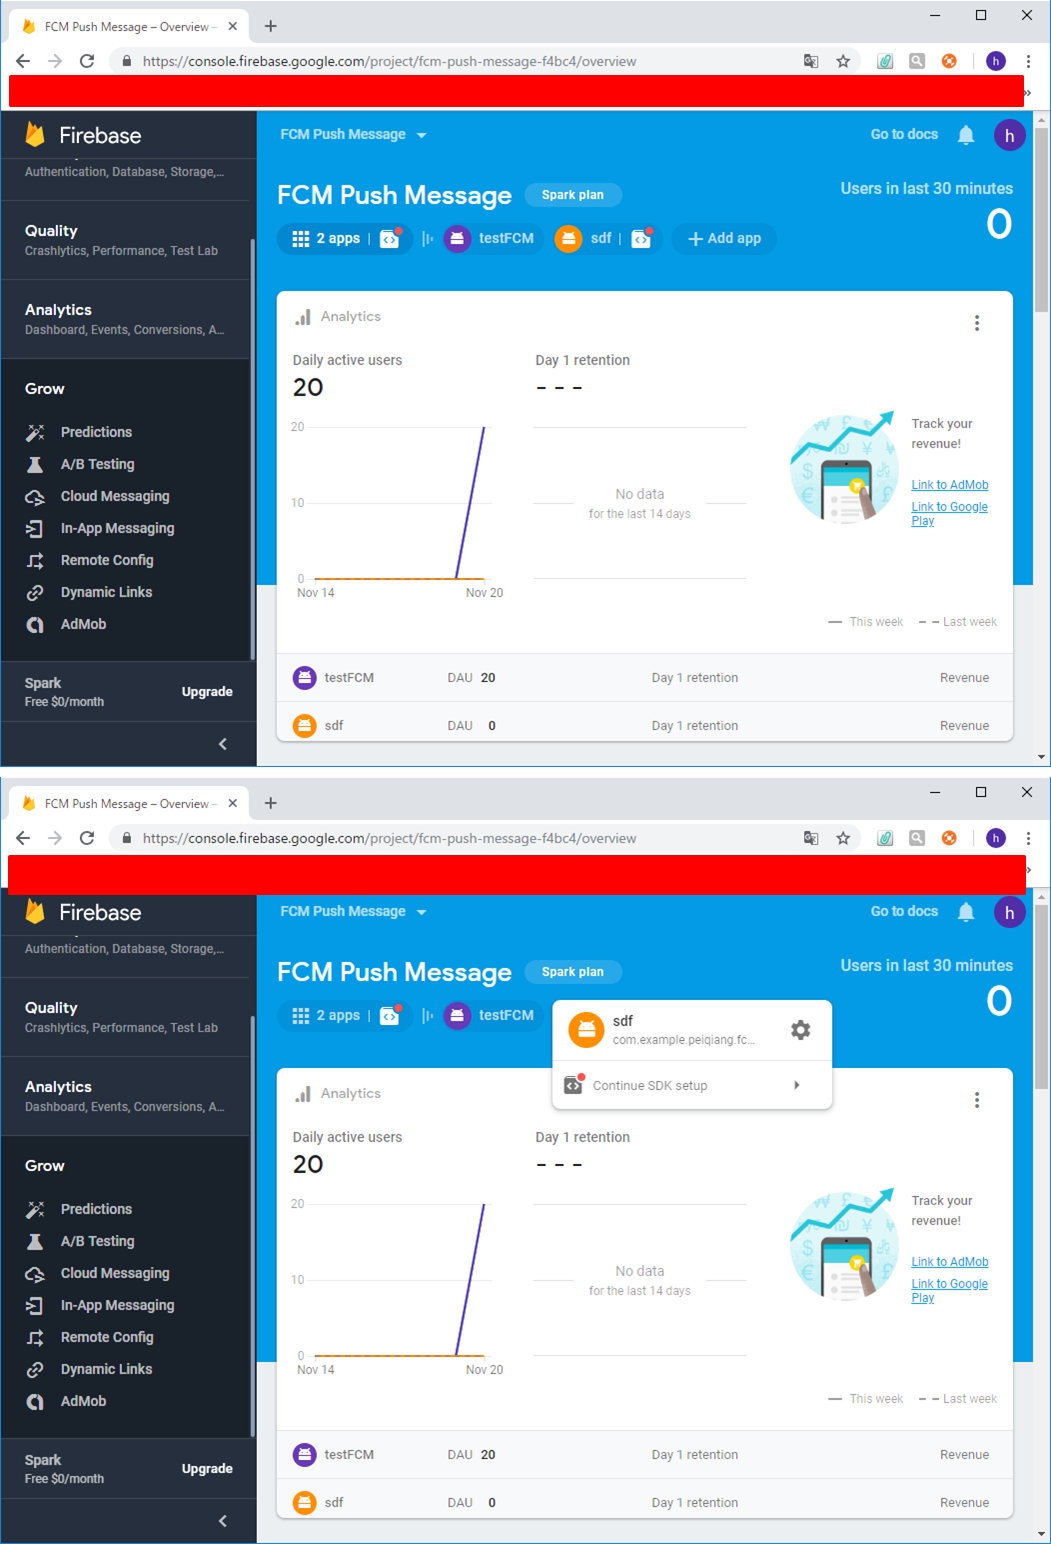
11 之后会生成一个app:sdf
12 到此firebase的服务器配置完了
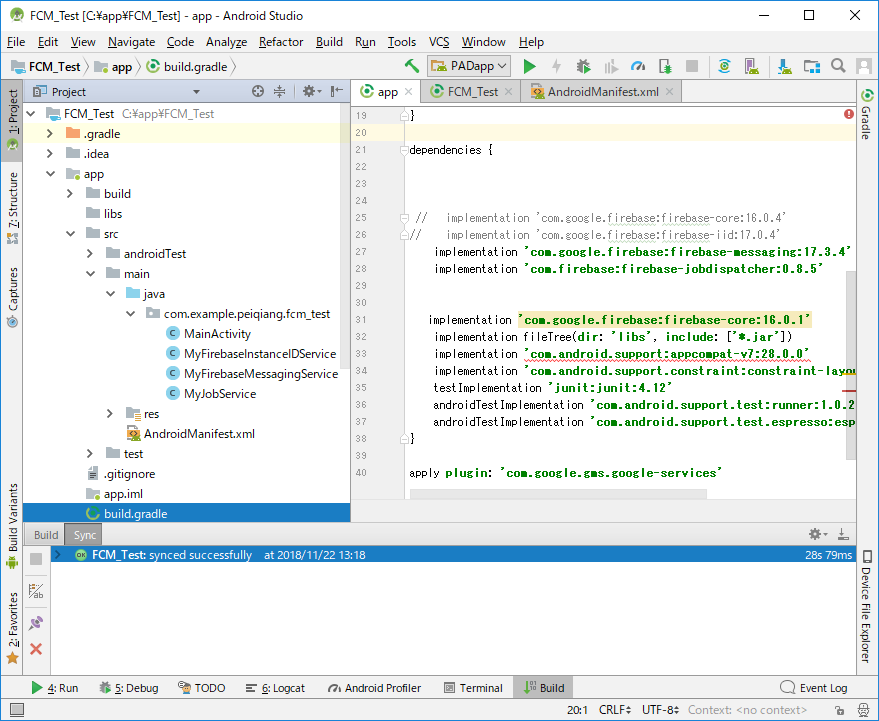
13 配置前台,找到文件app下的build.gradle下面追加下面的两行代码,如下图所示
implementation 'com.google.firebase:firebase-messaging:17.3.4'
implementation 'com.firebase:firebase-jobdispatcher:0.8.5'
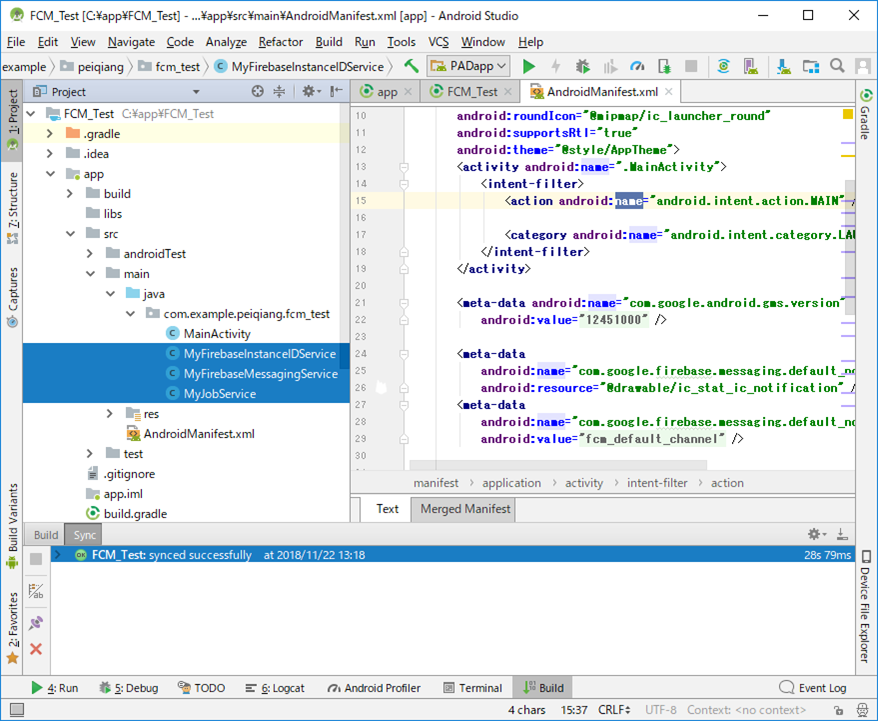
14 在下面的路径下追加三个类,并修改AndroidMainifest.xml文件
MyJobService
package com.example.peiqiang.fcm_test;

import android.util.Log;

import com.firebase.jobdispatcher.JobParameters;
import com.firebase.jobdispatcher.JobService;

public class MyJobService extends JobService {

    private static final String TAG = "MyJobService";

    @Override
    public boolean onStartJob(JobParameters jobParameters) {
        Log.d(TAG, "Performing long running task in scheduled job");
        // TODO(developer): add long running task here.
        return false;
    }

    @Override
    public boolean onStopJob(JobParameters jobParameters) {
        return false;
    }

}
MyFirebaseMessagingService
/**
 * Copyright 2016 Google Inc. All Rights Reserved.
 * <p>
 * Licensed under the Apache License, Version 2.0 (the "License");
 * you may not use this file except in compliance with the License.
 * You may obtain a copy of the License at
 * <p>
 * http://www.apache.org/licenses/LICENSE-2.0
 * <p>
 * Unless required by applicable law or agreed to in writing, software
 * distributed under the License is distributed on an "AS IS" BASIS,
 * WITHOUT WARRANTIES OR CONDITIONS OF ANY KIND, either express or implied.
 * See the License for the specific language governing permissions and
 * limitations under the License.
 */

package com.example.peiqiang.fcm_test;

import android.app.NotificationChannel;
import android.app.NotificationManager;
import android.app.PendingIntent;
import android.content.Context;
import android.content.Intent;
import android.media.RingtoneManager;
import android.net.Uri;
import android.os.Build;
import android.support.v4.app.NotificationCompat;
import android.text.Html;
import android.util.Log;

import com.firebase.jobdispatcher.FirebaseJobDispatcher;
import com.firebase.jobdispatcher.GooglePlayDriver;
import com.firebase.jobdispatcher.Job;
import com.google.firebase.messaging.FirebaseMessagingService;
import com.google.firebase.messaging.RemoteMessage;

public class MyFirebaseMessagingService extends FirebaseMessagingService {

    private static final String TAG = "MyFirebaseMsgService";

    /**
     * Called when message is received.
     *
     * @param remoteMessage Object representing the message received from Firebase Cloud Messaging.
     */
    // [START receive_message]
    @Override
    public void onMessageReceived(RemoteMessage remoteMessage) {
        // [START_EXCLUDE]
        // There are two types of messages data messages and notification messages. Data messages
        // are handled
        // here in onMessageReceived whether the app is in the foreground or background. Data
        // messages are the type
        // traditionally used with GCM. Notification messages are only received here in
        // onMessageReceived when the app
        // is in the foreground. When the app is in the background an automatically generated
        // notification is displayed.
        // When the user taps on the notification they are returned to the app. Messages
        // containing both notification
        // and data payloads are treated as notification messages. The Firebase console always
        // sends notification
        // messages. For more see: https://firebase.google.com/docs/cloud-messaging/concept-options
        // [END_EXCLUDE]

        // TODO(developer): Handle FCM messages here.
        // Not getting messages here? See why this may be: https://goo.gl/39bRNJ
        Log.d(TAG, "From: " + remoteMessage.getFrom());

        // Check if message contains a data payload.
        if (remoteMessage.getData().size() > 0) {
            Log.d(TAG, "Message data payload: " + remoteMessage.getData());

            if (/* Check if data needs to be processed by long running job */ true) {
                // For long-running tasks (10 seconds or more) use Firebase Job Dispatcher.
                scheduleJob();
            } else {
                // Handle message within 10 seconds
                handleNow();
            }

        }

        // Check if message contains a notification payload.
        if (remoteMessage.getNotification() != null) {
            Log.d(TAG, "Message Notification Body: " + remoteMessage.getNotification().getBody());
        }
//        super.onMessageReceived(remoteMessage);
//        sendNotification(remoteMessage);

        // Also if you intend on generating your own notifications as a result of a received FCM
        // message, here is where that should be initiated. See sendNotification method below.
    }
    // [END receive_message]


//    private void sendNotification(RemoteMessage message) {
//        Intent intent;
//        intent = new Intent(this, MainActivity.class);
//        Log.d(TAG, message.getData().toString());
//
//        intent.setFlags(Intent.FLAG_ACTIVITY_NEW_TASK | Intent.FLAG_ACTIVITY_CLEAR_TASK);
//        PendingIntent pendingIntent = PendingIntent.getActivity(this, 0 /* Request code */, intent,
//                PendingIntent.FLAG_ONE_SHOT);
//        Uri defaultSoundUri = RingtoneManager.getDefaultUri(RingtoneManager.TYPE_NOTIFICATION);
//
//        NotificationCompat.Builder notificationBuilder = new NotificationCompat.Builder(this)
//                .setSmallIcon(R.mipmap.ic_launcher)
//                .setContentTitle(message.getData().get("title"))
//                .setContentText(Html.fromHtml(message.getData().get("body")))
//                .setAutoCancel(true)
//                .setSound(defaultSoundUri)
//                .setContentIntent(pendingIntent);
//
//        NotificationManager notificationManager =
//                (NotificationManager) getSystemService(Context.NOTIFICATION_SERVICE);
//        notificationManager.notify(0, notificationBuilder.build());
//        saveMessage(message);
//    }


    // [START on_new_token]

    /**
     * Called if InstanceID token is updated. This may occur if the security of
     * the previous token had been compromised. Note that this is called when the InstanceID token
     * is initially generated so this is where you would retrieve the token.
     */
    @Override
    public void onNewToken(String token) {
        Log.d(TAG, "Refreshed token: " + token);

        // If you want to send messages to this application instance or
        // manage this apps subscriptions on the server side, send the
        // Instance ID token to your app server.
        sendRegistrationToServer(token);
    }
    // [END on_new_token]

    /**
     * Schedule a job using FirebaseJobDispatcher.
     */
    private void scheduleJob() {
        // [START dispatch_job]
        FirebaseJobDispatcher dispatcher = new FirebaseJobDispatcher(new GooglePlayDriver(this));
        Job myJob = dispatcher.newJobBuilder()
                .setService(MyJobService.class)
                .setTag("my-job-tag")
                .build();
        dispatcher.schedule(myJob);
        // [END dispatch_job]
    }

    /**
     * Handle time allotted to BroadcastReceivers.
     */
    private void handleNow() {
        Log.d(TAG, "Short lived task is done.");
    }

    /**
     * Persist token to third-party servers.
     *
     * Modify this method to associate the user's FCM InstanceID token with any server-side account
     * maintained by your application.
     *
     * @param token The new token.
     */
    private void sendRegistrationToServer(String token) {
        // TODO: Implement this method to send token to your app server.
    }

    /**
     * Create and show a simple notification containing the received FCM message.
     *
     * @param messageBody FCM message body received.
     */
    private void sendNotification(String messageBody) {
        Intent intent = new Intent(this, MainActivity.class);
        intent.addFlags(Intent.FLAG_ACTIVITY_CLEAR_TOP);
        PendingIntent pendingIntent = PendingIntent.getActivity(this, 0 /* Request code */, intent,
                PendingIntent.FLAG_ONE_SHOT);

        String channelId = getString(R.string.default_notification_channel_id);
        Uri defaultSoundUri = RingtoneManager.getDefaultUri(RingtoneManager.TYPE_NOTIFICATION);
        NotificationCompat.Builder notificationBuilder =
                new NotificationCompat.Builder(this, channelId)
                        .setSmallIcon(R.drawable.ic_stat_ic_notification)
                        .setContentTitle(getString(R.string.fcm_message))
                        .setContentText(messageBody)
                        .setAutoCancel(true)
                        .setSound(defaultSoundUri)
                        .setContentIntent(pendingIntent);

        NotificationManager notificationManager =
                (NotificationManager) getSystemService(Context.NOTIFICATION_SERVICE);

        // Since android Oreo notification channel is needed.
        if (Build.VERSION.SDK_INT >= Build.VERSION_CODES.O) {
            NotificationChannel channel = new NotificationChannel(channelId,
                    "Channel human readable title",
                    NotificationManager.IMPORTANCE_DEFAULT);
            notificationManager.createNotificationChannel(channel);
        }

        notificationManager.notify(0 /* ID of notification */, notificationBuilder.build());
    }
}
MyFirebaseInstanceIDService
/**
 * Copyright 2016 Google Inc. All Rights Reserved.
 * <p>
 * Licensed under the Apache License, Version 2.0 (the "License");
 * you may not use this file except in compliance with the License.
 * You may obtain a copy of the License at
 * <p>
 * http://www.apache.org/licenses/LICENSE-2.0
 * <p>
 * Unless required by applicable law or agreed to in writing, software
 * distributed under the License is distributed on an "AS IS" BASIS,
 * WITHOUT WARRANTIES OR CONDITIONS OF ANY KIND, either express or implied.
 * See the License for the specific language governing permissions and
 * limitations under the License.
 */

package com.example.peiqiang.fcm_test;

import android.util.Log;

import com.google.firebase.iid.FirebaseInstanceId;
import com.google.firebase.iid.FirebaseInstanceIdService;


public class MyFirebaseInstanceIDService extends FirebaseInstanceIdService {

    private static final String TAG = "MyFirebaseIIDService";

    /**
     * Called if InstanceID token is updated. This may occur if the security of
     * the previous token had been compromised. Note that this is called when the InstanceID token
     * is initially generated so this is where you would retrieve the token.
     */
    // [START refresh_token]
    @Override
    public void onTokenRefresh() {
        // Get updated InstanceID token.
        String refreshedToken = FirebaseInstanceId.getInstance().getToken();
        Log.d(TAG, "Refreshed token: " + refreshedToken);

        // If you want to send messages to this application instance or
        // manage this apps subscriptions on the server side, send the
        // Instance ID token to your app server.
        sendRegistrationToServer(refreshedToken);
    }
    // [END refresh_token]

    /**
     * Persist token to third-party servers.
     *
     * Modify this method to associate the user's FCM InstanceID token with any server-side account
     * maintained by your application.
     *
     * @param token The new token.
     */
    private void sendRegistrationToServer(String token) {
        // TODO: Implement this method to send token to your app server.
//        SendBird.registerPushTokenForCurrentUser(token, new SendBird.RegisterPushTokenWithStatusHandler() {
//            @Override
//            public void onRegistered(SendBird.PushTokenRegistrationStatus pushTokenRegistrationStatus, SendBirdException e) {
//                if (e != null) {
//                    Toast.makeText(MyFirebaseInstanceIDService.this, "" + e.getCode() + ":" + e.getMessage(), Toast.LENGTH_SHORT).show();
//                    return;
//                }
//
//                if (pushTokenRegistrationStatus == SendBird.PushTokenRegistrationStatus.PENDING) {
//                    Toast.makeText(MyFirebaseInstanceIDService.this, "Connection required to register push token.", Toast.LENGTH_SHORT).show();
//                }
//            }
//        });
    }
}
<?xml version="1.0" encoding="utf-8"?>
<manifest xmlns:android="http://schemas.android.com/apk/res/android"
    package="com.example.peiqiang.fcm_test">
    <uses-permission android:name="android.permission.INTERNET" />

    <application
        android:allowBackup="true"
        android:icon="@mipmap/ic_launcher"
        android:label="@string/app_name"
        android:roundIcon="@mipmap/ic_launcher_round"
        android:supportsRtl="true"
        android:theme="@style/AppTheme">
        <activity android:name=".MainActivity">
            <intent-filter>
                <action android:name="android.intent.action.MAIN" />

                <category android:name="android.intent.category.LAUNCHER" />
            </intent-filter>
        </activity>

        <meta-data android:name="com.google.android.gms.version"
            android:value="@integer/google_play_services_version" />

        <meta-data
            android:name="com.google.firebase.messaging.default_notification_icon"
            android:resource="@drawable/ic_stat_ic_notification" />
        <meta-data
            android:name="com.google.firebase.messaging.default_notification_channel_id"
            android:value="@string/default_notification_channel_id" />


        <service android:name=".MyFirebaseMessagingService">
            <intent-filter>
                <action android:name="com.google.firebase.MESSAGING_EVENT"/>
            </intent-filter>
        </service>

        <service  android:name=".MyFirebaseInstanceIDService">
            <intent-filter>
                <action android:name="com.google.firebase.INSTANCE_ID_EVENT"/>
            </intent-filter>
        </service>
        <service android:name=".MyJobService" android:exported="false">
            <intent-filter>
                <action android:name="com.firebase.jobdispatcher.ACTION_EXECUTE"/>
            </intent-filter>
        </service>
    </application>
</manifest>
15 在此期间可能会报错,报错的原因是没有找到XXX,这个时候就要去定义一些常量文件。
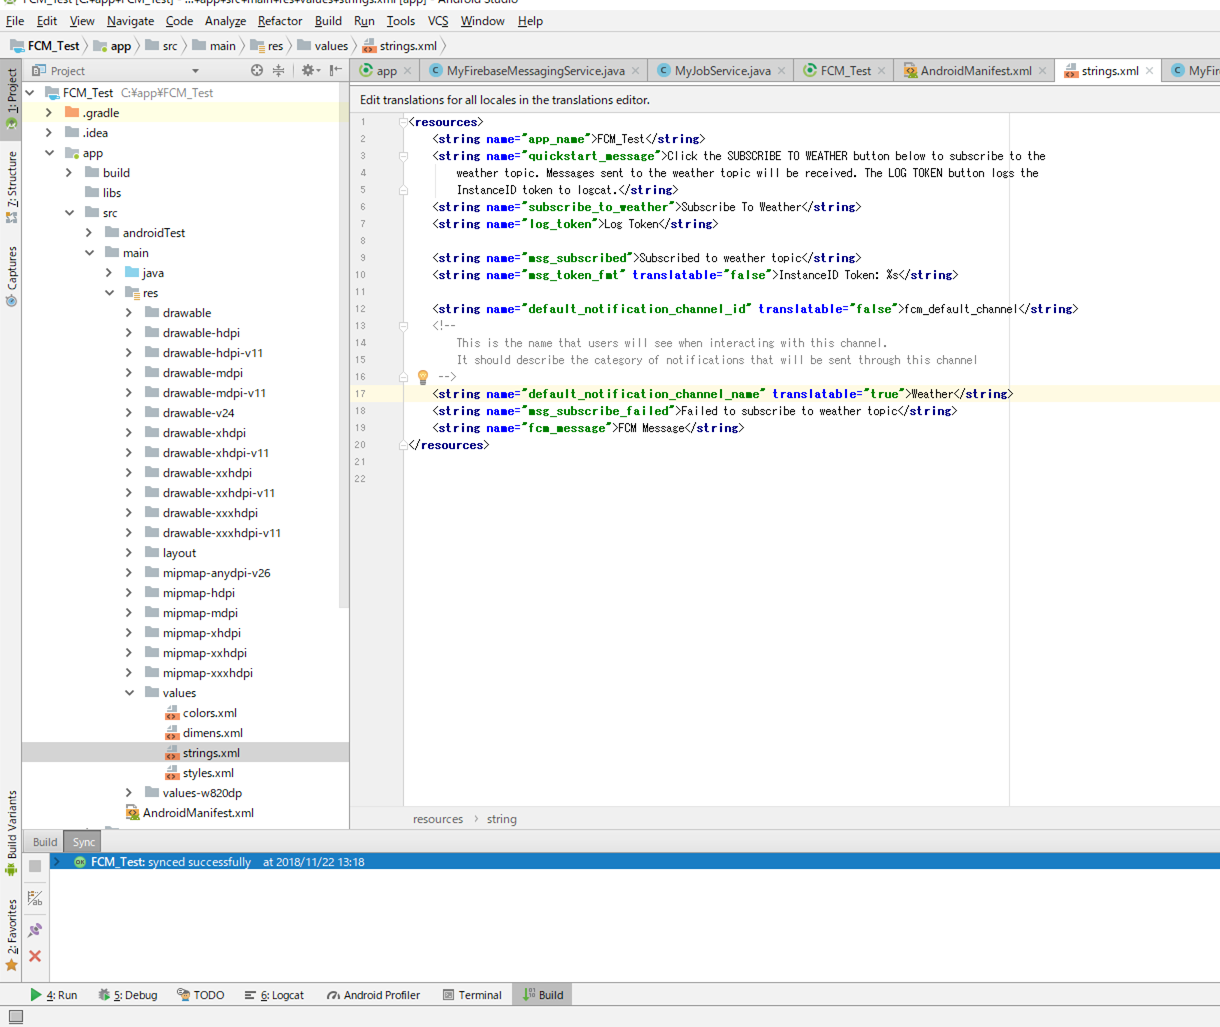
string.xml
<resources>
    <string name="app_name">FCM_Test</string>
    <string name="quickstart_message">Click the SUBSCRIBE TO WEATHER button below to subscribe to the
        weather topic. Messages sent to the weather topic will be received. The LOG TOKEN button logs the
        InstanceID token to logcat.</string>
    <string name="subscribe_to_weather">Subscribe To Weather</string>
    <string name="log_token">Log Token</string>

    <string name="msg_subscribed">Subscribed to weather topic</string>
    <string name="msg_token_fmt" translatable="false">InstanceID Token: %s</string>

    <string name="default_notification_channel_id" translatable="false">fcm_default_channel</string>
    <!--
        This is the name that users will see when interacting with this channel.
        It should describe the category of notifications that will be sent through this channel
     -->
    <string name="default_notification_channel_name" translatable="true">Weather</string>
    <string name="msg_subscribe_failed">Failed to subscribe to weather topic</string>
    <string name="fcm_message">FCM Message</string>
</resources>
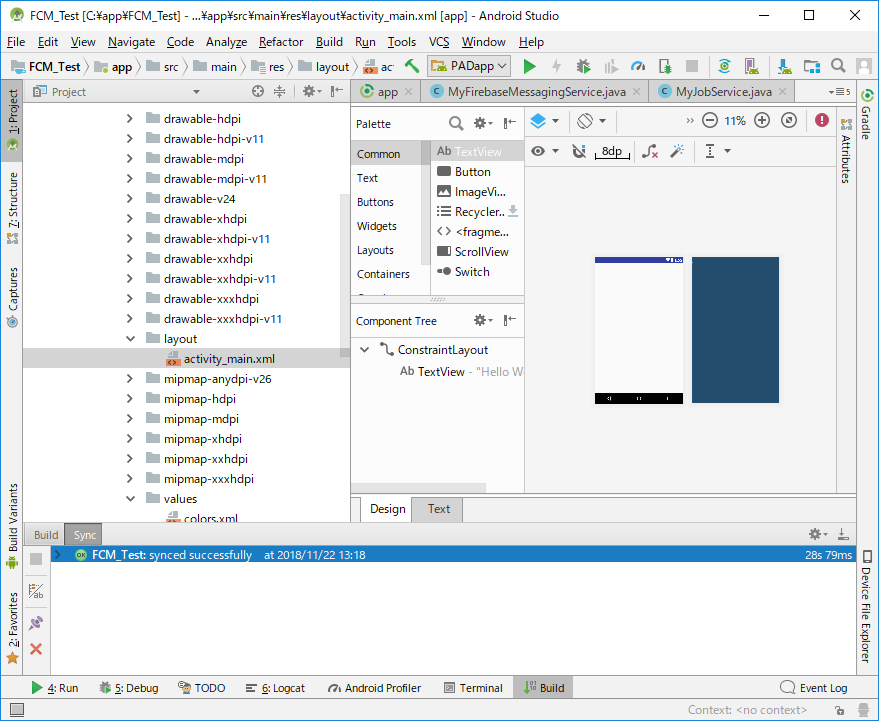
activity_main.xml文件是设计你的app在手机上的具体显示
配置完之后可能会出现一些图片找不到的情况,这样你就要去下面的网址找到对应的图片,放到你自己的工程下面,路径参照网址
https://github.com/firebase/quickstart-android/tree/master/messaging/app/src/main/res
16 编译如果没有错误的话,到目前为止就算是OK了
17 启动你的虚拟机
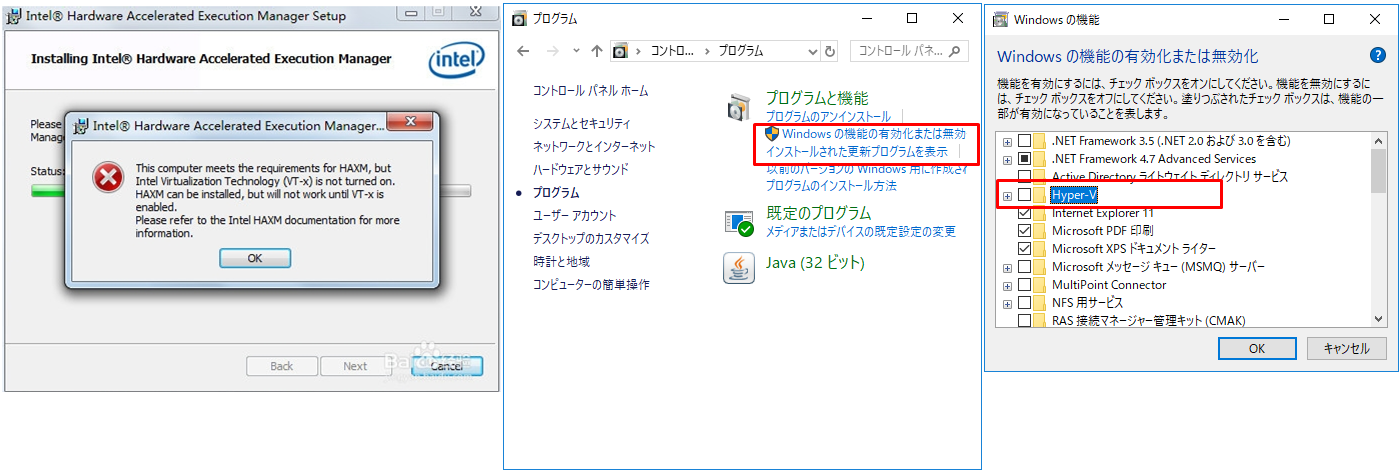
在这遇到的坑有,haxm安装不上
Android studio的虚拟手机启动不起来,window10系统需要安装haxm的文件,如果你没有安装的话再window10系统启动不起来的,window7系统好像可以直接启动,可以尝试着看一下,如果不好用的话在寻找haxm文件
haxm文件自己去C盘下搜索所有的文件就可以找到。当你安装的时候报下图错误的时候,可以上网自己找一下,有相关的解答。解决的办法就是取你的BIOS里面设置一下。Window10设置完之后还是启动不了的话,就去找你的系统是否安装
过window10 自带的虚拟机,如果安装过,OK问题就在这了。去查找你的控制面板里面,找到下图的地方,把Hyper-V给去掉之后再重新安装haxm文件,应该就不会出现这种问题了
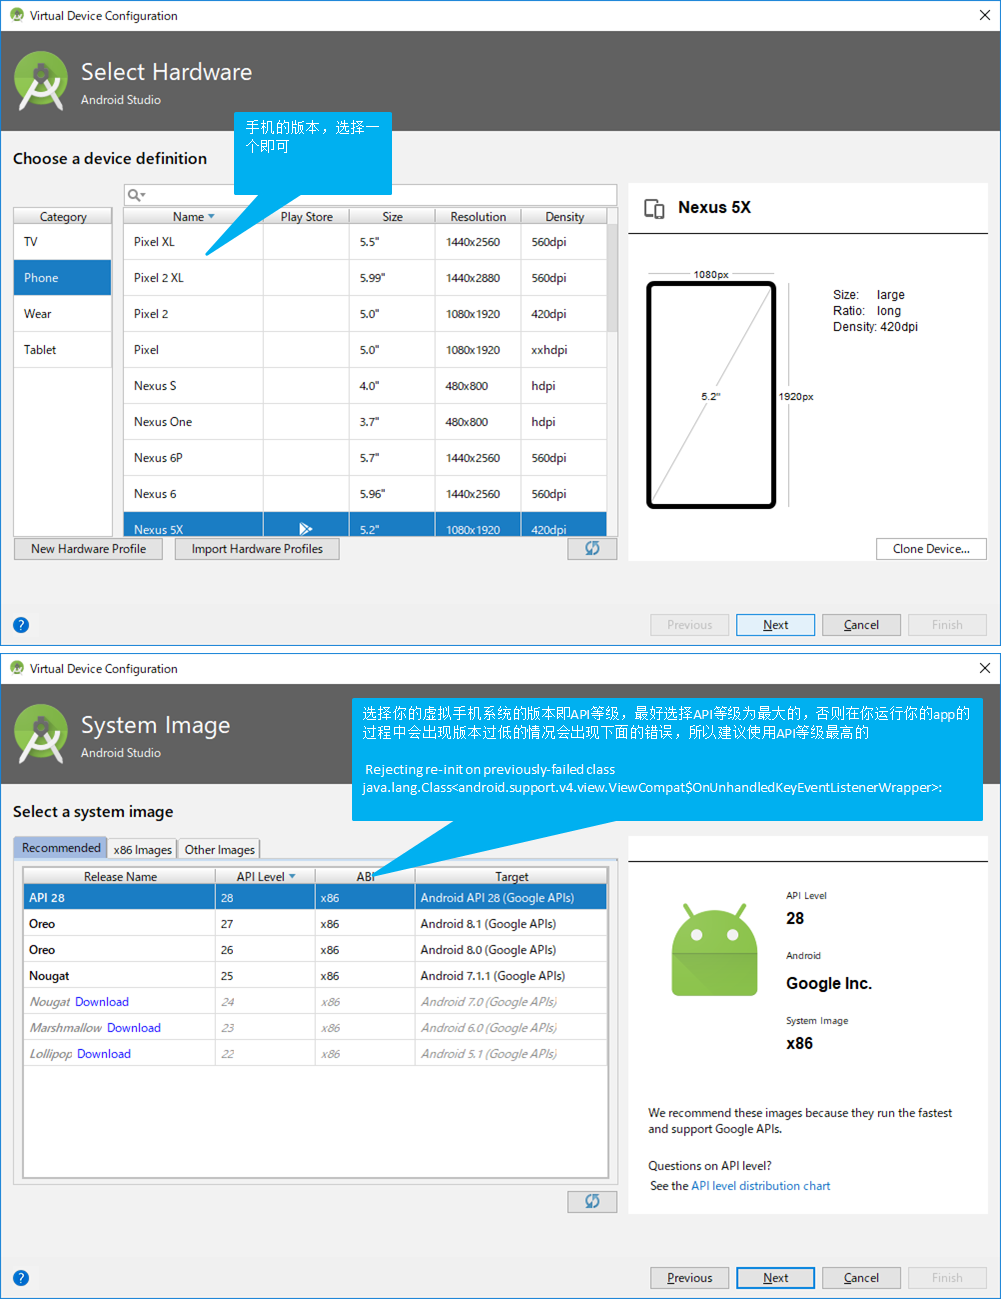
18 启动你的虚拟机之后会让你选择你的手机虚拟机的版本问题
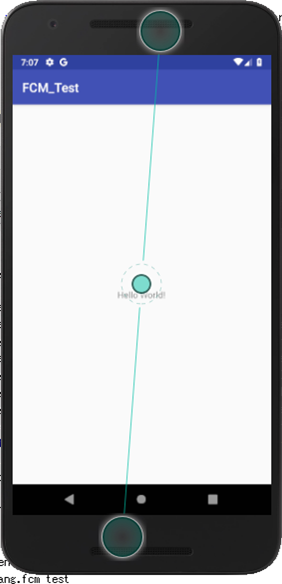
19 运行起来之后你的虚拟手机上会出现你自己创建的app
20 到此为止,你的前台和后台配置完成了接下来就是发送消息
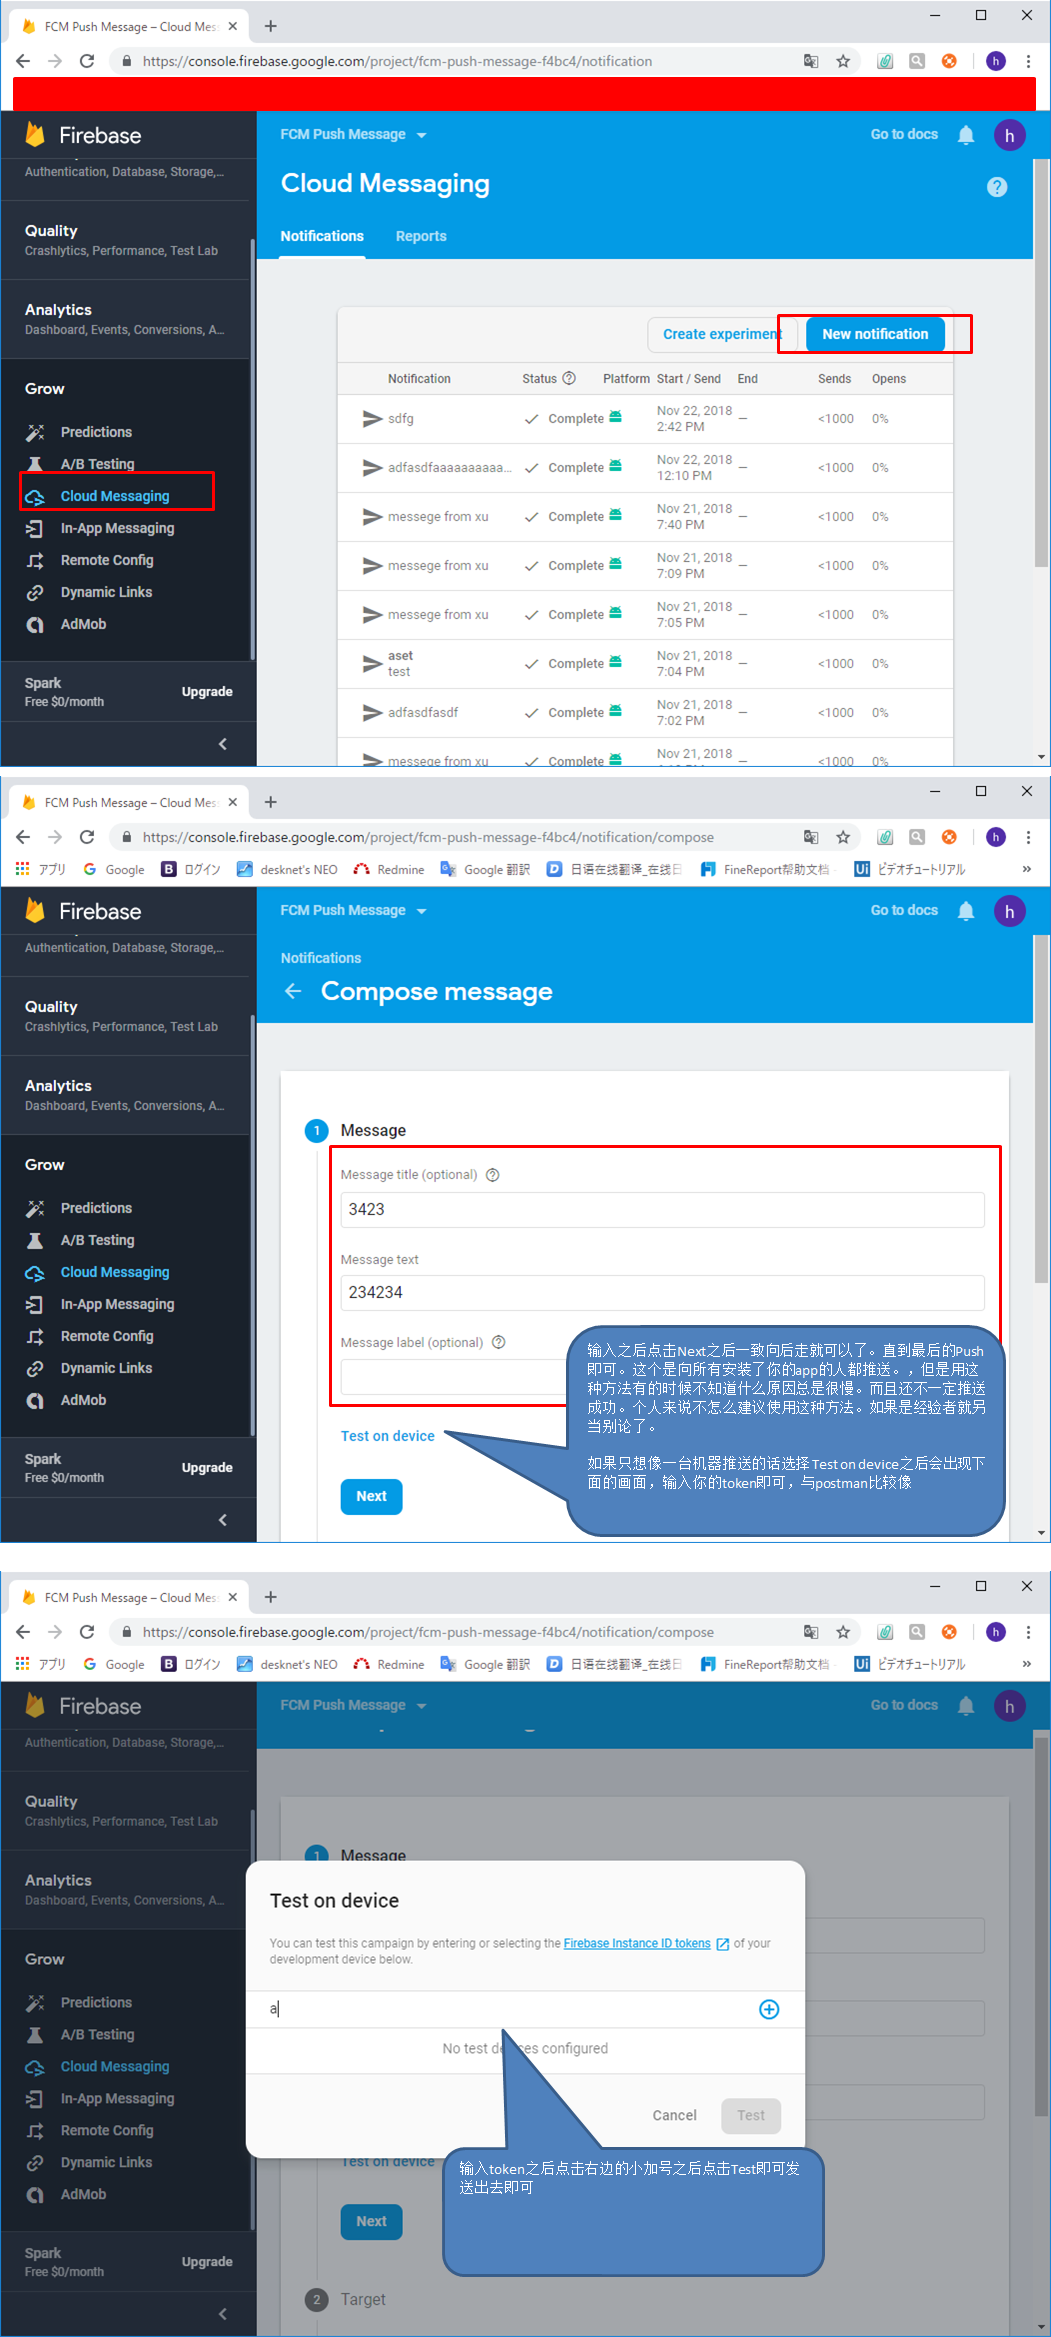
发送消息有两种模式,一种是用postman来发送,一种是用firebase的服务器来发送
postman来发送
上网自己下载一个postman的一个软件打开之后如下图
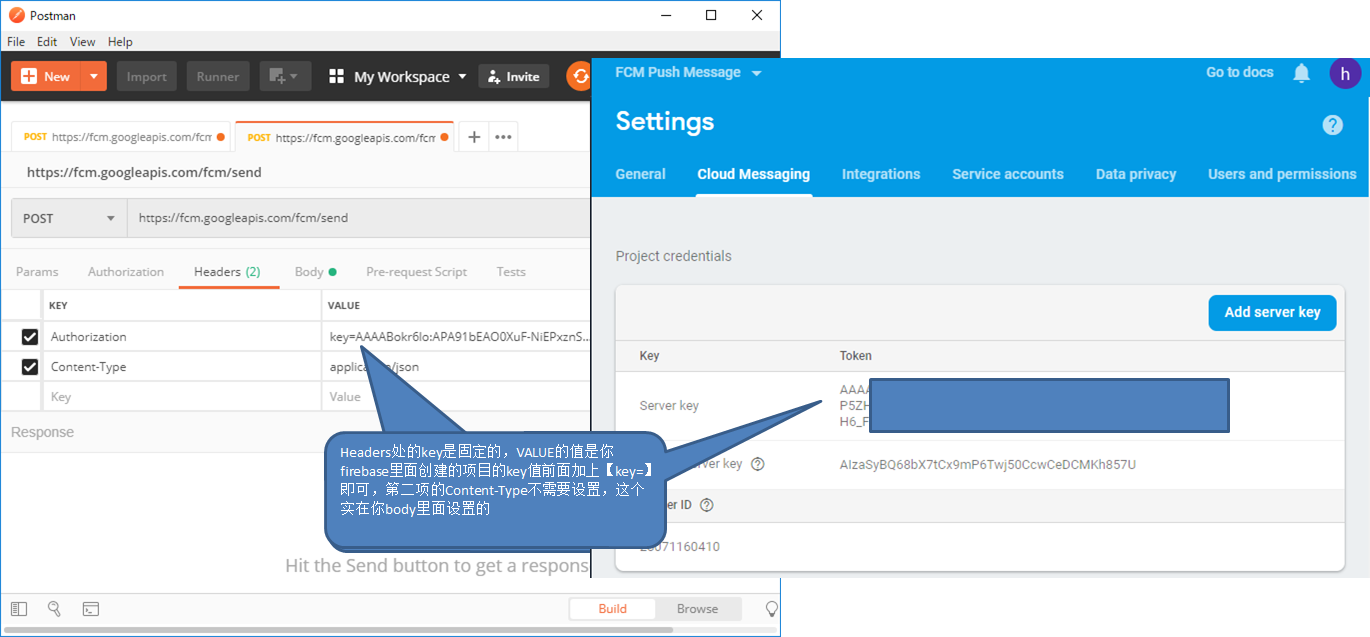
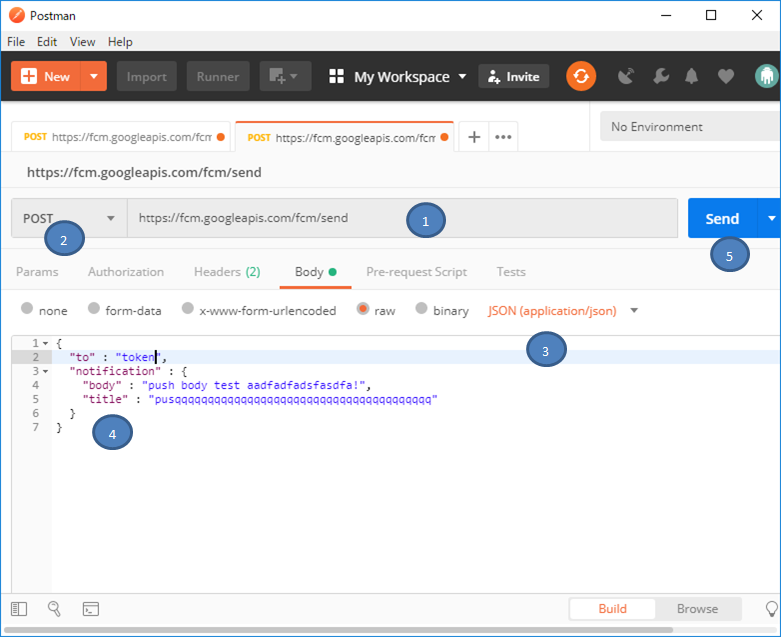
解释说明
1. 网址URL是固定的,调用你的firebase服务器 【https://fcm.googleapis.com/fcm/send】
2. 传送方式是POST形式
3. 选择你传送出去的参数形式
4.具体的数据。
{
"to" : "token",
"notification" : {
"body" : "push body test aadfadfadsfasdfa!",
"title" : "pusqqqqqqqqqqqqqqqqqqqqqqqqqqqqqqqqqqqqqqq"
}
}
5.点击send之后就会把消息发送到你手机设备上面
在运行的时候遇到的一些盲点,有经验的人知道,对于像我这样的菜鸟来说,就是一个非常大的坑,坑了我三天,还是在有经验的人那里学到的测试的方法
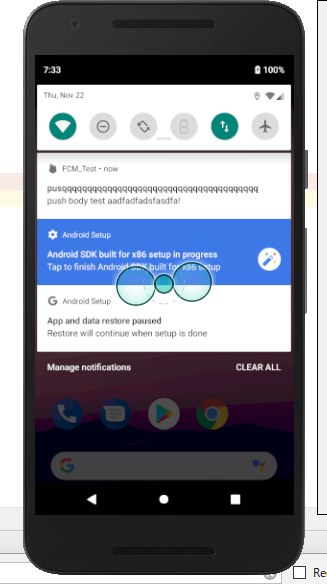
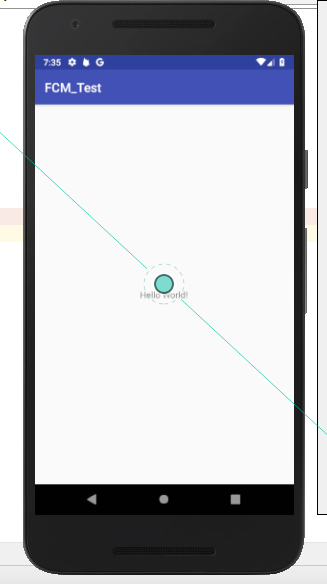
在目前我们的代码程度上,如果你的画面是下面的画面的话,之后你在点击send进行发信的话,恭喜你,你也与我一样。在下面的画面上进行推送是不成功的,你手机不会收到消息的
只有把我们的app隐藏,或者是在后台执行,这种情况下是可以推送到我们的手机上的,如果想要在app在画面上显示之后进行推送的话,就要再写代码,代码怎么可以自己上网查,我还没做到这一步
再有一点就是postman他有的时候会延迟,不会及时的送到消息,一般的情况下会及时的推送到你手机上,但是有的情况下是不会即使的推送到你手机上面的,要多等一会,这个需要注意
测试时候的小窍门,就是把你的app给卸载之后在启动Androidstudio,来回往复
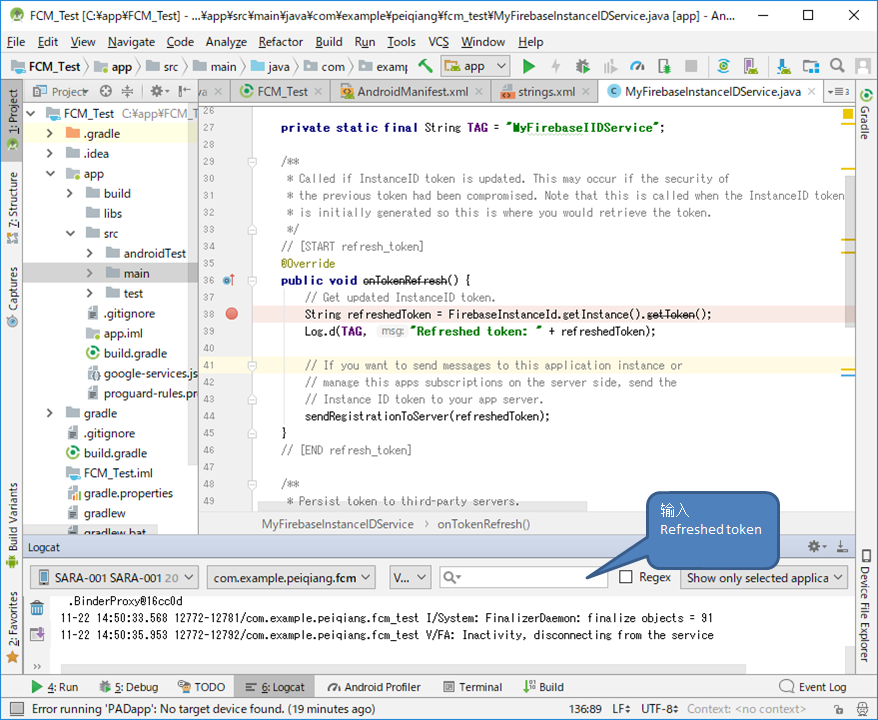
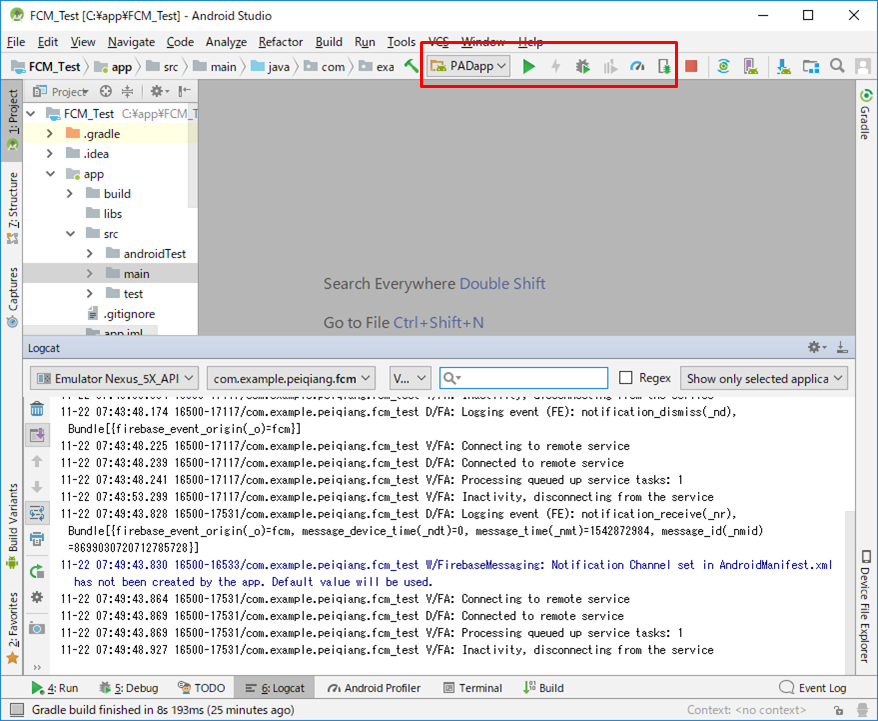
token取得方法,在你运行的时候会把你安装的在虚拟手机上面的token号直接打在Logcat里面,
请注意,只有每次app安装的时候token才会打到logcat里面,如果第一次安装了,没有卸载的情况下,执行这个重启app或者重启虚拟机都打不出来token的
用firebase服务器来发送消息,具体参照下图
21 虚拟机弄好之后就要用真机器来试验你做的app有没有问题了,这里讲一下用真机器来调试你的APP
Android studio工具里面点击下图的标识之后会出现增加Android APP的界面
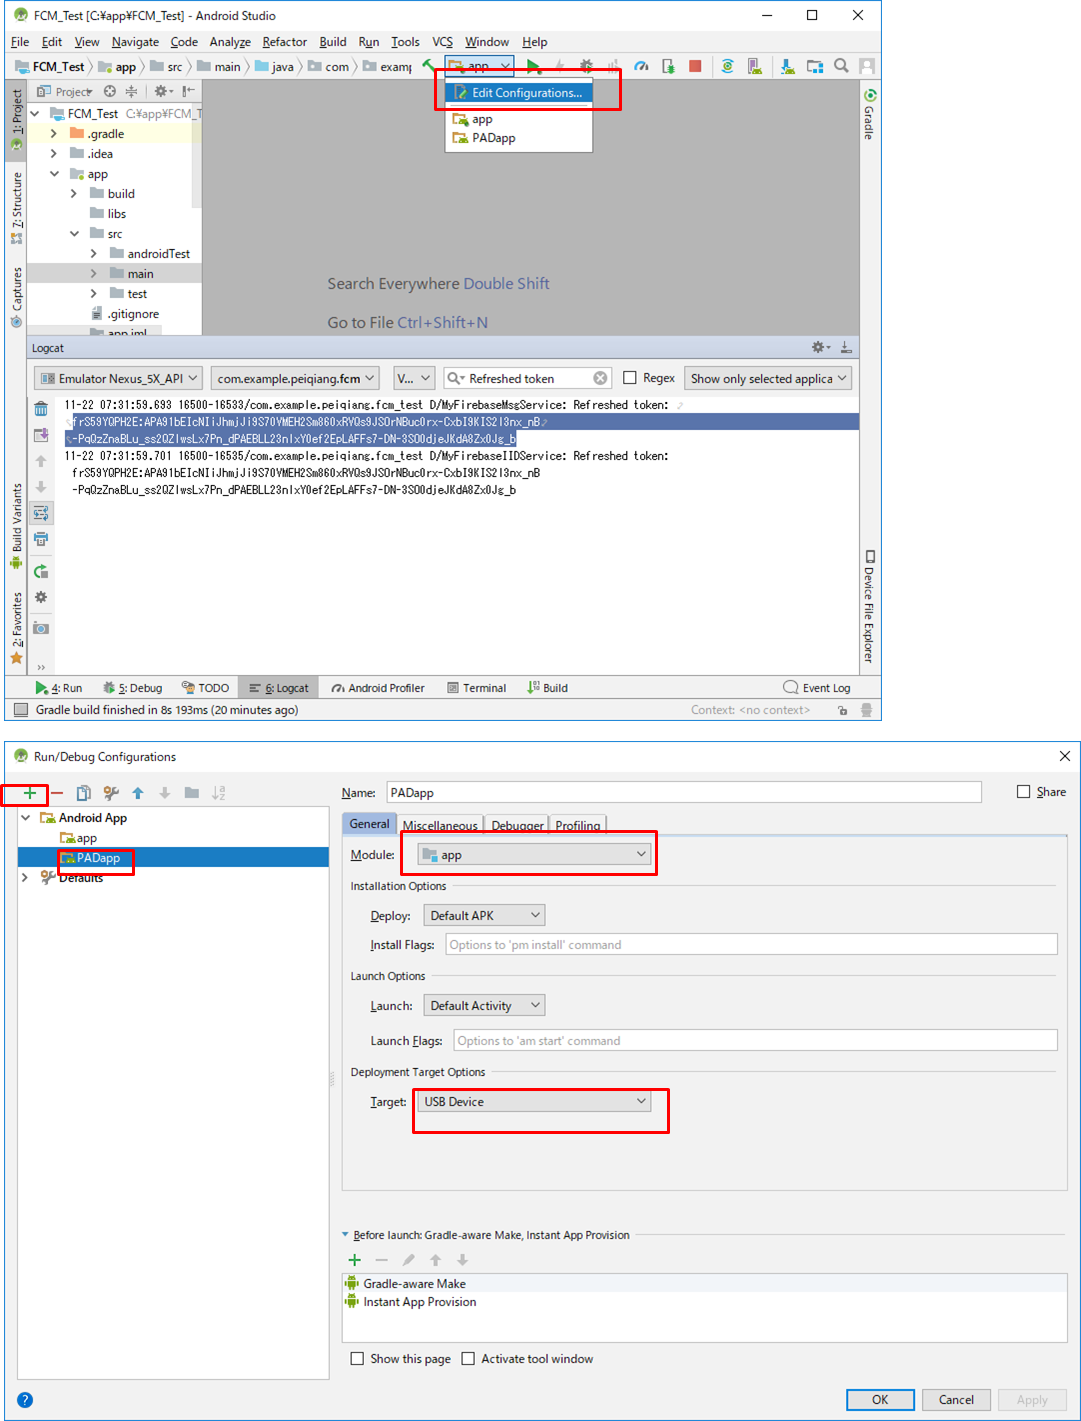
手机打开你的开发者选项,如果不知道在哪的话可以在网上搜一下,打开USB调试即可,有的手机即使打开了USB调试了但是在运行你的Android studio的时候是会报错的,这样的话你就要换一台手机了
用数据线链接你的手机和电脑之后就可以按照下图的方式点击运行APP就会安装在你的手机上面,如果是debug的话,是可以打断点的


 2150
2150


 被折叠的 条评论
为什么被折叠?
被折叠的 条评论
为什么被折叠?
 到【灌水乐园】发言


