


VSCode ARM CortexM 开发: http://coffeelatte.cpolar.cn/post/software/applications/vscode/vscode_arm_cortexm_开发/
文章目录
VSCode 的嵌入式开发插件具备了相当多的功能,这里主要使用 Embedded IDE,这是一个支持 MCU 开发的工具,其优势是可以通过 pack 包来添加芯片,降低了国产芯片开发环境配置的难度。
Embedded IDE 不具备调试功能,为了调试 ARM Cortex-M MCUs,可以配合安装 Cortex-Debug 插件。这两个插件直接在扩展商店进行搜索安装即可,下面主要介绍使用方法。
1. Embedded IDE
Embedded IDE 集成了 MCU 项目创建,固件和工具下载等功能。安装完毕后在 VSCode 图标面板中会出现 EIDE 图标,EIDE 即 Embedded IDE 的缩写。
点击 EIDE 图标,将出现“New Project”、“Open Project”、“Import Project”项目按钮,以及“Configure Toolchain”、“Setup Utility Tools”、“Open plug-in Settings”选项菜单。
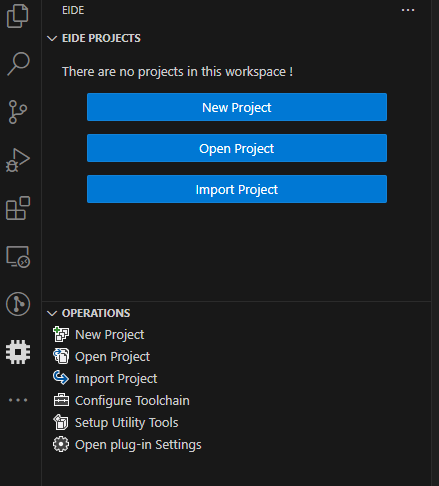
“New Project” 可用于创建新 MCU 工程,“Import Project” 可以将 Keil、IAR 或 Eclipse 类 IDE(如 STM32Cube IDE) 工程导入到 EIDE 环境中。“New Project” 和 “Import Project” 都有很好的引导界面,使用起来很方便。
EIDE 会跟随 VSCode 的语言配置展示为英文或中文菜单,如果没有自动跟随,可以点击 “Open plug-in Settings” 后,在配置中切换 EIDE 界面语言。
这里我们假设已经创建或导入了一个 ARM Cortex M 工程,接下来看一下工程配置及开发工具链的安装。
1.1. 安装工具链
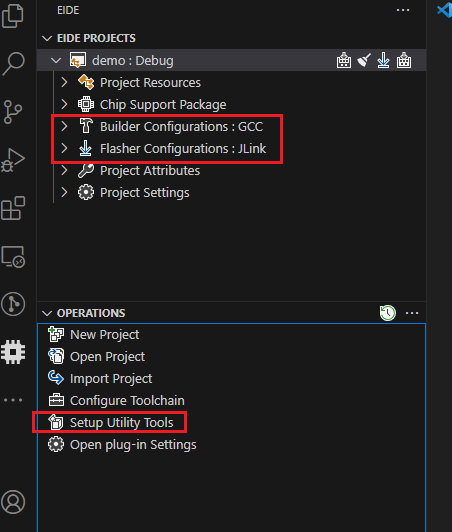
在 EIDE 的“Builder Configurations”和“Flasher Configurations”下可以看到默认使用了 GCC 编译器和 JLink 调试器。如果你的系统中已经直接或间接的安装了这两个工具,那可以到“Open plug-in Settings”下配置好相关工具的路径。
如果没有安装这两个工具,则可以点击“Setup Utility Tools”进行安装:
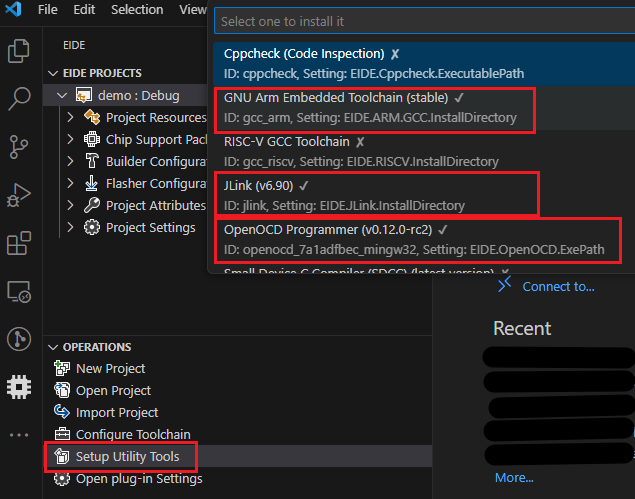
EDID 不支持工具卸载功能,实际上,这些工具默认下载并解压在 “${userRoot}/.eide/tools” 目录下(“${userRoot}”即当前的用户目录)。如果需要卸载,则直接到该目录下删除对应工具即可。
我们也可以选择其他版本的 JLink 来使用(增加了部分国产芯片):
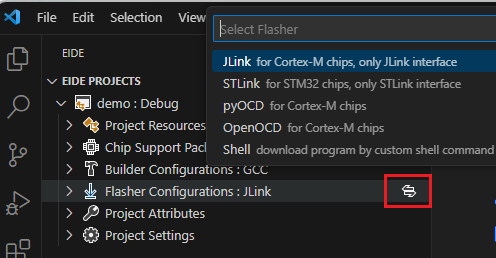
EDID 也支持使用 AC5、AC6、IAR 等编译器,以及 STLink、pyOCD 等下载器,可以点击“Builder Configurations”和“Flasher Configurations”后面的切换按钮进行更换。
注:使用“Setup Utility Tools”安装的 GCC 包在使用时会造成 FreeRTOS 堆栈大很多(TCB 中的 struct _reent xNewLib_reent 结构有问题,runtime 的问题),解决办法是使用 ARM 官网提供的 GCC 进行替换(点此下载)。
1.2. 项目配置
有了编译器和调试器工具,就可以编译并下载程序。但是,在此之前需要先进行项目配置,除了配置编译器和下载器以外,需要配置“Chip Support Package”、“Builder Configurations”、“Flasher Configurations”和“Project Attributes”。
如果某项目无法展开,则点击项目后边的“+”号进行添加即可:
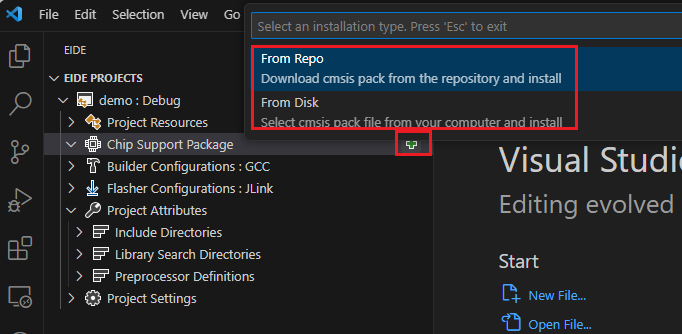
先添加一个“Chip Support Package”,“From Repo”会从网络上自动下载相关 pack 包,“From Disk”则可以选择硬盘上一个已经下载好的 pack 包。相关资源可能在 github 上,所以网络安装需要些特殊工具支持。如果失败,可以多尝试几次。
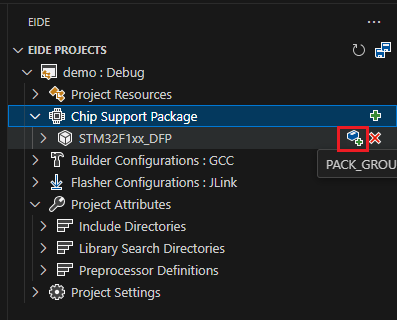
继续点击加号添完成“Chip Support Package”和“Builder Configurations”、“Flasher Configurations”的添加。配置好“Chip Support Package”后会自动完成 Svd 的配置,有了 Svd 才可以调试外设。
GCC 需要配置“Linker Script File Path”,这个是 LD 连接文件,该文件可以来自 STM32 Cube,或者示例参考工程。如果是 Keil 的 ACx 编译器,则可以使用默认连接脚本(将“Use Custom Linker Script File”置为 false)。IAR 编译器需要配置 icf 格式的连接文件。
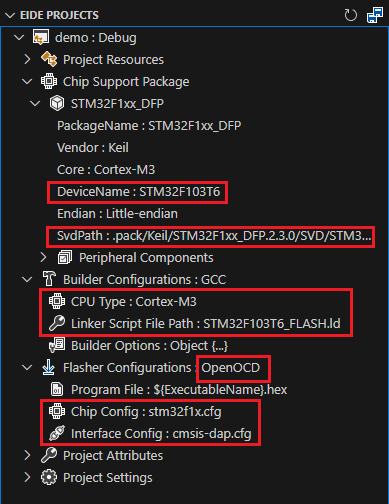
“Flasher Configurations”以 OpenOCD 为例,需要配置“Chip Config”和“Interface Config”,所谓“Chip Config”即指芯片的配置,“Interface Config” 指使用哪种调试器,这里使用的是 DAP 调试器,如果是 stlink 或 jlink 只要按需修改即可。
如果是导入的项目,不添加“Chip Support Package”也可以正常编译和下载、调试,只是调试时不支持查看外设寄存器。
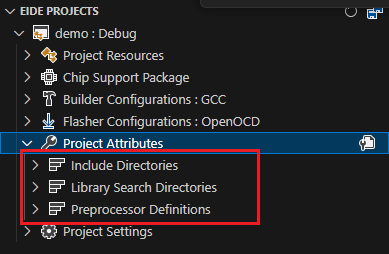
“Project Attributes” 中可以配置 Include Path、Library Path 和 全局宏 等。
其他项目一般会自动配置,如有差异则按需变更即可。
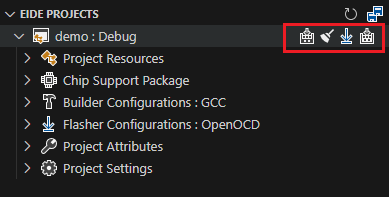
1.3. 编译和下载
安装好依赖工具并做好项目配置后就可以编译并下载程序,点击项目右侧的按钮即可:
1.3.1. GCC 编译链接选项
- -specs=nano.specs:defines the system include path and library parameters to use newlib-nano. The spec file contains replacements for -lc and others to nano equivalents, e.g. -lc_nano. So using it in conjunction with these will make gcc still pass nano libaries to the linker.
- -specs=nosys.specs:just defines that system calls should be implemented as stubs that return errors when called (-lnosys). The choice of libc in this case depends on whether nano should be used. With %G the libgcc spec-string is processed, which defines the parameters passed to the linker.
- -specs=rdimon.specs:‘rdimon’ is something like ‘remote dispatch interface monitor’. It installs code that mimics a syscall, but runs a ‘bkpt’ instruction which traps via a debugger which then executes the code on the host. So there is a small set of stubs on the target which are syscalls for ‘open’ which end up opening a file on the host (same for read()/write(), etc). You need to run initialise_monitor_handles() to install them and the code will ONLY run under a JTAG/SW debugger.
- On the linker command line, add --specs=rdimon.specs and ensure -nostartfiles is not present.
- Call void initialise_monitor_handles(void) from your firmware before using semihosting.
- -lm:链接 math 库。
2. 调试
Embedded IDE 不具备调试功能,需要 Cortex-Debug 扩展插件。Cortex-Debug 可以与 EIDE 进行很好的配合,只需要极少的额外的配置。
Cortex-Debug 会自动安装 RTOS Views 以及其他一些依赖插件,如果提示自动安装,点击允许即可。
RTOS Views 支持 RTOS 调试功能,比如查看系统中的 Task 等。
2.1. 基本调试
进入 VSCode 的 “Run and Debug”页面,创建或修改“launch.json”调试文件。
一个基于 JLink 的调试配置如下:
{
    // Use IntelliSense to learn about possible attributes.
    // Hover to view descriptions of existing attributes.
    // For more information, visit: https://go.microsoft.com/fwlink/?linkid=830387
    "version": "0.2.0",
    "configurations": [
        {
            "name": "jlink",
            "cwd": "${workspaceFolder}",
            "executable": "./build/Debug/<debug file name>.elf",
            "request": "launch",
            "type": "cortex-debug",
            "runToEntryPoint": "main",
            "servertype": "jlink",
            "device": "Target Chip Name",
            "cmsisPack": "/Path/to/PackFile.pack",
            "svdFile": "/Path/to/SystemViewDescriptionFile.svd",
            "interface": "swd",
            "rtos": "FreeRTOS",
            "serverArgs": ["-speed", "6000"],
            "rttConfig": {
                "enabled": true,
                "address": "auto",
                "decoders": [
                    {
                        "label": "rtt0",
                        "port": 0,
                        "type": "console",
                        "timestamp": true,
                        "logfile": "./rtt.log"
                    }
                ]
            }
        }
    ]
}
一个基于 PyOCD 的调试配置文件如下:
{
    // Use IntelliSense to learn about possible attributes.
    // Hover to view descriptions of existing attributes.
    // For more information, visit: https://go.microsoft.com/fwlink/?linkid=830387
    "version": "0.2.0",
    "configurations": [
    {
        "name": "pyocd",
        "cwd": "${workspaceFolder}",
        "executable": "./build/Debug/<debug file name>.elf",
        "request": "launch",
        "type": "cortex-debug",
        "runToEntryPoint": "main",
        "servertype": "pyocd",
        "toolchainPrefix": "arm-none-eabi",
        "targetId": "Target Chip Name",
        "cmsisPack": "/Path/to/PackFile.pack",
        "serverArgs": ["--frequency=8m", "--trust-crc", "--erase=chip", "--uid=0123456789", "-O", "rtos.enable=true", "-O", "rtos.name=freertos", "-O", "smart_flash=true"],
        "svdFile": "/Path/to/SystemViewDescriptionFile.svd"
    }
}
- request:
- launch:表示加载程序并调试,对于 ARM 的调试,使用该配置进行调试,会开始更新程序,复位并从第一条指令开始执行、调试程序;
- attach:表示附加到一个正在运行的程序,对于 ARM 的调试,使用该配置进行调试,调试器不会更新/下载程序,也不会复位,而是附加到当前正在芯片上执行的程序(不被 serverArgs 等其他参数覆盖的情况下),从当前时刻和状态继续执行;
- executable:带有调试符号的编译结果文件,如果是 AXF 文件,需要转换为 ELF 文件再使用,方法可以参考 2.2. ARMCC 编译器的额外调试配置;
- runToEntryPoint:相当于“运行到 main 函数停止”功能;
- servertype:jlink、pyocd、stlink、openocd 等;
- toolchainPrefix:使用 ARM GCC 编译器及调试器的,需要将此字段设置为 “arm-none-eabi”;
- device:jlink 使用此字段设置芯片型号,如 STM32F429BI;
- targetId:pyocd 使用此字段设置芯片型号,如 STM32F429BITx;
- cmsisPack:要使用的 pack 文件,如果使用 EIDE 自带的 pack 文件,其默认下载在 “<User>/.eide/pack/cmsis” 目录下;
- serverArgs:传递给调试服务器(这里是 pyocd gdbserver)的参数。
- –erase:
- auto:自动
- chip:整个芯片
- sector:按扇区擦除
- –uid:指定 Debuger Adapter 的 UID,用于区分多个 Debuger Adapter。
- -O 参数:指定 pyOCD GDBServer Session 的 Options,格式是:-O OPTION=VALUE
- Session options 列表:参考 pyOCD Session options list 官方说明
- rtos.enable:使能或禁能 RTOS 工具,没有使用 RTOS 或者使用了不支持的 RTOS 时,使能该功能会导致调试启动时自动检测 RTOS 的时间过长。
- rtos.name:指定 RTOS 名称。
- freertos
- Session options 列表:参考 pyOCD Session options list 官方说明
- –erase:
- svdFile:即 System View Description 文件,指定该文件才可以在调试时查看设备寄存器,如果使用 EIDE,通常在 “.pack” 文件夹下,如 “.pack/Keil/STM32F4xx_DFP.2.14.0/CMSIS/SVD/STM32F429x.svd” 或 “.pack/Nationstech/N32L40x_DFP.0.9.0/svd/N32L406.svd”。
2.2. ARMCC 编译器的额外调试配置
由于 Cortex-Debug 的后端调试器为 GDB,调试文件为 ELF 格式,而 ARMCC 的编译结果为 AXF 文件。如果直接调试 AXF 文件将导致错误。解决方法为:使用工具将 AXF 文件转换为 ELF 文件即可。这个转换过程是自动完成的,可以在 VSCode 配置的 EIDE 配置中实现。
按 Ctrl+Shift+P,输入 “Open Settings”,进入配置页面,在搜索框中输入“EIDE AXF”,找到:“EIDE.ARM.Option: Axf To Elf”选项并勾选。重新编项目,EIDE 自动将 .axf 文件转换到 .elf 文件。

2.3. 使用 RTT
如果使用的是 JLink 调试器,Cortex-Debug 可以在调试时自动调出 RTT 输出窗口,配置方法为:在“launch.json”调试文件的“configurations”字段中增加:
"rttConfig": {
    "enabled": true,
    "address": "auto",
    "decoders": [
        {
            "label": "rtt0",
            "port": 0,
            "type": "console",
            "timestamp": true,
            "logfile": "./rtt.log"
        }
    ]
}
CMSIS-DAP 等调试器也支持 RTT 功能,可以使用 PyOCD 的 rtt 命令来查看调试器的 RTT 输出:
pyocd.exe rtt --target <Target Chip Name> --pack </Path/To/Nationstech.N32L40x_DFP.0.9.0.pack> --log-file </Path/to/LogFile>
截止目前(2024年,版本 0.36.0),PyOCD 无法支持 GDB Server 和 RTT 功能的同时使用,官方有同时使能该功能的计划,并在 2022 年有所讨论,但尚未见该功能完成,讨论也仍处于 Open 状态。
2.4. 调试断点
VSCode 下调试断点的基本使用方法与其他 IDE 差别不大,在源码中需要打断点的位置按 F9 即可,断点可以被禁能或移除。
除普通断点外 VSCode 还支持:条件断点(Conditional Breakpoint)、记录点(Logpoint)、触发断点(Hit Breakpoint)、数据断点(Watchpoints)和函数断点(Function Breakpoint)。另外,断点还支持计数触发功能。以上断点功能,实际上是由 Cortex-Debug 插件实现的。
以下针对各种类型的特殊断点进行说明。
2.4.1. 条件断点
当程序执行到某行,且满足设定的条件表达式时,暂停程序的执行。
在需要打断点的源码行号前右击鼠标,选择“Add Conditional Breakpoint”;或按 F9 添加断点后,右击该断点,选择“Edit Breakpoint”,在下拉列表中选择“Expression”,将一个普通断点转换为 Conditional Breakpoint。
Expression 对话框中的键入条件表达式,然后回车确认。当程序执行到此行,且满足所设定的条件时,程序暂停。
2.4.2. 记录点
记录点是一种特殊的断点,用于在不暂停程序执行的情况下记录日志信息。其功能首先在 Cortex-Debug V1.3.0 版本上实现。
在需要打断点的源码行号前右击鼠标,选择“Add Logpoint”;或按 F9 添加断点后,右击该断点,选择“Edit Breakpoint”,在下拉列表中选择“Log Message”,将一个普通断点转换为 Logpoint。
Log Message 对话框中的键入格式化字符串,与 printf 类似,比如需要打印变量 counter0 和 counter1 的值,其语法格式为:
"Value of: counter0 is %d, counter1 is %d\n" counter0 counter1
与 printf 的区别是参数间使用空格而非逗号做间隔。
当程序执行到带有记录点的代码行时,指定的日志信息将被输出到“Debug Console”,程序不会暂停,而是继续执行。
记录点对于在不中断程序流程的情况下记录变量值和调试信息非常有用。
2.4.3. 触发断点
触发断点是一种在命中另一个断点后自动启用的断点。
在需要打断点的源码行号前右击鼠标,选择“Add Triggered Breakpoint”;或按 F9 添加断点后,右击该断点,选择“Edit Breakpoint”,在下拉列表中选择“Wait for Breakpoint”,将一个普通断点转换为 Hit Breakpoint。
Wait for Breakpoint 对话框中选择作为触发源的断点即可。当源断点被触发后,对应的 Hit Breakpoint 被激活。
2.4.4. 数据断点
也可以叫监控断点,当监控到数据/变量被改变、读取或访问时,暂停程序的执行。数据断点只能监控全局变量,或在函数范围内监控局部变量。一旦程序执行超出变量作用范围,该断点失效。当前版本的 Cortex-Debug 下,为数据断点设置条件是不起作用的,若想实现谋数据变为特定值时暂停的功能,需要进行变通,比如统一由某个函数修改数据,然后在该函数中为其设置条件断点,或使用带条件的函数断点。
数据断点添加比较特别,需要在调试界面的 Variables 窗口中右击需要监控的全局变量,或当前作用域下的局部变量。然后选择:“Break on Value Read”、“Break on Value Change”或“Break on Value Access”。
数据断点将被添加到调试界面的 Breakpoints 窗口中,因此可以像操作其他断点那样对其禁能或移除。
2.4.5. 函数断点
在调试界面的 Breakpoints 窗口中点击右上角的“+”按钮,输入函数名称,就可以添加函数断点。当程序执行到对应函数时,将暂停执行。
函数断点的功能比较强大,一方面,可以同时为多个同名函数设置函数断点,比如被 weak 关键字修饰的函数以及实际使用的函数,或 C++ 类继承中的重载函数、多态函数,对于这样的函数,一旦设置断点,便全部生效。有的时候,由于条件编译等原因不好确认多个同名函数到底使用了哪个时,也可以使用函数断点帮忙确认。
另一方面,函数断点可以设置计数或条件。这样可实现进入函数几次,或进入函数后还要满足什么条件才能暂停执行。
比如要监控数据变为谋特定值时暂停程序执行,可在每次修改数据后调用一个测试函数,使被修改的数据作为参数传入该函数:
void test_value(int v)
{
  (void)v;
}
然后为该函数设定函数断点并为参数 v 设定条件。调试系统将在每次修改数据并进入 test_value() 函数后检查条件,一旦条件满足,将暂停执行。
函数断点支持使用内存地址,这样可以为某个具体对象的函数方法设定函数断点。只要在该对象生成后,从调试窗口获取该对象地址即可,后面设置方法与普通函数断点相同,即在调试界面的 Breakpoints 窗口中点击右上角的“+”按钮,输入
((my_class *) 0xcccccccc)->my_method
即可。
2.4.6. 计数断点
VSCode 下,可以为普通断点和函数断点设置计数值,以达到满足命中次数要求时,再暂停执行的目的。需要注意的是,第一次命中计数值为 0,如果设定值为 3,将在第四次命中时触发断点,暂停程序。
按 F9 添加断点后,右击该断点,选择“Edit Breakpoint”,在下拉列表中选择“Hit Count”,将为一个普通断点设置计数值。
在调试界面的 Breakpoints 窗口中,点击普通断点或函数断点的“Edit Condition”按钮,选择“Edit Hit Count”可以为对应的断点设置计数值。
3. 国产芯片及 CMSIS-DAP 调试器的支持
通常国产芯片会提供 Keil 的 pack 文件,以及 JLink扩展支持该芯片的方法。因此如果使用 Keil+DAP 或者使用 EIDE+JLink 均可下载和调试。但使用 EIDE+DAP 就需要变通一下,因为 EIDE 所支持的调试器中并没有 Keil 中的 CMSIS-DAP 选项,只有 OpenOCD 和 PyOCD。而想让 OpenOCD 支持某款芯片就要编写该芯片的 Flash 算法,这个方法有些复杂。
而 PyOCD 则可以直接使用 Keil 的 pack 文件,通过这种方式使 EIDE 支持国产芯片更加普遍适用,并且易于实现。同时在 EIDE 的“Chip Support Package”中也可以通过文件加载 pack 文件来获取国产芯片的型号支持。
3.1. PyOCD 的安装
既然是 Py 开头的,那一定使需要用到 Python,Windows 下从官网下载好 Python3,或者 Linux 下使用命令进行安装后(需要安装 pip)后,通过 pip 命令安装 PyOCD 即可:
# 配置 pip 使用阿里云镜像.
pip config set global.index-url http://mirrors.aliyun.com/pypi/simple/
pip config set global.trusted-host mirrors.aliyun.com
pip config set global.timeout 120
# 安装 PyOCD.
pip install --upgrade pyocd
需要注意的是,Windows 下不要使用 MSYS2 这类环境下的 python 和 pip,容易安装失败。
之后使用
pyocd --version
验证安装是否成功。
然后将 EIDE 中的“Flasher Configurationgs” 配置为 pyOCD。点击“Flasher Configurationgs->Other Options”,将打开“debug.pyocd.yaml”文件,向该文件添加:
pack:
  - /Abs/Path/To/Company.Family_DFP.Version.pack
之后重启 Vscode,便可在 EIDE 的 “Flasher Configurationgs->Target Name”中选择 pack 文件中的芯片,并进行调试。
PyOCD 能够自动识别 CMSIS-DAP 等多种调试器,不需要在 EDID 中设置调试器种类。
PyOCD 配合 ST-Link、CMSIS-DAPv2 使用时,需要 libusb 库支持,若没有按照或正确配置,将提示:
STLink, CMSIS-DAPv2 and PicoProbe probes are not supported because no libusb library was found.
此时需按如下方式安装配置:
pip intall libusb
Windows 下安装完毕后将在 <Python 安装目录>/Lib/site-packages/libusb/_platform/_windows 的子文件夹下找到对应的 libusb-1.0.dll 文件,将其拷贝到 <Python 安装目录> 或 <Python 安装目录>/Scripts 下(只要被系统 PATH 包含即可)即可在系统命令行中正常使用。
但 VScode 下使用 EIDE 下载或调试程序还是提示找不到 libusb,需要将 libusb-1.0.dll 再拷贝一份到 <User>/.eide/bin/scripts 下才能解决问题。
3.2. 关于 PyOCD 的扩展说明
以上使用 pack 包的方法是基于 PyOCD 对 pack 包的手动管理。PyOCD 支持两种手动管理 pack 包的方式,官方原文说明如下:
Manual pack usage

If you prefer to manually manage packs, or if the managed pack system cannot access online packs from your network, you can download them yourself from the official CMSIS-Pack list. The downloaded pack files can be stored wherever you like. Typically you would group them in a single common directory. Another good option is to place the pack file used with a project in a project-relative location.

There are two ways to use a manually downloaded pack.

The simplest option is to pass the --pack option to the pyocd tool, specifying the path to the .pack file. PyOCD does not cache any information about packs used this way, so this argument must be passed for every invocation in addition to the other arguments. For instance, to run the GDB server, you might execute pyocd gdbserver --pack=Keil.STM32L4xx_DFP.2.2.0.pack. Note that you can pass multiple --pack arguments to pyOCD, which might be useful in a scripted execution of pyOCD.

For a more permanent solution, use a pyocd.yaml configuration file. In the config file, set the pack session option to either a single .pack file path or a list of paths. Now when you run the pyocd tool, it will automatically pick up the pack file(s) to use.

Here is an example config file that lists two packs.

pack:
  - /Users/admin/CMSIS-Packs/Keil.STM32L0xx_DFP.2.0.0.pack
  - /Users/admin/CMSIS-Packs/NXP.MKV58F24_DFP.11.0.0.pack

To see the targets provided by a .pack file, run pyocd list --targets and pass the approprate --pack option or use a config file, as described above.

Note: .pack files are simply zip archives with a different extension. To examine the contents of a pack, change the extension to .zip and extract.

Note: PyOCD can work with expanded packs just like zipped .pack files. Pass the path to the root directory of the pack using the --pack argument, as above. This is very useful for cases such as development or debugging of a pack, or for working with other CMSIS-Pack managers that store packs in decompressed form.
PyOCD 的 yam 配置文件说明 如下:
Config file

pyOCD supports a YAML configuration file that lets you set session options that either apply to all probes or to a single probe, based on the probe’s unique ID.

The easiest way to use a config file is to place a pyocd.yaml file in the project directory. An alternate .yml extension and optional dot prefix on the config file name are allowed. Alternatively, you can use the --config command line option, for instance --config=myconfig.yaml. Finally, you can set the config_file option. If there is a need to prevent reading a config file, use the --no-config argument.

The top level of the YAML file is a dictionary. The keys in the top-level dictionary must be names of session options, or the key probes. Session options are set to the value corresponding to the dictionary entry. Unrecognized option names are ignored.
EIDE 中的 debug.pyocd.yaml 属于项目级的配置文件。
PyOCD 安装了 CMSIS Pack Manager,其位置在用户目录下
C:\Users\<User Name>\AppData\Local\cmsis-pack-manager\cmsis-pack-manager
3.3 PyOCD 常用命令
# Update the pack index.
pyocd pack update
# Report pack(s) in the index containing matching device part numbers.
pyocd pack find <part keyword>
# Download and install pack(s) containing matching device part numbers.
pyocd pack install <part number>
# Show the list of installed packs.
pyocd pack show
# Delete the pack index and all installed packs.
pyocd pack clean
4. 常见问题解决
4.1. GCC 链接错误 引用未定义函数 _read、_write、_sbrk
d:/gcc-arm-none-eabi-4_9/bin/../lib/gcc/arm-none-eabi/4.9.3/../../../../arm-none-eabi/lib/armv7-m\libc_nano.a(lib_a-sbrkr.o): In function `_sbrk_r':
sbrkr.c:(.text._sbrk_r+0xc): undefined reference to `_sbrk'
d:/gcc-arm-none-eabi-4_9/bin/../lib/gcc/arm-none-eabi/4.9.3/../../../../arm-none-eabi/lib/armv7-m\libc_nano.a(lib_a-writer.o): In function `_write_r':
writer.c:(.text._write_r+0x10): undefined reference to `_write'
d:/gcc-arm-none-eabi-4_9/bin/../lib/gcc/arm-none-eabi/4.9.3/../../../../arm-none-eabi/lib/armv7-m\libc_nano.a(lib_a-closer.o): In function `_close_r':
closer.c:(.text._close_r+0xc): undefined reference to `_close'
d:/gcc-arm-none-eabi-4_9/bin/../lib/gcc/arm-none-eabi/4.9.3/../../../../arm-none-eabi/lib/armv7-m\libc_nano.a(lib_a-fstatr.o): In function `_fstat_r':
fstatr.c:(.text._fstat_r+0xe): undefined reference to `_fstat'
d:/gcc-arm-none-eabi-4_9/bin/../lib/gcc/arm-none-eabi/4.9.3/../../../../arm-none-eabi/lib/armv7-m\libc_nano.a(lib_a-isattyr.o): In function `_isatty_r':
isattyr.c:(.text._isatty_r+0xc): undefined reference to `_isatty'
d:/gcc-arm-none-eabi-4_9/bin/../lib/gcc/arm-none-eabi/4.9.3/../../../../arm-none-eabi/lib/armv7-m\libc_nano.a(lib_a-lseekr.o): In function `_lseek_r':
lseekr.c:(.text._lseek_r+0x10): undefined reference to `_lseek'
d:/gcc-arm-none-eabi-4_9/bin/../lib/gcc/arm-none-eabi/4.9.3/../../../../arm-none-eabi/lib/armv7-m\libc_nano.a(lib_a-readr.o): In function `_read_r':
readr.c:(.text._read_r+0x10): undefined reference to `_read'
如果此问题出现在 gcc-arm-none-eabi 13.0 及以上版本,可以先尝试替换到 ARM 官网提供的 10.3 版本,下载链接参考 1.1. 安装工具链 中下载。
如果是其他版本上的问题,可尝试在 Builder Configurations -> Builder Options 中修改编译链接参数。
选择 Global Options 或 Linker,添加或删除 “–specs=nosys.spece”(文章:ARM GCC 链接错误 引用未定义函数 _read _write _sbrk 解决和重定向 中说要添加该参数,但我实际项目中已经添加了该参数仍然报出了这个警告,删除后警告消失)。


 588
588

 被折叠的 条评论
为什么被折叠?
被折叠的 条评论
为什么被折叠?
 到【灌水乐园】发言


