


帧内预测中的initPredIntraParams()函数 (负参考方向处在跑代码时再看一遍)_青椒鸡汤的博客-CSDN博客
H.266/VVC-VTM代码学习-帧内预测05-Angular模式下计算预测像素值xPredIntraAng_liaojq2020的博客-CSDN博客
H.266/VVC代码学习21:帧内角度预测的实现 / 近对角模式的PDPC(xPredIntraAng)_海洋之心。的博客-CSDN博客
H.266/VVC代码学习:帧内预测之角度预测函数(predIntraAng、xPredIntraAng)_涵小呆的博客-CSDN博客_vvc 帧内预测
【VTM10.0】xPredIntraAng函数解析_神遁克里苏的博客-CSDN博客
预测模式选的44
1.1 角度偏移值小于0的模式
void IntraPrediction::xPredIntraAng( const CPelBuf &pSrc, PelBuf &pDst, const ChannelType channelType, const ClpRng& clpRng)
{
  int width =int(pDst.width);
  int height=int(pDst.height);
  //在initPredIntraParams()中确定的几个变量
  const bool bIsModeVer     = m_ipaParam.isModeVer;
  const int  multiRefIdx    = m_ipaParam.multiRefIndex;
  const int  intraPredAngle = m_ipaParam.intraPredAngle;//角度偏移值,分正负
  const int  absInvAngle    = m_ipaParam.absInvAngle;//角度偏移值的倒数*512*32,便于除法运算

  Pel* refMain;
  Pel* refSide;
  //用于存放上侧参考像素
  Pel  refAbove[2 * MAX_CU_SIZE + 3 + 33 * MAX_REF_LINE_IDX];
  //用于存放左侧参考像素
  Pel  refLeft [2 * MAX_CU_SIZE + 3 + 33 * MAX_REF_LINE_IDX];

  // Initialize the Main and Left reference array.
  //初始化参考像素,分为19~49投影与不投影两种情况
  //+ multiRefIdx是因为第1参考行比第0参考行多出一个,第2参考行比第0参考行多出2个像素
  if (intraPredAngle < 0)
  {
    for (int x = 0; x <= width + 1 + multiRefIdx; x++)
    {
      refAbove[x + height] = pSrc.at(x, 0);
    }
    for (int y = 0; y <= height + 1 + multiRefIdx; y++)
    {
      refLeft[y + width] = pSrc.at(y, 1);
    }
    // 如果是垂直类模式(34~49),则主要侧为正上方参考行,次要侧为正左侧参考行
    // 如果是水平类模式(19~33),则主要侧为正左侧参考行,次要侧为正上方参考
    refMain = bIsModeVer ? refAbove + height : refLeft + width;
    refSide = bIsModeVer ? refLeft + width : refAbove + height;
    // Extend the Main reference to the left.
    //主要侧的长度
    int sizeSide = bIsModeVer ? height : width;
    for (int k = -sizeSide; k <= -1; k++)
    {
      refMain[k] = refSide[std::min((-k * absInvAngle + 256) >> 9, sizeSide)];
    }
  }
for循环:填充参考像素,因为这里的预测模式是19~49,所以为投影像素预留了位置。如图,以8X8的块为例。

refMain = bIsModeVer ? refAbove + height : refLeft + width:这里加 宽或高应该是为了在主要侧存储次要侧投影过来的像素
refMain[k]:由次要侧的像素通过算式,来投影填充主要侧从k到0的位置,k为负

1.2 角度偏移值大于0的模式
   //对于角度偏移值大于0的模式,直接填充2*width+1的参考像素
  else
  {
    for (int x = 0; x <= m_topRefLength + multiRefIdx; x++)
    {
      refAbove[x] = pSrc.at(x, 0);
    }
    for (int y = 0; y <= m_leftRefLength + multiRefIdx; y++)
    {
      refLeft[y] = pSrc.at(y, 1);
    }
    //主要侧
    refMain = bIsModeVer ? refAbove : refLeft;
    //次要侧
    refSide = bIsModeVer ? refLeft : refAbove;

    // Extend main reference to right using replication
    //MRL填充像素
    const int log2Ratio = floorLog2(width) - floorLog2(height);//宽高比
    const int s         = std::max<int>(0, bIsModeVer ? log2Ratio : -log2Ratio);
    const int maxIndex  = (multiRefIdx << s) + 2;
    const int refLength = bIsModeVer ? m_topRefLength : m_leftRefLength;
    const Pel val       = refMain[refLength + multiRefIdx];
    //复制segmentE最后像素,填充segmentF
    for (int z = 1; z <= maxIndex; z++)
    {
      refMain[refLength + multiRefIdx + z] = val;
    }
  }
jvet-w2002 预测段翻译 (未完成)_青椒鸡汤的博客-CSDN博客
H.266/VVC技术学习:帧内预测之MRL技术_涵小呆的博客-CSDN博客
log2Ratio ,s,maxIndex:用于MRL, segments A 和 segments F 不是 由重建像素得来,而是分别由 segments B 和 segments E 内最近的像素填充。这几个参数是判断填充像素个数的

  // swap width/height if we are doing a horizontal mode:水平模式时交换height和width
  if (!bIsModeVer)
  {
    std::swap(width, height);
  }
  //能存下最大CU的每个像素值
  Pel       tempArray[MAX_CU_SIZE * MAX_CU_SIZE];
  const int dstStride = bIsModeVer ? pDst.stride : width;
  Pel *     pDstBuf   = bIsModeVer ? pDst.buf : tempArray;

  // compensate for line offset in reference line buffers
  refMain += multiRefIdx;
  refSide += multiRefIdx;

  Pel *pDsty = pDstBuf;
- a、角度模式下,为了便于后续循环的统一书写(写为width),统一将水平类模式下的宽/高值进行交换,即将其旋转90度(此说法便于理解)进行预测,预测完成后,再将其旋转归位。
- b、在预测实现的过程中,参考像素是存储在一维数组refMain中的。
这下面的几个参数要与if (!bIsModeVer) 联系起来
tempArray:为了存储横向模式块的所有像素预测值的一个临时数组,里面的值推测应该都是默认值,如-13108。之后赋给pDstBuf,pDsty,在预测和滤波过程时,里面的值会更改,最后再转置,赋给pDst.这是推测,之后再修改,可以之后看其他大小块的值是否也为-13108
dstStride:如果为垂直模式,等于当前块的stride值,否则为width值
pDstBuf:如果是横向模式,为tempArray。如果为垂直模式,就为pDst中存储的buf,即当前图像默认预测值.是否是默认预测值,可以在之后再关注一下
pDsty:是个指针变量,可以在地址上直接修改值。就等于预测值
//完全水平或完全垂直模式(18和50),直接用对应参考像素预测
if( intraPredAngle == 0 )  // pure vertical or pure horizontal
  {
    for( int y = 0; y < height; y++ )
    {
      for( int x = 0; x < width; x++ )
      {
        //直接预测,跳过了refMain第一个最左上角参考像素
        //之前水平垂直互换,所以现在用的就是垂直模式50来预测,之后再换回来
        pDsty[x] = refMain[x + 1];
      }
      //使用PDPC
      if (m_ipaParam.applyPDPC)
      {
        const int scale   = (floorLog2(width) + floorLog2(height) - 2) >> 2;
        const Pel topLeft = refMain[0];
        const Pel left    = refSide[1 + y];  // 次要侧左侧的参考像素。因为现在以上方为主要侧,之后再转置回来
        for (int x = 0; x < std::min(3 << scale, width); x++)
        {
          const int wL  = 32 >> (2 * x >> scale);//权重
          const Pel val = pDsty[x];
          //预测值是原始得到的预测值(主参考行的投影)加上对应次要侧位置和最左上角位置的差值
          pDsty[x]      = ClipPel(val + ((wL * (left - topLeft) + 32) >> 6), clpRng);
        }
      }

      pDsty += dstStride;
    }
  }
PDPC:标准文档第8.4.5.2.15 Position-dependent intra prediction sample filtering process 有解释
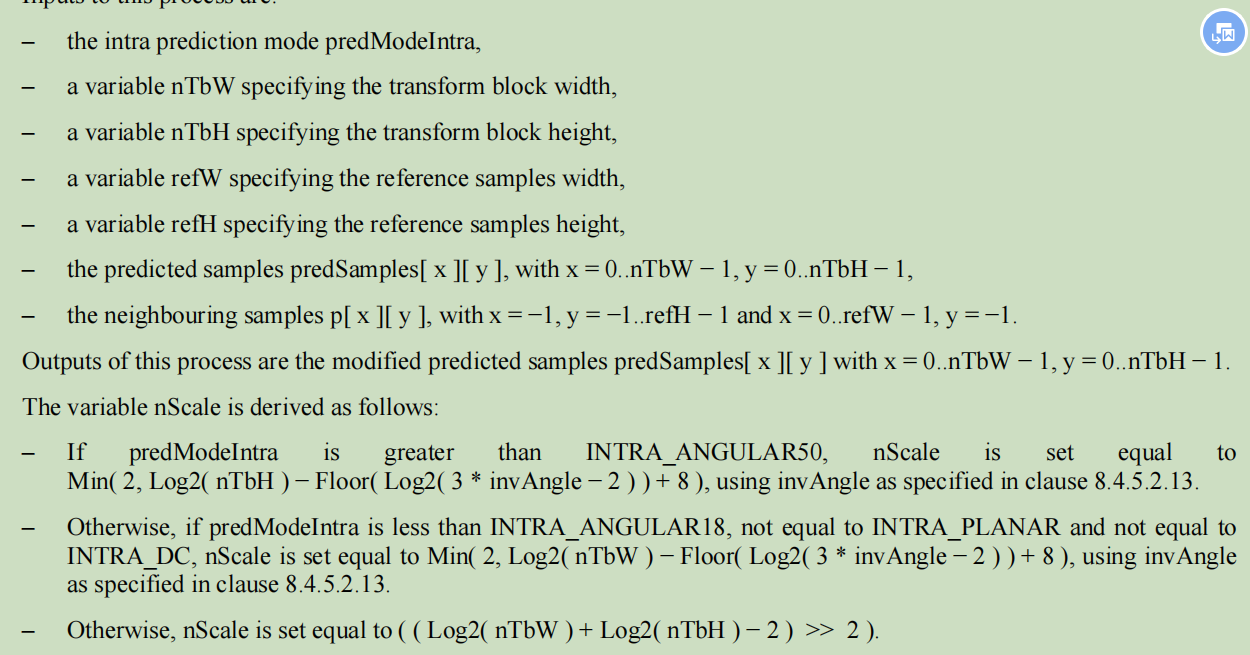
18或50的情况

最终预测值公式

算法到代码的推导过程
1.根据前面代码,这是个单一模式(水平或垂直),再加上水平模式被置换成了垂直模式,所以PDPC时无上侧参考像素的权重wT
参考像素为:refL[ x ][ y ] = p[ −1 ][ y ] − p[ −1 ][ −1 ] + predSamples[ x ][ y ]left = refSide[1 + y]; p[ −1 ][ y ]:垂直预测模式下的左侧参考像素,随y变动
topLeft = refMain[0]; p[ −1 ][ −1 ]:最左上方参考像素
val = pDsty[x]; predSamples[ x ][ y ]:当前预测像素的值2.权重wL
wL[ x ] = ( predModeIntra = = INTRA_ANGULAR50 ) ? 32 >> ( ( x << 1 ) >> nScale ) : 03.标准文档里的公式
predSamples[ x ][ y ] = Clip1( ( refL[ x ][ y ] * wL[ x ] + refT[ x ][ y ] * wT[ y ] +( 64 − wL[ x ] − wT[ y ] ) * predSamples[ x ][ y ] + 32 ) >> 6 )4.上面进行替换
pDsty[x] = Clip1( ( (left - topLeft + val )* wL[ x ] +( 64 − wL[ x ] ) * val + 32 ) >> 6 )
可推出
pDsty[x] = Clip1( ( (left - topLeft )* wL[ x ] +64 * val + 32 ) >> 6 )
可推出
pDsty[x] = Clip1( val +( (left - topLeft )* wL[ x ] + 32 ) >> 6 )
与代码相同
ClipPel:clip reconstruction 截取片段重建
pDsty += dstStride:
非18或50的角度模式
else
  {
    for (int y = 0, deltaPos = intraPredAngle * (1 + multiRefIdx); y<height; y++, deltaPos += intraPredAngle, pDsty += dstStride)
    {
      const int deltaInt   = deltaPos >> 5;//(iIdx)计算当前像素对应参考像素在REF(主要侧)中的位置
      const int deltaFract = deltaPos & 31;//(iFact)计算当前像素对应参考像素的权重
      //对于除水平、垂直、2、34、66之外的模式进行使用高斯插值滤波器插值处理
      //偏移值不是32的整数倍
      if ( !isIntegerSlope( abs(intraPredAngle) ) )
      {
        //亮度块四抽头滤波
        if( isLuma(channelType) )
        {
          const bool useCubicFilter = !m_ipaParam.interpolationFlag;//滤波器标志位
          // 四抽头高斯插值滤波器
          const TFilterCoeff        intraSmoothingFilter[4] = {TFilterCoeff(16 - (deltaFract >> 1)), TFilterCoeff(32 - (deltaFract >> 1)), TFilterCoeff(16 + (deltaFract >> 1)), TFilterCoeff(deltaFract >> 1)};
          // 判断是使用三次插值滤波器还是高斯插值滤波器
          const TFilterCoeff* const f                       = (useCubicFilter) ? InterpolationFilter::getChromaFilterTable(deltaFract) : intraSmoothingFilter;

          //对主要侧遍历,滤波求出预测值
          for (int x = 0; x < width; x++)
          {
            Pel p[4];

            p[0] = refMain[deltaInt + x];
            p[1] = refMain[deltaInt + x + 1];
            p[2] = refMain[deltaInt + x + 2];
            p[3] = refMain[deltaInt + x + 3];

            Pel val = (f[0] * p[0] + f[1] * p[1] + f[2] * p[2] + f[3] * p[3] + 32) >> 6;

            pDsty[x] = ClipPel(val, clpRng);   // always clip even though not always needed
          }
        }
H.266/VVC技术学习:帧内预测之角度预测模式_涵小呆的博客-CSDN博客
H.266/VVC代码学习:帧内预测之角度预测函数(predIntraAng、xPredIntraAng)_涵小呆的博客-CSDN博客_vvc 帧内预测
文档里大于等于模式34时的插值滤波
对于亮度分量,对位于非整数位置处的像素使用三次插值滤波器或者高斯插值滤波器对分数像素位置处的像素进行插值。对于色度分量,使用HEVC中的两抽头插值滤波器

计算方法,见万帅书P122-123。如果想对插值这个黑盒进行理解,见朱秀昌书P98-99
iIdx = ( ( ( y + 1 + refIdx ) * intraPredAngle ) >> 5 ) + refIdxiFact = ( ( y + 1 + refIdx ) * intraPredAngle ) & 31里面的y是因为这是个循环,累加造成的
亮度分量的插值滤波,可与代码对照

 else
        //色度分量进行线性滤波
        {
          // Do linear filtering
          for (int x = 0; x < width; x++)
          {
            Pel p[2];

            p[0] = refMain[deltaInt + x + 1];
            p[1] = refMain[deltaInt + x + 2];

            pDsty[x] = p[0] + ((deltaFract * (p[1] - p[0]) + 16) >> 5);
          }
        }
      }
      else
      //对于不插值处理的模式(水平、垂直、2、34、66),直接将滤波后的参考像素作为预测像素
      {
        // Just copy the integer samples
        for( int x = 0; x < width; x++ )
        {
          pDsty[x] = refMain[x + deltaInt + 1];
        }
      }
      if (m_ipaParam.applyPDPC)
      {
        const int scale       = m_ipaParam.angularScale;
        int       invAngleSum = 256;

        for (int x = 0; x < std::min(3 << scale, width); x++)
        {
          invAngleSum += absInvAngle;

          int wL   = 32 >> (2 * x >> scale);
          Pel left = refSide[y + (invAngleSum >> 9) + 1];
          pDsty[x] = pDsty[x] + ((wL * (left - pDsty[x]) + 32) >> 6);
        }
      }
    }
  }
色度线性滤波

PDPC的另外几种情况


因为之前进行了转置,所以代码里没用到小于19模式的算法,只用了大于50垂直模式的算法,即第二张图
refSide[y + (invAngleSum >> 9) + 1]:加上1,确保跳过最左上角参考像素
最后预测值的获得
left = refSide[y + (invAngleSum >> 9) + 1] = refL[ x ][ y ]
pDsty[x] = Clip1( ( refL[ x ][ y ] * wL[ x ] + refT[ x ][ y ] * wT[ y ] +( 64 − wL[ x ] − wT[ y ] ) * predSamples[ x ][ y ] + 32 ) >> 6 )
替换
pDsty[x] = Clip1( ( left * wL[ x ] +( 64 − wL[ x ]) * pDsty[x] + 32 ) >> 6 )
推导出
pDsty[x] = Clip1( pDsty[x] +( (left - pDsty[x] )* wL[ x ] + 32 ) >> 6 )
与代码 相同
// Flip the block if this is the horizontal mode
//预测结束后,将横向模式重新翻转过来
  if( !bIsModeVer )
  {
    for( int y = 0; y < height; y++ )
    {
      for( int x = 0; x < width; x++ )
      {
        pDst.at( y, x ) = pDstBuf[x];//x,y翻转
      }
      pDstBuf += dstStride;
    }
  }
}
pDstBuf += dstStride:在一行的像素预测值存进缓冲区后,地址加上当前块stride长的地址。然后开始下一行的预测值存储。但这里好像存储的是列,因为之前置换过,之后细看
4.预测值的存储
void IntraPrediction::xPredIntraAng( const CPelBuf &pSrc, PelBuf &pDst, const ChannelType channelType, const ClpRng& clpRng)
pDst为存储预测值的参数
Pel tempArray[MAX_CU_SIZE * MAX_CU_SIZE];
const int dstStride = bIsModeVer ? pDst.stride : width;
Pel * pDstBuf = bIsModeVer ? pDst.buf : tempArray;
若是垂直角度模式, pDstBuf = pDst.buf,pDstBuf为一个指针变量,修改pDstBuf就等于修改pDst
若是水平角度模式,pDstBuf = tempArray, tempArray为临时的一个数组,在最后的倒置中
pDst.at( y, x ) = pDstBuf[x];
将水平模式的值也传输到 pDst中
举例
当前块32X32
地址从72d0到7310,总共变化64字节,这个数组为short类型,所以为加了32个像素的地址


pDst的地址0x000001423bddae60,从这里开始存储了1024个像素的预测值,这个预测值是用各种模式选出出的预测值
由继续划分的16X16的块的地址可看出,这一块的预测值是存在另一个地址中的,与32的块不同,因为更小的块单独测试用的模式可能会不同,最后要优化


 1万+
1万+


 被折叠的 条评论
为什么被折叠?
被折叠的 条评论
为什么被折叠?
 到【灌水乐园】发言


