


目录
2.1、字节数组输入流 ByteArrayInputStream
2.2.1、缓冲输入流 BufferedInputStream
2.2.3、回推输入流 PushbackInputStream
3.1、字节数组输出流 ByteArrayOutputStream
3.2.1、缓冲输出流 BufferedOutputStream
先序
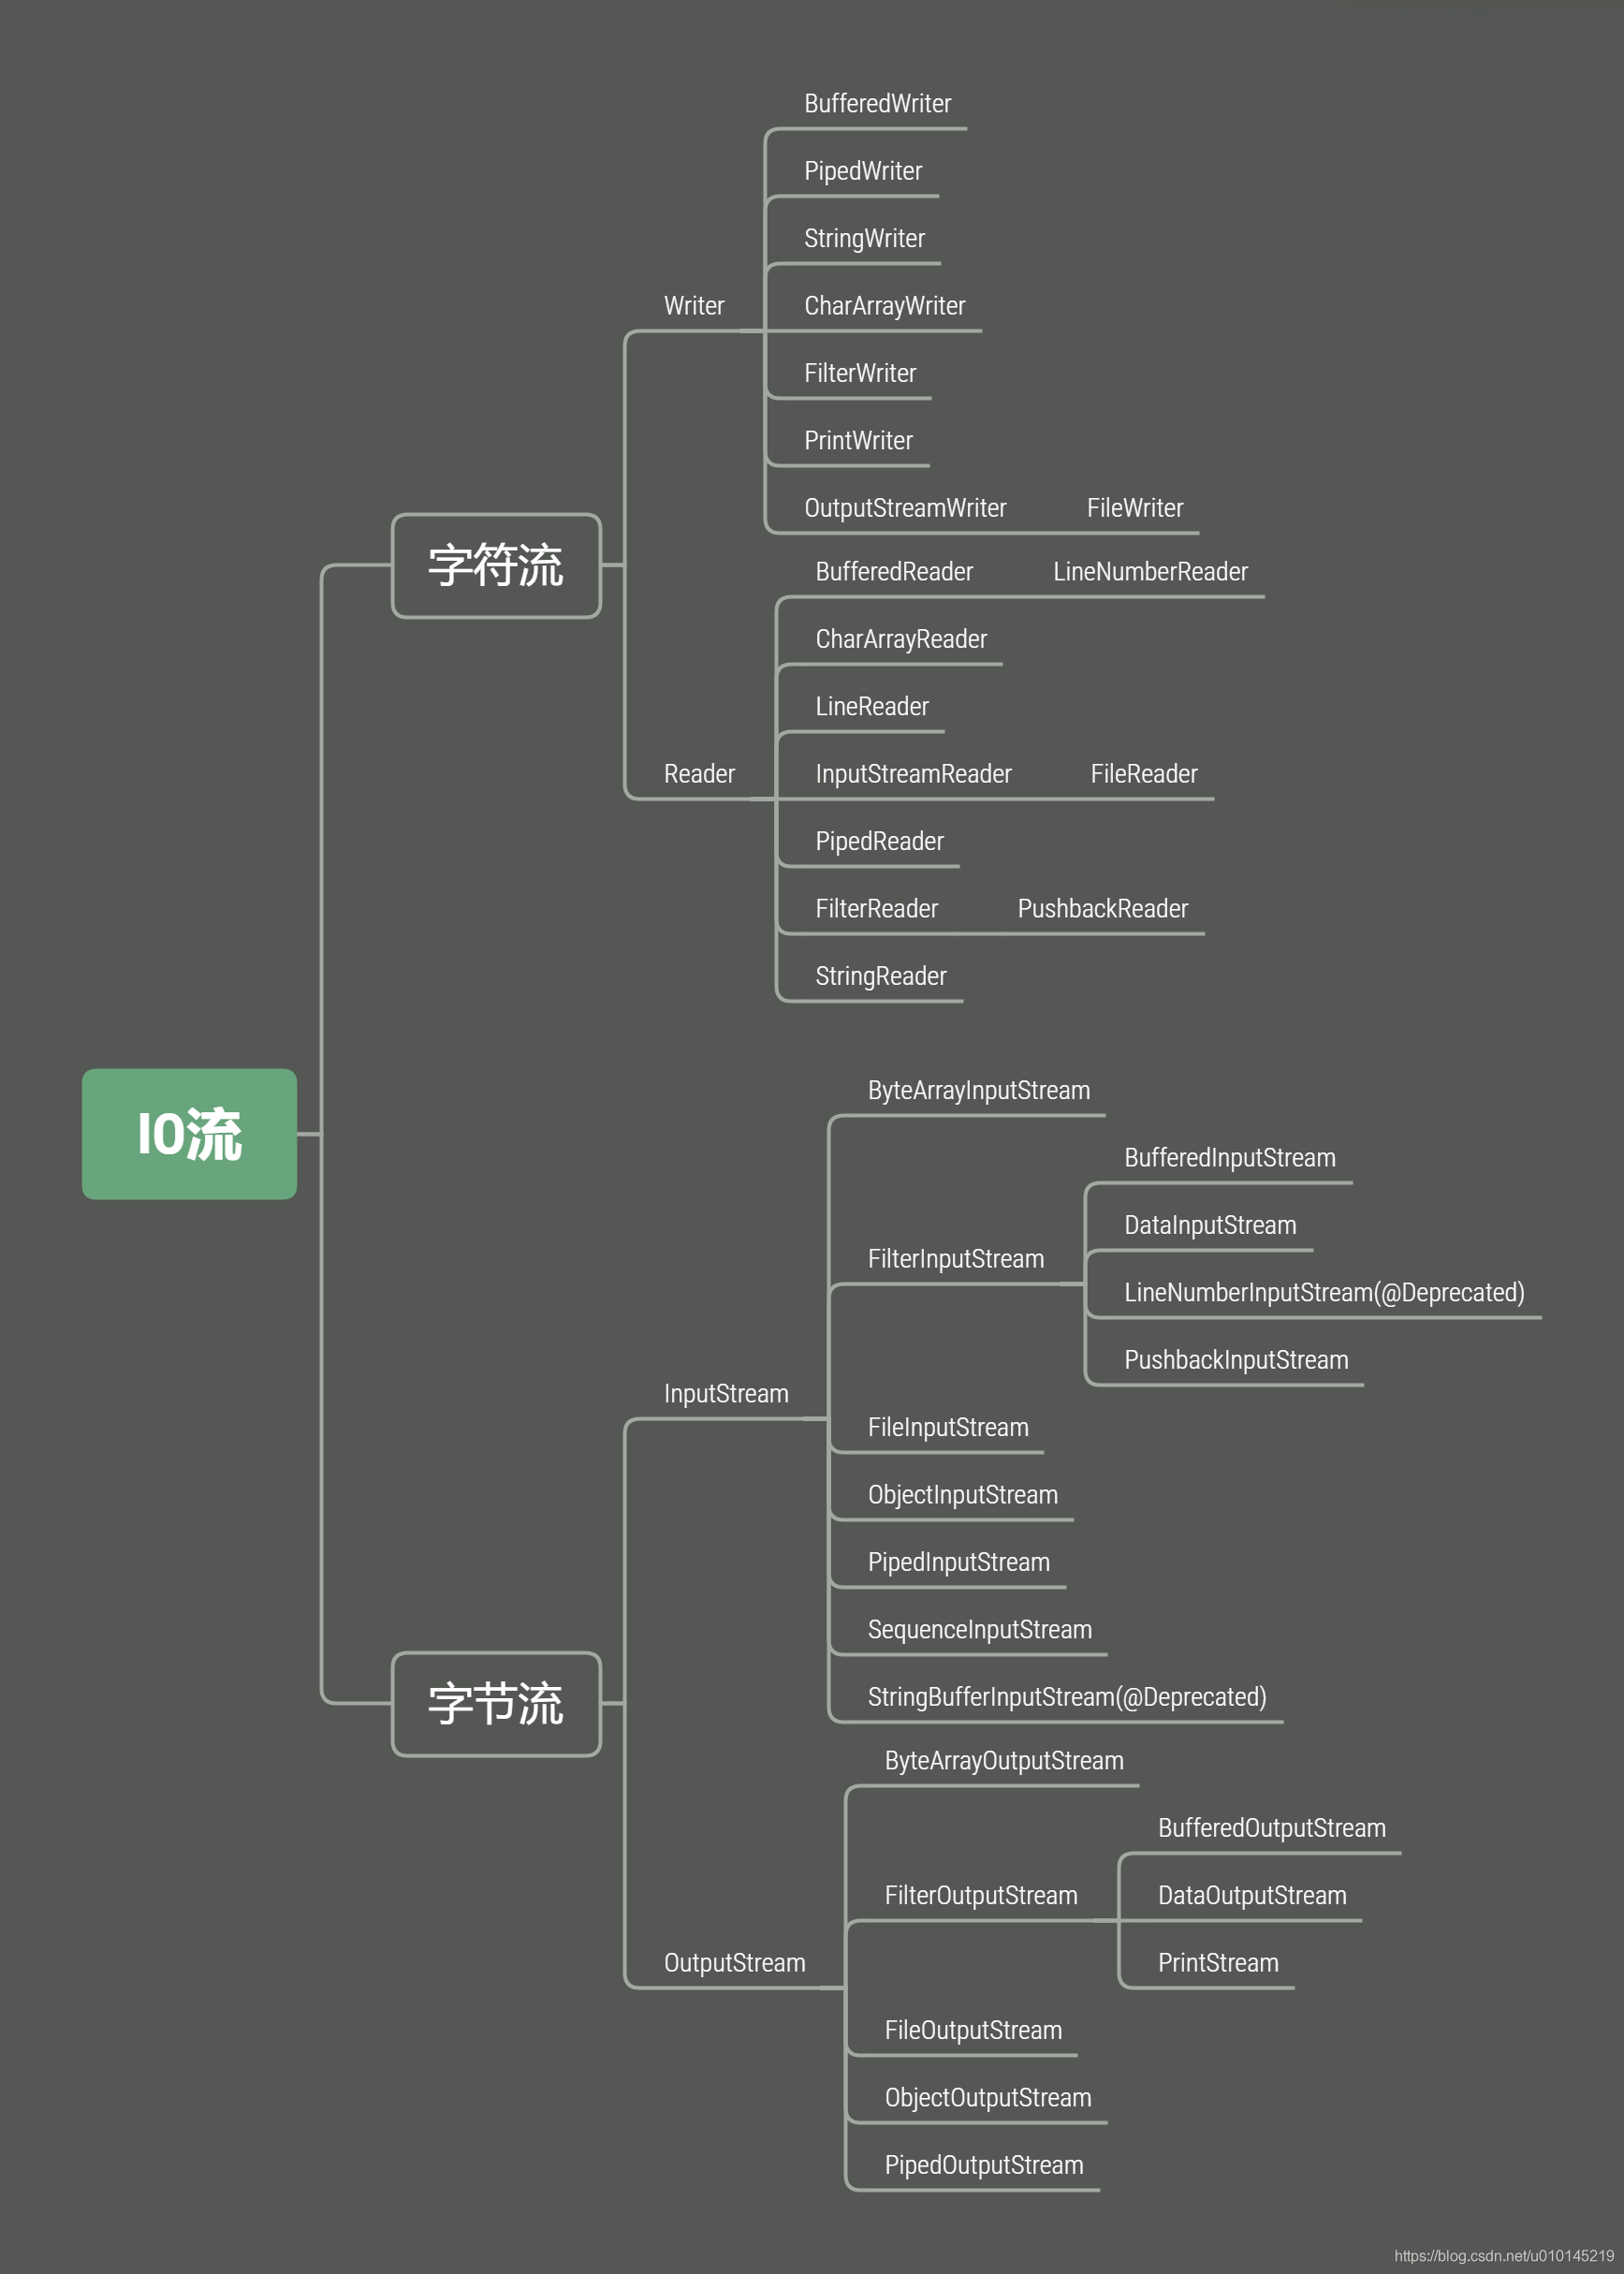
下面这张图是来自这篇博客https://blog.csdn.net/u010145219/article/details/89792877,我觉得梳理得很棒,所以借用一下。
1、Bits 工具类
Bits 是一个工具类,一般是供 java io 包下的类使用的,用于处理字节,因为输入输出流分为 字节流 和 字符流。接下来看看有哪些方法:
1、static boolean getBoolean(byte[] b, int off):判断字节数组 b 的第 off 位置是否不为0,true表示不为0。
2、static char getChar(byte[] b, int off):从 off 开始,获取字节数组 b 的一个字符,因为 java 中一个 char 代表2个字节,因为会将 b 数组的 off 和 off + 1 位置的2个字节拼成一个字符。
3、static short getShort(byte[] b, int off):short 也是2个字节,所以也是将 b 数组的 off 和 off + 1 位置拼成一个short。
4、static int getInt(byte[] b, int off):int 是4字节,所以将 b 数组的 off、off + 1、off + 2 和 off + 3 位置拼成一个int。
5、static float getFloat(byte[] b, int off):float 是4字节,将 b 数组的 off 至 off + 3 位置先拼成一个int,再利用 Float 类的静态本地方法 intBitsToFloat(int a) 转为 float。
6、static long getLong(byte[] b, int off):long 是8字节,将 b 数组的 off 至 off + 7 位置拼成一个long。
7、static double getDouble(byte[] b, int off):double 是8字节,先将 b 数组的 off 至 off + 7 位置拼成一个long,再利用Double类的静态本地方法 longBitsToDouble(long a) 转为 double。
8、static void putBoolean(byte[] b, int off, boolean val):将 boolean 值转换为字节,存储于数组 b 的 off 位置上。
9、static void putChar(byte[] b, int off, char val):将 char 值分为2个字节,分别存于数组 b 的off 和 off + 1 位置上。
10、static void putShort(byte[] b, int off, short val):将 short 值分为2个字节,分别存于数组 b 的off 和 off + 1 位置上。
11、static void putInt(byte[] b, int off, int val):将 int 值分为4个字节,分别存于数组 b 的 off 至 off + 3 位置上。
12、static void putFloat(byte[] b, int off, float val):先用 Float 类的静态本地方法 floatToIntBits(float a) 将 float 转为 int,再将 int 值分为4个字节,存储于数组 b 里面。
13、static void putLong(byte[] b, int off, long val):将 long 值分为8个字节,分别存于数组 b 的 off 至 off + 7 位置上。
14、static void putDouble(byte[] b, int off, double val):先用 Double 类的静态本地方法 doubleToLongBits(double a) 将double 转为 long,再将 long 存储于数组 b 中。
我觉得重要的不是学习这些方法的功能,而是学习这些方法的源代码,如果进行字节的处理与转换的,下面看4个方法:
    static boolean getBoolean(byte[] b, int off) {
        return b[off] != 0;
    }

    static char getChar(byte[] b, int off) {
        return (char) ((b[off + 1] & 0xFF) +
                       (b[off] << 8));
    }

    static void putBoolean(byte[] b, int off, boolean val) {
        b[off] = (byte) (val ? 1 : 0);
    }

    static void putChar(byte[] b, int off, char val) {
        b[off + 1] = (byte) (val      );
        b[off    ] = (byte) (val >>> 8);
    }
2、输入流 InputStream
读取字节流的话,都是基于read() 无参方法的,但是read() 的具体实现要看具体的输入流子类。InputStream 抽象类定义了输入流的一些规范和操作。
public abstract class InputStream implements Closeable {

    // 能够跳过的最大字节数
    private static final int MAX_SKIP_BUFFER_SIZE = 2048;

    // 读取输入流中下一个字节,返回读取到的字节,如果输入流到底了,就返回 - 1。
    public abstract int read() throws IOException;

    // 读取输入流中的字节,如果足够的话,把数组b装满,返回实际读取的字节数
    public int read(byte b[]) throws IOException {
        return read(b, 0, b.length);
    }

    //读取输入流中第off位置的字节开始,读取len个字节,存储到字节数组 b 中,返回实际读取的字节数
    public int read(byte b[], int off, int len) throws IOException {
        if (b == null) {
            throw new NullPointerException();
        } else if (off < 0 || len < 0 || len > b.length - off) {
            throw new IndexOutOfBoundsException();
        } else if (len == 0) {
            return 0;
        }

        int c = read();
        if (c == -1) {
            return -1;
        }
        b[off] = (byte)c;

        int i = 1;
        try {
            for (; i < len ; i++) {
                c = read();
                if (c == -1) {
                    break;
                }
                b[off + i] = (byte)c;
            }
        } catch (IOException ee) {
        }
        return i;
    }

    // 从输入流的当前位置往后跳 n 个字节,返回的是实际跳了多少字节,因为也许输入流中剩下的字节数
    // 小于n,意味着跳过的字节就无法获取了,除非用mark 和 reset
    public long skip(long n) throws IOException {

        long remaining = n;
        int nr;

        if (n <= 0) {
            return 0;
        }

        int size = (int)Math.min(MAX_SKIP_BUFFER_SIZE, remaining);
        byte[] skipBuffer = new byte[size];
        while (remaining > 0) {
            nr = read(skipBuffer, 0, (int)Math.min(size, remaining));
            if (nr < 0) {
                break;
            }
            remaining -= nr;
        }

        return n - remaining;
    }

    // 返回下一次从此输入流中可以不阻塞地读取多少字节的数据,不同的输入流类有不同的实现,有些是
    // 返回输入的字节总数
    public int available() throws IOException {
        return 0;
    }

    // 关闭输入流方法
    public void close() throws IOException {}

    // mark方法,稍后详解介绍
    public synchronized void mark(int readlimit) {}

    // reset方法,稍后详细介绍
    public synchronized void reset() throws IOException {
        throw new IOException("mark/reset not supported");
    }

    // 判断是否支持 mark() 和 reset() 功能
    public boolean markSupported() {
        return false;
    }

}
2.1、字节数组输入流 ByteArrayInputStream
ByteArrayInputStream 的作用:将一个字节数组进行封装,封装为 ByteArrayInputStream,封装的好处呢?ByteArrayInputStream 提供了一套便于操作字节数组的接口,如果我们直接对字节数组进行操作的话,非常麻烦,要写不少代码,而且代码难以复用,如果封装为 ByteArrayInputStream 的话,可以更加灵活地操作字节数组。
基本原理:对于一个目标字节数组,ByteArrayInputStream 内部有一个字节数组 buf,专门用于存储目标字节数组,仅仅是浅拷贝,没有创建新的数组空间,对于数组 buf, 有2个重要的属性:pos 和 count, count 是数组里的字节总数,初始化好了之后就不会改变了,pos 是指向 buf 里下一次将要读取的字节,所以每读取一个字节,pos 就往 buf 尾部移动一个位置。通过 pos 和 count 的比较可以判断出是否已经读取完了。
下面是 ByteArrayInputStream 的源码,每个方法都有注释,这里特别说一下 mark 和 reset 方法,mark 方法是一个变量,用于存储当前 pos 的值,也就是将当前的 pos 这个位置存起来,存起来干嘛呢?便于随时将 pos 指回 mark 存的这个位置,因为没有方法能够让 pos 往 buf 数组头方向移动,所以一旦读取过的字节,将不再有机会读取了,但是 mark 就可以让 pos 再回到之前的某个位置,重新开始读取。 mark 只是存储当前 pos 的位置,只有调用了 reset 方法,才能使 mark 这个位置起作用。
public class ByteArrayInputStream extends InputStream {
    // 存储读取到的字节
    protected byte buf[];
    // 将要从输入流中读取的下一个字节的位置序号
    protected int pos;
    // mark 标记位置,默认为 0
    protected int mark = 0;
    // buf数组中字节的个数
    protected int count;
    // 构造方法,带有初始化字节数组
    public ByteArrayInputStream(byte buf[]) {
        this.buf = buf;
        this.pos = 0;
        this.count = buf.length;
    }
    // 构造方法,将参数 buf 数组的offset开始的length个字节(不包含offset)存于输入流的buf数
//组,如果offset + length超出了参数buf数组,就将buf数组从offset开始的剩余元素全部存于输入流的
//buf数组。
    public ByteArrayInputStream(byte buf[], int offset, int length) {
        this.buf = buf;
        this.pos = offset;
        this.count = Math.min(offset + length, buf.length);
        this.mark = offset;
    }
    // 从此输入流的buf数组中读取下一个字节,如果到底了,就返回 -1
    public synchronized int read() {
        return (pos < count) ? (buf[pos++] & 0xff) : -1;
    }
    // 从此输入流的buf数组中读取off开始的len个元素存储于b数组
    public synchronized int read(byte b[], int off, int len) {
        if (b == null) {
            throw new NullPointerException();
        } else if (off < 0 || len < 0 || len > b.length - off) {
            throw new IndexOutOfBoundsException();
        }
        if (pos >= count) {
            return -1;
        }
        int avail = count - pos;
        if (len > avail) {
            len = avail;
        }
        if (len <= 0) {
            return 0;
        }
        System.arraycopy(buf, pos, b, off, len);
        pos += len;
        return len;
    }
    // 跳过 n 个字节
    public synchronized long skip(long n) {
        long k = count - pos;
        if (n < k) {
            k = n < 0 ? 0 : n;
        }
        pos += k;
        return k;
    }
    // 返回此输入流中还有多少个字节没有被读取
    public synchronized int available() {
        return count - pos;
    }
    // 表示支持mark 和 reset 功能
    public boolean markSupported() {
        return true;
    }
    // 将下一个要读取的字节的位置标记起来
    public void mark(int readAheadLimit) {
        mark = pos;
    }
    // 重置,把将要读取的下一个字节的位置改为mark标记的位置
    public synchronized void reset() {
        pos = mark;
    }
    // 关闭没有任何操作,所以ByteArrayInputStream 输入流不需要关闭,java虚拟机自管
    public void close() throws IOException {}
}
2.2、过滤输入流 FilterInputStream
下面是 FilterInputStream 的源码,可以看到,就是进行了一层封装,什么都没有,那它这么做有什么用呢?其实,这就是一种经典的设计模式——装饰者模式,FilterInputStream 类不能被我们只用使用,因为没用,但是确实是装饰者模式实现的基石。
public class FilterInputStream extends InputStream {
    protected volatile InputStream in;
    protected FilterInputStream(InputStream in) {     this.in = in;    }
    public int read() throws IOException {     return in.read();    }
    public int read(byte b[]) throws IOException {  return read(b, 0, b.length);    }
    public int read(byte b[], int off, int len) throws IOException {
        return in.read(b, off, len);
    }
    public long skip(long n) throws IOException {    return in.skip(n);    }
    public int available() throws IOException {     return in.available();    }
    public void close() throws IOException {     in.close();    }
    public synchronized void mark(int readlimit) {     in.mark(readlimit);    }
    public synchronized void reset() throws IOException {    in.reset();    }
    public boolean markSupported() {      return in.markSupported();    }
}
装饰者模式:顾名思义,就是在一个已存在的对象上进行属性或者功能的添加,比如一个已经存在的类,如果我们要进行功能和属性上的扩展,一般是继承它,然后新声明一些成员变量并且重写一些方法,方法的重写是很烦的,而且耦合度也不小。
5、装饰者会导致出现很多小对象,如果过度使用,会让程序变得复杂。
2.2.1、缓冲输入流 BufferedInputStream
BufferedInputStream 继承了 FilterInputStream,相当于是封装者,而 FilterInputStream 里面的 InputStream 相当于被封装者,BufferedInputStream 为 InputStream 这个原始输入流提供了更加独特的操作接口。独特在什么地方呢?
独特之处(作用):将原始输入流中的字节按多批次处理,没次都取出一部分字节存放于 BufferedInputStream 内部的缓冲区(实际也是字节数组),然后我们读取数据的目的地就放在了缓冲区,也许有人会困惑了,这样做,不是没事找事吗,还这么麻烦,直接读取原始数据流不就行了吗。我的理解是:如果原始数据流仅仅是对内存中的字节数组的封装,那 Buffered-InputStream 真的是搞麻烦了,但如果原始数据流是对磁盘中的数据的封装(比如文件流),那用 BufferedInputStream 会更加高效,因为 BufferedInputStream 是缓存区输入流,一次性从磁盘中读取很多字节,减少了磁盘IO次数,而那些没有缓冲的输入流,读取字节都是一个一个地,会有着大量的磁盘IO。因此,BufferedInputStream 才有了存在的意义。
读了源码之后,有两个值得学习的知识点:
1、MAX_BUFFER_SIZE 之所以是最大整数值 - 8,是因为有些虚拟机要在数组前面加一点信息,所以预留一点空间。
2、判断输入流是否关闭的标准是,输入流对象是否为null。
3、fill()方法的功能:从原始输入流 InputStream 中读取字节数据,写到缓冲区,尽量把缓冲区写满,然后对缓冲区里的字节进行读写。fill()的基本原理:为什么是尽量写满呢?一般来讲,缓冲区的数据读过之后,就可以删除了,因此,按理说每次就从 InputStream 里读取固定大小数据,把buffer填满,1 buffe 1 buffer 的读取不就行了吗,但是偏偏有个 markpos 标记功能,如果markpos = -1,说明没有开启标记功能,否则,说明开启了标记功能,等会很可能还要读一遍 markpos 之后的字节数据,所以并不是将缓冲区的数据全部删除,而是需要把 markpos 之后的数据集中保存在缓冲区前面,腾出缓冲区后面的空间, 然后再将 InputStream 里的数据读取一部分到缓冲区里(未必填满),然后更新 pos、count、markpos 等属性,OK,我们又可以读取 BufferedInputStream 里的新数据啦。
用户可以使用的方法:
1、public boolean markSupported():固定返回true,因为支持 mark 和 reset 功能。
2、void mark(int readlimit):执行标记,不过需要设置marklimit = readlimit。
3、public synchronized void reset():使得 markpos 标记起作用,让 pos 指定 markpos 标记。
4、public synchronized int read(byte b[], int off, int len):读取指定区间的字节,用 off 和 len 去确定区间。
5、public synchronized int read():读取下一个字节,如果没有可读的了,就返回 -1。
6、public synchronized int available():获取剩余可读字节数(是可以下一次不阻塞地读取的),如果剩余的特别多,就可能直接返回Integer的最大值,否则,返回原始 InputStream 剩余的 + 缓冲区剩余的。
7、public synchronized long skip(long n):让读取指针 pos 跳过 n 个字节。
下面是 BufferedInputStream 类的源码,部分方法的源码没有给出,但是会简单介绍一下。
public
class BufferedInputStream extends FilterInputStream {
    // 默认缓冲区大小,单位字节
    private static int DEFAULT_BUFFER_SIZE = 8192;
    // 缓冲区最大大小
    private static int MAX_BUFFER_SIZE = Integer.MAX_VALUE - 8;
    // 缓冲区,其实也是一个数组
    protected volatile byte buf[];

    // 这是一个原子更新器,用于更新缓冲区(字节数组 buf)
    private static final
        AtomicReferenceFieldUpdater<BufferedInputStream, byte[]> bufUpdater =
        AtomicReferenceFieldUpdater.newUpdater
        (BufferedInputStream.class,  byte[].class, "buf");

    // 缓冲区里存储的字节总数量
    protected int count;
    // 下一个要读取的字节位置
    protected int pos;
    // mark标记,只是在这里类,换了个名字
    protected int markpos = -1;
    // 用于限制 markpos 和 pos 的最大距离,即顶多往之前读marklimit个位置。
    protected int marklimit;
    // 获取可用的输入流 inputStream 对象
    private InputStream getInIfOpen() throws IOException {
        InputStream input = in;
        if (input == null)
            throw new IOException("Stream closed");
        return input;
    }

    // 获得可用的缓冲区(字节数组 buffer)
    private byte[] getBufIfOpen() throws IOException {
        byte[] buffer = buf;
        if (buffer == null)
            throw new IOException("Stream closed");
        return buffer;
    }

    // 构造方法
    public BufferedInputStream(InputStream in) {
        this(in, DEFAULT_BUFFER_SIZE);
    }

    // 构造方法,指定缓冲区大小
    public BufferedInputStream(InputStream in, int size) {
        super(in);
        if (size <= 0) {
            throw new IllegalArgumentException("Buffer size <= 0");
        }
        buf = new byte[size];
    }
    // 将原始 inputStream 流中的字节数据读取一部分到缓冲区中,在缓冲区里处理。
    private void fill() throws IOException {
        // 省略具体实现代码
    }

    // 从缓冲区读取一个字节,如果有必要,会填充缓冲区,如果原始输入流 InputStream 里的读完了,就返回 - 1.
    public synchronized int read() throws IOException {
        if (pos >= count) {
            fill();
            if (pos >= count)
                return -1;
        }
        return getBufIfOpen()[pos++] & 0xff;
    }
    // 跳过 n 个字节
    public synchronized long skip(long n) throws IOException {
        //省略具体实现
    }
    // 返回下一次能够不阻塞地读取的字节数,原始InputStream里的 + 缓冲区剩余未读的
    public synchronized int available() throws IOException {
        int n = count - pos;
        int avail = getInIfOpen().available();
        return n > (Integer.MAX_VALUE - avail)
                    ? Integer.MAX_VALUE
                    : n + avail;
    }
    // 关闭缓冲输入流,即把自己的字节数组buffer置为null,而且把被封装者InputStream置为null
    public void close() throws IOException {
        byte[] buffer;
        while ( (buffer = buf) != null) {
            if (bufUpdater.compareAndSet(this, buffer, null)) {
                InputStream input = in;
                in = null;
                if (input != null)
                    input.close();
                return;
            }
        }
    }
}
2.2.2、 数据输入流 DataInputStream
DataInputStream 是数据输入流,继承了 FilterInputStream 类,因此,正常的字节输入流的功能,它基本都有,比如几个read 方法,但是没有mark标记功能。但是又实现了 DataInput 接口,因此提供了比较有特色的功能。下面介绍一下特色功能:
1、readFully 方法:其实本质上是调用的 read 方法,read 方法有时会因为像网络阻塞等外部原因而读取不成功,但是readFully 内部有一个循环,直到成功读取为止 或者 读取完了才肯罢休。
2、skipBytes 方法:非要跳过指定数量的字节,除非跳到末尾了。
3、readBoolean方法、readInt 方法等等,这些方法都是类似,比如readInt 方法,连续读取4个字节,然后拼成一个 int 并发返回,跟上面讲的 Bits 工具类里的实现差不多。
4、readLine 方法:从原始输入流中读取一行字节,碰到换行符或者回车符就算一行了,并将读取到的一行转为字符串并返回
5、readUTF 方法:针对的是以utf-8格式编码的输入流,首先从该输入流中读取开头2个字节,这两个字节拼成short类型,这个short值是代表后面输入流的长度(有多少字节),然后根据short值创建一个字节数组bytearr,将输入流里的全部字节读取出来存入字节数组bytearr,再将bytearr转换为字符数组chararr,最后处理字符数组,形成一个字符串,并返回字符串。
浏览 DataInputStream 的源代码后,大概明白了这句话的含义:“是用来装饰其它输入流,它允许应用程序以与机器无关方式从底层输入流中读取基本 Java 数据类型”。我想它的意思是,机器底层无非也就是字节流,但是我可以不关心字节层面的,我可以以指定java基本数据类型去读取流数据,然后读取的数据就是java基本数据类型了。
但是也需要注意的是,如果你把一组short类型的数据转为字节流,然后你说你非要以int类型读取该字节流,虽然也能成功,但是读取到的数据就有问题了。所以在使用DataInputStream时,需要注意一下,转为字节流前的类型或者编码格式 和 读取字节流时所按照的读取类型 或者 编码格式 要一致。
源码如下,部分源码没有给出注释,但是作了介绍。
public class DataInputStream extends FilterInputStream implements DataInput {
    // 构造方法,指定原始输入流
    public DataInputStream(InputStream in) {
        super(in);
    }
    // 字节数组 和 字符数组
    private byte bytearr[] = new byte[80];
    private char chararr[] = new char[80];
    // 从原始输入流中读取字节存入数组 b
    public final int read(byte b[]) throws IOException {
        return in.read(b, 0, b.length);
    }
    // 从原始输入流中读取指定位置范围的字节存入数组 b
    public final int read(byte b[], int off, int len) throws IOException {
        return in.read(b, off, len);
    }
    // 从原始输入流读取字节,将b数组填满,除非数据不够了
    public final void readFully(byte b[]) throws IOException {
        readFully(b, 0, b.length);
    }
    // 确保能够读取到指定位置区间的那些字节,除非数据已经读完了
    public final void readFully(byte b[], int off, int len) throws IOException {
        if (len < 0)
            throw new IndexOutOfBoundsException();
        int n = 0;
        while (n < len) {
            int count = in.read(b, off + n, len - n);
            if (count < 0)
                throw new EOFException();
            n += count;
        }
    }
    // 非要跳过 n 个字节,除非到末尾了
    public final int skipBytes(int n) throws IOException {
        int total = 0;
        int cur = 0;

        while ((total<n) && ((cur = (int) in.skip(n-total)) > 0)) {
            total += cur;
        }

        return total;
    }
    // 读取一个字节,然后转换为boolean并返回布尔值
    public final boolean readBoolean() throws IOException {
        int ch = in.read();
        if (ch < 0)
            throw new EOFException();
        return (ch != 0);
    }
    // 读取一个字节,然后转换为byte并返回(有符号的字节)
    public final byte readByte() throws IOException {
        int ch = in.read();
        if (ch < 0)
            throw new EOFException();
        return (byte)(ch);
    }
    // 读取一个字节并返回(本来就是无符号的)
    public final int readUnsignedByte() throws IOException {
        int ch = in.read();
        if (ch < 0)
            throw new EOFException();
        return ch;
    }
    // 一次性读取2个字节,将2个字节转换为short,并返回short
    public final short readShort() throws IOException {
        int ch1 = in.read();
        int ch2 = in.read();
        if ((ch1 | ch2) < 0)
            throw new EOFException();
        return (short)((ch1 << 8) + (ch2 << 0));
    }
    public final int readUnsignedShort() throws IOException {
        int ch1 = in.read();
        int ch2 = in.read();
        if ((ch1 | ch2) < 0)
            throw new EOFException();
        return (ch1 << 8) + (ch2 << 0);
    }
    public final char readChar() throws IOException {
        int ch1 = in.read();
        int ch2 = in.read();
        if ((ch1 | ch2) < 0)
            throw new EOFException();
        return (char)((ch1 << 8) + (ch2 << 0));
    }
    public final int readInt() throws IOException {
        int ch1 = in.read();
        int ch2 = in.read();
        int ch3 = in.read();
        int ch4 = in.read();
        if ((ch1 | ch2 | ch3 | ch4) < 0)
            throw new EOFException();
        return ((ch1 << 24) + (ch2 << 16) + (ch3 << 8) + (ch4 << 0));
    }
    private byte readBuffer[] = new byte[8];
    public final long readLong() throws IOException {
        readFully(readBuffer, 0, 8);
        return (((long)readBuffer[0] << 56) +
                ((long)(readBuffer[1] & 255) << 48) +
                ((long)(readBuffer[2] & 255) << 40) +
                ((long)(readBuffer[3] & 255) << 32) +
                ((long)(readBuffer[4] & 255) << 24) +
                ((readBuffer[5] & 255) << 16) +
                ((readBuffer[6] & 255) <<  8) +
                ((readBuffer[7] & 255) <<  0));
    }
    public final float readFloat() throws IOException {
        return Float.intBitsToFloat(readInt());
    }
    public final double readDouble() throws IOException {
        return Double.longBitsToDouble(readLong());
    }
    private char lineBuffer[];
    @Deprecated
    public final String readLine() throws IOException {
        char buf[] = lineBuffer;
        if (buf == null) {
            buf = lineBuffer = new char[128];
        }
        int room = buf.length;
        int offset = 0;
        int c;
loop:   while (true) {
            switch (c = in.read()) {
              case -1:
              case '\n':
                break loop;
              case '\r':
                int c2 = in.read();
                if ((c2 != '\n') && (c2 != -1)) {
                    if (!(in instanceof PushbackInputStream)) {
                        this.in = new PushbackInputStream(in);
                    }
                    ((PushbackInputStream)in).unread(c2);
                }
                break loop;
              default:
                if (--room < 0) {
                    buf = new char[offset + 128];
                    room = buf.length - offset - 1;
                    System.arraycopy(lineBuffer, 0, buf, 0, offset);
                    lineBuffer = buf;
                }
                buf[offset++] = (char) c;
                break;
            }
        }
        if ((c == -1) && (offset == 0)) {
            return null;
        }
        return String.copyValueOf(buf, 0, offset);
    }
    public final String readUTF() throws IOException {
        return readUTF(this);
    }
    // 从UTF编码格式的流中读取出来内容,并以String的形式返回
    public final static String readUTF(DataInput in) throws IOException {
        int utflen = in.readUnsignedShort();
        byte[] bytearr = null;
        char[] chararr = null;
        if (in instanceof DataInputStream) {
            DataInputStream dis = (DataInputStream)in;
            if (dis.bytearr.length < utflen){
                dis.bytearr = new byte[utflen*2];
                dis.chararr = new char[utflen*2];
            }
            chararr = dis.chararr;
            bytearr = dis.bytearr;
        } else {
            bytearr = new byte[utflen];
            chararr = new char[utflen];
        }
        int c, char2, char3;
        int count = 0;
        int chararr_count=0;
        in.readFully(bytearr, 0, utflen);
        while (count < utflen) {
            c = (int) bytearr[count] & 0xff;
            if (c > 127) break;
            count++;
            chararr[chararr_count++]=(char)c;
        }
        while (count < utflen) {
            c = (int) bytearr[count] & 0xff;
            switch (c >> 4) {
                case 0: case 1: case 2: case 3: case 4: case 5: case 6: case 7:
                    /* 0xxxxxxx*/
                    count++;
                    chararr[chararr_count++]=(char)c;
                    break;
                case 12: case 13:
                    /* 110x xxxx   10xx xxxx*/
                    count += 2;
                    if (count > utflen)
                        throw new UTFDataFormatException(
                            "malformed input: partial character at end");
                    char2 = (int) bytearr[count-1];
                    if ((char2 & 0xC0) != 0x80)
                        throw new UTFDataFormatException(
                            "malformed input around byte " + count);
                    chararr[chararr_count++]=(char)(((c & 0x1F) << 6) |
                                                    (char2 & 0x3F));
                    break;
                case 14:
                    /* 1110 xxxx  10xx xxxx  10xx xxxx */
                    count += 3;
                    if (count > utflen)
                        throw new UTFDataFormatException(
                            "malformed input: partial character at end");
                    char2 = (int) bytearr[count-2];
                    char3 = (int) bytearr[count-1];
                    if (((char2 & 0xC0) != 0x80) || ((char3 & 0xC0) != 0x80))
                        throw new UTFDataFormatException(
                            "malformed input around byte " + (count-1));
                    chararr[chararr_count++]=(char)(((c     & 0x0F) << 12) |
                                                    ((char2 & 0x3F) << 6)  |
                                                    ((char3 & 0x3F) << 0));
                    break;
                default:
                    /* 10xx xxxx,  1111 xxxx */
                    throw new UTFDataFormatException(
                        "malformed input around byte " + count);
            }
        }
        return new String(chararr, 0, chararr_count);
    }
}
2.2.3、回推输入流 PushbackInputStream
回推输入流,为什么叫这个名字呢?其它的输入流都是被读取,每读取一个,pos 就往后移动,而这个输入流是可以往里写入数据的,每写一个字节,pos 就往前移动。 PushbackInputStream 也是基于缓冲区的(字节数组),但是它的缓冲区原理和 BufferedInputStream 不一样,并且 PushbackInputStream 没有标记功能,因为回推功能 和 标记功能 有点冲突,回推也是会改变 pos 值的,比如我回推2个字节的数据, pos 就往前移动2个位置,但是此时 reset 了,mark起作用了,pos 的值就变成了mark值,岂不是把我回推的工作给覆盖了。
PushbackInputStream 继承了 FilterInputStream 类,因此也是装饰者模式里的装饰者,它自己有个缓冲区(字节数组),另外也包含了原始输入流,缓冲区的目的是存储回推的字节数据,不是用来存储原始输入流的数据,因此,和 BufferedInputStream 的原理不一样。 PushbackInputStream 结构如下图,它自己的缓冲区是绿色部分的,初始化时没有内容,原始输入流是橙色部分的,肯定有数据的,pos 初始化就指原始输入流的第一个字节处。

可能有人会问,回推具体是什么操作呢? OK,先看一下回推方法 unread(int b),确保原始输入流式是打开的,然后 pos 指向了 0 位置(说明缓冲区满了)的话,就抛出异常说明缓冲区已满,如果没有满的话,就将 pos 指向前一个位置,并把要推入的数据 b 存入缓冲区的 pos 位置处。
因此,只要我们只执行回推操作,pos 就永远不会指向缓冲区。
    public void unread(int b) throws IOException {
        ensureOpen();
        if (pos == 0) {
            throw new IOException("Push back buffer is full");
        }
        buf[--pos] = (byte)b;
    }
它只有2个构造方法:
1、public PushbackInputStream(InputStream in, int size):构造方法,指定原始输入流,并指定缓冲区大小。
2、public PushbackInputStream(InputStream in):构造方法,指定原始输入流,默认缓冲区大小为1。
常用方法(部分方法在源码里没有给出,因为前文已经讲得够多了,不重复了):
1、public int read():读取一个字节。
2、public int read(byte[] b, int off, int len):读取 len 个字节存入 b 数组中,从 off 位置开始存。
3、public int available():获取剩余可读字节数(是可以下一次不阻塞地读取的),如果剩余的特别多,就可能直接返回Integer的最大值,否则,返回原始 InputStream 剩余的 + 缓冲区剩余的。
4、public long skip(long n):跳过 n 个字节。
5、public void unread(int b):先查看缓冲区是否存得下,存不下会抛出异常,存得下就会将 b 转为字节,然后存入。
6、public void unread(byte[] b, int off, int len):回推数组 b 的 off 位置开始的len个字节 存入 缓冲区,如果存不下,抛出异常
7、public void unread(byte[] b):回推一个字节。
8、public synchronized void close():关闭输入流,释放资源(缓冲区 + 原始输入流)。
public class PushbackInputStream extends FilterInputStream {
    // 缓冲区
    protected byte[] buf;
    // 输入流读取指针,下一个将要读取字节的位置
    protected int pos;
    // 判断输入流是否开启,否则抛出异常
    private void ensureOpen() throws IOException {
        if (in == null)
            throw new IOException("Stream closed");
    }
    // 构造方法
    public PushbackInputStream(InputStream in, int size) {
        super(in);
        if (size <= 0) {
            throw new IllegalArgumentException("size <= 0");
        }
        this.buf = new byte[size];
        this.pos = size;
    }
    // 构造方法
    public PushbackInputStream(InputStream in) {
        this(in, 1);
    }

    // 回推一个整数,只不过整数要强制转为 byte
    public void unread(int b) throws IOException {
        ensureOpen();
        if (pos == 0) {
            throw new IOException("Push back buffer is full");
        }
        buf[--pos] = (byte)b;
    }

    // 回推数组 b 的 off 位置开始的len个字节 存入 缓冲区,如果存不下,抛出异常
    public void unread(byte[] b, int off, int len) throws IOException {
        ensureOpen();
        if (len > pos) {
            throw new IOException("Push back buffer is full");
        }
        pos -= len;
        System.arraycopy(b, off, buf, pos, len);
    }

    // 回推一个字节
    public void unread(byte[] b) throws IOException {
        unread(b, 0, b.length);
    }
    // 关闭输入流,释放资源
    public synchronized void close() throws IOException {
        if (in == null)
            return;
        in.close();
        in = null;
        buf = null;
    }
}
2.3、文件输入流 FileInputStream
文件输入流专门用于从文件里读取数据,它是没有缓冲区的,所以没有flush方法,磁盘IO的次数就会很多,效率不高。由于FileInputStream 内部多为本地方法,我也没能力知晓具体原理,所以尽量介绍吧。
很多资料里介绍说 FileInputStream 效率不高,没有 FileChannel 的效率高,java.io 的效率比不上 java.nio,原因是频繁地读取磁盘会导致速度变慢。
简单说一下 FileDescriptor fd:文件描述符对象,顾名思义就是描述一个文件的信息,比如,文件号,有哪些线程在访问这个文件,文件的一些属性等等。
至于其它几个继承 InputStream 的方法,这里不重复说了。
另外, FileInputStream 包含了 FileChannel 成员变量,可是并没有用到 FileChannel 呀,为什么还要包含一个 FileChannel 变量呢?其实,FileChannel 是一个可选功能,FileInputStream 是单向的,只能读取磁盘,但是 FileChannel 是双全工的,通过使用它,既能往磁盘写,又能读取磁盘,FileChannel 里的方法是必须搭配 ByteBuffer 或者 ByteBuffer[] (可以被称为缓冲区)使用的,所以 FileChannel 是可以批量读取文件的,因此磁盘IO的次数少,效率更高。FileChannel 有优势,自然也有劣势,所以不能一味地抛弃 FileInputStream,而只用 FileChannel。
1、public FileChannel getChannel():获得该文件的文件通道,然后通过这个文件通道去写入数据。
2、public FileInputStream(FileDescriptor fdObj):这个构造方法值得一说,为什么要有这个方法呢?一般我们最常想到的就是直接用文件路径 或者 File 对象,很遗憾,FileInputStream 没有可以获取文件路径的方法,所以无法从一个FileInputStream 或者 FileOutputStream 对象里获取到文件路径,其次,在使用 FileInputStream、FileOutputStream、还有其他文件流时,都会是先根据文件路径找到文件,然后封装成一个文件描述符对象,反正都要封装,还不如直接使用文件描述符。
public class FileInputStream extends InputStream {
    // 文件描述符
    private final FileDescriptor fd;
    // 带文件名的文件路径
    private final String path;
    // 文件通道
    private FileChannel channel = null;
    private final Object closeLock = new Object();
    private volatile boolean closed = false;
    // 构造方法,指定文件
    public FileInputStream(String name) throws FileNotFoundException {
        this(name != null ? new File(name) : null);
    }
    // 构造方法,指定File对象
    public FileInputStream(File file) throws FileNotFoundException {
        String name = (file != null ? file.getPath() : null);
        SecurityManager security = System.getSecurityManager();
        if (security != null) {
            security.checkRead(name);
        }
        if (name == null) {
            throw new NullPointerException();
        }
        if (file.isInvalid()) {
            throw new FileNotFoundException("Invalid file path");
        }
        fd = new FileDescriptor();
        fd.attach(this);
        path = name;
        open(name);
    }

    // 构造方法,指定文件描述符
    public FileInputStream(FileDescriptor fdObj) {
        SecurityManager security = System.getSecurityManager();
        if (fdObj == null) {
            throw new NullPointerException();
        }
        if (security != null) {
            security.checkRead(fdObj);
        }
        fd = fdObj;
        path = null;
        fd.attach(this);
    }
    // 打开文件
    private void open(String name) throws FileNotFoundException {    open0(name);   }
    public int read() throws IOException {      return read0();    }
    private native int read0() throws IOException;
    private native int readBytes(byte b[], int off, int len) throws IOException;
    public int read(byte b[]) throws IOException {
        return readBytes(b, 0, b.length);
    }
    public int read(byte b[], int off, int len) throws IOException {
        return readBytes(b, off, len);
    }
    // 跳过 n 个字节
    public long skip(long n) throws IOException {     return skip0(n);    }
    private native long skip0(long n) throws IOException;
    // 返回文件里下次能不阻塞地读取的字节数
    public int available() throws IOException {    return available0();    }
    private native int available0() throws IOException;
    // 关闭文件输入流
    public void close() throws IOException {
        synchronized (closeLock) {
            if (closed) {             return;            }
            closed = true;
        }
        if (channel != null) {         channel.close();        }
        fd.closeAll(new Closeable() {
            public void close() throws IOException {           close0();           }
        });
    }
    // 获取文件描述符对象
    public final FileDescriptor getFD() throws IOException {
        if (fd != null) {
            return fd;
        }
        throw new IOException();
    }
    // 获取文件通道
    public FileChannel getChannel() {
        synchronized (this) {
            if (channel == null) {
                channel = FileChannelImpl.open(fd, path, true, false, this);
            }
            return channel;
        }
    }
}
3、输出流 OutputStream
OutputStream 是一个抽象类,表示输出流,我们的数据是往输出流里面写入的。它定义基本的操作方法,3种 write 方法,特别说一下 flush() 方法,输出流一般有一个字节数组作为缓冲区,数据写入输出流后,先存储在缓冲区,等到缓冲区满了之后,或者没有数据可写入了,输出流再调用 flush() 方法将缓冲区的数据刷新入磁盘。这样相当于按批存入磁盘,减少了磁盘 IO 次数。
public abstract class OutputStream implements Closeable, Flushable {
    // 将整数b转为 byte,再将byte写入此输出流
    public abstract void write(int b) throws IOException;
    // 将字节数组写入此输出流
    public void write(byte b[]) throws IOException {
        write(b, 0, b.length);
    }
    // 将字节数组的off位置开始的len个字节写入此输出流
    public void write(byte b[], int off, int len) throws IOException {
        if (b == null) {
            throw new NullPointerException();
        } else if ((off < 0) || (off > b.length) || (len < 0) ||
                   ((off + len) > b.length) || ((off + len) < 0)) {
            throw new IndexOutOfBoundsException();
        } else if (len == 0) {
            return;
        }
        for (int i = 0 ; i < len ; i++) {
            write(b[off + i]);
        }
    }
    // 将输出流中缓冲区的数据立即刷新到磁盘里去
    public void flush() throws IOException {
    }
    // 关闭输出流,释放资源
    public void close() throws IOException {
    }
}
3.1、字节数组输出流 ByteArrayOutputStream
一般输出流都是把数据写入磁盘里,但是这个 ByteArrayOutputStream 是将数据写入内存中的一个缓冲区,说是缓冲区,其实就是一个字节数组,把内存中的字节存入到此缓冲区(字节数组),这不是多此一举吗?其实你要说是多此一举也行,但是比如你离散地获取一些字节,你把这些字节存入 ByteArrayOutputStream,可以更加方便地管理,因为有很多现成的方法可用,但是你非要自己去管理得到的那些离散的字节,也行,只不过很麻烦,下次再碰到这种情况,你还得自己去写一遍管理代码。
ByteArrayOutputStream 更多地像一个存储仓库,用于缓存我们的一些字节数据。
突然发现,ArrayList 和 ByteArrayOutputStream 很像,本质上都是由一个可变长度的数据实现的,只不过 ByteArrayOutputStream 支持的是字节,而 ArrayList 支持的 Object 类型,另外,在输出流这个概念里,ArrayList 没有那些特色的功能(如果要有的话,也只能自己额外编写代码实现了)。
另外,ByteArrayOutputStream 的 close 关闭方法没有用,因为缓冲区在内存中,是个字节数组,当它不在被使用时,java虚拟机会自动清理它的。
介绍几个常用方法:
1、public synchronized void write(int b):将整数转为byte,再将byte写入此输出流
2、public synchronized void write(byte b[], int off, int len) :将字节数组的off位置开始的len个字节写入此输出流
3、public synchronized void writeTo(OutputStream out):将此输出流的缓冲区数据写入参数out输出流
4、public synchronized void reset():将count置为0,意味着从缓冲区开头开始写入数据
5、public synchronized byte toByteArray()[] :获取一份此输出流的缓冲区(字节数组),深拷贝
6、public synchronized int size():此输出流的缓冲区的字节数量
7、public synchronized String toString():将此输出流的缓冲区里的所有字节按照默认的字符集编码生成字符串
8、public synchronized String toString(String charsetName):将此输出流的缓冲区里的所有字节按照指定的字符集编码生成字符串
9、public void close():关闭输出流,其实上面也没有做
public class ByteArrayOutputStream extends OutputStream {
    // 缓冲区
    protected byte buf[];
    // 缓冲区内数据字节数量
    protected int count;
    // 构造方法,默认缓冲区大小为32字节
    public ByteArrayOutputStream() {     this(32);    }
    // 构造方法,指定缓冲区大小
    public ByteArrayOutputStream(int size) {
        if (size < 0) {
            throw new IllegalArgumentException("Negative initial size: "
                                               + size);
        }
        buf = new byte[size];
    }
    // 确保此输出流缓冲区大小有minCapacity,如果不够,就扩大缓冲区
    private void ensureCapacity(int minCapacity) {
        // overflow-conscious code
        if (minCapacity - buf.length > 0)
            grow(minCapacity);
    }
    // 输出流缓冲区最大大小
    private static final int MAX_ARRAY_SIZE = Integer.MAX_VALUE - 8;
    private void grow(int minCapacity) {
        // overflow-conscious code
        int oldCapacity = buf.length;
        int newCapacity = oldCapacity << 1;
        if (newCapacity - minCapacity < 0)
            newCapacity = minCapacity;
        if (newCapacity - MAX_ARRAY_SIZE > 0)
            newCapacity = hugeCapacity(minCapacity);
        buf = Arrays.copyOf(buf, newCapacity);
    }
    private static int hugeCapacity(int minCapacity) {
        if (minCapacity < 0) // overflow
            throw new OutOfMemoryError();
        return (minCapacity > MAX_ARRAY_SIZE) ?
            Integer.MAX_VALUE :
            MAX_ARRAY_SIZE;
    }
    // 将整数转为byte,再将byte写入此输出流
    public synchronized void write(int b) {
        ensureCapacity(count + 1);
        buf[count] = (byte) b;
        count += 1;
    }
    // 将字节数组的off位置开始的len个字节写入此输出流
    public synchronized void write(byte b[], int off, int len) {
        if ((off < 0) || (off > b.length) || (len < 0) ||
            ((off + len) - b.length > 0)) {
            throw new IndexOutOfBoundsException();
        }
        ensureCapacity(count + len);
        System.arraycopy(b, off, buf, count, len);
        count += len;
    }
    // 参数也是一个输出流,意思是将此输出流的缓冲区数据写入指定输出流里
    public synchronized void writeTo(OutputStream out) throws IOException {
        out.write(buf, 0, count);
    }
    // 将count置为0,意味着从缓冲区开头开始写入数据
    public synchronized void reset() {      count = 0;    }
    // 获取一份此输出流的缓冲区(字节数组),深拷贝
    public synchronized byte toByteArray()[] { return Arrays.copyOf(buf, count);   }
    // 此输出流的缓冲区的字节数量
    public synchronized int size() {    return count;    }
    // 将此输出流的缓冲区里的所有字节按照默认的字符集编码生成字符串
    public synchronized String toString() {  return new String(buf, 0, count);   }
    // 将此输出流的缓冲区里的所有字节按照指定的字符集编码生成字符串
    public synchronized String toString(String charsetName)
        throws UnsupportedEncodingException
    {
        return new String(buf, 0, count, charsetName);
    }
    // 关闭输出流,其实上面也没有做
    public void close() throws IOException {}
}
3.2、过滤输出流 FilterOutputStream
这个也是装修者模式的开始,FilterOutputStream 内部的原始输出流 out 是被装修者,这里就不重复说了,看看前文的FilterInputStream类就可以了。
只是close() 方法值得一学,关闭资源,是要先将缓冲区的数据刷入磁盘后,再关闭资源。
public class FilterOutputStream extends OutputStream {
    protected OutputStream out;
    public FilterOutputStream(OutputStream out) {     this.out = out;    }
    public void write(int b) throws IOException {     out.write(b);    }
    public void write(byte b[]) throws IOException {    write(b, 0, b.length);    }
    public void write(byte b[], int off, int len) throws IOException {
        if ((off | len | (b.length - (len + off)) | (off + len)) < 0)
            throw new IndexOutOfBoundsException();
        for (int i = 0 ; i < len ; i++) {
            write(b[off + i]);
        }
    }
    public void flush() throws IOException {     out.flush();    }
    @SuppressWarnings("try")
    public void close() throws IOException {
        try (OutputStream ostream = out) {
            flush();
        }
    }
}
3.2.1、缓冲输出流 BufferedOutputStream
BufferedOutputStream 是装修者,内部有个缓冲区(字节数组),这个缓冲输出流有什么用呢?一般输出流都是把数据写入磁盘,如果每往输出流里写一个字节,就进行一次磁盘IO,那岂不是影响效率,所以有了 BufferedOutputStream,它是对原始输出流进行了一层装饰,每次写入输出流的字节,并不是直接写入到原始输出流,而是先存到 BufferedOutputStream 的缓冲区里,等缓冲区满了,再将缓冲区的数据写入原始输出流(磁盘),这样大大地减少了磁盘 IO 次数。
其实上面把原始输出流视为了写入到磁盘,但是并不是所有的输出流都这样,比如 ByteArrayOutputStream 就可以作为原始输出流,上面那样写是为了方便介绍。
值得注意的方法:
1、public synchronized void write(int b):将整数转为byte,再将byte写入此输出流。
2、public synchronized void write(byte b[], int off, int len) :将字节数组的off位置开始的len个字节写入此输出流。
这两个写入方法,都是会检查缓冲区是否还存得下,如果存不下,就将缓冲区的数据写入到原始输出流中,腾出空间了再存,如果原始输出流都存不下了,那就会异常;
3、flush():刷新的时候,是先将先把缓冲区里的数据写入原始输出流里,再把原始输出流里的数据刷入磁盘(未必是磁盘哦,因为万一原始输出流是 ByteArrayOutputStream这种, 根本没有磁盘这一说)。
public class BufferedOutputStream extends FilterOutputStream {
    // 缓冲区,本质上是个字节数组
    protected byte buf[];
    // 缓冲区中字节数据的个数
    protected int count;
    // 构造方法,指定原始输出流,默认设置缓冲区空间大小为8192
    public BufferedOutputStream(OutputStream out) {    this(out, 8192);    }
    // 构造方法,指定原始输出流,指定缓冲区空间大小
    public BufferedOutputStream(OutputStream out, int size) {
        super(out);
        if (size <= 0) {
            throw new IllegalArgumentException("Buffer size <= 0");
        }
        buf = new byte[size];
    }
    // 刷新缓冲区,将缓冲区的数据全部写入原始数据流。
    private void flushBuffer() throws IOException {
        if (count > 0) {
            out.write(buf, 0, count);
            count = 0;
        }
    }
    public synchronized void write(int b) throws IOException {
        if (count >= buf.length) {
            flushBuffer();
        }
        buf[count++] = (byte)b;
    }
    public synchronized void write(byte b[], int off, int len) throws IOException {
        if (len >= buf.length) {
            flushBuffer();
            out.write(b, off, len);
            return;
        }
        if (len > buf.length - count) {
            flushBuffer();
        }
        System.arraycopy(b, off, buf, count, len);
        count += len;
    }
    // 先把缓冲区里的数据写入原始输出流里,再把原始输出流里的数据刷入磁盘
    public synchronized void flush() throws IOException {
        flushBuffer();
        out.flush();
    }
}
3.2.2、DataOutputStream 数据输出流
可以参数 DataInputStream 的理解,都差不多,DataOutputStream 也是对原始输出流 out 的一个装饰者,自身没有缓冲区,它的绝大部分方法都是间接地调用原始输出流的方法。DataOutputStream 的作用:允许将 java基本类型的数据 按照指定 java 基本类型的形式写入输出流。下面介绍几个方法,看完你就明白了。
1、public final void writeByte(int v):将整数类型 v 转换位 byte类型,这样的话,byte 值就是 v 的低8位,然后再将 byte 值写入输出流。明显会丢失一部分数据,但是为什么还要这么做呢?而且 DataOutputStream 里大部分这种转类型写的方法的参数都是int,我觉得原因应该是和输入流的read()方法有关,因为 int read() 方法读取出来的一个字节转为了 int 返回给我们,所以,你只要和输入流对上号,从输入流 read 得到的 int,再把 int 写入输出流,数据就不会有问题了。
2、public final void writeShort(int v):这个是保留 int 值的低16位(2个字节作为short类型值),再进行两次写入操作,一次写入一个字节。
3、public final void writeLong(long v):这个方法有点意思,将long分为8个字节,按理说应该写人8次,但是它却没有这么做,它将8个字节存入一个字节数组里,然后直接将这个字节数组全部写入,等同于写8次字节。我想它这么做的原因是:如果原始输出流的目的地是磁盘的话,那将减少磁盘IO次数,因为一次连续的写肯定比8次断续地写要高效呀。
4、public final void writeFloat(float v):这个方法也值得我们学习,学习什么呢?float的底层表示是采用 IEEE 754 浮点“单一格式”位布局,32位从高到底分别是 "一位做符号位,八位留作指数,23位作尾数",格式稍微复杂,每一位都有严格的意义。float 不允许执行位移操作,我们不能用 >>> 位移操作来获取 float 的4个字节,但是反正底层表示都是4个字节,二进制的,对于同一个二进制,以不同数据类型的方式显示出来的值会不一样,但是底层的二进制是不会变的,所以用 Float.floatToIntBits(float a) 方法将 float 转为 int(注意不是强制类型转换,因为强制类型转换会导致精度丢失,而这个方法不会丢失),实际我觉得就是以 int 方式表示这个 4 个字节,然后就可以使用位移操作了,就可以分别得到 float 的4个字节了,最后将4个字节存入输出流。
5、public final void writeDouble(double v):原理同上。
6、public final void writeUTF(String str):将字符串转换为字符数组,每个字符都用修改版utf-8 格式转为字节,然后将这些字节写入此数据输出流。
7、static int writeUTF(String str, DataOutput out):同上,但是最后将字节写入指定数据输出流。
public class DataOutputStream extends FilterOutputStream implements DataOutput {
    // 截至目前,已经往此数据输出流写入的字节数
    protected int written;
    // 字节数组,共某些方法使用的,不是缓冲区
    private byte[] bytearr = null;
    // 构造方法,指定原始输出流
    public DataOutputStream(OutputStream out) {     super(out);    }
    // 将written值 + value
    private void incCount(int value) {
        int temp = written + value;
        if (temp < 0) {
            temp = Integer.MAX_VALUE;
        }
        written = temp;
    }
    // 把int转为byte,再把byte写入原始输出流
    public synchronized void write(int b) throws IOException {
        out.write(b);
        incCount(1);
    }
    public synchronized void write(byte b[], int off, int len) throws IOException {
        out.write(b, off, len);
        incCount(len);
    }
    // 原始输出流刷新
    public void flush() throws IOException {     out.flush();    }
    // 将 boolean 值转为 byte 值,再将 byte 写入原始输出流
    public final void writeBoolean(boolean v) throws IOException {
        out.write(v ? 1 : 0);
        incCount(1);
    }
    // 将 int 转为 byte,再将 byte 写入原始输出流
    public final void writeByte(int v) throws IOException {
        out.write(v);
        incCount(1);
    }
    // 将 int 的低16位作为2个字节(short)写入原始输出流
    public final void writeShort(int v) throws IOException {
        out.write((v >>> 8) & 0xFF);
        out.write((v >>> 0) & 0xFF);
        incCount(2);
    }
    // 将 int 的低16位作为2个字节(char)写入原始输出流
    public final void writeChar(int v) throws IOException {
        out.write((v >>> 8) & 0xFF);
        out.write((v >>> 0) & 0xFF);
        incCount(2);
    }
    // 将 int 分为4个字节,分别写入原始输出流
    public final void writeInt(int v) throws IOException {
        out.write((v >>> 24) & 0xFF);
        out.write((v >>> 16) & 0xFF);
        out.write((v >>>  8) & 0xFF);
        out.write((v >>>  0) & 0xFF);
        incCount(4);
    }
    private byte writeBuffer[] = new byte[8];
    // 将long分成8个字节,然后分别写入原始输出流
    public final void writeLong(long v) throws IOException {
        writeBuffer[0] = (byte)(v >>> 56);
        writeBuffer[1] = (byte)(v >>> 48);
        writeBuffer[2] = (byte)(v >>> 40);
        writeBuffer[3] = (byte)(v >>> 32);
        writeBuffer[4] = (byte)(v >>> 24);
        writeBuffer[5] = (byte)(v >>> 16);
        writeBuffer[6] = (byte)(v >>>  8);
        writeBuffer[7] = (byte)(v >>>  0);
        out.write(writeBuffer, 0, 8);
        incCount(8);
    }
    // 将4字节的float转为4字节的int(不丢失数据和精度),再将int写入原始输出流
    public final void writeFloat(float v) throws IOException {
        writeInt(Float.floatToIntBits(v));
    }
    // 将8字节的double转为8字节的long(不丢失数据和精度),再将long写入原始输出流
    public final void writeDouble(double v) throws IOException {
        writeLong(Double.doubleToLongBits(v));
    }
    // 将字符串s拆分为一个一个的字符,每个字符占2字节,但是强制将字符类型转为byte类型,因此字符
    // 的低8位得以保留,高8位没有了,再将这下byte存入原始输出流
    public final void writeBytes(String s) throws IOException {
        int len = s.length();
        for (int i = 0 ; i < len ; i++) {
            out.write((byte)s.charAt(i));
        }
        incCount(len);
    }
    // 将字符串s拆分为一个一个的字符,每个字符占2字节,将每个字符按照字节写入原始输出流
    public final void writeChars(String s) throws IOException {
        int len = s.length();
        for (int i = 0 ; i < len ; i++) {
            int v = s.charAt(i);
            out.write((v >>> 8) & 0xFF);
            out.write((v >>> 0) & 0xFF);
        }
        incCount(len * 2);
    }
    // 将字符串 str 转换为字节序列,然后按照修改版的utf-8格式写入此数据输出流
    public final void writeUTF(String str) throws IOException {
        writeUTF(str, this);
    }
    // 将字符串 str 转换为字节序列,然后按照修改版的utf-8格式写入指定的数据输出流 out
    static int writeUTF(String str, DataOutput out) throws IOException {
        int strlen = str.length();
        int utflen = 0;
        int c, count = 0;
        /* use charAt instead of copying String to char array */
        for (int i = 0; i < strlen; i++) {
            c = str.charAt(i);
            if ((c >= 0x0001) && (c <= 0x007F)) {
                utflen++;
            } else if (c > 0x07FF) {
                utflen += 3;
            } else {
                utflen += 2;
            }
        }
        if (utflen > 65535)
            throw new UTFDataFormatException(
                "encoded string too long: " + utflen + " bytes");
        byte[] bytearr = null;
        if (out instanceof DataOutputStream) {
            DataOutputStream dos = (DataOutputStream)out;
            if(dos.bytearr == null || (dos.bytearr.length < (utflen+2)))
                dos.bytearr = new byte[(utflen*2) + 2];
            bytearr = dos.bytearr;
        } else {
            bytearr = new byte[utflen+2];
        }
        bytearr[count++] = (byte) ((utflen >>> 8) & 0xFF);
        bytearr[count++] = (byte) ((utflen >>> 0) & 0xFF);
        int i=0;
        for (i=0; i<strlen; i++) {
           c = str.charAt(i);
           if (!((c >= 0x0001) && (c <= 0x007F))) break;
           bytearr[count++] = (byte) c;
        }
        for (;i < strlen; i++){
            c = str.charAt(i);
            if ((c >= 0x0001) && (c <= 0x007F)) {
                bytearr[count++] = (byte) c;
            } else if (c > 0x07FF) {
                bytearr[count++] = (byte) (0xE0 | ((c >> 12) & 0x0F));
                bytearr[count++] = (byte) (0x80 | ((c >>  6) & 0x3F));
                bytearr[count++] = (byte) (0x80 | ((c >>  0) & 0x3F));
            } else {
                bytearr[count++] = (byte) (0xC0 | ((c >>  6) & 0x1F));
                bytearr[count++] = (byte) (0x80 | ((c >>  0) & 0x3F));
            }
        }
        out.write(bytearr, 0, utflen+2);
        return utflen + 2;
    }
    // 已经往输出流里写入的字节数
    public final int size() {   return written;   }
}
3.3、文件输出流 FileOutputStream
文件输出流专门用于将数据写入到文件中,它是没有缓冲区的,所以没有flush方法,磁盘IO的次数就会很多,效率不高。由于FileOutputStream 内部多为本地方法,我也没能力知晓具体原理,所以尽量介绍吧。
很多资料里介绍说 FileOutputStream 效率不高,没有 FileChannel 的效率高,java.io 的效率比不上 java.nio,原因是频繁地磁盘写入会导致速度变慢,那就看看具体有哪些写方法:
1、write(int b, boolean append):将 int 转为 byte (保留 int 的低8位),再将 byte 写入文件,如果 append 参数为 true 的话,就将 byte 追加到文件末尾(这样不会丢失文件原来的数据),如果 append 参数为 false 的话,就从文件开头开始写入(会覆盖掉原来的内容),还有一个问题,为什么不是将整个 int 写入文件呢,因为 FileOutputStream 是继承 OutputStream 字节流,如果不加特别说明,当然是以字节为基准。
2、write(int b):功能同上,默认以覆盖形式写入文件(除非我们已经设置为追加方式了)。
3、void writeBytes(byte b[], int off, int len, boolean append):将字节数组 b 的 off 位置开始的 len 个字节写入文件,写入的方式由 append 参数决定。底层也是一个字节一个字节的写入文件。
4、void write(byte b[]):将数组字节 b 全部写入文件,写入的方式取决于 append 成员变量。底层也是一个字节一个字节的写入文件。
5、void write(byte b[], int off, int len):将字节数组 b 的 off 位置开始的 len 个字节写入文件,写入方式取决于 append 变量,底层也是一个字节一个字节的写入文件。
看了上面这几个写入数据的方法,也就明白了 FileOutputStream 是低效的。
但是 FileOutputStream 包含了 FileChannel 成员变量,可是并没有用到 FileChannel 呀,为什么还要包含一个 FileChannel 变量呢?其实,FileChannel 是一个可选功能,FileOutputStream 是单向的,只能往磁盘里写,但是 FileChannel 是双全工的,通过使用它,既能往磁盘写,又能读取磁盘,FileChannel 里的方法是必须搭配 ByteBuffer 或者 ByteBuffer[] (可以被称为缓冲区)使用的,所以 FileChannel 是批量写入文件的,因此磁盘IO的次数少,效率更高。FileChannel 有优势,自然也有劣势,所以不能一味地抛弃 FileOutputStream,而只用 FileChannel。
6、public FileChannel getChannel():获得该文件的文件通道,然后通过这个文件通道去写入数据。
至于几个构造方法,看看下面的源码注释吧。
public class FileOutputStream extends OutputStream {
    // 文件描述符对象
    private final FileDescriptor fd;
    // 是否是追加的方式
    private final boolean append;
    // 文件通道
    private FileChannel channel;
    // 文件路径
    private final String path;
    private final Object closeLock = new Object();
    private volatile boolean closed = false;
    // 构造方法,给定文件绝对路径 + 文件名
    public FileOutputStream(String name) throws FileNotFoundException {
        this(name != null ? new File(name) : null, false);
    }
    // 构造方法,给定文件绝对路径 + 文件名,是否以追加的方式
   public FileOutputStream(String name, boolean append) throws FileNotFoundException{
        this(name != null ? new File(name) : null, append);
    }
    // 构造方法,直接给定File对象
    public FileOutputStream(File file) throws FileNotFoundException {
        this(file, false);
    }
    // 构造方法,直接给定File对象,是否以追加的方式
    public FileOutputStream(File file, boolean append) throws FileNotFoundException {
        String name = (file != null ? file.getPath() : null);
        SecurityManager security = System.getSecurityManager();
        if (security != null) {
            security.checkWrite(name);
        }
        if (name == null) {
            throw new NullPointerException();
        }
        if (file.isInvalid()) {
            throw new FileNotFoundException("Invalid file path");
        }
        this.fd = new FileDescriptor();
        fd.attach(this);
        this.append = append;
        this.path = name;

        open(name, append);
    }
    // 构造方法,直接指定文件描述符对象
    public FileOutputStream(FileDescriptor fdObj) {
        SecurityManager security = System.getSecurityManager();
        if (fdObj == null) {
            throw new NullPointerException();
        }
        if (security != null) {
            security.checkWrite(fdObj);
        }
        this.fd = fdObj;
        this.append = false;
        this.path = null;

        fd.attach(this);
    }
    // 打开文件,指定写入方式
    private void open(String name, boolean append)
        throws FileNotFoundException {
        open0(name, append);
    }
    private native void write(int b, boolean append) throws IOException;
    public void write(int b) throws IOException {     write(b, append);    }
    private native void writeBytes(byte b[], int off, int len, boolean append)
        throws IOException;
    public void write(byte b[]) throws IOException {
        writeBytes(b, 0, b.length, append);
    }
    public void write(byte b[], int off, int len) throws IOException {
        writeBytes(b, off, len, append);
    }
    // 关闭文件输出流
    public void close() throws IOException {
        synchronized (closeLock) {
            if (closed) {
                return;
            }
            closed = true;
        }
        if (channel != null) {
            channel.close();
        }
        fd.closeAll(new Closeable() {
            public void close() throws IOException {
               close0();
           }
        });
    }
    // 获取文件描述符对象
     public final FileDescriptor getFD()  throws IOException {
        if (fd != null) {
            return fd;
        }
        throw new IOException();
     }
    // 获取当前文件的文件通道
    public FileChannel getChannel() {
        synchronized (this) {
            if (channel == null) {
                channel = FileChannelImpl.open(fd, path, false, true, append, this);
            }
            return channel;
        }
    }
}
如有不正确的地方,欢迎指出,相互学习。


 695
695


 被折叠的 条评论
为什么被折叠?
被折叠的 条评论
为什么被折叠?
 到【灌水乐园】发言


