一、安装环境
- 百度网盘链接: https://pan.baidu.com/s/1AhCxncPQ1Wt_vZvjcNMejA 提取码: z9hb
- 操作系统以及虚拟机:openEuler-20.03-LTS-aarch64-dvd.iso(自行下载)
- 宿主机IP:10.10.1.201(gsarch)
查看系统
[root@gsarch ~]# uname -r
4.19.90-2003.4.0.0036.oe1.aarch64
二、安装qemu
下载链接:https://download.qemu.org/
缺少依赖自行安装即可
[root@gsarch ~]# yum install -y zlib-devel glib2-devel pixman-devel libvirt-daemon  ###安装依赖
[root@gsarch ~]# systemctl start libvirtd
[root@gsarch ~]# tar xf qemu-5.1.0.tar.xz
[root@gsarch ~]# cd qemu-5.1.0
[root@gsarch ~]# ./configure --target-list=aarch64-softmmu
[root@gsarch ~]# make && make install
三、安装系统
网上很多使用
QEMU_EFI.fd(下载地址:http://releases.linaro.org/components/kernel/uefi-linaro/16.02/release/qemu64/)方式,但是我测试是失败得,应该是他们系统是x86_64
1、环境准备
[root@gsarch ~]# mkdir -p /data
[root@gsarch ~]# qemu-img create -f qcow2 /data/os.qcow2 20G
[root@gsarch ~]# cp qemu-5.1.0/pc-bios/edk2-aarch64-code.fd .
[root@gsarch ~]# ls openEuler-20.03-LTS-aarch64-dvd.iso
openEuler-20.03-LTS-aarch64-dvd.iso
2、安装方式
(1)通过VNC
这里我使用文本模式不知道为什么不行,所以使用此方式
[root@gsarch ~]# qemu-system-aarch64 -m 2048 \
					-cpu cortex-a57 -smp 2 \
					-M virt -bios edk2-aarch64-code.fd \
					-serial stdio -display vnc=10.10.1.201:0 \
					-drive if=none,file=/root/openEuler-20.03-LTS-aarch64-dvd.iso,id=hd0 \
					-device virtio-blk-device,drive=hd0 \
					-drive if=none,file=/data/os.qcow2,id=hd1  \
					-device virtio-blk-device,drive=hd1 \
					-netdev tap,id=unet \
					-device virtio-net-pci,netdev=unet \
					-device virtio-gpu-pci -device driver="nec-usb-xhci" \
					-device driver="usb-kbd" \
					-device driver="usb-mouse"
(2)文本模式
[root@gsarch ~]# qemu-system-aarch64 -m 2048 \
					-cpu cortex-a57 -smp 2 \
					-M virt -bios edk2-aarch64-code.fd \
					-nographic -drive if=none,file=/root/openEuler-20.03-LTS-aarch64-dvd.iso,id=hd0 \
					-device virtio-blk-device,drive=hd0 \
					-drive if=none,file=/data/os.qcow2,id=hd1  \
					-device virtio-blk-device,drive=hd1 \
					-netdev tap,id=unet \
					-device virtio-net-pci,netdev=unet \
					-device virtio-gpu-pci -device driver="nec-usb-xhci" \
					-device driver="usb-kbd" \
					-device driver="usb-mouse"
3、图形安装


使用UltraVNC进行连接:


四、网络配置
网络分为user和tap,这里我们使用tap来实现
1、宿主机网络配置
[root@gsarch ~]# vim /etc/qemu-ifup
#!/bin/bash
switch=br0
ifconfig $1 up
brctl addif ${switch} $1

[root@gsarch ~]# vim /etc/qemu-ifdown
#!/bin/bash
switch=br0
brctl delif ${switch} $1
ifconfig $1 down

[root@gsarch ~]# chmod +x /etc/qemu-ifup
[root@gsarch ~]# chmod +x /etc/qemu-ifdown
[root@gsarch ~]# cat /etc/sysconfig/network-scripts/ifcfg-br0
TYPE=Bridge
DEVICE=br0
NAME=br0
BOOTPROTO=none
ONBOOT=yes
IPADDR=10.10.1.201
PREFIX=24
GATEWAY=10.10.1.254

[root@gsarch ~]# cat /etc/sysconfig/network-scripts/ifcfg-enp125s0f0
DEVICE=enp125s0f0
BOOTPROTO=static
ONBOOT=yes
BRIDGE=br0

[root@gsarch ~]# systemctl restart network
2、虚拟机网络配置
[root@localhost ~]# cat /etc/sysconfig/network-scripts/ifcfg-enp0s1
TYPE=Ethernet
BOOTPROTO=none
NAME=enp0s1
DEVICE=enp0s1
ONBOOT=yes
IPADDR=10.10.1.207
PREFIX=24
GATEWAY=10.10.1.254
[root@localhost ~]# poweroff
3、启动虚拟机
[root@gsarch ~]# qemu-system-aarch64 -m 2048 -cpu cortex-a72 -smp 2 -M virt \
				    -bios edk2-aarch64-code.fd -nographic \
				    -drive if=none,file=/data/os.qcow2,id=hd0 \
				    -device virtio-blk-device,drive=hd0 \
				    -device virtio-scsi-device \
					-netdev tap,id=unet \
					-device virtio-net-pci,netdev=unet
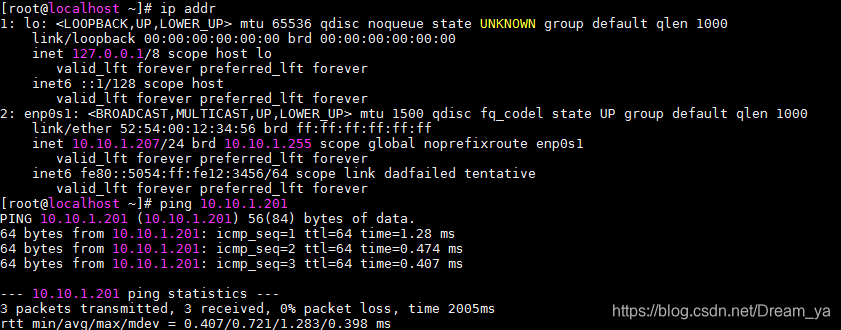
4、查看网络信息

五、开启多个虚拟机
如果想指定mac地址:
-nic tap,mac=xx:xx:xx:xx:xx:xx
# cp /data/os.qcow2 <目录>
# qemu-system-aarch64 -m 2048 -cpu cortex-a72 -smp 2 -M virt \
	    -bios edk2-aarch64-code.fd -nographic \
	    -drive if=none,file=<目录>/os.qcow2,id=hd0 \
	    -device virtio-blk-device,drive=hd0 \
	    -device virtio-scsi-device \
		-netdev tap,id=unet \
		-device virtio-net-pci,netdev=unet
参考文章:


 454
454

 被折叠的 条评论
为什么被折叠?


