


Font
字体
Fonts can be created or imported for use in either the GUI Text or the Text Mesh Components.
字体 (Fonts) 可以进行创建或导入,以在图形用户界面文本 (GUI Text) 或文本网格 (Text Mesh) 组件中使用。
Importing Font files
导入字体文件
To add a font to your project you need to place the font file in your Assets folder. Unity will then automatically import it. Supported Font formats are TrueType Fonts (.ttf files) and OpenType Fonts (.otf files).
要将字体添加到工程,需要将字体文件置于资源文件夹中。Unity 随后将自动导入该文件。支持的字体格式为 TrueType 字体(.ttf 或 .dfont 文件)和 OpenType 字体(.otf 文件)。
To change the Size of the font, highlight it in the Project View and you have a number of options in the Import Settings in the Inspector.
要更改字体大小,请在工程视图 (Project View) 中突出显示它,在检视器 (Inspector) 的导入设置 (Import Settings) 中提供 了一些选项。

Import Settings for a font字体的导入设置
| Property: | Function: |
|---|---|
| Font Size 字体大小 | The size of the font, based on the sizes set in any word processor 字体大小(基于任何文字处理程序中设置的大小) |
| Rendering mode 渲染模式 | The font rendering mode, which tells Unity how to apply smoothing to the glyphs. 统一字体渲染模式,讲述如何运用平滑符号。 |
| Character 字符 | The character set of the font to import into the font texture 字体的文本编码。可以在此处强制字体仅显示大写或小写字符 |
| Setting this mode to Dynamic causes Unity to embed the font data itself and render font glyphs at runtime (see below). 设置为动态模式导致统一嵌入字体数据本身和渲染字体字形在运行时(见下文)。 |
Import Settings specific to dynamic fonts
特定于非动态字体的导入设置
| Property: | Function: |
|---|---|
| Include Font Data 包括字体数据 | This setting controls the packaging of the font when used with Dynamic font property. When selected the TTF is included in the output of the build. When not selected it is assumed that the end user will have the font already installed on their machine. Note that fonts are subject to copyright and you should only include fonts that you have licensed or created for yourself. 此设置控制与“动态”(Dynamic) 字体属性一起使用时的字体打包。选中时,TTF 会包括在编译版本输出中。未选中时,会假设最终用户已在其计算机上安装了字体。请注意,字体受版权保护,只应包括已获得许可或为自己创建的字体。 |
| Font Names 字体名称 | A list of fallback fonts to use when fonts or characters are not available (see below). 仅当未选择“包括字体数据”(Include Font Data) 时可用。输入逗号分隔的字体名称列表。将从左到右依次尝试这些字体,会使用在游戏者计算机上找到的第一个字体。 |
After you import the font, you can expand the font in Project View to see that it has auto-generated some assets. Two assets are created during import: “font material” and “font texture”.
导入字体之后,可以在“工程视图”(Project View) 中展开字体,会看到其自动生成了一些资源。导入过程中会创建两个资源:“字体材质”和“字体纹理”。
Dynamic fonts
动态字体
When you set the Characters drop-down in the Import Settings to Dynamic, Unity will not pre-generate a texture with all font characters. Instead, it will use the FreeType font rendering engine to create the texture on the fly. This has the advantage that it can save in download size and texture memory, especially when you are using a font which is commonly included in user systems, so you don’t have to include the font data, or when you need to support asian languages or large font sizes (which would make the font textures very large using normal font textures).
Unity 3.0 添加了对动态字体渲染的支持。将“导入设置”(Import Settings) 中的字符 (Characters) 下拉菜单设置为动态 (Dynamic)时,Unity 不会对所有字体字符预先生成纹理。而是使用 FreeType 字体渲染引擎动态创建纹理。这样做的优点是可以节省下载大小和纹理内存,尤其是在使用通常包括在用户系统中的字体时,因此您不必包括字体数据,或是在需要支持亚洲语言或较大字体大小时(使用正常字体纹理时,这会使字体纹理非常大)。
When Unity tries to render text with a dynamic font, but it cannot find the font (because Include Font Data was not selected, and the font is not installed on the user machine), or the font does not include the requested glyph (like when trying to render text in east Asian scripts using a latin font), then it will try each of the fonts listed in the Font Names field, to see if it can find a font matching the font name in the project (with font data included) or installed on the user machine which has the requested glyph. If non of the listed fallback fonts are present and have the requested glpyh, Unity will fall back to a hard-coded global list of fallback fonts, which contains various international fonts commonly installed on the current runtime platform.
Note that some target platforms (WebGL, some consoles) do not have OS default fonts Unity can access for rendering text. For those platforms, Include Font Datawill be ignored, and font data will always be included. All fonts to be used as fallbacks must be included in the project, so if you need to render international text, you need to supply a font which has the required characters, and set up that font in the Font Names list of other fonts.
Custom fonts
To create a custom font select ‘Create->custom font’ from the project window. This will add a custom font asset to your project library.
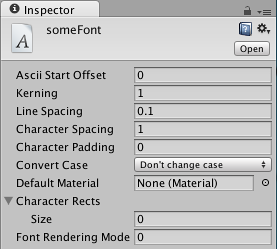
The Ascii Start Offset field is a decimal that defines the Ascii index you would like to begin your Character Rects index from. For example, if your Ascii Start Offset is set to 0 then the capital letter A will be at index 65 but if the Ascii Start Offset is set to 65 then the letter A will be at index 0. You can consult the Ascii Table herebut you should bear in mind that custom font uses the decimal ascii numbering system.
Kerning can be set to define how close each character will be to the next character on the same line and Line spacing can be set to define how close each line will be to the next.
To create a font material you will need to import your font as a texture then apply that texture to a material, then drag your font material onto the Default Materialsection.
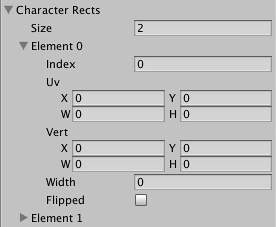
The Character Rects section is where each character of your font is defined.

The Size field is for defining how many characters are in your font.
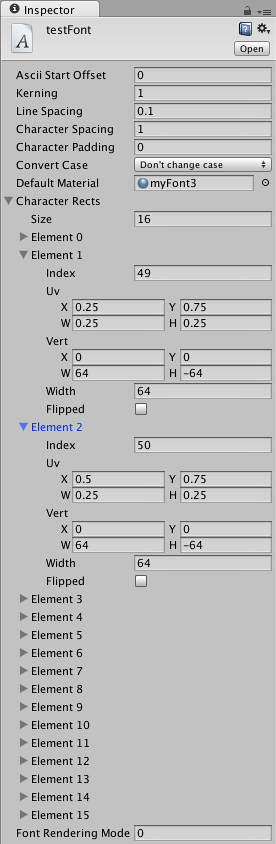
Within each Element there is an index field for the ascii index of the character. This will be an integer that represents the character in this element.
To work out the UV values you need to figure out how your characters are positioned on a scale of 0 to 1. You divide 1 by the number of characters on a dimension. For example if you have a font and the image dimensions on it are 256x128; 4 characters across, 2 down (so 64x64) then UV width will be 0.25 and UV height will be 0.5.
For UV X and Y, it’s just a matter of deciding which character you want and multiplying the width or height value times the column/row of the letter.
Vert size is based on the pixel size of the characters e.g. your characters are each 128x128, putting 128 and –128 into the Vert Width and Height will give properly proportioned letters. Vert Y must be negative.
Width will be the width of your character in pixels.
Custom fonts
To create a custom font select ‘Create->custom font’ from the project window. This will add a custom font asset to your project library.

The Ascii Start Offset field is a decimal that defines the Ascii index you would like to begin your Character Rects index from. For example, if your Ascii Start Offset is set to 0 then the capital letter A will be at index 65 but if the Ascii Start Offset is set to 65 then the letter A will be at index 0. You can consult the Ascii Table herebut you should bear in mind that custom font uses the decimal ascii numbering system.
Kerning can be set to define how close each character will be to the next character on the same line and Line spacing can be set to define how close each line will be to the next.
To create a font material you will need to import your font as a texture then apply that texture to a material, then drag your font material onto the Default Materialsection.
The Character Rects section is where each character of your font is defined.
The Size field is for defining how many characters are in your font.
Within each Element there is an index field for the ascii index of the character. This will be an integer that represents the character in this element.
To work out the UV values you need to figure out how your characters are positioned on a scale of 0 to 1. You divide 1 by the number of characters on a dimension. For example if you have a font and the image dimensions on it are 256x128; 4 characters across, 2 down (so 64x64) then UV width will be 0.25 and UV height will be 0.5.
For UV X and Y, it’s just a matter of deciding which character you want and multiplying the width or height value times the column/row of the letter.
Vert size is based on the pixel size of the characters e.g. your characters are each 128x128, putting 128 and –128 into the Vert Width and Height will give properly proportioned letters. Vert Y must be negative.
Width will be the width of your character in pixels.

Example of custom font inspector with values
Unicode support
Unity has full unicode support. Unicode text allows you to display German, French, Danish or Japanese characters that are usually not supported in an ASCII character set. You can also enter a lot of different special purpose characters like arrow signs or the option key sign, if your font supports it.
To use unicode characters, choose either Unicode or Dynamic from the Characters drop-down in the Import Settings. You can now display unicode characters with this font. If you are using a GUIText or Text Mesh, you can enter unicode characters into the Component’s Text field in the Inspector.
You can also use unicode characters if you want to set the displayed text from scripting. The Javascript and C# compilers fully support Unicode based scripts. You have to save your scripts with UTF–16 encoding. Now you can add unicode characters to a string in your script and they will display as expected in UnityGUI, a GUIText, or a Text Mesh.
Changing Font Color
There are different ways to change the color of your displayed font, depending on how the font is used.
GUIText & Text Mesh
If you are using a GUIText or a Text Mesh, you can change its color by using a custom Material for the font. In the Project View, click on , and select and set up the newly created Material in the Inspector. Make sure you assign the texture from the font asset to the material. If you use the built-in GUI/Text Shadershader for the font material, you can choose the color in the Text Color property of the material.
UnityGUI
If you are using UnityGUI scripting to display your font, you have much more control over the font’s color under different circumstances. To change the font’s color, you create a GUISkin from , and define the color for the specific control state, e.g. . For more details, please read the GUI Skin page.
Hints
- To display an imported font select the font and choose .
- Using only lower or upper case characters reduces generated texture size.
- The default font that Unity supplies is Arial. This font is always available and does not appear in the Project window.
See also the page on Fonts.


 4960
4960

 被折叠的 条评论
为什么被折叠?
被折叠的 条评论
为什么被折叠?
 到【灌水乐园】发言


