


如何高效的学习,这才是我们最值得去学习的。
andengine中绘制虚拟游戏摇杆非常简单,只需要实现AnalogOnScreenControl模拟摇杆类,在设置一些属性即可。先看效果图:
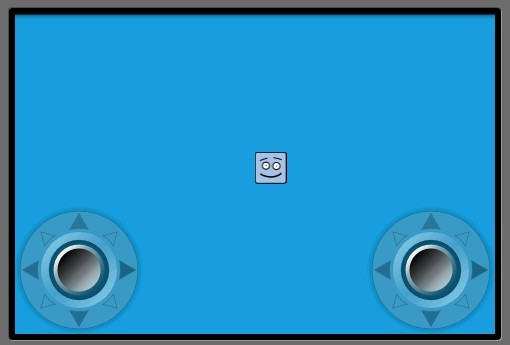
左边的摇杆是控制精灵上下左右移动,右边的摇杆空值精灵的旋转。代码结构跟andengine学习系列二一样,其中很多注释在系列二中有说明,在该章内便不多复述。
onLoadEngine()方法:
@Override
	public Engine onLoadEngine() {
		this.mCamera = new Camera(0, 0, CAMERA_WIDTH, CAMERA_HEIGHT);
		final Engine engine = new Engine(new EngineOptions(true, ScreenOrientation.LANDSCAPE, new RatioResolutionPolicy(CAMERA_WIDTH, CAMERA_HEIGHT), this.mCamera));

		try {		//因为有两个摇杆,需要两个手指同时进行,所以这里要注册多点触控
			if(MultiTouch.isSupported(this)) {
				engine.setTouchController(new MultiTouchController());
				if(MultiTouch.isSupportedDistinct(this)) {
					Toast.makeText(this, "MultiTouch detected --> Both controls will work properly!", Toast.LENGTH_LONG).show();
				} else {
					this.mPlaceOnScreenControlsAtDifferentVerticalLocations = true;
					Toast.makeText(this, "MultiTouch detected, but your device has problems distinguishing between fingers.\n\nControls are placed at different vertical locations.", Toast.LENGTH_LONG).show();
				}
			} else {
				Toast.makeText(this, "Sorry your device does NOT support MultiTouch!\n\n(Falling back to SingleTouch.)\n\nControls are placed at different vertical locations.", Toast.LENGTH_LONG).show();
			}
		} catch (final MultiTouchException e) {
			Toast.makeText(this, "Sorry your Android Version does NOT support MultiTouch!\n\n(Falling back to SingleTouch.)\n\nControls are placed at different vertical locations.", Toast.LENGTH_LONG).show();
		}

		return engine;
	}
onLoadResources()方法:
public void onLoadResources() {

		this.mTexture = new Texture(32, 32, TextureOptions.BILINEAR_PREMULTIPLYALPHA);
		this.mFaceTextureRegion = TextureRegionFactory.createFromAsset(this.mTexture, this, "face_box.png", 0, 0);

		this.mOnScreenControlTexture = new Texture(256, 128, TextureOptions.BILINEAR_PREMULTIPLYALPHA);
		this.mOnScreenControlBaseTextureRegion = TextureRegionFactory.createFromAsset(this.mOnScreenControlTexture, this, "onscreen_control_base.png", 0, 0);	//这里是加载摇杆的地盘的纹理图片
		this.mOnScreenControlKnobTextureRegion = TextureRegionFactory.createFromAsset(this.mOnScreenControlTexture, this, "onscreen_control_knob.png", 128, 0);	//这里是加载摇杆的纹理图片

		this.mEngine.getTextureManager().loadTextures(this.mTexture, this.mOnScreenControlTexture);
	}
onLoadScene()方法,关键的业务逻辑便在该方法中:
public Scene onLoadScene() {
		this.mEngine.registerUpdateHandler(new FPSLogger());

		final Scene scene = new Scene(1);
		scene.setBackground(new ColorBackground(0.09804f, 0.6274f, 0.8784f));

		final int centerX = (CAMERA_WIDTH - this.mFaceTextureRegion.getWidth()) / 2;
		final int centerY = (CAMERA_HEIGHT - this.mFaceTextureRegion.getHeight()) / 2;
		final Sprite face = new Sprite(centerX, centerY, this.mFaceTextureRegion);

		scene.getTopLayer().addEntity(face);

//-------------------------------------------以下为左摇杆的实现----------------------------------------------------------------------																final int x1 = 0;													//y坐标为屏幕的高度减去摇杆底盘的高度,注意屏幕在前面已经被强制横屏
		final int y1 = CAMERA_HEIGHT - this.mOnScreenControlBaseTextureRegion.getHeight();																				//AnalogOnScreenControl构造方法中:第一第二参数是该摇杆的坐标,第三个参数为上面定义camera,第四第五个参数为摇杆底盘和摇杆的纹理区域,第六个参数为pTimeBetweenUpdates界面的更新
		final AnalogOnScreenControl velocityOnScreenControl = new AnalogOnScreenControl(x1, y1, this.mCamera, this.mOnScreenControlBaseTextureRegion, this.mOnScreenControlKnobTextureRegion, 0.1f, new IAnalogOnScreenControlListener() {											//备注1
			@Override
			public void onControlChange(final BaseOnScreenControl pBaseOnScreenControl, final float pValueX, final float pValueY) {
				Log.i("test","x1:"+x1+",y1:"+y1+",pValueX:"+pValueX+",pValueY:"+pValueY);
				face.setVelocity(pValueX * 100, pValueY * 100);	//备注2
			}

			@Override
			public void onControlClick(final AnalogOnScreenControl pAnalogOnScreenControl) {	//备注3
				/* Nothing. */
			}
		});
		velocityOnScreenControl.getControlBase().setBlendFunction(GL10.GL_SRC_ALPHA, GL10.GL_ONE_MINUS_SRC_ALPHA);											//备注4
		velocityOnScreenControl.getControlBase().setAlpha(0.5f);

		scene.setChildScene(velocityOnScreenControl);
//-------------------------------------------------------end 坐摇杆的实现------------------------------------------------------------//-------------------------------------------------------以下为右摇杆的实现----------------------------------------------------------

		final int y2 = (this.mPlaceOnScreenControlsAtDifferentVerticalLocations) ? 0 : y1;
		final int x2 = CAMERA_WIDTH - this.mOnScreenControlBaseTextureRegion.getWidth();
		final AnalogOnScreenControl rotationOnScreenControl = new AnalogOnScreenControl(x2, y2, this.mCamera, this.mOnScreenControlBaseTextureRegion, this.mOnScreenControlKnobTextureRegion, 0.1f, new IAnalogOnScreenControlListener() {
			@Override
			public void onControlChange(final BaseOnScreenControl pBaseOnScreenControl, final float pValueX, final float pValueY) {
				Log.i("test","x2:"+x2+",y2:"+y2+",pValueX:"+pValueX+",pValueY:"+pValueY);
				if(pValueX == x1 && pValueY == x1) {
					face.setRotation(x1);
				} else {
					face.setRotation(MathUtils.radToDeg((float)Math.atan2(pValueX, -pValueY)));
								//备注5
				}
			}

			@Override
			public void onControlClick(final AnalogOnScreenControl pAnalogOnScreenControl) {
				/* Nothing. */
			}
		});
		rotationOnScreenControl.getControlBase().setBlendFunction(GL10.GL_SRC_ALPHA, GL10.GL_ONE_MINUS_SRC_ALPHA);
		rotationOnScreenControl.getControlBase().setAlpha(0.5f);

		velocityOnScreenControl.setChildScene(rotationOnScreenControl);		//备注6

		return scene;
	}														//---------------------------------------------end 右摇杆的实现------------------------------------------------------------
备注1:关于AnalogOnScreenControl 类的第六个参数pTimeBetweenUpdates,我在这里把他理解成界面的延时程度,值设的越高,则精灵跟随摇杆变换的越缓慢;但是如果设成0,则两个摇杆失灵,于是我们在这里把他设置成0.1f,便可以看到精灵跟随摇杆很灵活的变换而没有卡壳和延时的现象
备注2:face.setVelocity,整个精灵移动的核心代码便是这一句,怎么样?比起用SurfaceView实现的摇杆简单方便的多吧!
备注3:onControlClick(),这个方法是当我们点击摇杆的时候会触发的方法,比如我们在这里可以把摇杆设置放大1.5倍,当没有点击的时候又恢复原来的状态,给人一种真实的感觉。
备注4:关于这里颜色的混合可以参考http://www.cnblogs.com/yujunyong/archive/2011/04/13/2015467.html,比较全面。
备注5:face.setRotation(),精灵的转动也是这一句代码便可实现,MathUtils.radToDeg方法返回的是:(180/PI)*方法中的参数; Math.atan2()函数返回点(x,y)和原点(0,0)之间直线的倾斜角。具体可以参考http://apps.hi.baidu.com/share/detail/50270911。
备注6:这里可能会有疑问,为什么是velocityOnScreenControl.setChildScene,而不是scene.setChildScene,事实上,经过测试发现,scene.setChildScene这种情况会把前面定义好的左边的摇杆覆掉,也就没有了,scene只会显示最后一个定义的摇杆,于是我们在这里写好的右边的摇杆需要setChildScene左边的摇杆中,然后一起setChildScene整个场景中,这样两个摇杆都会显示了。


 1694
1694

 被折叠的 条评论
为什么被折叠?
被折叠的 条评论
为什么被折叠?
 到【灌水乐园】发言


