


一直以来想把这一系列文章和代码放上来,发现国外很多人都开始转到WPF开发了,可能是在国内XP还很流行所以大家都还是没有体验到WPF的优势。这里转了Sacha Barber的WPF的介绍文章,希望以后哪天谁想学WPF了来这里瞅瞅。绝对经典。
Introduction
what exactly am I going to talk about in this article? This is a bit of a hard one to nail down actually, it could come across as being a bit vague, but what I'm aiming to cover is a brief introduction into the following:
- What to do in XAML
- What to do in code
- How to reference classes/assemblies from XAML
- Markup extensions
- What are resources, And how can they help me
- How to use resource files
Basically in a nutshell that's what this article will be about. I have provided a simple project, which doesnt do anything actaully, apart from show you the syntax. I have decided to give you a really dumb demo app on purpose, I dont want to confuse you with Events/Commands/Databinding and Templates/Styles at this stage. So the demo app is intentionally dumb. If you have a beef with me supplying something has does nothing, sue me. I have an excellent lawyer.
>So without futher ado, let's start shall we.
What To Do In XAML
Caveat : This is only a recommendation, you can do what you want, this is just the way I like to do things.
Generally WPF could be considered a quasi Model View Controller (MVC) type pattern. Ok the model and the controller are joined together, but the XAML / Code behind, does give you a nice segregation from View to code behind logic, in the same way that ASP .NET does. Its not the classic MVC, but the view is definately seperate, thanks to XAML.
I see this as a good thing, and as such I would recommend doing the following in XAML :
- The actual markup that respresents the UI
- Inclusion of required resource files
- Inclusion of local resources (more on this in this article)
- Possible declaration of Command Bindings (more on this in next article)
Wow that was a short list wasn't it. And to my mind that is how it should stay. There will obviously be times where exceptions have to made, but to be honest I think that by abiding by this guideline, you will acheive a quite clean/segregated design.
What To Do In Code
Caveat : This is only a recommendation, you can do what you want, this is just the way I like to do things.
The way I see it, the code behind file (C#|VB .NET) should carry out all the event handling and cutsom logic to drive the UI. The UI should be fairly dumb. There are a couple of exceptions where it may be useful to do things in XAML that are just a ball ache to do in code behind, and of course if this turns out to be the case you should use XAML. There is no right answer to this part, you have to make your own best call. But anyway that said, this is what I would recommend:
- All event handling (you don't have a choice here, code behnd it must be)
- Any looping/Maths/callig of other intermediate Non-UI class methods that don't contricute to the UI directly
- Any validation
- Any exception handling, which is non-existent in XAML, due to it's declarative nature
- Any recusive operations
Basically the UI (XAML) should just present data, and anything else should be in code behind.
Josh Smith recently published a true MVC pattern in WPF at codeproject which is available right here, if you really can't wait and just want to crack on.
But be warned, it's fairly advanced stuff, but you know, I have high hopes for you lot...and hope that by the end of this series you will have mastered enough to look at Josh's code and at least get the basics, and go oh yeah there a binding, theres a resource cool..I get it.
It took me about 1/2 hour to get what he was up to, and I've been messing with this stuff a little while now.
How To Reference Classes/Assemblies From XAML
One thing that you will definately do at some point (if you wish to develop anything but, a single Window application) is reference your own classes/controls and maybe even classes/controls from a different .NET assembly, from XAML. Now in code behind this is a snitch right, we just write a
And bada bing, we can referenec all the lovely objects in the System.Windows.Controls namespace. Nice and easy in code behind, but we are talkng XAML, hows all that work in XAML. Well the same rules apply, if we want to use a control from the current namespace we need someway in the XAML of stating we wish to use a controls from the current namespace. This is done with a namespace directive at the top of the XAML file where you wish to use the control/class. Yep that right classes can also be instantiated directly in XAML code, provided they are referenced using the correct namespace.
Lets see some examples of this. i'll cover 4 options here:
- Assembly Ref 1 : Using a local (same namespace) control in a
Window - Assembly Ref 2 : Using a local (same namespace) class in a
Window - Assembly Ref 3 : Using a external (different namespace/assembly) control in a
Window - Assembly Ref 4 : Using a external (different namespace/assembly) class in a
Window
The code that accompanies this article has comment in the Window1.xaml that you can use to check these Assembly control references with. I've tried to make it easy for you.
So without further ado lets carry on shall we.
Assembly Ref 1 : Using A Local (Same Namespace) Control In A Window
This is the easist of the 4 methods to reference classes within XAML. As the class we wish to reference is within the same namespace we can simlpy include a xmlns: namespace declaration within the opening tag of our Window (note I am using Window but this could be Frame or any other hosting control for WPF.
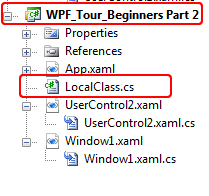
Lets say the current application I am working with has a namespace of "WPF_Tour_Beginners_Part_2" and that this is also the name of the generated Assembly. And that we have a UserControl called UserConrtrol2, in this namespace:
We can simply use the following xmlns: namespace declaration within the opening tag of our Window.
This then enables us to now use the UserConrtrol2 UserControl in the XAML markup as follows:
You may why I use the word local, in the xmlns: declaration at the within the Window. Well the answer is that you can use whatevery name you want, but local: is used in lots of books and has sort of become the defacto convention for same namespace objects. I guess this stems from the fact that they are indeed local to the current namespace/Assembly
Assembly Ref 2 : Using A Local (Same Namespace) Class In A Window
This is pretty much the same steps as we just followed for a local UserControl. The only difference is that a UserControl is a visual object in WPF (basically inherits from Visual or Visual3D) which means it can be used as part of the UI. Classes however may or may not inherit from Visual or Visual3D, so may or may not be UI type objects. If they do not inherit from Visual or Visual3D they will not be able to be used in UI markup, but can still be used as Resources. Now I know we haven't discussed Resources yet, so i'm sorry about that, but for now you are just going to have to gloss over this and accept that we can instantiate a class by putting a reference to it in a Resource section or Resource file of a XAML file
Lets say the current application I am working with has a namespace of "WPF_Tour_Beginners_Part_2" and that this is also the name of the generated Assembly. And that we have a custom class called LocalClass, in this namespace:
As before can simply use the following xmlns: namespace declaration within the opening tag of our Window.
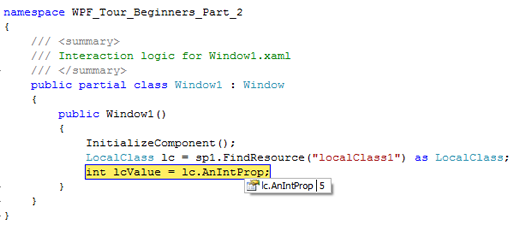
This then enables us to now use the custom class LocalClass in the XAML markup, as a Resource as follows:
So what about that. We've instatiated a LocalClass object in XAML now, and set its AnIntProp property to 5. Note that in order to be able to construct a class in XAML you will need to have a parameterless constructor on the source class being used.
So if we wanted to we could use this instantaited instance of this LocalClass class in code behind, we can simply grab the Resource and use the instantaited object as if it had been created and added to the heap in code behind using the new keyword. Let's see this, again its a Resource thing (sorry for jumping ahead), but I think it's a fairly useful thing to demonstrate.
Assembly Ref 3 : Using A External (Different Namespace/Assembly) Control In A Window
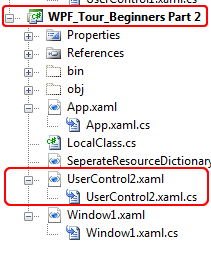
This is pretty much the same steps as we just followed for a local UserControl. The only difference this time is that the UserControl we are trying to use in the current Window actually lives in a different Assembly (the demo app uses an Assembly called "SeperateWPFUserControl_Dll"). So we obviously still need to reference this "SeperateWPFUserControl_Dll" assembly. But how do we reference and use it in XAML.
Well it's not that different from what we saw earlier, the only addition to the xmlns: namespace declaration, is the inclusion of the Assembly name
Lets say the current application I am working with has a namespace of "WPF_Tour_Beginners_Part_2" and that we are trying to reference a 3rd party Assembly ("SeperateWPFUserControl_Dll" in the demo app) and that the 3rd party Assembly contains a UserControl called "UserControl1":

As before can simply use the following xmlns: namespace declaration within the opening tag of our Window, but this time it's fully qualified and included the Assembly name also
This then enables us to now use the UserConrtrol1 UserControl in the XAML markup as follows:
As before you are free to choose whatever name you like to the namespace, though its probably a good idea to call it the same name as the source Assembly where the item being used resides. This may be easier to fault find should something go wrong.
Assembly Ref 4 : Using A External (Different Namespace/Assembly) Control In A Window
This is pretty much the same steps as we just followed for a local Class. The only difference here is that we will be using classes from some of the core .NET Assemblies, but the principle is the same.
Let say we want to use the following classes in our XAML
- System.Collections.Hashtable within the mscorlib.dll
- System.Int32 within the mscorlib.dll
As before can simply use the following xmlns: namespace declaration(s) within the opening tag of our Window.
This then enables us to now use these classes in the XAML markup, as a Resource as follows:
That's pretty much the same as we previously saw with the LocalClass, example.
Markup Extensions
Markup extentions enable you to extend the expressability of XAML. Where the markup extension string can be evaluated at run time and produce the appropriate object based on a string. Markup extensions are invoked in XAML with explicit and consistent manner.
When ever an attribute value is enclosed in {} braces, the XAML compiler/parser treats it as a markup extension value rather than a literal string.
For example lets consider the following Rectangle, which simply sets the Background property to null.
As the compiler/parser sees the {} enclosed string, it will know this is a markup extension. However this is just a parlor trick that the XAML parser knows how to perform. We can declare MarkUp extensions in the same way as we used classes, previously described, directly in the XAML. This is achieved by using property-element syntax.
Property-element syntax, allows use to expand out any property into a full element of the XAML tree, which allows us to add child elements to it. To best understand this perhaps an example is needed.
We can imagine that we could declare a markup extension like this
Or possibly like this
Now using Property element syntax, we are able to treat the mode property as a element in the tree that can have its own child elements, such as this example
See we can do quite a lot in XAML, remember all these objects are just classes so there is no problem, us declaring them like this. The {} braces are really syntactic sugar for whats going on behind the scenes, which is, that a whole slew of classes (as just demonstrated) are being created behind the scenes. This Property element syntax, can be applied to anything. For example here is another property, being used as an element, for a Button Background property
System.Windows.Markup.MarkupExtension is the base class that all markup extensions inherit from. There are the following markup extension classes available as standard
- System.Windows.Markup.ArrayExtension
- System.Windows.Markup.NullExtension
- System.Windows.Markup.StaticExtension
- System.Windows.Markup.TypeExtension
- System.Windows.ResourceKey
- System.Windows.DynamicResourceExtension
- System.Windows.ColorConvertedBitmapExtension
- System.Windows.StaticResourceExtension
- System.Windows.TemplateBindingExtension
- System.Windows.ThemeDictionaryExtension
- System.Windows.Data.BindingBase
- System.Windows.Data.RelativeSource
The most common markup extensions used in WPF programming are those that support resource references (StaticResource and DynamicResource), and those that support data binding (Binding), note the abscence of the "Extension" suffix. This is implied by the compiler as the {} indicates a markup extension the "Extension" suffix is NOT required.
StaticResource provides a value for a XAML property by substituting the value of an already defined resource. For details, see StaticResource Markup Extension.
DynamicResource provides a value for a XAML property by deferring that value to be a run-time reference to a resource. A dynamic resource reference forces a new lookup each time that such a resource is accessed. For details, see DynamicResource Markup Extension.
Binding provides a data bound value for a property, per the data context that applies to the element. This markup extension is relatively complex, because it enables a substantial inline syntax for specifying a data binding. For details, see Binding Markup Extension.
RelativeSource provides source information for a Binding that can navigate several possible relationships in the run-time element tree. This provides specialized sourcing for bindings that are created in multi-use templates or created in code without full knowledge of the surrounding element tree. For details, see RelativeSource MarkupExtension.
There are also several other markup extensions (as shown above) that are not specific to the WPF application of XAML, but are instead part of the specification and namespace of XAML as a language. These are typically identifiable by the x: prefix. The WPF implementation for these uses the same MarkupExtension base class to provide the implementation.
x:Type supplies the Type object for the named type. This is used most frequently in styles and templates. For details, see x:Type Markup Extension.
x:Static produces static values from value-type code entities that are not directly the type of a property's value, but can be evaluated to that type.
x:Null specifies null as a value for a XAML property.
x:Array provides support for creation of general arrays in XAML syntax, for cases where the collection support provided by base elements and control models is deliberately not used.
Don't worry if you think the Binding and RelativeSource extensions look weird, we will be revisiting these in the binding article.
NOTE : You can also create your own MarkUp extensions, for example you can check out Tomer Shamam, excellent post WPF Control State Persistency where he creates a markup extension to persist WPF elements state to file.
I would recommend you also look at this MSDN article, Markup Extensions and XAML which goes into some more detail about markup extensions.
What Are Resources, And How Can They Help Me
Resources are re-usable objects that may be declared in various places:
- Within the application, App.xaml file (or whatever you application file is called). Which means that the declared resource will have global application scope.
- Within the
Resourcesproperty of the currentWindow(assuming we are working with aWindow). Which means that the declared resource will haveWindowlevel scope. All UI elements that are part of the resource declaringWindow, will have access to the declared resource. - Within the
Resourcesproperty of anyFrameworkElementorFrameworkContentElement. - Seperate loose XAML resource file.
You can think of a resource as a single object that stored in a Dctionary of resource objects. And as such each resource MUST have a key, that enables the safe and unique retrieval of the resource from the ResourceDictionary.
When you define resources in markup, you assign the unique key through the x:Key Attribute. Typically, the key is a string; however, you can also set it to other object types by using the appropriate markup extensions. Nonstring keys for resources are used by certain feature areas in WPF, notably for styles, component resources, and data styling. But we'll see more on this in subsequent articles in this article series.
Every framework-level element (FrameworkElement or FrameworkContentElement) has a Resources property, which is the property that contains the resources (as a ResourceDictionary) that a resource defines. You can define resources on any element. However, resources are most commonly defined on the root element, which would normal be Window.
So once you declare a resource you are free to use it on a element. For example the following XAML declares a new SolidColorBrush resource on a Window, which is then used for the Background of 2 Button objects within the Window.
This simple use of resources means that the 2 Button objects, will have a Blue SolidColorBrush used for their Backgrounds. (Note : As we say nothing about how to deal with what the button looks like when the mouse is over ism the Blue SolidColorBrush used for their Background, only applies when the mouse is not over the Button. We will be covering this, in the Styles/Templates article in this series).
One thing to note is that we are actually using the StaticResourceExtension (Remember we can ommit the "Extension" suffix), but what the heck is a StaticResourceExtension, and what's it do for us. Well there are actually 2 types of resources that we can use.
A resource can be referenced as either a static resource or a dynamic resource. This is done by using either the StaticResourceExtension Markup Extension or the DynamicResourceExtension Markup Extension markup extension.
According to the MSDN Resources (WPF) section these are the guidelines as an when to use static/dynamic resources.
Static Resources
Static resource references work best for the following circumstances:
- You have no intention of changing the value of the resource after it is referenced the first time.
- Your application design concentrates most of all of its resources into page or application level resource dictionaries. Static resource references are not reevaluated based on runtime behaviors such as reloading a page, and therefore there can be some performance benefit to avoiding large numbers of dynamic resource references when they are not necessary per your resource and application design.
- You are setting the value of a property that is not on a
DependancyObjector aFreezable(That's immutable object really)
- You are creating a resource dictionary that will be compiled into a DLL, and packaged as part of the application or shared between applications.
- You are creating a theme for a custom control, and are defining resources that are used within the themes. For this case, you typically do not want the dynamic resource reference lookup behavior, you instead want the static resource reference behavior so that the lookup is predictable and self-contained to the theme. With a dynamic resource reference, even a reference within a theme is left unevaluated until runtime, and there is a chance that when the theme is applied, some local element will redefine a key that your theme is trying to reference, and the local element will fall prior to the theme itself in the lookup. If that happens, your theme will not behave in an expected manner.
- You are using resources to set large numbers of dependency properties. Dependency properties have effective value caching as enabled by the property system, so if you provide a value for a dependency property that can be evaluated at load time, the dependency property does not have to check for a reevaluated expression and can return the last effective value. This technique can be a performance benefit.
Dynamic Resources
Dynamic resources work best for the following circumstances:
- The value of the resource depends on conditions that are not known until runtime. This includes system resources, or resources that are otherwise user settable. For example, you can create setter values that refer to system properties, as exposed by SystemColors, SystemFonts, or SystemParameters. These values are truly dynamic because they ultimately come from the runtime environment of the user and operating system. You might also have application-level themes that can change, where page-level resource access must also capture the change.
- You are creating or referencing theme styles for a custom control.
- You intend to adjust the contents of a
ResourceDictionaryduring an application lifetime. - You have a complicated resource structure that has interdependencies, where a forward reference may be required. Static resource references do not support forward references, but dynamic resource references do support them because the resource does not need to be evaluated until runtime, and forward references are therefore not a relevant concept.
- You are referencing a resource that is particularly large from the perspective of a compile or working set, and the resource might not be used immediately when the page loads. Static resource references always load from XAML when the page loads; however, a dynamic resource reference does not load until it is actually used.
- You are creating a style where setter values might come from other values that are influenced by themes or other user settings.
- You are applying resources to elements that might be reparented in the logical tree during application lifetime. Changing the parent also potentially changes the resource lookup scope, so if you want the resource for a reparented element to be reevaluated based on the new scope, always use a dynamic resource reference.
Your Resource Options
Ok so that was a brief (yes there is a whole lot more to resource, as with all this stuff, I cant tell you everything, you'll have to read around these topics) introduction into Resources.
What we are going to do now is see how to define some of these different resources. Lets say the following, types of resources:
- Application level resource (global resource)
Windowlevel resourceFrameworkElementlevel resource- Seperate loose XAML resource
Application Level Resource
To create a global application scope resource, we simply add a Resources section to the App.xaml file (or whatever you application file is called). Lets see an example.
This means that any object within the present application can now use this resource. In the attached demo application I have created a single Button within the Window1.xaml that uses this application level resource.
Window Level Resource
I simply uses the resource "windowLevelResourceBlueBrush" on the 2 Button objects
Framework Element Level Resource
As I stated earlier each (FrameworkElement or FrameworkContentElement) has a Resources property. Which means that you can create a local (think only available to the current element and its children) resource.
Seperate Loose XAML Resources
Windows Presentation Foundation (WPF) resources support a merged resource dictionary feature. This feature provides a way to define the resources portion of a WPF application outside of the compiled XAML application. Resources can then be shared across applications and are also more conveniently isolated for localization.
Note that the ResourceDictionary element does not have an x:Key Attribute, which is generally required for all items in a resource collection. But another ResourceDictionary reference within the MergedDictionaries collection is a special case, reserved for this merged resource dictionary scenario. The ResourceDictionary that introduces a merged resource dictionary cannot have an x:Key Attribute. Typically, each ResourceDictionary within the MergedDictionaries collection specifies a Source attribute. The value of Source should be a uniform resource identifier (URI) that resolves to the location of the resources file to be merged. The destination of that URI must be another XAML file, with ResourceDictionary as its root element. Lets see an example of this shall we:
Lets start with how to define the actual loose XAML file.
Thats enough. The only other thing to ensure that the "Build Action" is set to Resource or Page in Visual Studio
So how to do we then use this. Lets say we want to use this loose XAML file on a Button resources property, we can do something like the following
Property-element syntax


 327
327


 被折叠的 条评论
为什么被折叠?
被折叠的 条评论
为什么被折叠?
 到【灌水乐园】发言


