


背景
假设你已经搭建了modelbox开发容器,能够使用webUI构建流程图。如果没有请参考昇腾npu上构建modelbox webUI开发容器教程。
现在,本文会说明,如何在终端用命令的方式将流程图暴露为服务,并能够在本地用postman访问。
本文参考ModelBox运行的"通过modelbox命令启动"一节
主要流程
首先,假设我们编写了如图的程序,其中foobar阶段会固定输出一个字符串。

foobar.py内容如下,固定会输出"Hello world!"
import _flowunit as modelbox

class FoobarFlowUnit(modelbox.FlowUnit):
    # Derived from modelbox.FlowUnit
    def __init__(self):
        super().__init__()

    def open(self, config):
        # Open the flowunit to obtain configuration information
        return modelbox.Status.StatusCode.STATUS_SUCCESS

    def process(self, data_context):
        # Process the data
        # input data
        in_data = data_context.input("in_data")
        # output data
        out_data = data_context.output("out_data")

        # Example process code.
        # Remove the following code and add your own code here.
        for buffer in in_data:
            add_buffer = modelbox.Buffer(self.get_bind_device(), "Hello world!")
            out_data.push_back(add_buffer)

        return modelbox.Status.StatusCode.STATUS_SUCCESS

    def close(self):
        # Close the flowunit
        return modelbox.Status()

    def data_pre(self, data_context):
        # Before streaming data starts
        return modelbox.Status()

    def data_post(self, data_context):
        # After streaming data ends
        return modelbox.Status()
mnist_response.py的代码逻辑也很简单,固定输出上一步骤的字符串,内容如下:
import _flowunit as modelbox
import numpy as np
import json

class MnistResponseFlowUnit(modelbox.FlowUnit):
    def __init__(self):
        super().__init__()

    def open(self, config):
        return modelbox.Status.StatusCode.STATUS_SUCCESS

    def process(self, data_context):
        in_data = data_context.input("in_data")
        out_data = data_context.output("out_data")

        for buffer in in_data:
            add_buffer = modelbox.Buffer(self.get_bind_device(), buffer.as_object())
            out_data.push_back(add_buffer)

        return modelbox.Status.StatusCode.STATUS_SUCCESS

    def close(self):
        return modelbox.Status()

    def data_pre(self, data_context):
        return modelbox.Status()

    def data_post(self, data_context):
        return modelbox.Status()

    def data_group_pre(self, data_context):
        return modelbox.Status()

    def data_group_post(self, data_context):
        return modelbox.Status()
然后,在项目路径内graph/下的.toml文件内,修改暴露的端口,如下文显示端口暴露在8190
…
digraph mnist_sample {
node [shape=Mrecord]
httpserver_sync_receive [ type=flowunit flowunit=httpserver_sync_receive device=cpu time_out_ms=“5000” endpoint=“http://0.0.0.0:8190” max_requests=“100” ]
…
那么,如何不用webUI,将流程图启动暴露为Restful服务呢?
-
进入modelbox开发容器
-
进入目录
/root/modelbox-service/conf -
编辑
modelbox.conf配置文件。把flow_path 属性指向你的项目的graph目录,比如在本文的mnist项目,流程图存储在/root/projects/mnist/src/graph目录下。内容如下:[server] ip = "0.0.0.0" port = "1104" flow_path = "/root/projects/mnist/src/graph/" # 后续略... -
执行
modelbox -c ./modelbox-service/conf/modelbox.conf -fV。如果在conf目录下则执行modelbox -c ./modelbox.conf -fV
然后,能看到终端输出日志:
[root@devserver-com conf]$ modelbox -c ./modelbox.conf -fV
[2023-12-06 20:35:17,711][ INFO][          main.cc:385 ] modelbox config path : ./modelbox.conf
[2023-12-06 20:35:17,711][ INFO][        server.cc:129 ] plugin list:
[2023-12-06 20:35:17,711][ INFO][        server.cc:131 ]  /usr/local/lib64/modelbox-plugin.so
[2023-12-06 20:35:17,711][ INFO][        server.cc:131 ]  /usr/local/lib64/modelbox-plugin-editor.so
[2023-12-06 20:35:17,712][ INFO][modelbox_plugin.cc:68  ] create modelbox plugin
[2023-12-06 20:35:17,712][ INFO][modelbox_plugin.cc:51  ] modelbox plugin init
[2023-12-06 20:35:17,712][ INFO][modelbox_plugin.cc:61  ] run modelbox plugin on http://0.0.0.0:1104
[2023-12-06 20:35:17,712][ INFO][modelbox_plugin.cc:73  ] modelbox plugin register handlers
[2023-12-06 20:35:17,712][ INFO][modelbox_plugin.cc:74  ] regist url : /v1/modelbox/job
[2023-12-06 20:35:17,712][ INFO][modelbox_plugin.cc:148 ] create local job
[2023-12-06 20:35:17,712][ INFO][modelbox_plugin.cc:192 ] Create local job /root/projects/mnist/src/graph//CMakeLists.txt
[2023-12-06 20:35:17,712][ERROR][          flow.cc:473 ] read config from  toml:/root/projects/mnist/src/graph//CMakeLists.txtfailed, err :Load config file failed, detail: [error] toml::parse_key_value_pair: missing key-value separator `=`
 --> /root/projects/mnist/src/graph//CMakeLists.txt
    |
 16 | cmake_minimum_required(VERSION 3.10)
    |                       ^--- should be `=`
[2023-12-06 20:35:17,712][ERROR][           job.cc:65  ] flow init failed: code: Fault, errmsg: Load config file failed, detail: [error] toml::parse_key_value_pair: missing key-value separator `=`
 --> /root/projects/mnist/src/graph//CMakeLists.txt
 ...
 [2023-12-06 20:35:18,824][ INFO][ editor_plugin.cc:126 ] create modelbox editor plugin
[2023-12-06 20:35:18,824][ INFO][ editor_plugin.cc:104 ] modelbox editor plugin init
[2023-12-06 20:35:18,824][ INFO][ editor_plugin.cc:119 ] run editor on http://0.0.0.0:1104
[2023-12-06 20:35:18,824][ INFO][        server.cc:59  ] app server start
[2023-12-06 20:35:18,825][ INFO][   http_helper.cc:438 ] Start listen at 0.0.0.0:1104
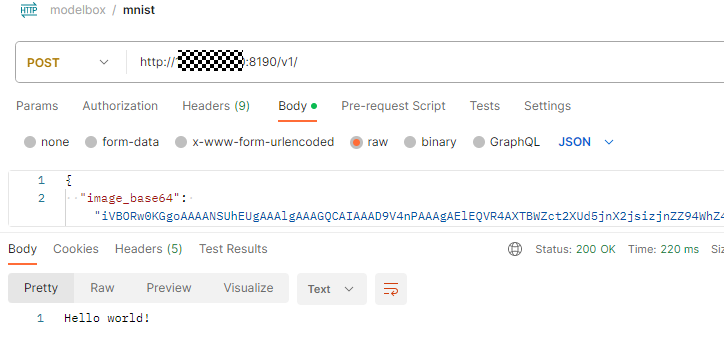
然后用postman访问那个服务器IP的8190端口,并按预定的接口填写参数,即可发出Restful请求。如下图所示,返回了字符串,与预期一致。


 649
649


 被折叠的 条评论
为什么被折叠?
被折叠的 条评论
为什么被折叠?
 到【灌水乐园】发言


