


TensorRT是一个高性能的深度学习推理(Inference)优化器,可以为深度学习应用提供低延迟、高吞吐率的部署推理。TensorRT可用于对超大规模数据中心、嵌入式平台或自动驾驶平台进行推理加速。
学习TensorRT当然是从英伟达官方的sampleMNIST开始,但是没有看英伟达官方API的同学难以直接上手看源码,这里就逐步拆解TensorRT的使用。本文先引入一个案例来介绍TensorRT的大致流程。如果感兴趣的同学可能看完这篇就不用看接下来的逐步分解,能不能坚持写下面的分解还是看心情吧,至于tensorRT的安装困难,我也知道困难,所以我就在docker拉去镜像偷个懒,
一.pytorch 代码案例
二.tensorRT引擎推理(C++版)
三.CMake简单链接
一.pytorch 代码案例
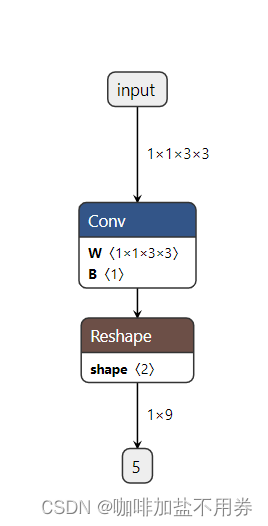
import torch
import torch.nn as nn
class Model(nn.Module):
    def __init__(self):
         super().__init__()
         self.conv=nn.Conv2d(1,1,3,stride=1,padding=1,bias=True)
         self.conv.weight.data.fill_(0.3)
         self.conv.bias.data.fill_(0.2)

    def forward(self,x):
        x=self.conv(x)
        # return x.view(x.size(0),-1)
        return x.view(-1,int(x.numel()//x.size(0)))

model=Model().eval()

x=torch.full((1,1,3,3),1.0)
y=model(x)

torch.onnx.export(model,(x,),"lesson1.onnx",input_names=["input"],output_names=["output"],verbose=True)
##注意这里的input 和 output 要用到
二.TensorRT推理引擎
大体流程如下图所示:
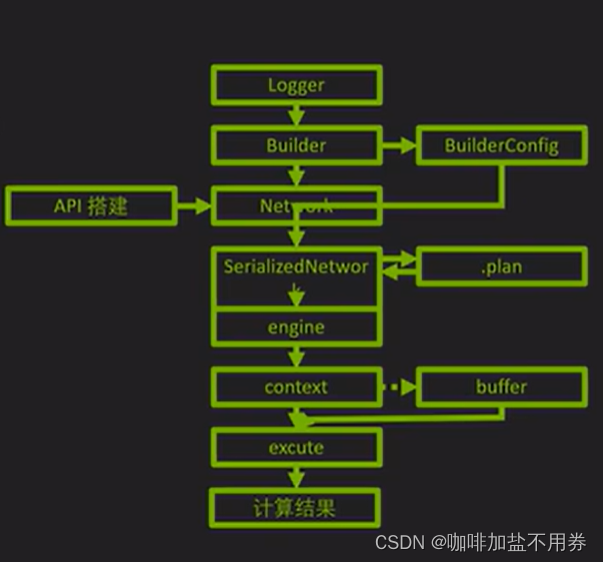
大体流程:
1.创建阶段
1.1创建日志(记录错误信息)
1.2建立Builder(管理网络元数据)和BuilderConfig() (配置信息)
1.3导入网络Network(由于这里是直接导入onnx文件,不需要从头用TensorRT构建网络机构)
1.4序列化
2.运行阶段
2.1建立引擎engine
2.2建立Context(GPU进程)
2.3为输入和输出建立Buffer区,这里于pytorch代码中的到处onnx文件代码对应
2.4buffer拷贝 (主机端到设备端,这里涉及cuda编程,由于本案例简单,不需要有cuda编程也懂)
2.5执行推理
2.6 Buffer拷贝回去(设备端到主机端)
废话不说上代码:
前期准备
#include "NvInfer.h"  //tensorRT的库导入
#include<iostream>
#include <cuda_runtime_api.h>  //cuda编程库导入
#include "NvOnnxParser.h"
#include <cassert>
#include <fstream>
#include <sstream>
#include <chrono>

using namespace nvinfer1;  //tensorRT大部分的命名空间
using namespace nvonnxparser; //tensorRT解析器的明明空间
const char* INPUT_BLOB_NAME = "input";  //这里对应pytorch中 export操作的输入
const char* OUTPUT_BLOB_NAME = "output"; //这里对应pytorch中 export操作的输入
const int INPUT_H=100;
const int INPUT_W=100;
const int OUTPUT_SIZE=1;
#define CHECK(status) \
    do\
    {\
        auto ret = (status);\
        if (ret != 0)\
        {\
            std::cerr << "Cuda failure: " << ret << std::endl;\
            abort();\
        }\
    } while (0)
建立日志,记录错误信息
class Logger:public ILogger{
    void log(Severity severity,const char*msg) noexcept override{
        ##kWARNING是一个整数,小于他的都是错误的信息 需要打印
        if(severity<Severity::kWARNING)
            std::cout<<msg<<std::endl;
    };
}logger;
建立引擎 需要外部输入builder和builder_config
ICudaEngine* createEngine(unsigned int maxBatchSize,IBuilder* builder,IBuilderConfig* config){
    ##maxbatchsize是输入数据的batch大小
    ##创建网络的定义信息 下面的 kEXPLICIT_BATCH是个常数,这里是显示的做批处理,必须要有使用flag操作。
    uint32_t flag=1U<<static_cast<uint32_t(NetworkDefinitionCreationFlag::kEXPLICIT_BATCH);
    INetworkDefinition * network=builder->createNetworkV2(flag);
    ##创建解析器
    IParser* parser=createParser(*network,logger);
    ##下面的lesson1.onnx就是pytorch导出的
    const char* onnx_path="../lesson1.onnx";
    parser->parseFromFile(onnx_path,static_cast<int32_t>(ILogger::Severity::kWARNING));
    for(int32_t i=0;i<parser->getNbErrors();i++){
        std::cout<<parser->getError(i)->desc()<<std::endl;
    }
    #为builder设置一些必要的信息
    builder->setMaxBatchSize(maxBatchSize);
    config->setMemoryPoolLimit(MemoryPoolType::kWORKSPACE,1U<<20);
    #创建引擎
    ICudaEngine* engine=builder->buildEngineWithConfig(*network,*config);
    std::cout << "successfully  convert onnx to  engine!!! " << std::endl;
    delete network;
    delete parser;
    return engine;
}
编写创建引擎的逻辑,调用上述函数
void APIToModel(unsigned int maxBatchSize,IHostMemory** modelStream){
#补了上述船舰builder和config的遗憾
IBuilder * builder=createInferBuilder(logger);
IBuilderConfig* config=builder->createBuilderConfig();
ICudaEngine* engine=createEngine(maxBatchSize,builder,config);
assert (engine!=nullptr);
// int k=engine->getNbBindings();
// std::cout<<"size of is "<<k<<std::endl;
// for(int i=0;i<k;i++) std::cout<<"name is "<<engine->getBindingName(i)<<std::endl;
(*modelStream) = engine->serialize();
delete engine;
delete builder;
delete config;
}编写在进行推理期间,要在GPU上申请空间并申请input和output的buffer
void doInferenced(IExecutionContext& context,float* input,float*output,int batchSize){
    // 获取活跃在gpu进程中的引擎
    const ICudaEngine& engine=context.getEngine();
    assert(engine.getNbBindings()==2);
    // 定义cuda上数据空间的名字
    void * buffers[2];
    // 获取engine中输入输出的索引,注意这里的INPUT_BLOB_NAME和OUTPUT_BLOB_NAME是在pytorch中声明的input和output

    int inputIndex=engine.getBindingIndex(INPUT_BLOB_NAME);
    int outputIndex=engine.getBindingIndex(OUTPUT_BLOB_NAME);
    //在gpu上申请空间,这个空间就是上面的输入输出的指针,大小就是一个tensor的大小,注意要flatten
    cudaMalloc(&buffers[inputIndex],batchSize*3*INPUT_H*INPUT_W*sizeof(float));
    cudaMalloc(&buffers[outputIndex],batchSize*OUTPUT_SIZE*sizeof(float));
    // 开启cuda流,这个是cuda编程 可以看看,以后有想法可以开坑写一些
    cudaStream_t stream;
    CHECK(cudaStreamCreate(&stream));
    CHECK(cudaMemcpyAsync(buffers[inputIndex],input,batchSize*3*INPUT_H*INPUT_W*sizeof(float),cudaMemcpyHostToDevice,stream));
    // cuda流异步启动推理
    context.enqueue(batchSize, buffers, stream, nullptr);

    CHECK(cudaMemcpyAsync(output,buffers[outputIndex],batchSize*OUTPUT_SIZE*sizeof(float),cudaMemcpyDeviceToHost, stream));
    // 同步一下cuda流
    cudaStreamSynchronize(stream);
    cudaStreamDestroy(stream);
    CHECK(cudaFree(buffers[inputIndex]));
    CHECK(cudaFree(buffers[outputIndex]));

}
将引擎保存到本地
int get_trtengine(){
    IHostMemory* modelStream{nullptr};
    APIToModel(1,&modelStream);
    assert(modelStream!=nullptr);
    std::ofstream a ("./lesson1.engine",std::ios::binary);
    if(!a){
        std::cerr<<"could not open plan output file"<<std::endl;
        return -1;
    }
    a.write(reinterpret_cast<const char*>(modelStream->data()),modelStream->size());
    // modelStream->destroy();
    delete modelStream;
    return 0;

}
启动推理,下面就简单里,嘎嘎乱杀即可
int infer(){
    char* trtModelStream{nullptr};
    size_t size{0};
//读取引擎
    std::ifstream file("./lesson1.engine",std::ios::binary);
    if(file.good()){
        file.seekg(0,file.end);
        size=file.tellg();
        file.seekg(0,file.beg);
        trtModelStream=new char[size];
        assert(trtModelStream);
        file.read(trtModelStream,size);
        file.close();
    }

    IRuntime* runtime=createInferRuntime(logger);
    assert(runtime!=nullptr);
//反序列化
    ICudaEngine* engine = runtime->deserializeCudaEngine(trtModelStream, size, nullptr);
    assert(engine != nullptr);
//创建进程
    IExecutionContext* context = engine->createExecutionContext();
    assert(context != nullptr);
    delete[] trtModelStream;

    float time_read_img=0;
    float time_infer=0;
//定义输出大小
    static float prob[OUTPUT_SIZE];
    auto start = std::chrono::system_clock::now();
    for (int i=0;i<1000;i++){

        static float data[3*INPUT_H*INPUT_W];
        for (int j=0;j<3*INPUT_H*INPUT_W;j++){
            data[i]=std::rand()/10;
        }
        doInferenced(*context,data,prob,1);
        std::cout<<prob[0]<<std::endl;
    }
    auto end = std::chrono::system_clock::now();
    std::cout << std::chrono::duration_cast<std::chrono::milliseconds>(end - start).count() << "ms" << std::endl;
    delete context;
    delete engine;
    delete runtime;
}

int main(){
    get_trtengine();
    infer();
}
三.CMake编写 (这不是重点 因地制宜的写写,这是按照本案例用到的库做的链接)
cmake_minimum_required(VERSION 3.1) ##最低版本
project(trt_example) ##项目名称

#tensorrt
include_directories(/usr/include/x86_64-linux-gnu) ##cmake 导入库文件
include_directories(/workspace/tensorrt/samples/common)

#cuda
include_directories(/usr/local/cuda-11.7/targets/x86_64-linux/include)

#cmake使用的C++版本号
set(CMAKE_CXX_STANDARD 14)

#为工程添加可执行文件
add_executable(trt_example main.cpp)

#链接.so文件
target_link_libraries(trt_example /usr/local/cuda-11.7/targets/x86_64-linux/lib/libcudart.so)
target_link_libraries(trt_example /usr/lib/x86_64-linux-gnu/libnvinfer.so)
target_link_libraries(trt_example /usr/lib/x86_64-linux-gnu/libnvonnxparser.so)

#使用cuda
set_target_properties(trt_example PROPERTIES
CUDA_SEPARABLE_COMPILATION ON)


 1561
1561

 被折叠的 条评论
为什么被折叠?
被折叠的 条评论
为什么被折叠?
 到【灌水乐园】发言


