


创建步骤为:
1. 新建res/xml/preferences.xml 文件
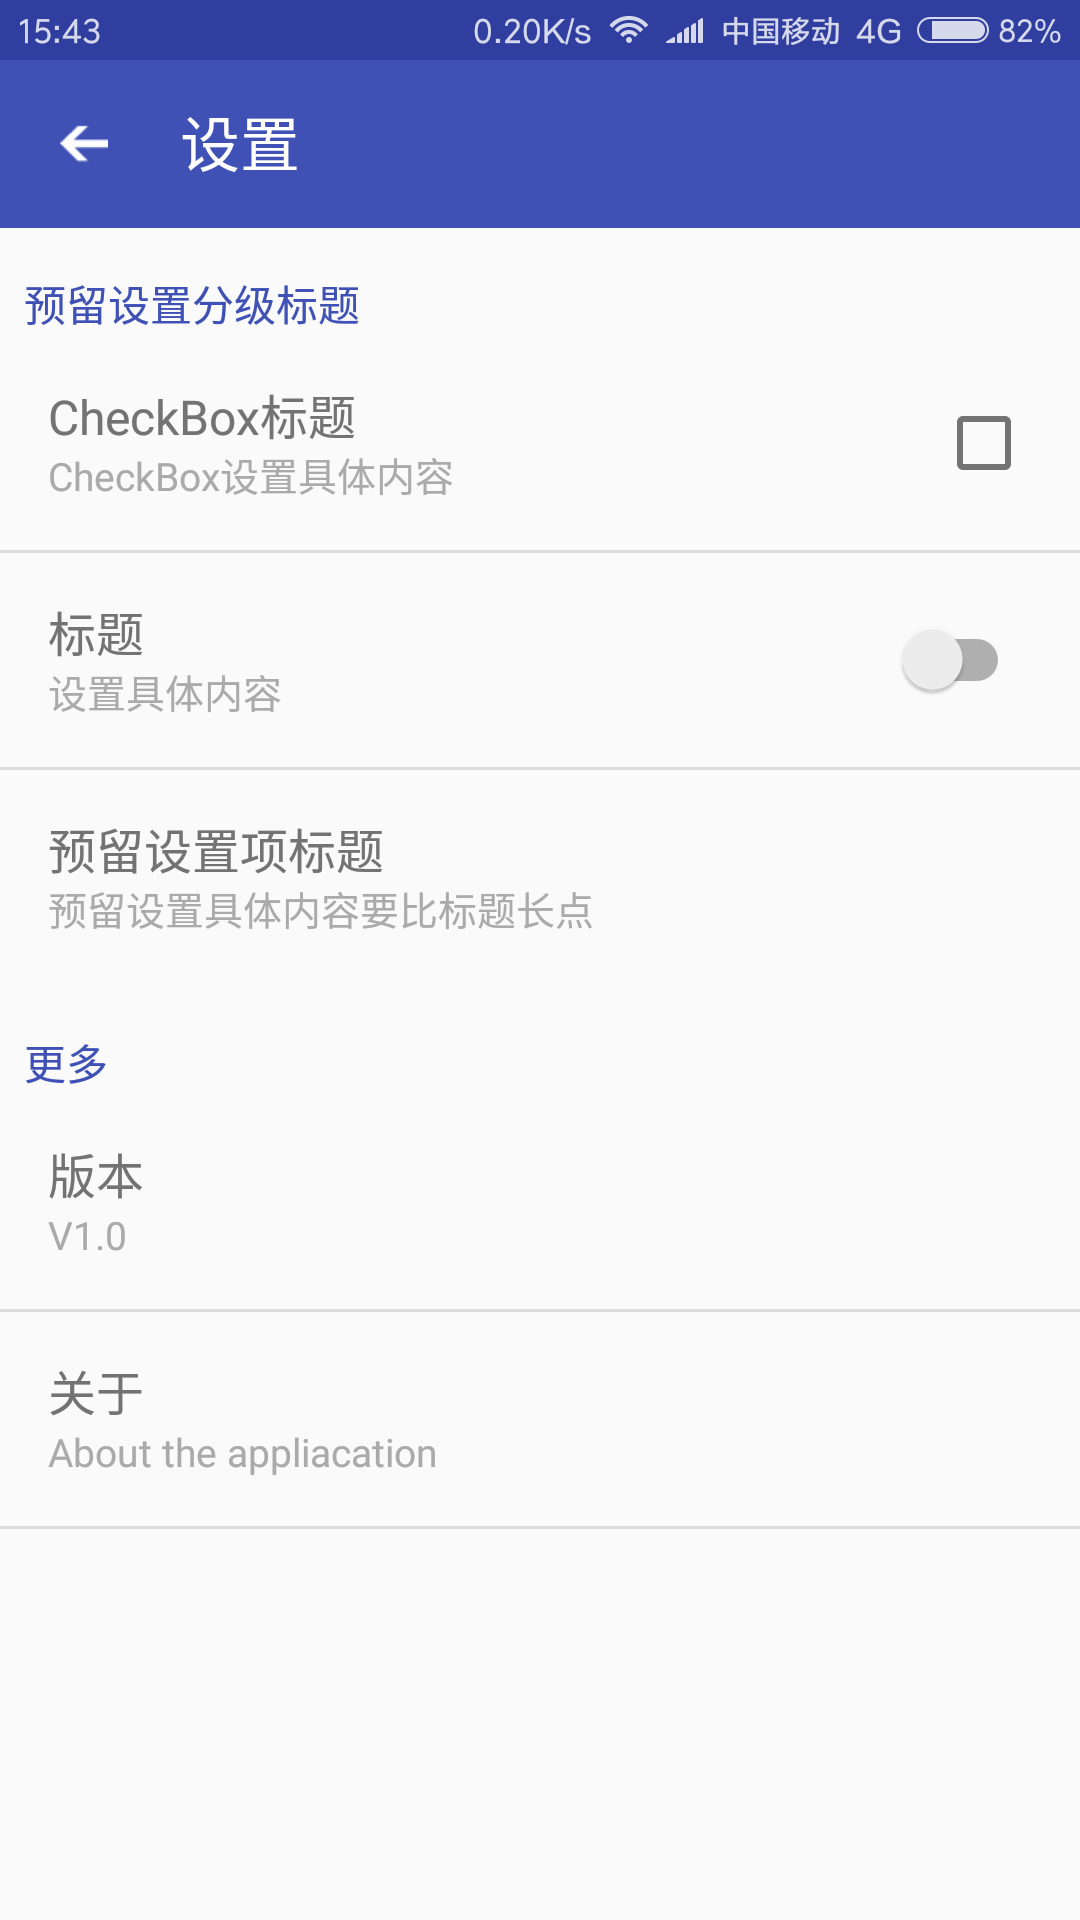
<?xml version="1.0" encoding="utf-8"?>
<PreferenceScreen xmlns:android="http://schemas.android.com/apk/res/android"
    android:layout="@layout/preference_item"
    android:title="设置"
    >

    <PreferenceCategory
        android:layout="@layout/preference_category_widget"
        android:title="预留设置分级标题">
        <CheckBoxPreference
            android:title="CheckBox标题"
            android:summary="CheckBox设置具体内容"
            android:layout="@layout/preference_item"/>

        <CheckBoxPreference
            android:title="标题"
            android:summary="设置具体内容"
            android:layout="@layout/preference_item"
            android:widgetLayout="@layout/switch_layout"/>

        <Preference
            android:layout="@layout/preference_item"
            android:title="预留设置项标题"
            android:summary="预留设置具体内容要比标题长点"/>
    </PreferenceCategory>


    <PreferenceCategory
        android:layout="@layout/preference_category_widget"
        android:title="更多">
        <Preference
            android:title="版本"
            android:summary="V1.0"
            android:layout="@layout/preference_item"/>

        <Preference
            android:layout="@layout/preference_item"
            android:title="关于"
            android:summary="About the appliacation"/>
    </PreferenceCategory>

</PreferenceScreen>
其中android:layout属性指明每个属性块所用的布局,以及指明Material Design风格
2.新建res/layout/preferences_category_widget.xml 文件
内容如下:
<?xml version="1.0" encoding="utf-8"?>
<LinearLayout xmlns:android="http://schemas.android.com/apk/res/android"
    android:orientation="vertical" android:layout_width="match_parent"
    android:layout_height="wrap_content">

    <TextView
        android:id="@android:id/title"
        android:layout_width="match_parent"
        android:layout_height="wrap_content"
        android:paddingLeft="8dp"
        android:paddingTop="16dp"
        android:textColor="@color/colorPrimary"
        android:text="indroduce"
        android:textSize="14sp" />

</LinearLayout>
新建res/layout/preference_item.xml 文件
内容如下:
<?xml version="1.0" encoding="utf-8"?>
<LinearLayout xmlns:android="http://schemas.android.com/apk/res/android"
    android:orientation="horizontal" android:layout_width="match_parent"
    android:layout_height="match_parent"
    android:gravity="center_vertical"
    android:padding="16dp">

    <RelativeLayout
        android:layout_width="match_parent"
        android:layout_height="wrap_content"
        android:layout_weight="1">

        <TextView
            android:id="@android:id/title"
            android:layout_width="wrap_content"
            android:layout_height="wrap_content"
            android:ellipsize="marquee"
            android:fadingEdge="horizontal"
            android:singleLine="true"
            android:text="title"
            android:textSize="16sp" />

        <TextView
            android:id="@android:id/summary"
            android:layout_width="wrap_content"
            android:layout_height="wrap_content"
            android:layout_below="@android:id/title"
            android:text="summary"
            android:textColor="#AAAAAA"
            android:textSize="13sp" />

    </RelativeLayout>

    <LinearLayout
        android:id="@android:id/widget_frame"
        android:layout_width="wrap_content"
        android:layout_height="wrap_content"
        android:layout_gravity="right|center_vertical"
        android:orientation="vertical"/>

</LinearLayout>
注意 一定要使用系统的id,
android:id=”@android:id/title”,android:id=”@android:id/summary”等等
新建res/layout/switch_layout.xml 文件
可以将复选框换成switch开关
内容如下:
<?xml version="1.0" encoding="utf-8"?>
<android.support.v7.widget.SwitchCompat xmlns:android="http://schemas.android.com/apk/res/android"
    android:layout_width="wrap_content"
    android:layout_height="wrap_content"
    android:textOff="OFF"
    android:textOn="ON"
    android:clickable="false"
    android:focusable="false"
    android:focusableInTouchMode="false"
    android:id="@android:id/checkbox">

</android.support.v7.widget.SwitchCompat>
3.至此已完成设置页面的内容,在此基础上我们应该在布局中加入toolbar以使页面更加完整。
整体布局为如下:
<?xml version="1.0" encoding="utf-8"?>
<LinearLayout xmlns:android="http://schemas.android.com/apk/res/android"
    android:orientation="vertical" android:layout_width="match_parent"
    android:layout_height="match_parent">

    <android.support.v7.widget.Toolbar
        android:id="@+id/toolbar_setting_more"
        android:layout_width="match_parent"
        android:layout_height="wrap_content"
        android:background="@color/colorPrimary"/>

    <FrameLayout
        android:id="@+id/content_frame"
        android:layout_width="match_parent"
        android:layout_height="match_parent" />
</LinearLayout>
4.为了让toolbar和我们设置的界面组合在一起,我们还应该设置一个自定义的Fragment,定义为SettingFragment,内容为如下:
public class SettingFragment extends PreferenceFragment {
    @Override
    public void onCreate(Bundle savedInstanceState) {
        super.onCreate(savedInstanceState);
        addPreferencesFromResource(R.xml.preferences);
    }
}
5.最后我们的SettingActivity可定义为如下:
public class SettingActivity extends BaseActivity {
        Toolbar mToolbar;

        @Override
        protected void onCreate(Bundle savedInstanceState) {

            super.onCreate(savedInstanceState);
            setContentView(R.layout.activity_settings_more);
            //ButterKnife.inject(this);
            initToolbar();
            getFragmentManager().beginTransaction().replace(R.id.content_frame, new SettingFragment()).commit();
        }


        /**
         * 初始化Toolbar
         */
        private void initToolbar() {
            mToolbar = (Toolbar) findViewById(R.id.toolbar_setting_more);
            mToolbar.setTitle("设置");
            mToolbar.setTitleTextColor(Color.WHITE);
            setSupportActionBar(mToolbar);
            ActionBar actionBar = getSupportActionBar();
            if (actionBar != null) {

//此处的activity_back为自己定义的返回的一个小图标
//可在http://www.iconfont.cn/查找合适的图标
                                 actionBar.setHomeAsUpIndicator(R.drawable.activity_back);
                actionBar.setDisplayHomeAsUpEnabled(true);
            }
        }

        /**
         * 选项菜单
         */
        @Override
        public boolean onOptionsItemSelected(MenuItem item) {
            switch (item.getItemId()) {
                case android.R.id.home:
                    finish();
                    return true;
            }
            return false;
        }
}
至此则完成了整个设置界面的设计。
另外,我们需要把控件是否选中保存到SharedPreferences中
设置 android:key=”@string/save_net_mode”属性
Java代码中用getPreferenceManager().findPreference(“key的名称”)来获取
示例如下:
final CheckBoxPreference checkboxPref = (CheckBoxPreference) getPreferenceManager()
        .findPreference(getString(R.string.save_net_mode));

checkboxPref.setOnPreferenceChangeListener(new Preference.OnPreferenceChangeListener() {

    /**
     * @param preference The changed Preference.
     * @param newValue   The new value of the Preference.
     * @return True to update the state of the Preference with the new value.
     */
    @Override
    public boolean onPreferenceChange(Preference preference, Object newValue) {
        boolean checked = Boolean.valueOf(newValue.toString());
        //保存到SharedPreferences中
        PrefUtils.setSaveNetMode(checked);
        Logger.d("Pref " + preference.getKey() + " changed to " + newValue.toString());
        return true;
    }
});


 1万+
1万+


 被折叠的 条评论
为什么被折叠?
被折叠的 条评论
为什么被折叠?
 到【灌水乐园】发言


