


我是在这个微信推文上看到Google居然免费开放使用它的GPU还有TPU,不得不佩服一下Google的开源精神,虽然机子很老,GPU是Tesla
K80,还能使用TPU,但是居然能用总没有要强,毕竟不要钱,省了电费与装机费嘛,玩玩还是可以的。而且GPU作为后摩尔时代的主要算力提供者,未来推广性能更强大的GPU,必然成为趋势。
主题先来看看这个。
https://blog.csdn.net/cocoaqin/article/details/79184540
Google Colab 免费GPU服务器使用教程
一、前言
不知道大家是否为了寻找免费GPU服务器而焦头烂额。
近些天,谷歌推出了Google Colab(Colaboratory)
官方对其的说明是:
Colaboratory 是一个研究项目,可免费使用。
划重点,最重要的特点是 免费GPU!免费GPU!免费GPU!
虽然不确定这个项目是不是永久的
但这无疑给纠结在是否花大量钱租用GPU服务器进行研究的个人研究者带去了重磅福利!
经过查阅资料与亲自实践,特把相关教程写成博文分享给大家。
由于博主水平能力有限,难免有错误,欢迎指正哈!
2018.3.22更新
emmm,大概是用的人多了…
在colab上跑一个DCGAN竟然比自己笔记本上用CPU跑的还要慢5倍…
天下没有免费的午餐…
二、Google Colab特征
- Colaboratory 是一个 Google 研究项目,旨在帮助传播机器学习培训和研究成果。它是一个 Jupyter 笔记本环境,不需要进行任何设置就可以使用,并且完全在云端运行。
- Colaboratory 笔记本存储在 Google 云端硬盘中,并且可以共享,就如同您使用 Google 文档或表格一样。Colaboratory 可免费使用。
- 利用Colaboratory ,可以方便的使用Keras,TensorFlow,PyTorch等框架进行深度学习应用的开发。
三、开始使用
注意:使用google服务可能需要梯子
3.1在谷歌云盘上创建文件夹
当登录账号进入谷歌云盘时,系统会给予15G免费空间大小。由于Colab需要依靠谷歌云盘,故需要在云盘上新建一个文件夹。
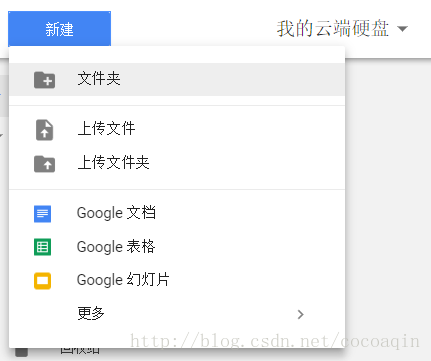
选择新建文件夹,文件夹名称可自定义。
3.2创建Colaboratory
进入创建好的文件夹,点开新建-更多。
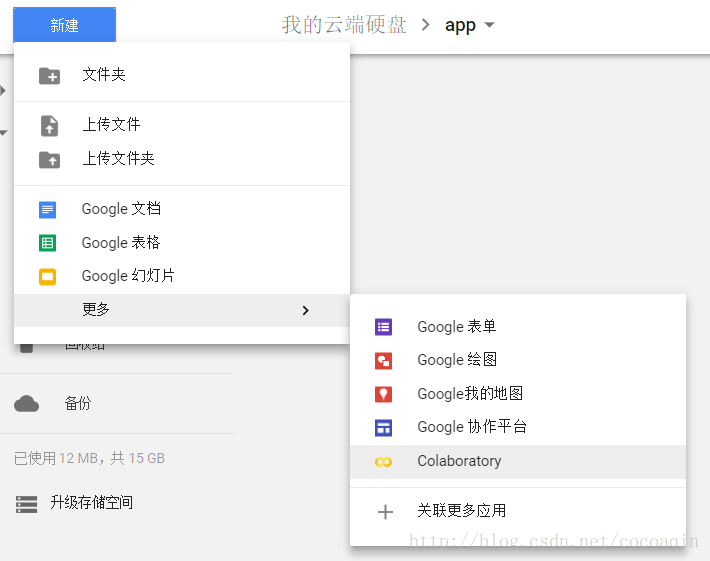
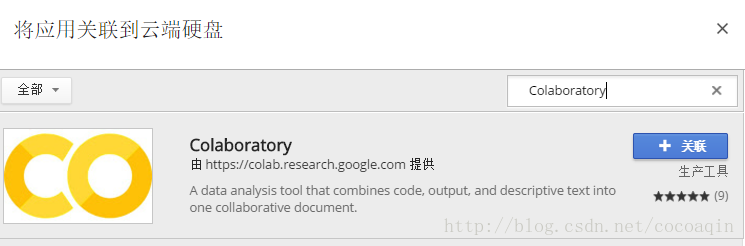
如果在更多栏里没有发现Colaboratory,选择关联更多应用,搜索Colaboratory,选择关联。
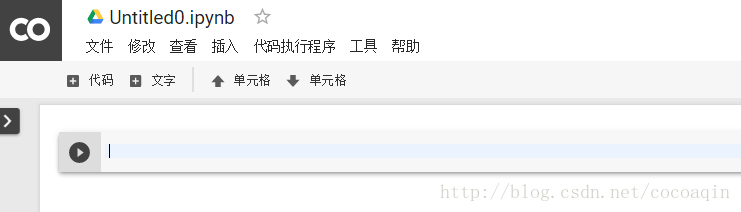
3.3创建完成
创建完成后,会自动生成一个jupyter笔记本,是不是很熟悉~
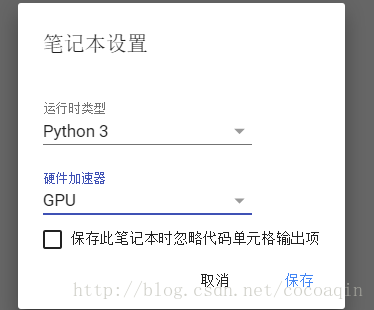
四、设置GPU运行
选择 修改-笔记本设置
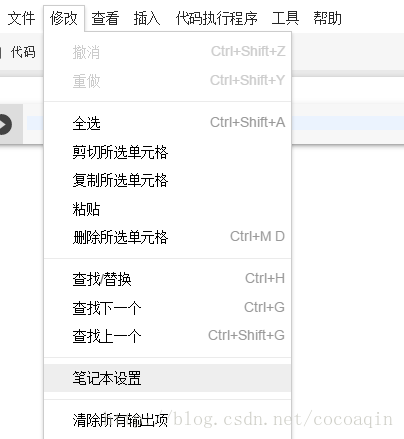
将硬件加速器设置为GPU即可
五、运行.py文件
5.1安装必要库
输入相应代码,并执行(crtl+F9)
!apt-get install -y -qq software-properties-common python-software-properties module-init-tools
!add-apt-repository -y ppa:alessandro-strada/ppa 2>&1 > /dev/null
!apt-get update -qq 2>&1 > /dev/null
!apt-get -y install -qq google-drive-ocamlfuse fuse
from google.colab import auth
auth.authenticate_user()
from oauth2client.client import GoogleCredentials
creds = GoogleCredentials.get_application_default()
import getpass
!google-drive-ocamlfuse -headless -id={creds.client_id} -secret={creds.client_secret} < /dev/null 2>&1 | grep URL
vcode = getpass.getpass()
!echo {vcode} | google-drive-ocamlfuse -headless -id={creds.client_id} -secret={creds.client_secret}
运行后,会出现以下提示

先点开相应的链接,选择自己的谷歌账号,并允许,最后会得到相应的代码,输入相应的框中即可
5.2 挂载云端硬盘
同上,输入下面命令,执行即可
!mkdir -p drive
!google-drive-ocamlfuse drive  -o nonempty
5.3 安装Keras
同理,输入命令
!pip install -q keras5.4 Hello Mnist!
将代码粘入jupyter笔记本中,运行,即可开始奇妙的Google Colab之旅
代码摘自:https://github.com/keras-team/keras/blob/master/examples/mnist_cnn.py
'''Trains a simple convnet on the MNIST dataset.
Gets to 99.25% test accuracy after 12 epochs
(there is still a lot of margin for parameter tuning).
16 seconds per epoch on a GRID K520 GPU.
'''

from __future__ import print_function
import keras
from keras.datasets import mnist
from keras.models import Sequential
from keras.layers import Dense, Dropout, Flatten
from keras.layers import Conv2D, MaxPooling2D
from keras import backend as K

batch_size = 128
num_classes = 10
epochs = 12

# input image dimensions
img_rows, img_cols = 28, 28

# the data, shuffled and split between train and test sets
(x_train, y_train), (x_test, y_test) = mnist.load_data()

if K.image_data_format() == 'channels_first':
    x_train = x_train.reshape(x_train.shape[0], 1, img_rows, img_cols)
    x_test = x_test.reshape(x_test.shape[0], 1, img_rows, img_cols)
    input_shape = (1, img_rows, img_cols)
else:
    x_train = x_train.reshape(x_train.shape[0], img_rows, img_cols, 1)
    x_test = x_test.reshape(x_test.shape[0], img_rows, img_cols, 1)
    input_shape = (img_rows, img_cols, 1)

x_train = x_train.astype('float32')
x_test = x_test.astype('float32')
x_train /= 255
x_test /= 255
print('x_train shape:', x_train.shape)
print(x_train.shape[0], 'train samples')
print(x_test.shape[0], 'test samples')

# convert class vectors to binary class matrices
y_train = keras.utils.to_categorical(y_train, num_classes)
y_test = keras.utils.to_categorical(y_test, num_classes)

model = Sequential()
model.add(Conv2D(32, kernel_size=(3, 3),
                 activation='relu',
                 input_shape=input_shape))
model.add(Conv2D(64, (3, 3), activation='relu'))
model.add(MaxPooling2D(pool_size=(2, 2)))
model.add(Dropout(0.25))
model.add(Flatten())
model.add(Dense(128, activation='relu'))
model.add(Dropout(0.5))
model.add(Dense(num_classes, activation='softmax'))

model.compile(loss=keras.losses.categorical_crossentropy,
              optimizer=keras.optimizers.Adadelta(),
              metrics=['accuracy'])

model.fit(x_train, y_train,
          batch_size=batch_size,
          epochs=epochs,
          verbose=1,
          validation_data=(x_test, y_test))
score = model.evaluate(x_test, y_test, verbose=0)
print('Test loss:', score[0])
print('Test accuracy:', score[1])
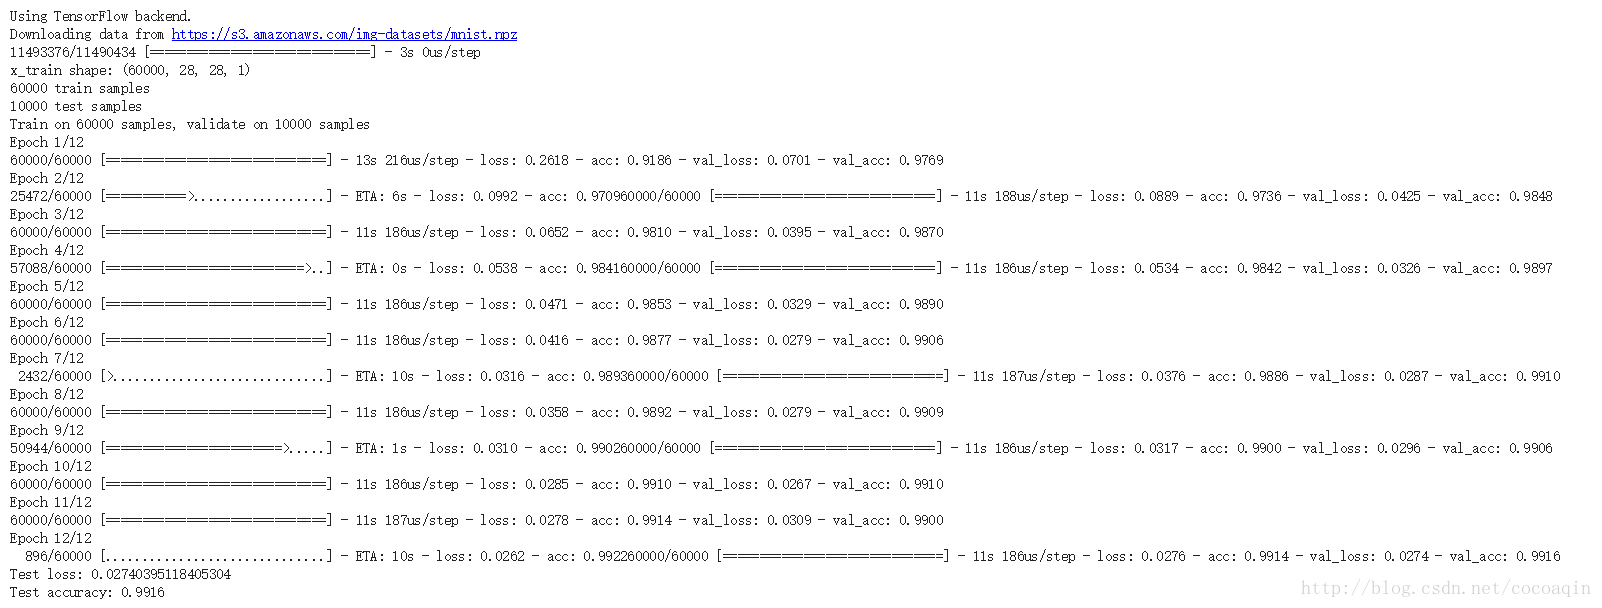
每一个epoch都只用了十多秒!
是不是很有意思呢!
References
https://medium.com/deep-learning-turkey/google-colab-free-gpu-tutorial-e113627b9f5d
当然上面讲得很好了,但是有些细节以及原理,容易被忽略。这里再补充几点。
- 首先你是用的机器GPU或者TPU,每次进去都是随机分配的,所以你可当它是一个云虚拟主机,不能保存文件,每次都会重新格式化,并且与装好很多软件,像Tensorflow,Pytorch,CUDA等,并且还都是最新的。
- 最好使用Google云硬盘与Colab协同工作,使用云盘作为一个文件系统,挂载在你的主机上(感觉是类Ubuntu的系统),可以在自己的云盘里面下载或本机上传文件,然后在云端训练。
- 注意使用的环境是jupyter notebook,它支持多种命令,并且直接支持python命令。因此想使用linux命令,最好在一般的linux命令前面加上感叹号!,以示区分,保证正常运行。其次,感觉它还支持很多Google自己研发的一些脚本语言貌似。。
- 目前访问云硬盘只能通过网页,最好使用chrom浏览器(毕竟它自己的,但据说其他浏览器也可以。。),最好能使用教育网,或者能上外网(翻墙之类的。。)。但是它可以通过下载Google类似MS的办公套件,应用名叫做备份与同步,它可以设置一个或者多个随时进行云端与本机的共享文件夹,也就是随时上传,随时下载,类似github的功能。。
- 还有就最好不要把自己隐私文件放在这个Google云盘吧。。感觉还是不太安全,而且一次登录之后,之后注销了也会自动登录。并且与本机结合的太过密切。。
目前貌似连接还不是太稳定,训练模型需要保持一直连接着。。所以最好经常保存断点吧,毕竟文件至少还可以存在云硬盘里。。
几个常见知识点:
- 从计算机那一栏,点了解详情进去。。
- 选择关联colab应用的时候,就像苹果app store里面对应用的介绍一样,或者直接在浏览器输入
https://colab.research.google.com/ ,它好像也会制动跳转,也就是一个user
guide,自身也是用notebook写的。。

- 其中一个很好的示例:
https://colab.research.google.com/notebooks/basic_features_overview.ipynb#scrollTo=KR921S_OQSHG

你可以将它们保存到自己的云硬盘里,以后随时查看。。
- 这里还有一个链接详细介绍Colab:
https://blog.csdn.net/ScorpC/article/details/80087073
另外其实你还可以编写一份notebook,作为一个常用脚本,并保存在你云盘里。就像最上面博客写那样,作为每次初始化使用Colab,登录GPU安装必要库,初始化环境,安装必要库,以及挂载你的云硬盘的基本操作。这样你以后既不用每次都去查,一条一条的输入命令去初始化你的随机GPU了。我这里在此贴持一份代码,仅供参考:
    ##安装必要库与授权
        !apt-get install -y -qq software-properties-common python-software-properties module-init-tools
        !add-apt-repository -y ppa:alessandro-strada/ppa 2>&1 > /dev/null
        !apt-get update -qq 2>&1 > /dev/null
        !apt-get -y install -qq google-drive-ocamlfuse fuse
        from google.colab import auth
        auth.authenticate_user()
        from oauth2client.client import GoogleCredentials
        creds = GoogleCredentials.get_application_default()
        import getpass
        !google-drive-ocamlfuse -headless -id={creds.client_id} -secret={creds.client_secret} < /dev/null 2>&1 | grep URL
        vcode = getpass.getpass()
        !echo {vcode} | google-drive-ocamlfuse -headless -id={creds.client_id} -secret={creds.client_secret}

    ##挂载云端硬盘
    #同上,输入下面命令,执行即可
        !mkdir -p drive
        !google-drive-ocamlfuse drive  -o nonempty
        ##默认挂在到/content/drive,可以自己更改


##查看显卡与驱动
        !nvidia-smi
        !nvcc -V

##查看目录
        !ls
        !cd /

##查看已安装深度学习库

        import tensorflow as tf
        tf.Session()
        tf.__version__

##进入python环境(这个其实每必要,notebook本身已支持)
        !python

##安装需要的库
        #pip好像直接可以用,不加感叹号
        #安装gpu版tensorflow
        !pip install tensorflow_gpu
        #好像自带了最新版本的tensorflow,pytorch 等

#安装Keras
        #同理,输入命令
        !pip install -q keras


##执行python文件
        !python ***.py

##执行cell里面的内容
        #这个应该是notebook里面的内容了,windows不支持terminal,也可以用notebook,虽然我不经常使用。。
        点击cell前面的播放按钮,或者快捷键:Ctrl+Enter
除了我上面介绍的,你可以去探索更多功能。。
更多请参考:
https://blog.csdn.net/wshixinshouaaa/article/details/80936939
https://blog.csdn.net/qq_41185868/article/details/79638292
https://blog.csdn.net/juanjuan1314/article/details/79194180
https://blog.csdn.net/ssssdbucdbod/article/details/80397808
https://blog.csdn.net/qq_28019591/article/details/81388697
https://blog.csdn.net/pirage/article/details/86741977
https://blog.csdn.net/sinat_25838589/article/details/79116847
https://blog.csdn.net/xltimelong/article/details/81170698
https://blog.csdn.net/guotong1988/article/details/80613147


 2476
2476


 被折叠的 条评论
为什么被折叠?
被折叠的 条评论
为什么被折叠?
 到【灌水乐园】发言


