


一:建目录
1.打开Xftp6软件,选择目前使用的213服务器;
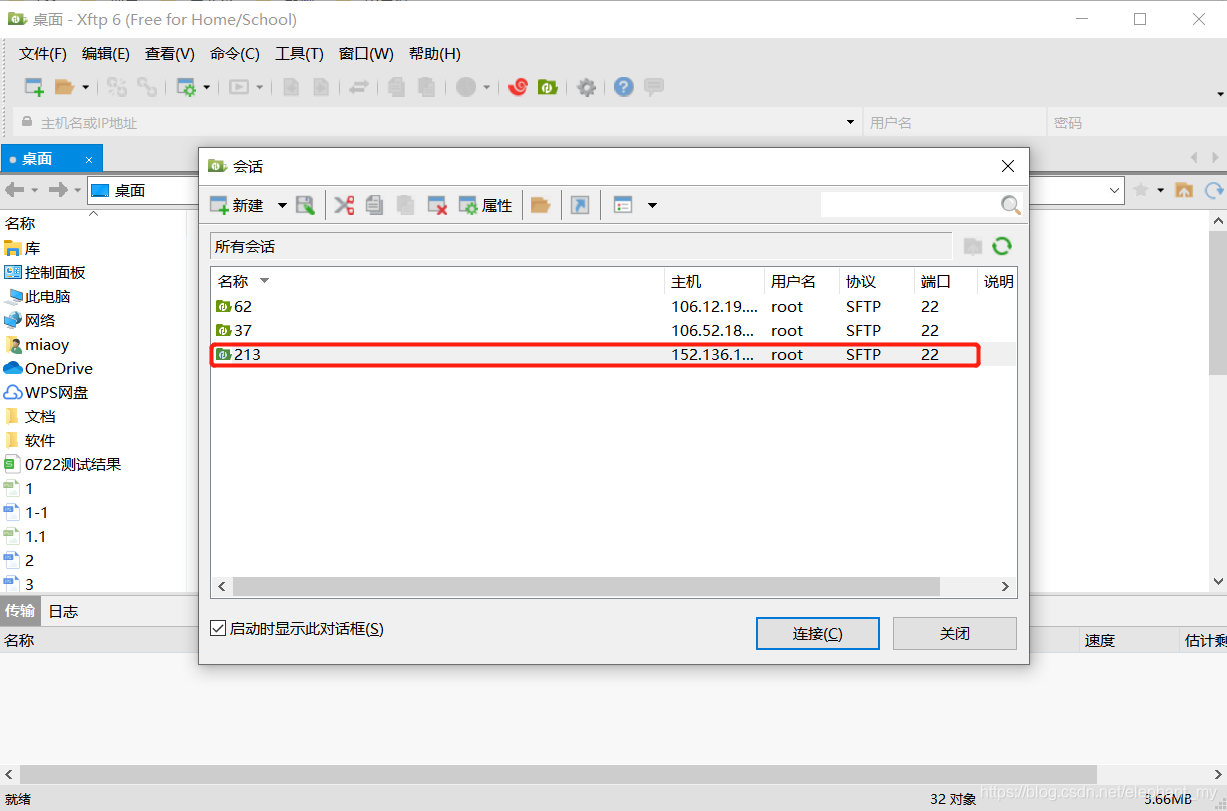
2.输入想要让项目所建的目录/usr/share/nginx,在此目录下右键新建文件夹encyclopedism;
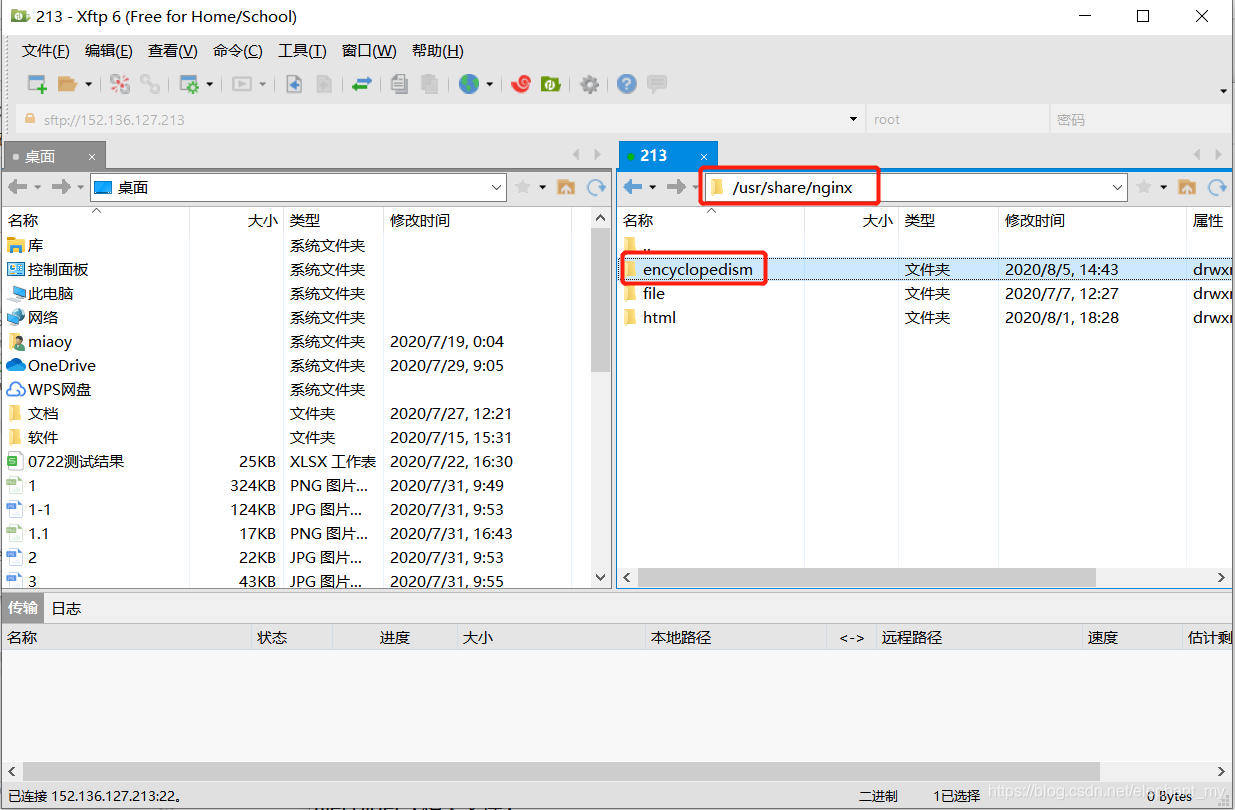
此时已将项目存放的服务器地址建好,接下来进行相关的接口配置
二:配置
3.进入/etc/nginx目录,可看到 nginx.conf 文件及 conf.d 文件夹;
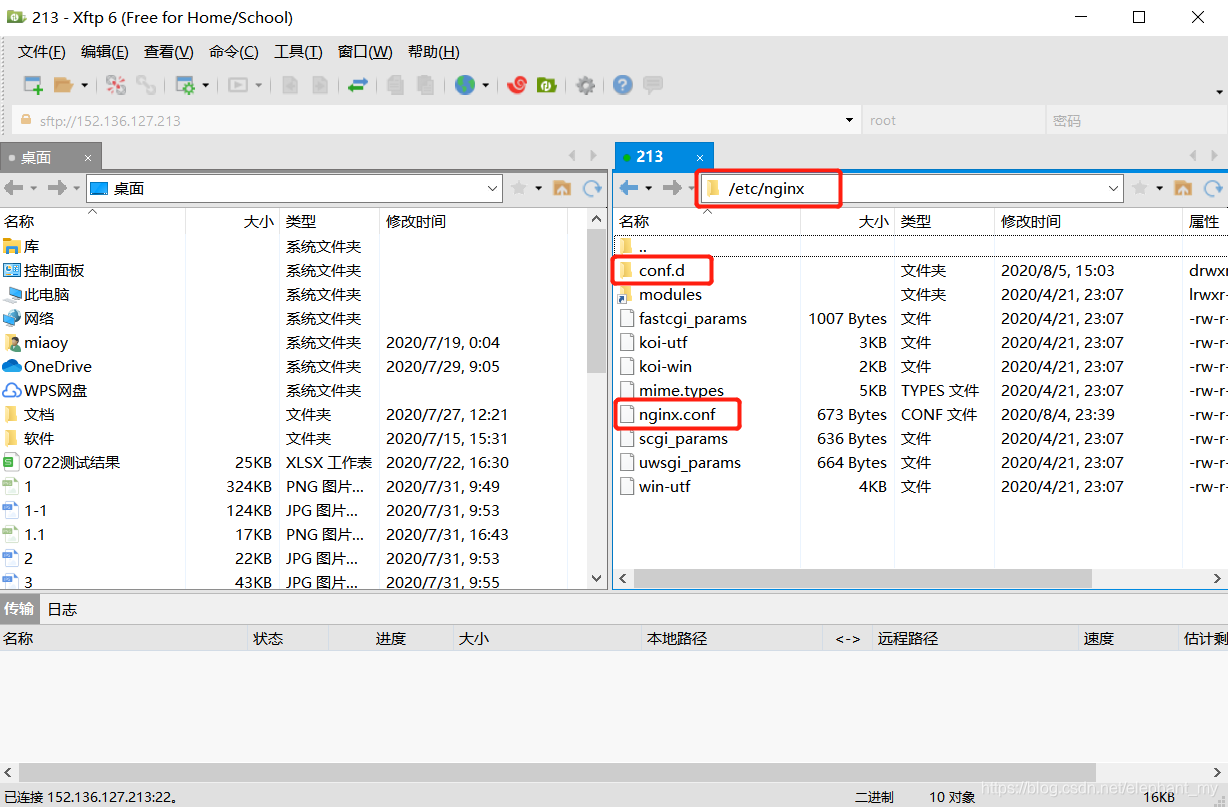
4.在 nginx.conf 文件下进行如下配置:
user  nginx;
worker_processes  1;

error_log  /var/log/nginx/error.log warn;
pid        /var/run/nginx.pid;


events {
    worker_connections  1024;
}


http {
    include       /etc/nginx/mime.types;
    default_type  application/octet-stream;

    log_format  main  '$remote_addr - $remote_user [$time_local] "$request" '
                      '$status $body_bytes_sent "$http_referer" '
                      '"$http_user_agent" "$http_x_forwarded_for"';

    access_log  /var/log/nginx/access.log  main;

    sendfile        on;
    #tcp_nopush     on;

    keepalive_timeout  65;

    #gzip  on;

    include /etc/nginx/conf.d/*.conf;

	client_max_body_size 200m;
}
其中include /etc/nginx/conf.d/*.conf;
可解释为:此服务器下的项目可能不止一个,若都将接口相关的配置放在一个文件中,会显得很乱,因此需要引入/etc/nginx/conf.d文件夹下的所有*.conf类型的文件。
5.进入 /etc/nginx/conf.d目录新建 encyclopedism.conf 文件;
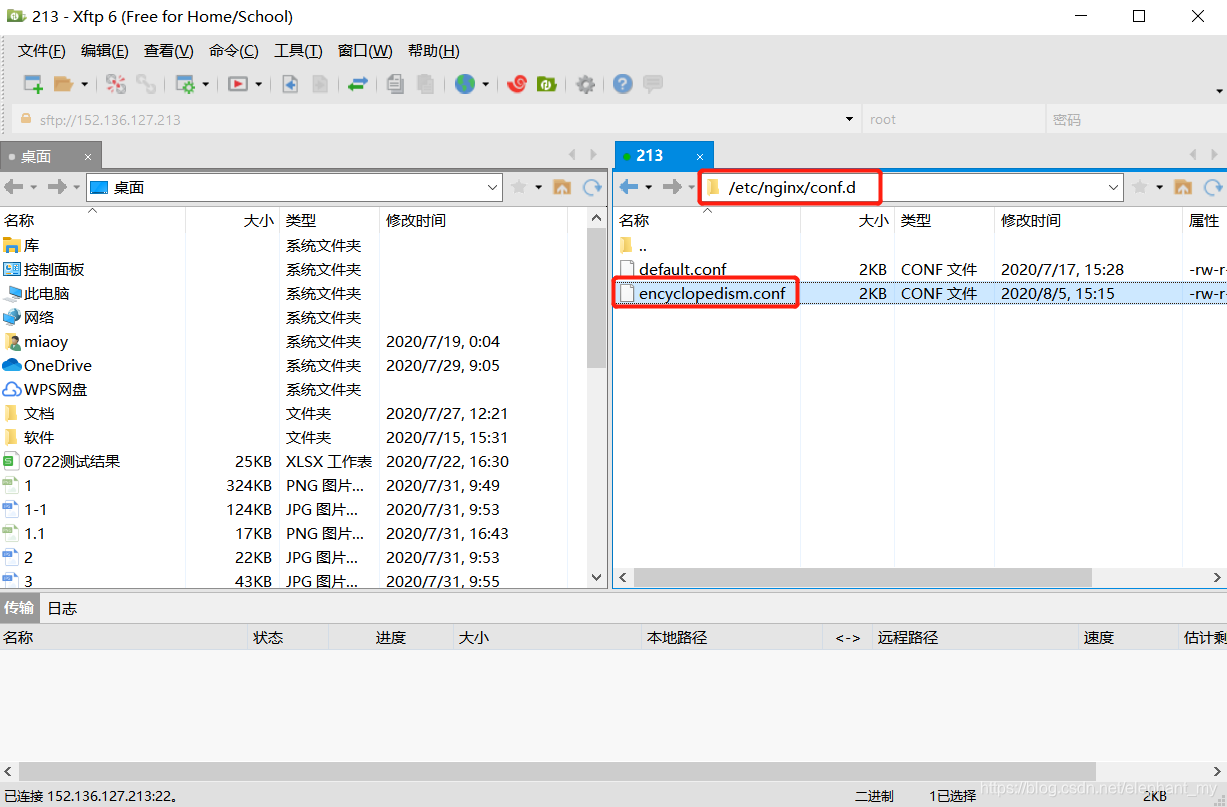
6.在 encyclopedism.conf 文件下进行如下配置:
server {
    listen       8082;
    server_name  localhost;

    #charset koi8-r;
    #access_log  /var/log/nginx/host.access.log  main;
	location /api/manager {
        proxy_pass   http://152.136.127.213:8001;
       proxy_set_header x-forwarded-for  $remote_addr;
    }
	location /api/business {
        proxy_pass   http://152.136.127.213:6678;
        proxy_set_header x-forwarded-for  $remote_addr;
    }
	location /api/web {
        proxy_pass   http://152.136.127.213:6678;
       proxy_set_header x-forwarded-for  $remote_addr;
    }
	location /mongodbFile {
        proxy_pass   http://152.136.127.213:6678;
       proxy_set_header x-forwarded-for  $remote_addr;
    }


    location / {
        root   /usr/share/nginx/encyclopedism;
        index  index.html index.htm;

       proxy_set_header x-forwarded-for  $remote_addr;
    }

    #error_page  404              /404.html;

    # redirect server error pages to the static page /50x.html
    #
    error_page   500 502 503 504  /50x.html;
    location = /50x.html {
        root   /usr/share/nginx/html;
    }

    # proxy the PHP scripts to Apache listening on 127.0.0.1:80
    #
    #location ~ \.php$ {
    #    proxy_pass   http://127.0.0.1;
    #}

    # pass the PHP scripts to FastCGI server listening on 127.0.0.1:9000
    #
    #location ~ \.php$ {
    #    root           html;
    #    fastcgi_pass   127.0.0.1:9000;
    #    fastcgi_index  index.php;
    #    fastcgi_param  SCRIPT_FILENAME  /scripts$fastcgi_script_name;
    #    include        fastcgi_params;
    #}

    # deny access to .htaccess files, if Apache's document root
    # concurs with nginx's one
    #
    #location ~ /\.ht {
    #    deny  all;
    #}
}
其中:
可自定义端口号和名称
listen       8082;     //自定义端口号
server_name  localhost;   //自定义名称
拦截:对后台访问路径的设置
location /api/manager {
        proxy_pass   http://152.136.127.213:8001;
       proxy_set_header x-forwarded-for  $remote_addr;
    }
即遇到含有/api/manager的 url ,将变成替换成http://152.136.127.213:8001/api/manager。
设置好后需要到Xshell 6软件下重启服务
三:重启服务
6.重新启动nginx:#cd /usr/share/nginx/encyclopedism #./nginx
具体在Xshell 6软件下如何操作还需要后续补充。
四:打包部署
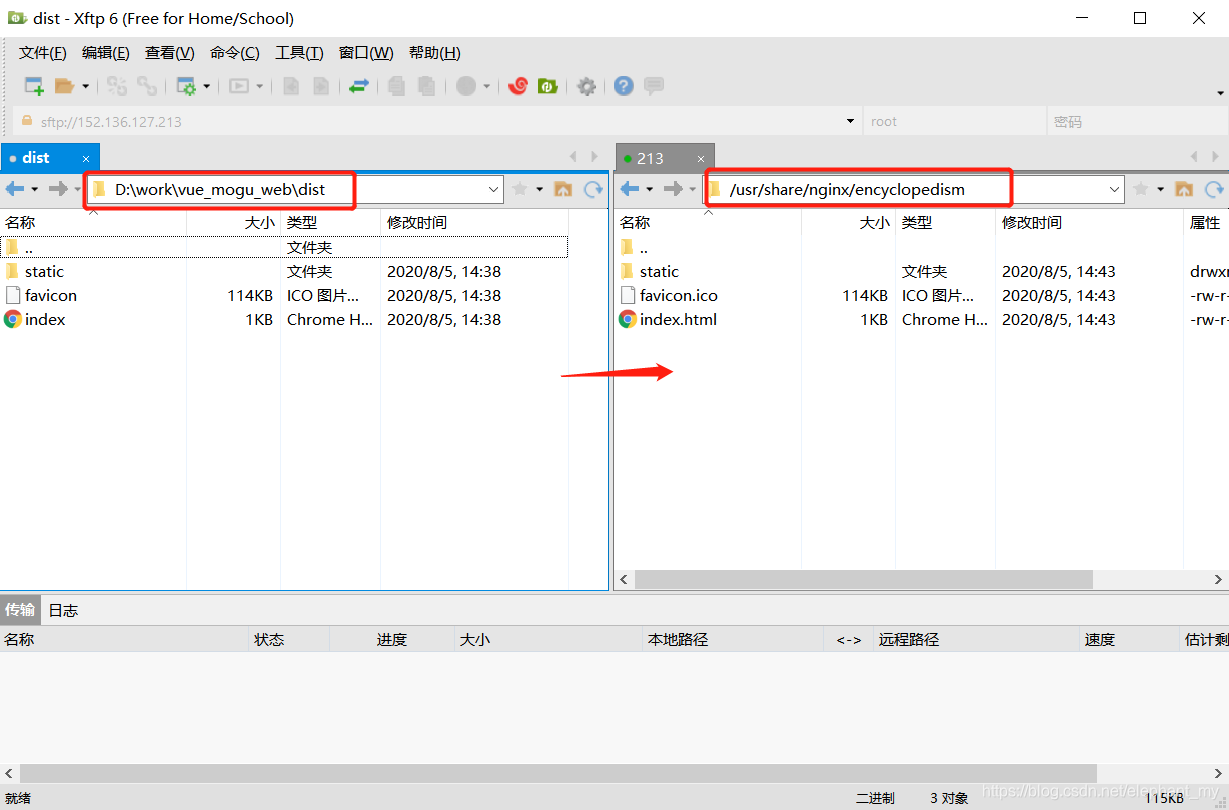
7.在编译器下对项目进行打包 npm run build 生成 dist 文件;
8.在Xftp6软件下进入建好的目录/usr/share/nginx/encyclopedism,在软件左侧找到项目所在文件下的 dist 文件,将 dist 中的文件全部复制到 建好的目录下即可。
了解更多参考大神作:vue前端项目打包并且在Linux服务器上部署过程(vue-admin-template-master)


 9781
9781

 被折叠的 条评论
为什么被折叠?
被折叠的 条评论
为什么被折叠?
 到【灌水乐园】发言


