


3台Centos
192.168.137.128 (Nginx)
192.168.137.129(Tomcat 端口8080)
192.168.137.131(Tomcat 端口8080)
(如果复制的VM的网卡不可用 可删除/etc/udev/rules.d/70-persistent-net.rules 文件 我的是70开头,有的不一样 可以执行 echo null >> 70-persistent-net.rulesj 空了 然后reboot 就可以看到网卡了)
配置免登陆
ssh-keygen -t ras 一路回车 会在/root/.ssh/生成公钥和私钥
接下来推送(128机器)
cat id_rsa.pub | ssh root@192.168.137.129 /root/.ssh/authorized_keys
在登陆129 给这个文件755权限
chmod 755 authorized_keys
然后回到128机器
ssh 192.168.137.129
ok
开放端口8080 这里有开放端口,不关闭防火墙
安装nginx(1.9.9)
wget http://nginx.org/download/nginx-1.9.9.tar.gz
解压
tar -zxvf nginx-1.9.9.tar.gz
进入目录
设置路径
./configure –prefix=/usr/local/nginx
编译
make
安装
make install
ok了 启动
cd /usr/local/nginx/sbin
./nginx
就可以访问了 出现wellcome Nginx 就可以了
上传tomcat 到139,131机器
scp 文件 root@192.168.137.129:/root
scp 文件 root@192.168.137.131:/root
两个机器解压
tar -zxvf apache-tomcat-7.0.63.tar.gz /usr/local/tomcat/
配置nginx.conf
vim /usr/local/nginx/conf/nginx.conf
#user  nobody;
worker_processes  1;

#error_log  logs/error.log;
#error_log  logs/error.log  notice;
#error_log  logs/error.log  info;

#pid        logs/nginx.pid;


events {
    worker_connections  1024;
}


http {
    include       mime.types;
    default_type  application/octet-stream;

    #log_format  main  '$remote_addr - $remote_user [$time_local] "$request" '
    #                  '$status $body_bytes_sent "$http_referer" '
    #                  '"$http_user_agent" "$http_x_forwarded_for"';

    #access_log  logs/access.log  main;

    sendfile        on;
    #tcp_nopush     on;

    #keepalive_timeout  0;
    keepalive_timeout  65;

    #gzip  on;
    #配置被代理服务器2个
    upstream backend {
             server 192.168.137.129:8080;
             server 192.168.137.131:8080;

         }


    server {
        listen       80;
        server_name  localhost;

        #charset koi8-r;

        #access_log  logs/host.access.log  main;

        location / {
           #这里的backend 和要上面的upstream 后的名称一样
        proxy_pass  http://backend;

        }


        #error_page  404              /404.html;

        # redirect server error pages to the static page /50x.html
        #
        error_page   500 502 503 504  /50x.html;
        location = /50x.html {
            root   html;
        }

        # proxy the PHP scripts to Apache listening on 127.0.0.1:80
        #
        #location ~ \.php$ {
        #    proxy_pass   http://127.0.0.1;
        #}

        # pass the PHP scripts to FastCGI server listening on 127.0.0.1:9000
        #
        #location ~ \.php$ {
        #    root           html;
        #    fastcgi_pass   127.0.0.1:9000;
        #    fastcgi_index  index.php;
        #    fastcgi_param  SCRIPT_FILENAME  /scripts$fastcgi_script_name;
        #    include        fastcgi_params;
        #}

        # deny access to .htaccess files, if Apache's document root
        # concurs with nginx's one
        #
        #location ~ /\.ht {
        #    deny  all;
        #}
    }


    # another virtual host using mix of IP-, name-, and port-based configuration
    #
    #server {
    #    listen       8000;
    #    listen       somename:8080;
    #    server_name  somename  alias  another.alias;

    #    location / {
    #        root   html;
    #        index  index.html index.htm;
    #    }
    #}


    # HTTPS server
    #
    #server {
    #    listen       443 ssl;
    #    server_name  localhost;

    #    ssl_certificate      cert.pem;
    #    ssl_certificate_key  cert.key;

    #    ssl_session_cache    shared:SSL:1m;
    #    ssl_session_timeout  5m;

    #    ssl_ciphers  HIGH:!aNULL:!MD5;
    #    ssl_prefer_server_ciphers  on;

    #    location / {
    #        root   html;
    #        index  index.html index.htm;
    #    }
    #}

}
修改上面的注释的两个地方就可以了
保存!
wq
开启129,131的tomcat
(可以在两个tomcat的webapp/ROOT/index.jsp做点手脚 好区分 我就改了一个HOME加个11111111111另一个0000000000000)
好了我们重启nginx
./nginx -s reload
不报错就说明OK了
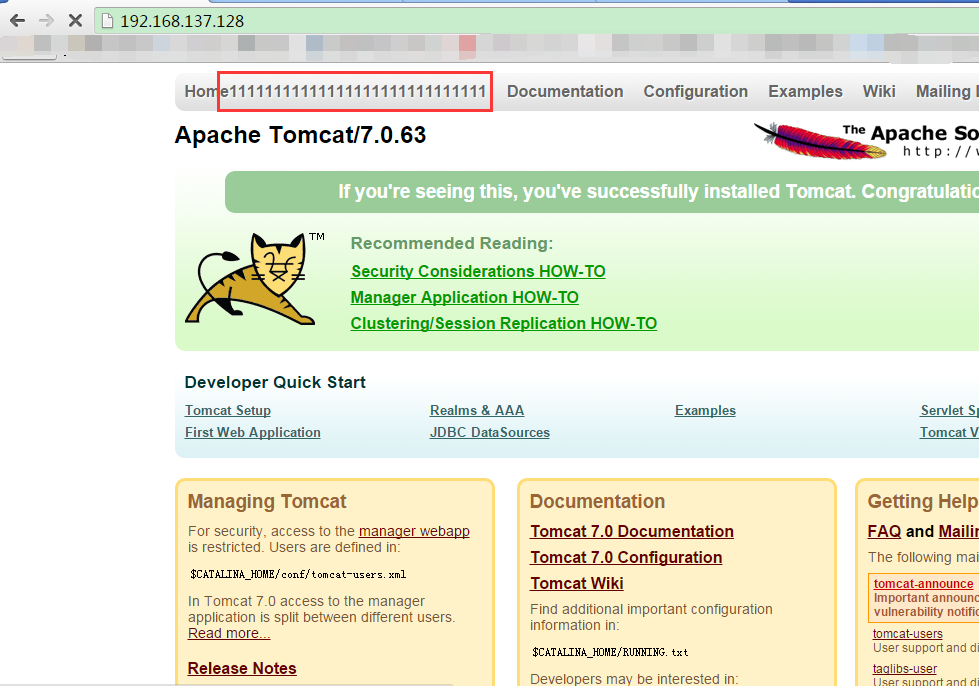
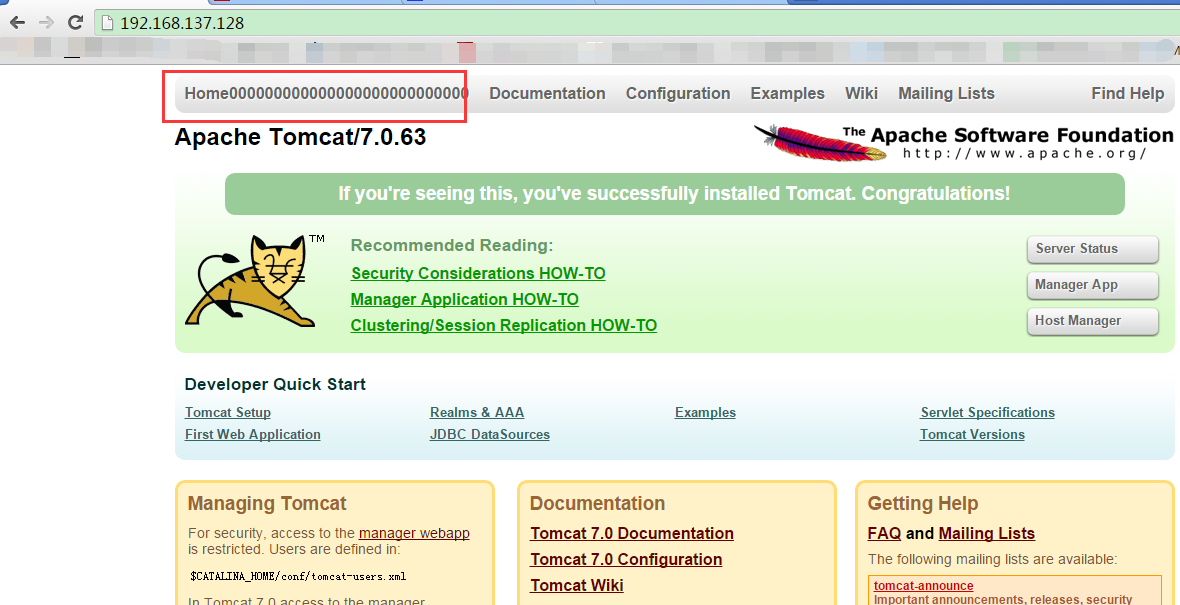
两次我们访问的是nginx ,但是访问的是129和131机器的tomcat,做到了负载均衡,我们可以对nginx搭建集群,这里分配的是hash分配算法.比较简单.
作为 service启动:
vi /etc/init.d/nginx
吧下面的复制过去路径不一样的需要改路径
#!/bin/bash
# nginx Startup script for the Nginx HTTP Server
# it is v.0.0.2 version.
# chkconfig: - 85 15
# description: Nginx is a high-performance web and proxy server.
#              It has a lot of features, but it's not for everyone.
# processname: nginx
# pidfile: /var/run/nginx.pid
# config: /usr/local/nginx/conf/nginx.conf
nginxd=/usr/local/nginx/sbin/nginx
nginx_config=/usr/local/nginx/conf/nginx.conf
nginx_pid=/var/run/nginx.pid
RETVAL=0
prog="nginx"
# Source function library.
. /etc/rc.d/init.d/functions
# Source networking configuration.
. /etc/sysconfig/network
# Check that networking is up.
[ ${NETWORKING} = "no" ] && exit 0
[ -x $nginxd ] || exit 0
# Start nginx daemons functions.
start() {
if [ -e $nginx_pid ];then
   echo "nginx already running...."
   exit 1
fi
   echo -n $"Starting $prog: "
   daemon $nginxd -c ${nginx_config}
   RETVAL=$?
   echo
   [ $RETVAL = 0 ] && touch /var/lock/subsys/nginx
   return $RETVAL
}
# Stop nginx daemons functions.
stop() {
        echo -n $"Stopping $prog: "
        killproc $nginxd
        RETVAL=$?
        echo
        [ $RETVAL = 0 ] && rm -f /var/lock/subsys/nginx /var/run/nginx.pid
}
# reload nginx service functions.
reload() {
    echo -n $"Reloading $prog: "
    #kill -HUP `cat ${nginx_pid}`
    killproc $nginxd -HUP
    RETVAL=$?
    echo
}
# See how we were called.
case "$1" in
start)
        start
        ;;
stop)
        stop
        ;;
reload)
        reload
        ;;
restart)
        stop
        start
        ;;
status)
        status $prog
        RETVAL=$?
        ;;
*)
        echo $"Usage: $prog {start|stop|restart|reload|status|help}"
        exit 1
esac
保存 给权限
chmod a+x /etc/init.d/nginx
测试
[root@localhost sbin]# service nginx start
正在启动 nginx: [确定]
ok了


 941
941

 被折叠的 条评论
为什么被折叠?
被折叠的 条评论
为什么被折叠?
 到【灌水乐园】发言


