


 本文详细介绍如何安装wxPython并创建一个包含菜单栏、状态栏、文本框等元素的图形界面应用程序。通过具体代码示例展示了如何响应用户交互事件。
wxPython 安装
- 查看本地Python版本
C:\Users\Administrator>py -V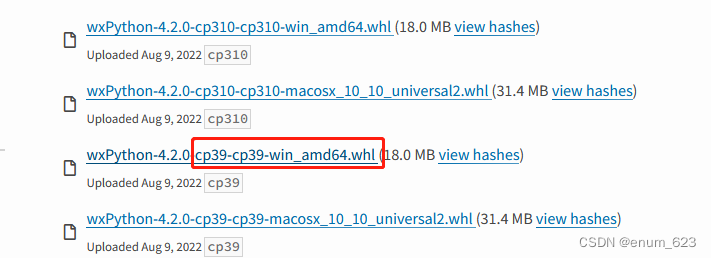
Python 3.9.2- 选择对应的wxPython版本
地址:https://pypi.org/project/wxPython/#files
选择
cp39表示Python的版本,win表示Windows,64表示64位的。
- 安装wxPython
下载完成后使用dos环境切换到Python安装目录的Scripts目录下。如D:\Python\Scripts
使用pip进行安装。等待提示安装成功即可。
pip3.9.exe install .\wxPython-4.2.0-cp39-cp39-win_amd64.whl
wxPython 使用
- wx.Frame 创建一个窗口
import wx

class MaimFrame(wx.Frame):
    def __init__(self, parent, id):
        wx.Frame.__init__(self,parent,id,title="网络服务",pos = (100,100),size = (800,600))

def main():
    app = wx.App()
    win = MaimFrame(parent =None,id = -1) #创建窗体
    win.Show() #显示窗体
    app.MainLoop() #运行程序

if __name__ == "__main__":
main()- 创建菜单栏
def InitMenuBar(self):
        menubar = wx.MenuBar() # 菜单栏
        setMenu = wx.Menu()
        aboutMenu = wx.Menu()
        menubar.Append(setMenu,'设置')
        menuServer = setMenu.Append(wx.ID_FILE,'服务器ip和端口设置','ip和端口')

        menubar.Append(aboutMenu,'关于')
        menuabout = aboutMenu.Append(wx.ID_ABOUT,'Info','Information')

        self.SetMenuBar(menubar)
        self.Bind(wx.EVT_MENU,self.menuServerClick,menuServer) #绑定菜单项点击事件
        self.Bind(wx.EVT_MENU,self.menuAboutClick,menuabout) #绑定菜单项点击事件


def menuServerClick(self,event):
        dlg = wx.TextEntryDialog(self, 'Enter Your Text','Text Entry Dialog')
        if dlg.ShowModal() == wx.ID_OK:
            print("Text entered:"+dlg.GetValue())
        dlg.Destroy()


    def menuAboutClick(self,event):
        info = wx.adv.AboutDialogInfo()
        info.SetName('网络服务')
        info.SetVersion('1.0.0')
        # info.SetDescription(description)
        info.SetCopyright('(C) 2022 Enum')
wx.adv.AboutBox(info=info) # 关于菜单窗口- 创建状态栏
def InitStatusBar(self):
        #创建状态栏
        self.statusbar = self.CreateStatusBar()
        self.timer = wx.Timer(self) #定时器
        #将状态栏分割为3个部分
        self.statusbar.SetFieldsCount(3)
        #分割状态栏的比例为3:2:1,用负数表示
        self.statusbar.SetStatusWidths([-3,-2,-1])
        # self.SetStatusBar(statusbar)
        #每部分状态栏显示的值,当鼠标停在menu上时,0号状态栏会临时显示上面menu里的提示信息
        # statusbar.SetStatusText('1111',0)

        # 显示当前配置的ip和端口
        self.statusbar.SetStatusText(self.__serverIp + ":" + str(self.__serverPort),1)
        # 显示当前磁盘可用空间
        self.statusbar.SetStatusText('可用空间: {:6.2f} GB '.format(gConfig.freeDisk),2)

        self.Bind(wx.EVT_TIMER,self.showTime, self.timer)
        self.timer.Start(1000) #一秒钟更新一次

        if gConfig.freeDisk < 1:
            wx.MessageBox("磁盘空间不足")#弹出提示框

def showTime(self,event): # 显示当前系统时间
    time_now_second = datetime.datetime.now().strftime("%Y/%m/%d %H:%M:%S")
    # self.statusbar.SetStatusText("aasfafd",0)
self.statusbar.SetStatusText(f"{time_now_second}",0)- 文本,文本框,按钮,多行文本,事件
panel = wx.Panel(self) #创建面板
#创建菜单栏和状态栏
self.InitMenuBar()
self.InitStatusBar()
#文本
self.title = wx.StaticText(panel,label="默认配置信息(可修改)",pos = (120,20))
self.label_ip=wx.StaticText(panel, label="网络IP",pos=(10,50))
self.label_port= wx.StaticText(panel, label="端口", pos=(10, 90))
#输入框
self.text_ip=wx.TextCtrl(panel,pos=(60,50),size=(235,25),style=wx.TE_LEFT)
self.text_port = wx.TextCtrl(panel, pos=(60, 90), size=(235, 25), style=wx.TE_LEFT) # TE_PASSWORD
self.text_port.SetEditable(False)
#创建“确定”和"取消"按钮
self.bt_confirm = wx.Button(panel, label='修改',pos=(306,50))

self.bt_confirm.Bind(wx.EVT_BUTTON,self.OnclickSubmit)

self.label_dir=wx.StaticText(panel, label="存储\n路径",pos=(10,154))
self.text_dir=wx.TextCtrl(panel,pos=(60,152),size=(235,40),style=wx.TE_LEFT|wx.TE_MULTILINE)
self.text_dir.SetEditable(False) #使其不能编辑

self.bt_open_dir=wx.Button(panel,label='打开路径',pos=(306,160))
self.bt_open_dir.Bind(wx.EVT_BUTTON, self.OnclickOpenDir) #绑定事件


richLable = wx.StaticText(panel, -1,  "运行日志",pos = (400,10))
# richLable.SetFont()
# 多行文本
self.__richText = wx.TextCtrl(panel, -1,"",pos = (400,30),size=(380,480),style = wx.TE_MULTILINE|wx.TE_RICH2)
self.__richText.SetInsertionPoint(0)
# richText.SetStyle(44,52,wx.TextAttr("white","black")) #设备文本样式
points = self.__richText.GetFont().GetPointSize()
font = wx.Font(points+3,wx.FONTFAMILY_DEFAULT,wx.FONTSTYLE_ITALIC,wx.FONTWEIGHT_BOLD,True)
# richText.SetStyle(68,82,wx.TextAttr("blue",wx.GREEN,font))

sizer = wx.FlexGridSizer(2,6,6) #创建布局
sizer.AddMany([richLable,self.__richText])
# self.__richText.AppendText("Addsssss")


panel.SetSizer(sizer=sizer)
self.SetMaxSize((800,600)) #设置最大窗口大小
self.SetMinSize((800,600)) #设置最小窗口大小 设置一样使其不能拉伸和缩小
self.Center() #居中显示

# 退出事件
self.Bind(wx.EVT_CLOSE,self.onExit)
def OnclickSubmit(self,event):
message="设置成功"
ip=self.text_ip.GetValue()
port = self.text_port.GetValue()
# 判断ip规则
if ip == "":
message="ip不能为空"
sep = ip.split('.')
if len(sep) != 4:
message="ip不合法,请检查"
for i,x in enumerate(sep):
try:
int_x = int(x)
if int_x < 0 or int_x > 255:
message="ip不合法,请检查"
break
except ValueError:
message="ip不合法,请检查"
break
gConfig.setIpConfing(ip=ip)
wx.MessageBox(message + "! 请关闭软件重启打开生效")#弹出提示框
def OnclickCancel(self,event):
self.text_ip.SetValue("")#清空
self.text_port.SetValue("")#清空
def OnclickOpenDir(self,event):
asyncio.run(openSystemPath(os.path.join(gConfig.currentEnvPath, gConfig.saveFileDir))) #通过异步方式打开操作,不阻塞主线程
def onExit(self,event):
print("onExit")
self.Destroy() #退出
async def openSystemPath(path):
# os.system("explorer.exe %s" % path)
webbrowser.open(path) #在window资源管理器打开
return- 更新UI 通过与线程同学更新ui
使用 wx.lib.pubsub
from wx.lib.pubsub import pub
如果导入失败安装模块
pip install pypubsub
#订阅主题,接收这个主题的信息
#pub.subscribe(callable, topic)
#发布主题,并向这个主题发送信息
#pub.sendMessage(topic,参数名=参数值...)
#订阅消息
pub.subscribe(self.updateDisplay,"updateDisplay")

#接收消息处理
def updateDisplay(self,msg):
    self.__richText.AppendText(msg + "\n")
发送消息
import wx

#在其他线程中发送消息
curtime = time.strftime("%Y-%m-%d %H:%M:%S",time.localtime())
self.request.sendall(str(curtime+ "|ERROR_400").encode("utf-8"))
wx.CallAfter(pub.sendMessage,"updateDisplay",msg = curtime + ": ERROR_400")
成果


 1377
1377

 被折叠的 条评论
为什么被折叠?
被折叠的 条评论
为什么被折叠?
 到【灌水乐园】发言


