


import QtQuick 2.14
import QtQuick.Controls 2.14
import QtGraphicalEffects 1.0
import QtQuick.Window 2.14
ApplicationWindow {
id: window
visible: true
width: 640
height: 480
flags: Qt.FramelessWindowHint
color: "transparent"
property real mouseX: 0
property real mouseY: 0
Rectangle {
id: background
anchors.fill: parent
radius: 20
border.color: "black"
border.width: 1
gradient: Gradient {
GradientStop { position: 0.0; color: "blue" }
GradientStop { position: 1.0; color: "purple" }
}
Rectangle {
id: titleBar
width: parent.width
height: 40
color: "transparent"
radius: 20
clip: true
MouseArea {
id: dragArea
anchors.fill: parent
cursorShape: Qt.SizeAllCursor
onPressed: {
window.mouseX = mouse.x
window.mouseY = mouse.y
}
onPositionChanged: {
window.x += mouse.x - window.mouseX
window.y += mouse.y - window.mouseY
}
}
Button {
id: closeButton
text: "X"
anchors.right: parent.right
anchors.rightMargin: 10
anchors.verticalCenter: parent.verticalCenter
background: Rectangle {
color: "transparent"
}
onClicked: {
Qt.quit()
}
}
}
Row {
anchors.centerIn: parent
spacing: 20
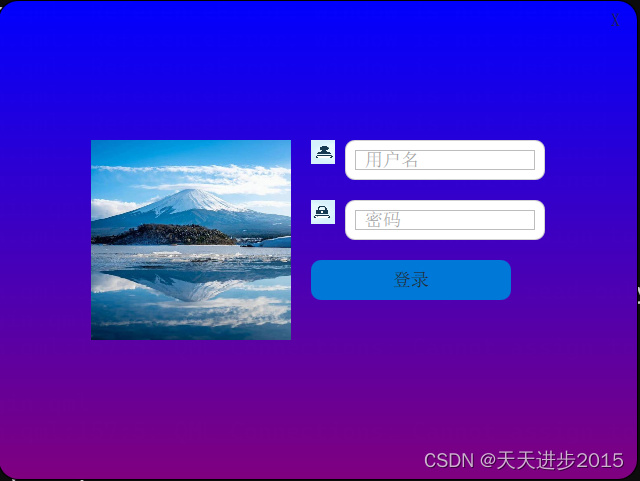
Image {
id: loginImage
source: "logo.jpeg"
width: 200
height: 200
}
Column {
spacing: 20
Row {
spacing: 10
Image {
source: "icon_user.png"
width: 24
height: 24
}
Rectangle {
width: 200
height: 40
radius: 10
color: "white"
border.color: "lightgray"
border.width: 1
clip: true
TextField {
id: usernameField
placeholderText: qsTr("用户名")
anchors.fill: parent
anchors.margins: 10
}
}
}
Row {
spacing: 10
Image {
source: "icon_password.png"
width: 24
height: 24
}
Rectangle {
width: 200
height: 40
radius: 10
color: "white"
border.color: "lightgray"
border.width: 1
clip: true
TextField {
id: passwordField
placeholderText: qsTr("密码")
echoMode: TextInput.Password
anchors.fill: parent
anchors.margins: 10
}
}
}
Button {
id: loginButton
text: qsTr("登录")
width: 200
height: 40
//radius: 10
clip: true
background: Rectangle {
color: "#0078d7"
radius: 10
}
onClicked: {
// 在此处添加登录逻辑
console.log("用户名: " + usernameField.text)
console.log("密码: " + passwordField.text)
}
}
}
}
}
onWidthChanged: {
background.width = window.width
}
onHeightChanged: {
background.height = window.height
}
}


 4626
4626


 被折叠的 条评论
为什么被折叠?
被折叠的 条评论
为什么被折叠?
 到【灌水乐园】发言


