


SpringBoot 2.7教程:SpringBoot + Web 项目搭建及实践应用-2022年最新图文版本
SpringBoot 2.7教程:SpringBoot + Web 项目搭建,异常捕获处理-2022年最新图文版本
SpringBoot 2.7教程:SpringBoot + Mysql 项目应用-2022年最新图文版本
SpringBoot 2.7教程:SpringBoot 集成 jsp 页面开发 -2022年最新图文版本
SpringBoot 2.7教程:SpringBoot 实现文件上传,图片上传并显示功能-2022年最新图文版本
SpringBoot 2.7教程:springboot 设置全局字符编码,解决乱码问题-2022年最新图文版
SpringBoot 2.7教程:SpringBoot mybatis 多数据源的整合方法-2022年最新图文版本
SpringBoot 2.7教程:SpringBoot 整合 RocketMQ 项目搭建-2022年最新图文版本
SpringBoot 2.7教程:SpringBoot 整合 RabbitMQ 项目搭建-2022年最新图文版本
SpringBoot 2.7教程:SpringBoot 整合 MongoDB 项目搭建-2022年最新图文版本
SpringBoot 2.7教程:SpringBoot 整合 Redisson 项目搭建-2022年最新图文版本
SpringBoot 2.7教程:SpringBoot 整合 Redis 项目搭建-2022年最新图文版本
本章主要目标:
1.学习SpringBoot 实现文件上传功能的项目搭建
目录
七、创建 MyWebMvcConfigurer,配置资源映射路径
一、新建springboot-file项目
二、修改pom.xml文件,确定引入的包
        <dependency>
            <groupId>org.springframework.boot</groupId>
            <artifactId>spring-boot-starter-web</artifactId>
        </dependency>
        <!-- 引入SpringBoot内嵌Tomcat对jsp的解析依赖,不添加这个解析不了jsp -->
        <dependency>
            <groupId>org.apache.tomcat.embed</groupId>
            <artifactId>tomcat-embed-jasper</artifactId>
        </dependency>
同时,在pom文件中的build标签下,添加如下内容:
<!--
    SpringBoot项目默认推荐使用的前端引擎是thymeleaf
    现在我们要使用SpringBoot集成jsp,手动指定jsp最后编译的路径
    同时SpringBoot集成jsp编译jsp的路径是规定好的:META-INF/resources
-->
<resources>
    <resource>
        <!-- 源文件夹 -->
        <directory>src/main/webapp</directory>
        <!-- 指定编译到的路径为 META-INF/resources -->
        <targetPath>META-INF/resources</targetPath>
        <!-- 指定源文件夹中的哪些资源需要进行编译 -->
        <includes>
            <include>*.*</include>
        </includes>
     </resource>
</resources>
三、配置视图解析器
要使用jsp,我们也可以在它的核心配置文件 application.properties 中,声明一下视图解析器。
#配置视图解析器
spring.mvc.view.prefix=/
spring.mvc.view.suffix=.jsp
四、添加webapp添加到resource
五、在webapp下添加file.jsp页面
<%@ page contentType="text/html;charset=UTF-8" language="java" %>
<html>
<head>
    <title>Title</title>
</head>
<body>
<form action="/fileUpload" method="post" enctype="multipart/form-data">
    <label>上传图片</label>
    <input type="file" name="file"/>
    <input type="submit" value="上传"/>
</form>
<p>图片:</p>
<img src="${filename }"/>
</body>
</html>
六、添加FileController
import org.springframework.stereotype.Controller;
import org.springframework.ui.Model;
import org.springframework.web.bind.annotation.GetMapping;
import org.springframework.web.bind.annotation.PostMapping;
import org.springframework.web.bind.annotation.RequestParam;
import org.springframework.web.multipart.MultipartFile;

import javax.servlet.http.HttpServletRequest;
import java.io.*;
import java.util.UUID;
/***
 * @date: 2022/6/30
 * @author  WX:深入技术架构
 * @description: 文件上传
 */
@Controller
public class FileController {

    @GetMapping(value = "/file")
    public String file() {
        return "file";
    }

    @PostMapping(value = "/fileUpload")
    public String fileUpload(@RequestParam(value = "file") MultipartFile file, Model model, HttpServletRequest request) {
        if (file.isEmpty()) {
            System.out.println("文件为空空");
        }
        String fileName = file.getOriginalFilename();  // 文件名
        String suffixName = fileName.substring(fileName.lastIndexOf("."));  // 后缀名
        String filePath = "/tmp/fileupload/"; // 上传后的路径,windows 使用 "D://fileupload//"
        fileName = UUID.randomUUID() + suffixName; // 新文件名
        File dest = new File(filePath + fileName);
        if (!dest.getParentFile().exists()) {
            dest.getParentFile().mkdirs();
        }
        try {
            file.transferTo(dest);
        } catch (IOException e) {
            e.printStackTrace();
        }
        String filename = "/fileupload/" + fileName;
        model.addAttribute("filename", filename);
        return "file";
    }
}
七、创建 MyWebMvcConfigurer,配置资源映射路径
import org.springframework.context.annotation.Configuration;
import org.springframework.web.servlet.config.annotation.ResourceHandlerRegistry;
import org.springframework.web.servlet.config.annotation.WebMvcConfigurer;

/**
 * 资源映射路径
 * WX:深入技术架构
 */
@Configuration
public class MyWebAppConfigurer implements WebMvcConfigurer {
    @Override
    public void addResourceHandlers(ResourceHandlerRegistry registry) {
                                                                                        // "file:D:/temp-rainy/"
        registry.addResourceHandler("/fileupload/**").addResourceLocations("file:/tmp/fileupload/");
    }
}
测试一下结果:
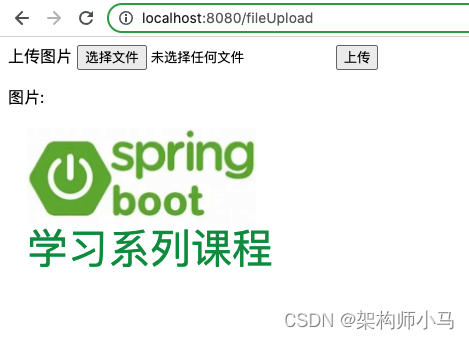


 838
838


 被折叠的 条评论
为什么被折叠?
被折叠的 条评论
为什么被折叠?
 到【灌水乐园】发言


