


前段时间开发地图程序的时候,有自定义annotation的callouts的需求,看到这个需求的时候毫无头绪,在网上找资料找了很久,最后终于找到了方法,真是功夫不负有心人。网上已有人实现了这个功能,国外有人写了两篇博文专门介绍了,不过在国内这个网站好像已被屏蔽,需要翻墙才能浏览。这次在国外,我专门转到我的博客当中,以供国人观看。原文地址:part1, part2
原文是英文,我也没得时间翻译,不了解的地方直接看代码或给我留言。
---------------------------------------------------------------以下是转载-----------------------------------------------------------------------------
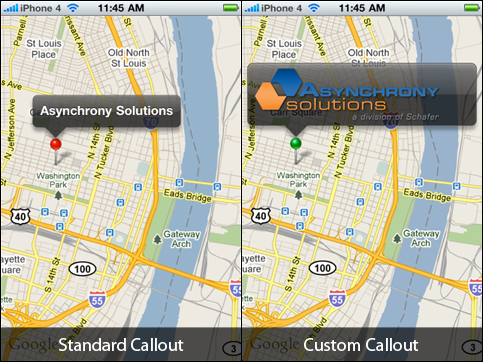
The iPhone’s Map Annotation Callouts are very useful for displaying small amounts of information when a map pin (annotation) is selected. One problem with the standard callouts present in iOS is the inability to change the height of the callout.
For example, you may want to display a logo or other image that is taller than the default callout. Or you may want to display an address and phone number on separate lines under the title. Both of these scenarios are impossible using the standard iOS callouts. There are many steps to building a good replacement callout with the proper look and behavior, but it can be done.
Part 1 (explained here) will explain how to build a custom map callout.
Part 2 covers adding a button to the custom callout, which is not as simple as it sounds.
Put it on the map (and take it off)
For this example we will create two simple map annotations in the view controller – one will display the standard callout and the other will display the custom callout.
To place the “custom callout annotation” on the map we will add the custom annotation when the mapView calls the mapView:didSelectAnnotationView: method, and we will remove the callout on the corresponding deselect method, mapView:didDeselectAnnotationView:. InmapView:viewForAnnotation: we return an instance of our custom MKAnnotationView subclass. Also, we disable the standard callout on the “parent” annotation view, which we will show the custom callout for.
Note: If building for iOS 3.x you will need to determine annotation selection another way (KVO, notifications, etc.).
Draw the callout (in the right place)
Now that we have the callout annotation placed on the map at the same coordinate as the parent annotation, we need to adjust the width and height of the callout view and adjust the center offset so that the view spans the entire width of the map and sits above the parent annotation. These calculations will be done during setAnnotation: because ourcontentHeight, offsetFromParent, and mapView properties should have been set by then.setNeedsDisplay will also be called in setAnnotation: so that the callout is redrawn to match up with the annotation.
The shape of the callout bubble is basically a round-rectangle with a triangle that points to the parent annotation. Determining where that point should be is a matter of finding the x-coordinate of the parent relative to it and adding the offsetFromParent.x property. LuckilyUIView contains the handy convertPoint:fromView: method to handle the conversion between coordinate systems.
The steps to draw something similar to the standard callout are as follows:
- Create the shape (path) of the callout bubble with the point in the right position to match up with the parent
- Fill the path and add the shadow (adding the shadow here and then restoring the context prevents the shadow from being redrawn with each subsequent step)
- Apply a stroke to the path (more opaque than the fill)
- Create a round rectangle path to appear as the “gloss”
- Fill the gloss path with a gradient
- Convert the glass path to a “stroked path” (this will allow us to apply a gradient to the stroke)
- Apply a gradient (light to transparent) to the stroked path
In code:
Note: in iOS 3.2 CGContextSetShadowWithColor reversed the direction of the y-axis offset, thus requiring theyShadowOffset method seen above.
Let’s Add Some Content
To allow the addition of content we will create a content view as a read-only property, which will allow our consumers to access it. An additional method, prepareContentFrame will be added and invoked from setAnnotation: to set the content frame.
In our map view controller we will add the following code in mapView:viewForAnnotation to place an image in the callout and set the proper content height.
Animation
So far the callout looks similar to the native callout, but it is still lacking some of the behavior of the original. The callout needs to animate out from the parent annotation. Also, when the parent annotation is near the edge of the map view, the map should be adjusted to move the parent annotation in from the edge of the view.
The animation would be fairly simple if we could just adjust the frame of the callout view, however that will not scale the contents of the callout. Thus, we must use aCGAffineTransform. Apple has a good introducton to affine transforms. The transform will need to both scale the view and translate the view to make it appear to grow out of the parent annotation. Scaling is simple – a value of 1 is normal size and other values act as a multiplier, so smaller values shrink the view and larger values expand the view. If the parent is off-center on the x-axis the callout needs to be translated to keep the point fixed directly over the parent annotation. Likewise the y-axis must be translated so that it appears that the callout grows upward from parent. We need to hold on to the frame for these calculations becauseself.frame cannot be trusted during the animations. The calculations are done in the following two methods:
There will be three steps to the animation to create the bounce-like effect of the standard callout. We cannot begin the animation with a scale of 0 because a transformation matrix with a scale of 0 cannot be inverted.
- Grow from very small to slightly larger than the final size
- Shrink to slightly smaller than the final size
- Grow to the final size
These three steps will be separate animations chained together using UIView’ssetAnimationDidStopSelector: and setAnimationDelegate: methods.
Shifting the Map
When the parent annotation is near the edge of the map, the map needs to be shifted so that the parent annotation and the callout remain a certain distance away from the edge of the view. To do this we need to calculate the distance to the edge of the view, the number of degrees latitude and longitude per pixel, and then set the new center point for the map. This adjustment should be made when didMoveToSuperview is called.
Conclusion
It takes a bit of work to replicate the iOS map annotation callout, but it is worth the effort if you need a larger space for content. You may download the full source code to see a working example.
这是part1, part2马上奉上。


 8698
8698


 被折叠的 条评论
为什么被折叠?
被折叠的 条评论
为什么被折叠?
 到【灌水乐园】发言


