


配置虚拟机环境
虚拟机安装ubuntu(此处略),需要注意的是虚拟机要开启嵌套虚拟化(即在虚拟机中再次使能虚拟化功能)
Hyper-v
停止虚拟机后使用get-vm 获取虚拟机名字,然后通过
Set-VMProcessor -ExposeVirtualizationExtensions $true -VMName ubuntu20.04命令即可(ubuntu20.04是我们的虚拟机名字)
Set-VMProcessor -ExposeVirtualizationExtensions $true -VMName ubuntu20.04可以获取虚拟功能是否开启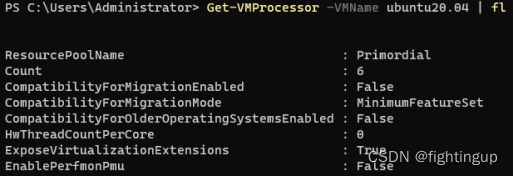
VMware虚拟机在虚拟机设置界面就有配置(略)
配置并下载android代码
代码下载参考
https://blog.csdn.net/qq_26216519/article/details/128695630
可使用国内镜像源替换android源(git config --global url.https://mirrors.tuna.tsinghua.edu.cn/git/AOSP/.insteadof https://android.googlesource.com)
切换分支
查看可切换的分支
cd .repo/manifests
git branch -a | cut -d / -f 3
以 android-12.1.0_r8 分支为例
repo init -b android-12.1.0_r8
repo sync -c --no-tags -j6   # 如果不需要与服务器数据一致,可以不运行该步
repo start android-12.1.0_r8 --all
查看切换结果
repo branches编译
source ./build/envsetup.sh
lunch sdk_car_x86_64-eng
m all -j$(nproc)
emulator -verbose -show-kernel -selinux permissive -writable-system
内核下载和替换
https://source.android.google.cn/docs/setup/build/building-kernels?hl=zh-cn
https://www.codeinsideout.com/blog/android/build-aosp/
下载:
repo init -u https://android.googlesource.com/kernel/manifest -b BRANCH【实际上用tsinghua AOSP源代替】:
export REPO_URL='https://mirrors.tuna.tsinghua.edu.cn/git/git-repo'
repo init -u https://mirrors.tuna.tsinghua.edu.cn/git/AOSP/kernel/manifest -b x
repo sync
修改内核配置:
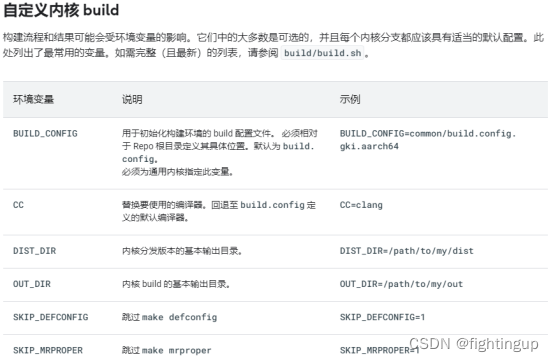
当我们需要修改内核config的时候,在gki下使用以下步骤进行修改:
~/android_kernel/common$ make ARCH=x86 gki_defconfig
~/android_kernel/common$ make ARCH=x86 menuconfig
~/android_kernel/common$ make ARCH=x86 savedefconfig
~/android_kernel/common$ cp defconfig arch/x86/config/gki_defconfig
编译
https://source.android.google.cn/docs/setup/build/building-kernels?hl=zh-cn#customize-build
BUILD_CONFIG=common/build.config.gki.x86_64 LTO=none build/build.sh
BUILD_CONFIG=common-modules/virtual-device/build.config.virtual_device.x86_64 build/build.sh  (android12构建virtual_device内核)
tools/bazel build //common-modules/virtual-device:virtual_device_x86_64_dist(android13构建virtual_device内核)
替换自己编译的kernel启动emulator
emulator -verbose -show-kernel -selinux permissive -writable-system -nocache -kernel out/android12-5.10/dist/bzImage (不关闭cache则不会从kernel启动)也可以通过修改device\generic\goldfish\x86_64-kernel.mk文件中KERNEL_MODULES_PATH和 EMULATOR_KERNEL_FILE将kernel和kernel ko加入到emulator镜像中重新编译aosp系统,而无需定制emulator的启动命令。
3.调试代码
调试android kernel见:
https://blog.csdn.net/fightingup/article/details/128906416?spm=1001.2014.3001.5501


 2791
2791


 被折叠的 条评论
为什么被折叠?
被折叠的 条评论
为什么被折叠?
 到【灌水乐园】发言


