


 该文介绍了一种使用C#语言与海康工业相机进行集成的方法,包括查找设备、打开设备、连续采集图像以及将图像转换为Halcon图像进行处理。代码示例展示了如何在WPF应用中操作相机,并提供了查找设备、打开设备、开始和停止采集的函数。此外,还实现了单步采集功能,利用Halcon库进行图像显示和处理。
本篇大部分代码都是原参考文章中的,详情可以看原参考文章。
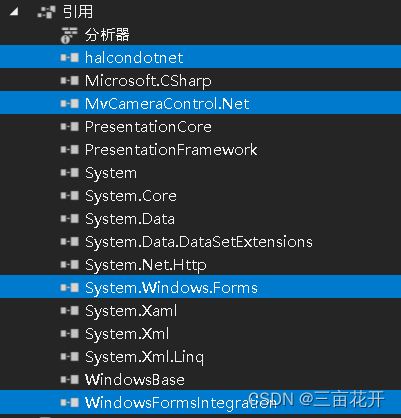
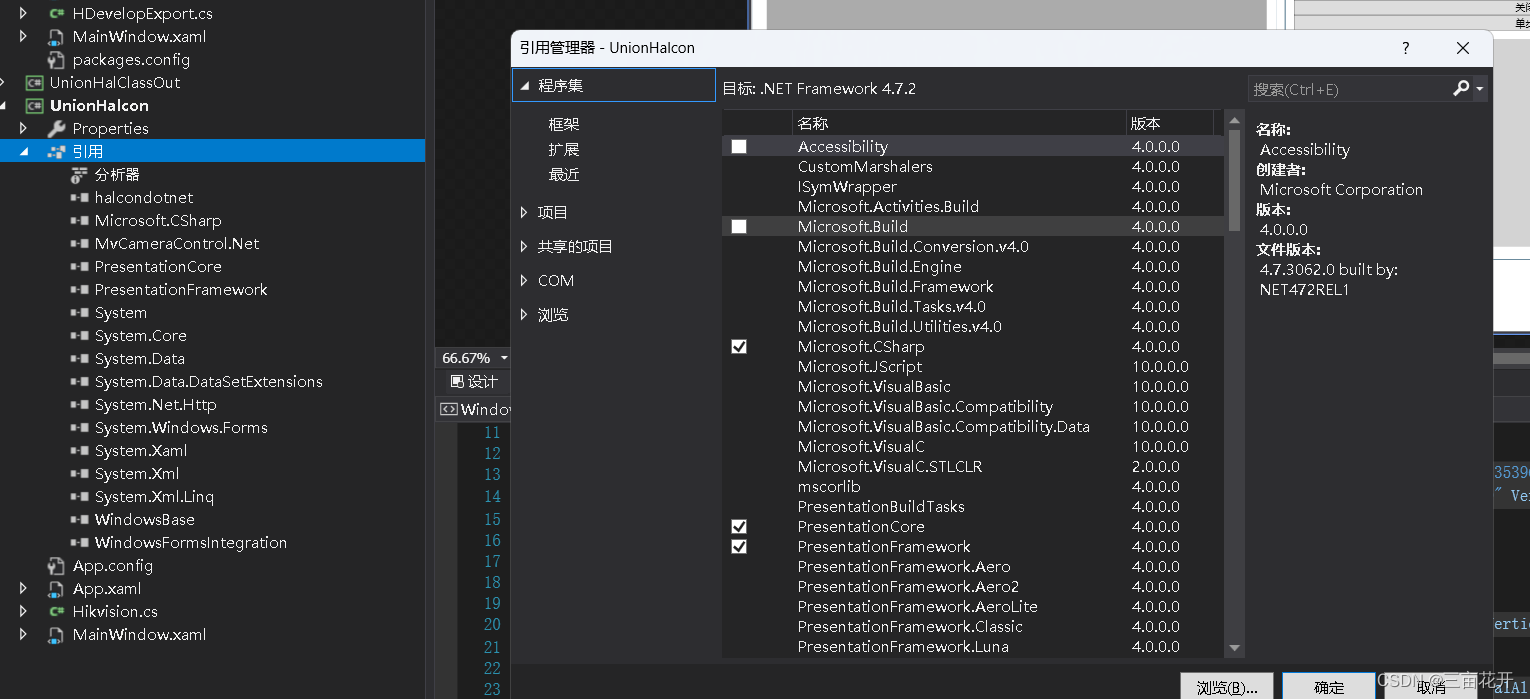
所需引用的名控件如图所示,前两个原文章有写,后两个需要在右击引用的程序集中自己找,如下2图。
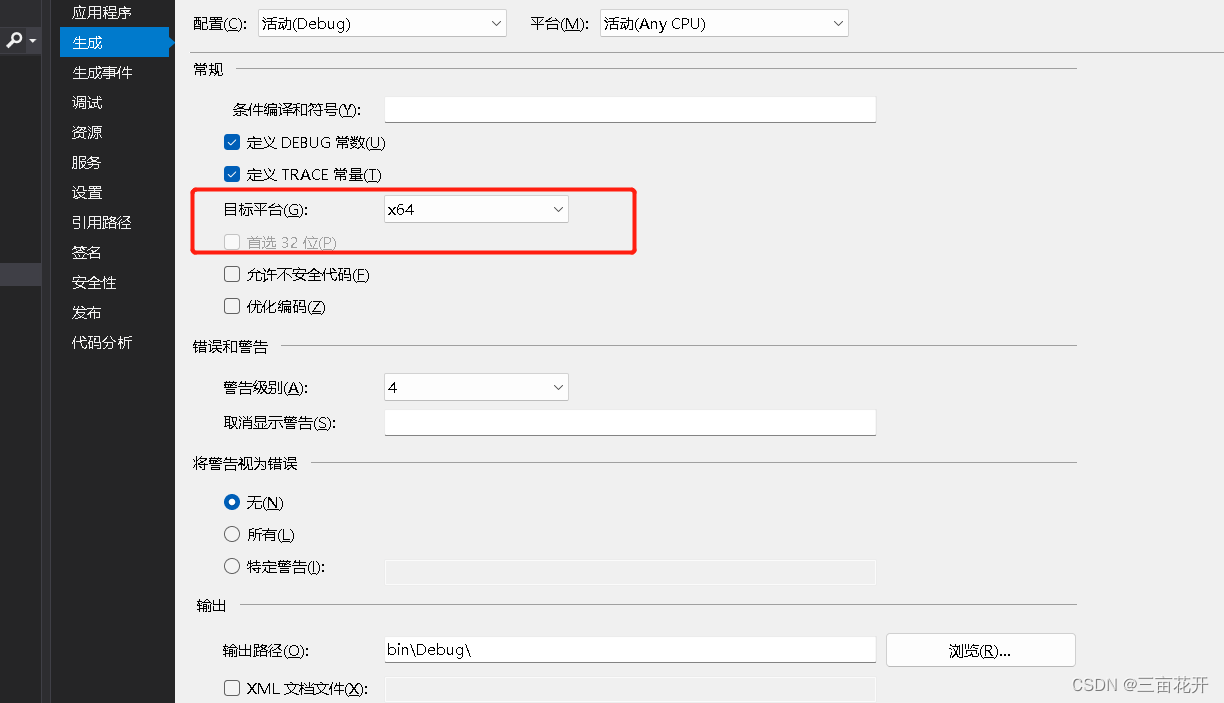
项目目标平台要改成*64(右击你当前的项目,最后有个属性)
完成前期名空间引用后,写一个专门类放海康工业相机需要调用的方法,降低前端代码的代码量,代码复制粘贴了原大佬文章中的内容,这里整合了一下。
using System;
using System.Collections.Generic;
using System.Linq;
using System.Runtime.InteropServices;
using System.Text;
using System.Threading.Tasks;
using System.Windows;
using System.Windows.Controls;
using HalconDotNet;
using MvCamCtrl.NET;

namespace UnionHalcon
{
    public class Hikvision
    {
        private MyCamera m_pMyCamera;
        MyCamera.MV_CC_DEVICE_INFO_LIST m_pDeviceList;//设备列表
        private MyCamera.MVCC_INTVALUE stParam;//用于接收特定的参数
        //为读取、保存图像创建的数组
        UInt32 m_nBufSizeForDriver = 3072 * 2048 * 3;
        byte[] m_pBufForDriver = new byte[3072 * 2048 * 3];
        UInt32 m_nBufSizeForSaveImage = 3072 * 2048 * 3 * 3 + 2048;
        byte[] m_pBufForSaveImage = new byte[3072 * 2048 * 3 * 3 + 2048];
        //要转成的Halcon图像
        HImage image = new HImage();

        //查找设备
        public void DeviceListAcq(ref ComboBox cbDeviceList)
        {
            int nRet;
            // ch:创建设备列表 en:Create Device List
            System.GC.Collect();
            cbDeviceList.Items.Clear();
            nRet = MyCamera.MV_CC_EnumDevices_NET(MyCamera.MV_GIGE_DEVICE | MyCamera.MV_USB_DEVICE, ref m_pDeviceList);
            if (0 != nRet)
            {
                MessageBox.Show("查找设备失败!");
                return;
            }

            // ch:在窗体列表中显示设备名 | en:Display device name in the form list
            for (int i = 0; i < m_pDeviceList.nDeviceNum; i++)
            {
                MyCamera.MV_CC_DEVICE_INFO device = (MyCamera.MV_CC_DEVICE_INFO)Marshal.PtrToStructure(m_pDeviceList.pDeviceInfo[i], typeof(MyCamera.MV_CC_DEVICE_INFO));
                if (device.nTLayerType == MyCamera.MV_GIGE_DEVICE)
                {
                    IntPtr buffer = Marshal.UnsafeAddrOfPinnedArrayElement(device.SpecialInfo.stGigEInfo, 0);
                    MyCamera.MV_GIGE_DEVICE_INFO gigeInfo = (MyCamera.MV_GIGE_DEVICE_INFO)Marshal.PtrToStructure(buffer, typeof(MyCamera.MV_GIGE_DEVICE_INFO));
                    if (gigeInfo.chUserDefinedName != "")
                    {
                        cbDeviceList.Items.Add("GigE: " + gigeInfo.chUserDefinedName + " (" + gigeInfo.chSerialNumber + ")");
                    }
                    else
                    {
                        cbDeviceList.Items.Add("GigE: " + gigeInfo.chManufacturerName + " " + gigeInfo.chModelName + " (" + gigeInfo.chSerialNumber + ")");
                    }
                }
                else if (device.nTLayerType == MyCamera.MV_USB_DEVICE)
                {
                    IntPtr buffer = Marshal.UnsafeAddrOfPinnedArrayElement(device.SpecialInfo.stUsb3VInfo, 0);
                    MyCamera.MV_USB3_DEVICE_INFO usbInfo = (MyCamera.MV_USB3_DEVICE_INFO)Marshal.PtrToStructure(buffer, typeof(MyCamera.MV_USB3_DEVICE_INFO));
                    if (usbInfo.chUserDefinedName != "")
                    {
                        cbDeviceList.Items.Add("USB: " + usbInfo.chUserDefinedName + " (" + usbInfo.chSerialNumber + ")");
                    }
                    else
                    {
                        cbDeviceList.Items.Add("USB: " + usbInfo.chManufacturerName + " " + usbInfo.chModelName + " (" + usbInfo.chSerialNumber + ")");
                    }
                }
            }

            // ch:选择第一项 | en:Select the first item
            if (m_pDeviceList.nDeviceNum != 0)
            {
                cbDeviceList.SelectedIndex = 0;
            }
        }

        //打开设备
        public void OpenDevice(ComboBox cbDeviceList)
        {
            if (m_pDeviceList.nDeviceNum == 0 || cbDeviceList.SelectedIndex == -1)
            {
                MessageBox.Show("未发现设备,请选择");
                return;
            }
            int nRet = -1;

            // ch:获取选择的设备信息 | en:Get selected device information
            MyCamera.MV_CC_DEVICE_INFO device =
                (MyCamera.MV_CC_DEVICE_INFO)Marshal.PtrToStructure(m_pDeviceList.pDeviceInfo[cbDeviceList.SelectedIndex],
                                                              typeof(MyCamera.MV_CC_DEVICE_INFO));

            // ch:打开设备 | en:Open device
            if (null == m_pMyCamera)
            {
                m_pMyCamera = new MyCamera();
                if (null == m_pMyCamera)
                {
                    return;
                }
            }

            nRet = m_pMyCamera.MV_CC_CreateDevice_NET(ref device);
            if (MyCamera.MV_OK != nRet)
            {
                return;
            }

            nRet = m_pMyCamera.MV_CC_OpenDevice_NET();
            if (MyCamera.MV_OK != nRet)
            {
                m_pMyCamera.MV_CC_DestroyDevice_NET();
                MessageBox.Show("设备打开失败");
                //ShowErrorMsg("Device open fail!", nRet);
                return;
            }

            // ch:探测网络最佳包大小(只对GigE相机有效) | en:Detection network optimal package size(It only works for the GigE camera)
            if (device.nTLayerType == MyCamera.MV_GIGE_DEVICE)
            {
                int nPacketSize = m_pMyCamera.MV_CC_GetOptimalPacketSize_NET();
                if (nPacketSize > 0)
                {
                    nRet = m_pMyCamera.MV_CC_SetIntValue_NET("GevSCPSPacketSize", (uint)nPacketSize);
                    if (nRet != MyCamera.MV_OK)
                    {
                        Console.WriteLine("Warning: Set Packet Size failed {0:x8}", nRet);
                    }
                }
                else
                {
                    Console.WriteLine("Warning: Get Packet Size failed {0:x8}", nPacketSize);
                }
            }
            MessageBox.Show("相机打开成功");
            // ch:设置采集连续模式 | en:Set Continues Aquisition Mode
            m_pMyCamera.MV_CC_SetEnumValue_NET("AcquisitionMode", 2);// ch:工作在连续模式 | en:Acquisition On Continuous Mode
            m_pMyCamera.MV_CC_SetEnumValue_NET("TriggerMode", 0);    // ch:连续模式 | en:Continuous
        }

        //连续采集(也就是实时显示)
        public void ContinuesGrab(System.Windows.Forms.PictureBox picBox)
        {
            int nRet;

            // ch:开始采集 | en:Start Grabbing
            nRet = m_pMyCamera.MV_CC_StartGrabbing_NET();
            if (MyCamera.MV_OK != nRet)
            {
                MessageBox.Show("采集失败!");
                //ShowErrorMsg("Trigger Fail!", nRet);
                return;
            }
            else
            {
                MessageBox.Show("开始连续采集");
            }

            //实时采集
            m_pMyCamera.MV_CC_SetEnumValue_NET("TriggerMode", 0);

            // ch:显示 | en:Display   在PictureBox控件中显示
            nRet = m_pMyCamera.MV_CC_Display_NET(picBox.Handle);
            if (MyCamera.MV_OK != nRet)
            {
                MessageBox.Show("显示失败!");
            }
        }

        //读取图片转换成Halcon图像
        public HImage ReadImage()
        {
            int nRet;
            //MyCamera.MVCC_INTVALUE stParam = new MyCamera.MVCC_INTVALUE();
            UInt32 nPayloadSize = 0;
            nRet = m_pMyCamera.MV_CC_GetIntValue_NET("PayloadSize", ref stParam);
            if (MyCamera.MV_OK != nRet)
            {
                return null;
            }
            nPayloadSize = stParam.nCurValue;
            if (nPayloadSize > m_nBufSizeForDriver)
            {
                m_nBufSizeForDriver = nPayloadSize;
                m_pBufForDriver = new byte[m_nBufSizeForDriver];
                m_nBufSizeForSaveImage = m_nBufSizeForDriver * 3 + 2048;
                m_pBufForSaveImage = new byte[m_nBufSizeForSaveImage];
            }

            IntPtr pData = Marshal.UnsafeAddrOfPinnedArrayElement(m_pBufForDriver, 0);
            MyCamera.MV_FRAME_OUT_INFO_EX stFrameInfo = new MyCamera.MV_FRAME_OUT_INFO_EX();
            nRet = m_pMyCamera.MV_CC_GetOneFrameTimeout_NET(pData, m_nBufSizeForDriver, ref stFrameInfo, 1000);//获取一帧图像,超时时间设置为1000
            if (MyCamera.MV_OK != nRet)
            {
                return null;
            }

            HImage image = new HImage();

            //采集的是黑白图像,利用Halcon图像库中的GenImage1算子来构建图像
            image.GenImage1("byte", (int)stFrameInfo.nWidth, (int)stFrameInfo.nHeight, pData);
            return image;
        }

        //停止采集
        public void StopGrab()
        {
            int nRet = -1;
            // ch:停止采集 | en:Stop Grabbing
            nRet = m_pMyCamera.MV_CC_StopGrabbing_NET();
            if (nRet != MyCamera.MV_OK)
            {
                MessageBox.Show("停止采集失败!");
            }

        }
    }
}
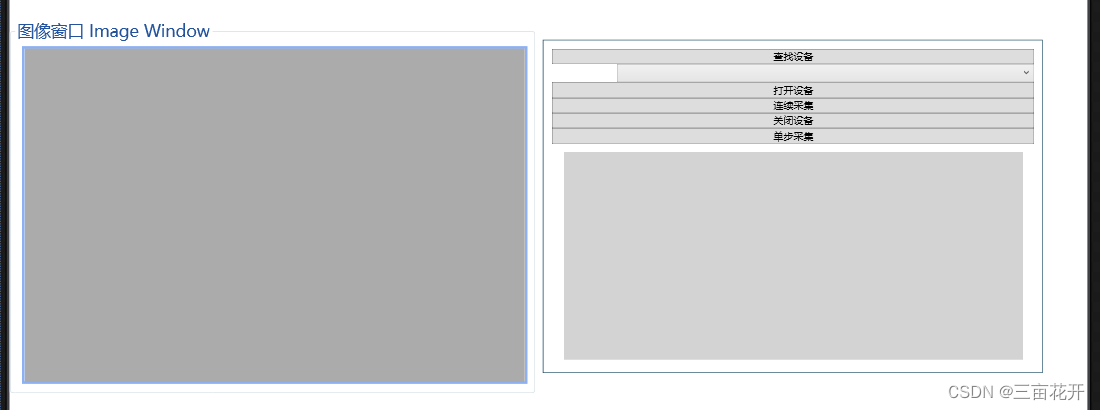
界面用wpf简单写了一个,如下图
前端代码如下所示
<Window x:Class="UnionHalClassOut.MainWindow"
        xmlns="http://schemas.microsoft.com/winfx/2006/xaml/presentation"
        xmlns:x="http://schemas.microsoft.com/winfx/2006/xaml"
        xmlns:d="http://schemas.microsoft.com/expression/blend/2008"
        xmlns:mc="http://schemas.openxmlformats.org/markup-compatibility/2006"
        xmlns:halcon="clr-namespace:HalconDotNet;assembly=halcondotnet"
        xmlns:local="clr-namespace:UnionHalClassOut"
        xmlns:wf="clr-namespace:System.Windows.Forms;assembly=System.Windows.Forms"
        mc:Ignorable="d"
        Title="MainWindow" Height="600" Width="1300">
    <Grid>
        <StackPanel Grid.Row="0" Orientation="Horizontal"  VerticalAlignment="Center">
            <GroupBox Height="450" Width="630" Header="图像窗口 Image Window" FontSize="20" Foreground="#FF23539C" FontFamily="Microsoft YaHei">
                <Border BorderBrush="#FF114461" Margin="5,0,0,0" BorderThickness="0" Height="400" Width="600" VerticalAlignment="Center" IsHitTestVisible="False">
                    <WindowsFormsHost Height="400" Width="600" Name="pictureHost"  >
                        <wf:PictureBox  x:Name="pictureBox1" Height="400" Width="600" />
                    </WindowsFormsHost>
                </Border>
            </GroupBox>
            <Border BorderBrush="#FF114461" Margin="10,0,0,0" BorderThickness="1" Height="400" Width="600" VerticalAlignment="Center" >
                <StackPanel Margin="10">
                    <Button x:Name="FindDevice" Content="查找设备" Click="FindDevice_Click"/>
                    <ComboBox HorizontalAlignment="Right" Foreground="#FF23539C" Name="cbDeviceList"  VerticalAlignment="Center" Width="578"/>
                    <Button x:Name="Opendevice" Content="打开设备" Click="Opendevice_Click"/>
                    <Button x:Name="Continue" Content="连续采集" Click="Continue_Click"/>
                    <Button x:Name="StopDevice" Content="关闭设备" Click="StopDevice_Click"/>
                    <Button x:Name="SingalGet" Content="单步采集" Click="SingalGet_Click"/>
                    <halcon:HWindowControlWPF Name="hwindowWPF" Width="550" Height=" 250"  Background="LightGray" Margin="0 10 0 0"/>
                </StackPanel>
            </Border>
        </StackPanel>
    </Grid>
</Window>
后台事件单机代码如图所示。
using System;
using System.Collections.Generic;
using System.Linq;
using System.Text;
using System.Threading.Tasks;
using System.Windows;
using System.Windows.Controls;
using System.Windows.Data;
using System.Windows.Documents;
using System.Windows.Input;
using System.Windows.Media;
using System.Windows.Media.Imaging;
using System.Windows.Navigation;
using System.Windows.Shapes;
using HalconDotNet;

namespace UnionHalClassOut
{
    /// <summary>
    /// MainWindow.xaml 的交互逻辑
    /// </summary>
    public partial class MainWindow : Window
    {
        public MainWindow()
        {
            InitializeComponent();
        }


        Hikvision ucDeviceList1 = new Hikvision();
        private void FindDevice_Click(object sender, RoutedEventArgs e)
        {
            ucDeviceList1.DeviceListAcq(ref cbDeviceList);
        }
        private void Opendevice_Click(object sender, RoutedEventArgs e)
        {
            ucDeviceList1.OpenDevice(cbDeviceList);
        }
        private void Continue_Click(object sender, RoutedEventArgs e)
        {
            ucDeviceList1.ContinuesGrab(pictureBox1);
        }
        private void StopDevice_Click(object sender, RoutedEventArgs e)
        {
            ucDeviceList1.StopGrab();

        }
        private void SingalGet_Click(object sender, RoutedEventArgs e)
        {
            HTuple hWind = hwindowWPF.HalconWindow;
            HTuple width, height;
            HObject hv_image;
            HOperatorSet.GenEmptyObj(out hv_image);
            hv_image.Dispose();
            hv_image = ucDeviceList1.ReadImage();
            HOperatorSet.GetImageSize(hv_image, out width, out height);
            HOperatorSet.SetPart(hWind, 0, 0, height - 1, width - 1);
            HOperatorSet.DispObj(hv_image, hWind);

        }
    }
}
最后一个简易版工业相机监控拍照就可以了。


 1066
1066

 被折叠的 条评论
为什么被折叠?
被折叠的 条评论
为什么被折叠?
 到【灌水乐园】发言


