


原文(需要翻墙)
译文:
ScrollView 是 Android 中最常用的控件之一,也是最容易用的控件之一。当内容屏幕放不下的时候,把它放到 ScrollView 中就完事。你甚至不会出错,因为 ScrollView 一次只接受一个子节点。然而,有一种使用情况稍微有点复杂,除非你仔细阅读了文档。
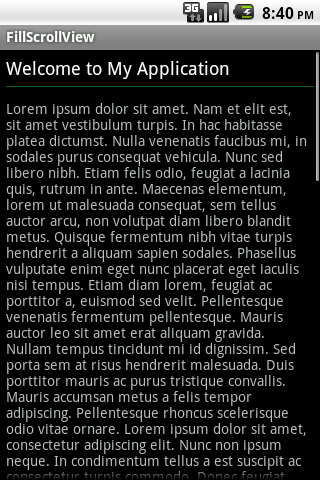
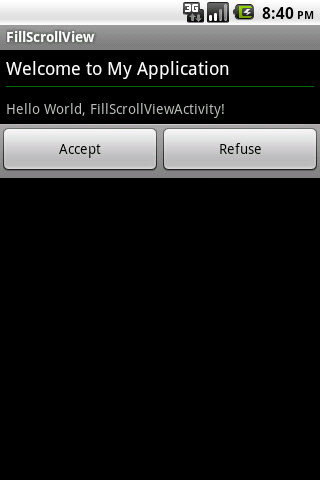
假设你的应用要展现一段文字和几个按钮。文字的长度可变,可能长于屏幕也可能短于屏幕。你想要把文字放到 ScrollView 当中并且你想让按钮随着文字滑动,可能是鼓励用户在点击按钮之前先阅读文字。视文字的长度,你的应用会像下面两张图片之一。
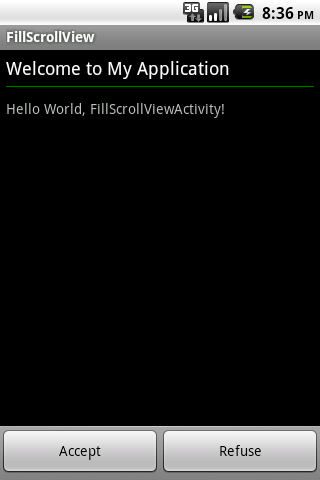
为了达到这种效果,我看到一些开发者试图把 ScrollView 子节点的 height 设为 fill_parent。这么做行不通,会导致如下效果:
为了理解为什么结果是这样,你首先要记住 android:layout_height=”fill_parent”表示设置高度和父节点一样。这显然不是你使用 ScrollView 的目的。毕竟,ScrollView 将变得毫无用处,如果它的内容和自己一样高。为了解决这个问题,你需要使用一个叫做 android:fillViewport 的 ScrollView 属性。当设为真,这个属性会让 ScrollView 的子节点伸展至和 ScrollView 一样高,如果需要的话。如果子节点比 ScrollView 更高的话,这个属性没有任何作用。
我写的正确例子 XML 在下面。在第32行,我把 TextView 的 android:layout_weight 设为1.0。这么做是为了强迫TextView 占用可用的空白位置,当它比 ScrollView 短的时候。只有在 android:fillViewport=”true”的时候,它才能起效。
<?xml version="1.0" encoding="utf-8"?>

<ScrollView xmlns:android="http://schemas.android.com/apk/res/android"
    android:id="@+id/scroller"
    android:layout_width="fill_parent"
    android:layout_height="fill_parent"
    android:fillViewport="true" >
    <LinearLayout
        android:layout_width="fill_parent"
        android:layout_height="wrap_content"
        android:orientation="vertical">
        <TextView
            android:layout_width="fill_parent"
            android:layout_height="wrap_content"
            android:paddingLeft="6dip"
            android:paddingRight="6dip"
            android:paddingTop="6dip"
            android:textAppearance="?android:attr/textAppearanceMedium"
            android:text="Welcome to My Application" />

        <View
            android:layout_width="fill_parent"
            android:layout_height="1dip"
            android:background="#ff106510"
            android:layout_marginLeft="6dip"
            android:layout_marginRight="6dip"
            android:layout_marginTop="6dip"
            android:layout_marginBottom="12dip" />

        <TextView
            android:layout_width="fill_parent"
            android:layout_height="wrap_content"
            android:layout_weight="1.0"

            android:paddingLeft="6dip"
            android:paddingRight="6dip"
            android:paddingBottom="6dip"

            android:text="@string/hello" />

        <LinearLayout
            android:layout_width="fill_parent"
            android:layout_height="wrap_content"

            android:background="@android:drawable/bottom_bar"
            android:gravity="center_vertical">
            <Button
                android:layout_width="0dip"
                android:layout_weight="1.0"
                android:layout_height="wrap_content"

                android:text="Accept" />
            <Button
                android:layout_width="0dip"
                android:layout_weight="1.0"
                android:layout_height="wrap_content"

                android:text="Refuse" />
        </LinearLayout>
    </LinearLayout>
</ScrollView>


 264
264

 被折叠的 条评论
为什么被折叠?
被折叠的 条评论
为什么被折叠?
 到【灌水乐园】发言


