


文章目录
安装 vmtools
备份镜像
避免 ubuntu 挂了之后,重新安装
更新源
方式一 命令行替换
1.备份原来的源,将以前的源备份一下,以防以后可以用的。
sudo cp /etc/apt/sources.list /etc/apt/sources.list.bak
2.打开/etc/apt/sources.list文件,清空然后换上自己找的源地址
sudo vim /etc/apt/sources.list (可将vim更换为自己熟悉的编辑器(gedit好用))
中科大源 -sun 这个好一点
deb http://mirrors.ustc.edu.cn/ubuntu/ focal main restricted
deb http://mirrors.ustc.edu.cn/ubuntu/ focal-updates main restricted
deb http://mirrors.ustc.edu.cn/ubuntu/ focal universe
deb http://mirrors.ustc.edu.cn/ubuntu/ focal-updates universe
deb http://mirrors.ustc.edu.cn/ubuntu/ focal multiverse
deb http://mirrors.ustc.edu.cn/ubuntu/ focal-updates multiverse
deb http://mirrors.ustc.edu.cn/ubuntu/ focal-backports main restricted universe multiverse
deb http://mirrors.ustc.edu.cn/ubuntu/ focal-security main restricted
deb http://mirrors.ustc.edu.cn/ubuntu/ focal-security universe
deb http://mirrors.ustc.edu.cn/ubuntu/ focal-security multiverse
#中科大源2

deb https://mirrors.ustc.edu.cn/ubuntu/ focal main restricted universe multiverse
deb-src https://mirrors.ustc.edu.cn/ubuntu/ focal main restricted universe multiverse
deb https://mirrors.ustc.edu.cn/ubuntu/ focal-updates main restricted universe multiverse
deb-src https://mirrors.ustc.edu.cn/ubuntu/ focal-updates main restricted universe multiverse
deb https://mirrors.ustc.edu.cn/ubuntu/ focal-backports main restricted universe multiverse
deb-src https://mirrors.ustc.edu.cn/ubuntu/ focal-backports main restricted universe multiverse
deb https://mirrors.ustc.edu.cn/ubuntu/ focal-security main restricted universe multiverse
deb-src https://mirrors.ustc.edu.cn/ubuntu/ focal-security main restricted universe multiverse
deb https://mirrors.ustc.edu.cn/ubuntu/ focal-proposed main restricted universe multiverse
deb-src https://mirrors.ustc.edu.cn/ubuntu/ focal-proposed main restricted universe multiverse
3.更新源
sudo apt update
4.更新软件
sudo apt upgrade
遇到问题:

这个问题是有另外一个程序正在运行,导致资源被锁不可用,输入如下命令进行解决:
sudo rm /var/cache/apt/archives/lock
sudo rm /var/lib/dpkg/lock
方式二 图形化替换
一般安装好的系统,默认的镜像源都是国外的,使用起来速度很慢,接下来就尝试一种图形化的更换镜像源的方法!
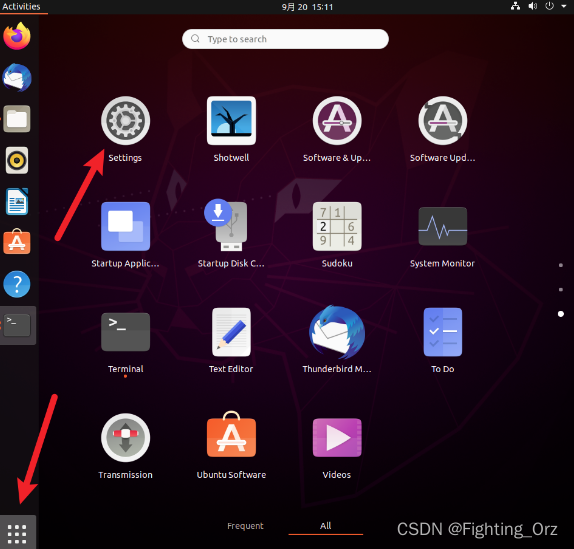
- 找到设置,Settings
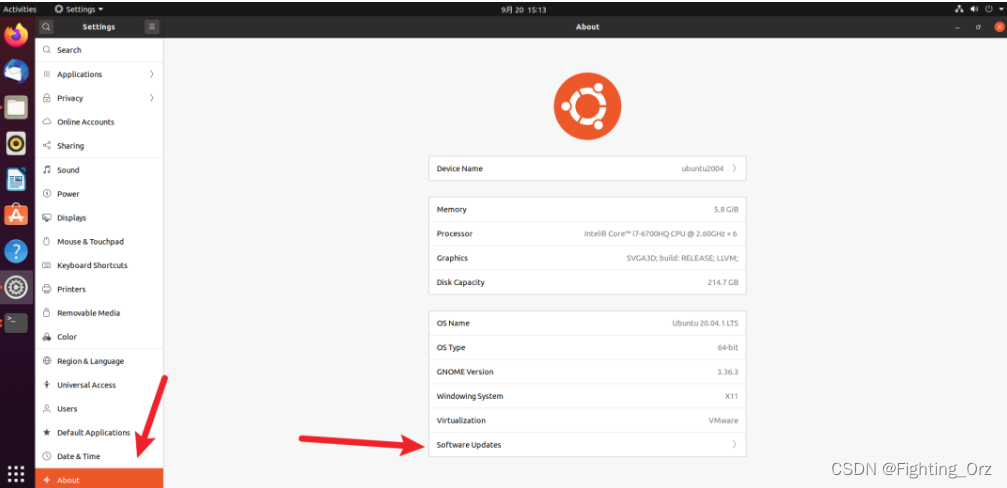
- 在左下角找到 About ,接着点击 Software Updates ,如果是中文界面,看起来就更方便啦,我主要是为了学习学习英语,多锻炼一下,哈哈
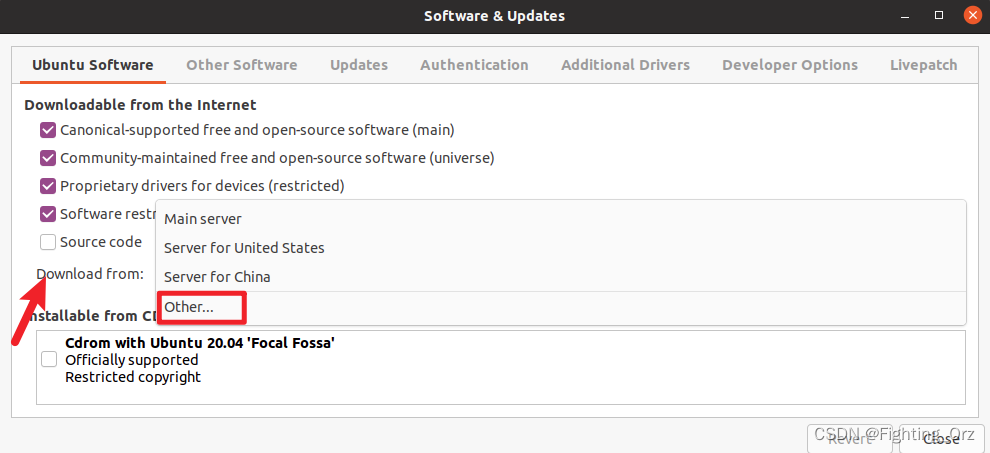
- 点击 Download from ,然后选中 Other ;
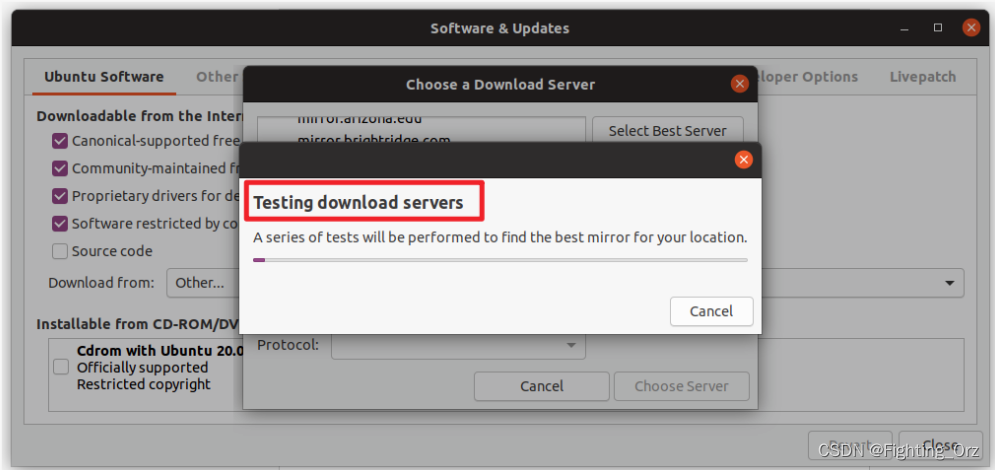
- 接着选择 Select Best Server ,这样系统就会选择一个最合适的镜像源,稍等片刻即可
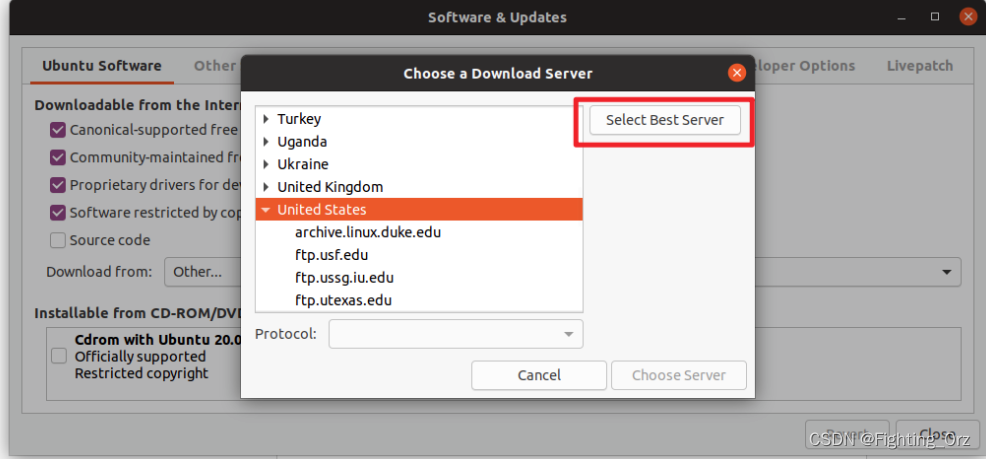
- 正在进行下载测试,可以看到下边的提示:正在进行一个服务测试,来找到最适合你的本地镜像服务器;
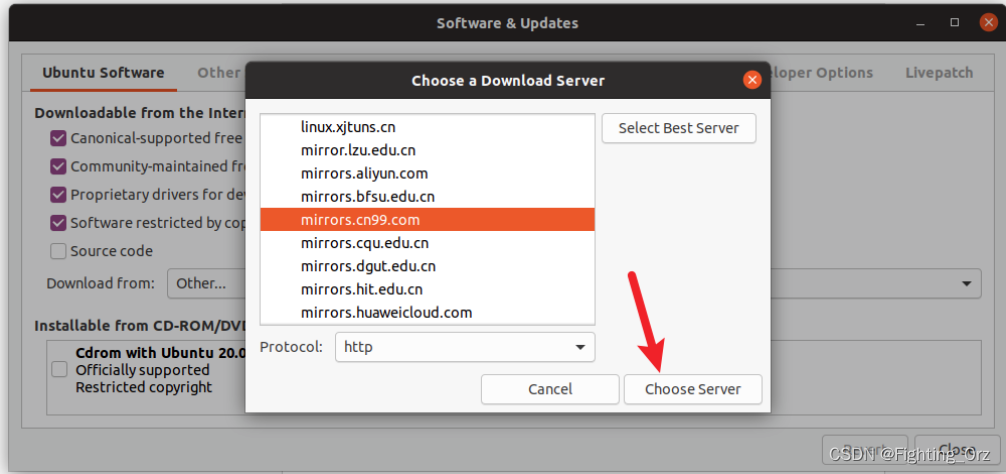
- 查找结束,我直接选择默认的
 7. 接着会提示输入密码,然后选择 Authenticate (认证);

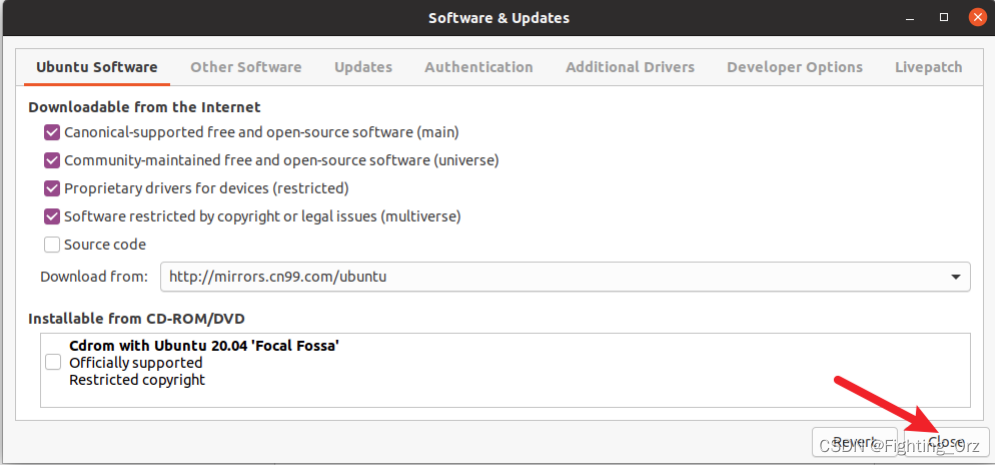
- 接着选择 Close
- 此时会提示,已经更新了镜像源,因此需要更新一下软件源列表啥的,按照提示正常操作就好;选择 Reload ,重新加载软件源列表;
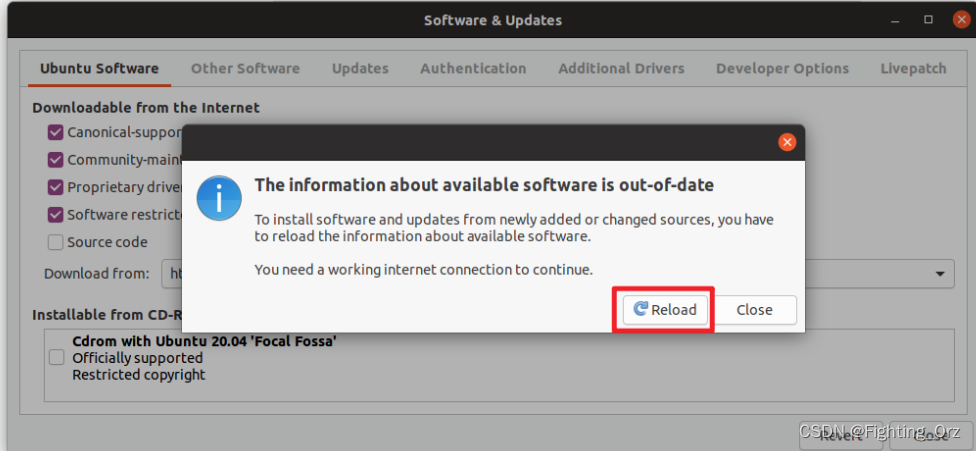
- 等待加载完毕即可;此时可以使用如下命令,进行软件的更新操作啦~
sudo apt-get update
sudo apt-get upgrade
建议
有一个小建议,就是后续安装软件,可以使用 aptitude 进行安装,这个比 apt-get 的好处在于,可以自己帮忙解决一些软件的依赖问题,如果无法解决,也会给出很好的建议,由我们进行选择如何处理;
安装方法如下
sudo apt-get install aptitude
使用方法如下,只是把对应的 apt-get 替换为 aptitude 即可!
sudo aptitude install <软件名>
软件安装
查看已安装/可安装 软件版本
比如 git
#方式一
sudo apt install apt-show-versions
apt-show-versions -a git

#方式二
apt-cache policy git

#方式三
apt-cache show git

# 方式四
# 搜索要安装的snap包
sudo snap find <snap name>

#查看snap包信息
snap info <snap name>

#安装一个snap包
sudo snap install <snap name>
安装 openssh-server
-
SSH分客户端openssh-client和openssh-server
如果你只是想登陆别的机器的SSH只需要安装openssh-client(ubuntu有默认安装,如果没有则sudo apt-get install openssh-client),如果要使本机开放SSH服务就需要安装openssh-server。 -
查看当前的ubuntu是否安装了ssh-server服务。默认只安装ssh-client服务。
dpkg -l | grep ssh
- 安装ssh-server服务
sudo apt-get install openssh-server
安装 vim
sudo apt install vim
配置 .vimrc
.vimrc
"==================="
"1.基本设置"
"==================="
set nocompatible
set wildmenu "按TAB键时命令行自动补齐,显示补齐命令"
set nu "显示行号
sy on "开启语法高亮功能"
set enc=utf-8 "设置编码格式为utf-8
set ruler "显示当前光标位置"
set autoread "文件在Vim之外修改过,自动重新读入"
set autowrite "设置自动保存内容"
"set autochdir "当前目录随着被编辑文件的改变而改变"
set nocp "使用vim而非vi,设置与vi不兼容模式"
"set mouse=v  "开启鼠标 a:所有模式  v:可视模式
set nocursorline " 关闭下划线显示

"设置 <leader> 为 空格键
let mapleader = "\<space>"
"set pastetoggle=<F11> "F11来支持切换paste和nopaste状态。"

"============="
"2. 设置缩进"
"============="
set cindent "c/c++自动缩进"
set smartindent
set shiftwidth=4
set tabstop=4
set expandtab

"============="
"3. 显示字符 空格 tab"
"============="
set listchars=tab:>-,trail:~
"set list
colorscheme desert

"================="
"4 当前文件内搜索选项"
"================="
set hlsearch "开启搜索结果的高亮显示"
set incsearch "边输入边搜索(实时搜索)"
" 设置搜索高亮颜色, 文本中取消高亮, 输入  :noh
hi Search  term=reverse ctermfg=0 ctermbg=3 guifg=Black guibg=Yellow
set ignorecase "搜索时忽略大小写
set smartcase  "有一个或以上大写字母时仍大小写敏感
set showcmd    "显示未敲完的命令

"========================"
"5.txt文件按照wiki语法高亮"
"========================"
 autocmd BufNewFile *.txt set ft=confluencewiki
 autocmd BufEnter *.txt set ft=confluencewiki

"=========================="
"6.不要交换文件和备份文件,减少冲突,保留撤销能力到 undodir"
"=========================="
set noswapfile
set nowritebackup
set nobackup
set undofile "enable undofile feature
set undodir=~/.vim/undodir
if !isdirectory(&undodir)
    call mkdir(&undodir, 'p', 0700)
endif

"=========================="
"7. other"
"=========================="
"change word to uppercase, I love this very much
inoremap <C-u> <esc>gUiwea
" set jj is Esc in insert mode
inoremap jj <Esc>
设置 vi 替代 vim
echo "
#  vi to vim
alias vi='vim'
" >> ~/.bashrc \
&& source ~/.bashrc
- 卸载vim
sudo apt remove vim - 卸载依赖
sudo apt autoremove
配置 shell 访问外网
# 配置 ssh 终端访问外网 可在 ~/.bashrc 中添加
export http_proxy="http://10.28.2.62:8118"
export https_proxy="http://10.28.2.62:8118"

# 取消代理
unset http_proxy
unset https_proxy
安装 fzf
git clone --depth 1 https://github.com/junegunn/fzf.git ~/.fzf
~/.fzf/install
source ~/.bashrc
安装git
sudo apt install git
-
配置git
设置用户名
git config --global user.name name
设置邮箱
git config --global user.name email -
配置 git proxy
# 配置代理
git config --global http.proxy  http://10.28.2.62:8118
git config --global https.proxy  https://10.28.2.62:8118

# 取消代理
git config --global --unset http.proxy
git config --global --unset https.proxy
- .gitconfig
path: ~/.gitconfig
[alias]
st = status
ci = commit
br = branch
co = checkout
au = add -u
ll = log --oneline --graph
d = difftool
cn = log  --date=format:"%Y-%m-%d" --pretty=format:"%h  %cd %cn"
[diff]
tool = vimdiff
安装 z.sh
下载
# 没有的话,手动创建
mkdir -p ~/.local/config && wget -P ~/.local/config https://github.com/zhongfeiorz/z/raw/master/z.sh
配置
执行
echo "
# z.sh config
. ~/.local/config/z.sh

alias zr='z -r'     # cd 到级别最高的匹配目录
alias zt='z -t'     # cd 到最常访问的匹配目录
alias zl='z -l'     # 列出匹配目录
alias ze='z -e'     # 打印最好的匹配
alias zc='z -c'     # 严格匹配 $PWD 的子目录
alias zx='z -x'     # 从 datafile 中删除当前目录

alias ztt='z -t | tail'
" >> ~/.bashrc
安装 cheat
添加 ~/bin 到 PATH 环境变量
echo "export PATH=\$PATH:~/bin " >> ~/.bashrc
下载我的cheat 配置
# 下载 myconf & 拷贝到 ~/.local 目录
mkdir ~/myconf \
&& git clone https://github.com/zhongfeiorz/my-usual-config.git ~/myconf \
&& cp -rf ~/myconf/cheat ~/.local/ \
&&  mkdir -p  ~/.local/cheat/mycheat/cheatsheets/community \
&&  mkdir -p  ~/.local/cheat/mycheat/cheatsheets/personal \
&& git clone https://github.com/cheat/cheatsheets.git ~/.local/cheat/mycheat/cheatsheets/community
在第一次运行前指定 conf.xml
cheat 由 YAML 文件配置,该文件将在首次运行时自动生成。
默认情况下,假定配置文件存在于符合 XDG 的配置路径中,例如 ~/.config/cheat/conf.yml。如果你想将它存储在别处,你可以导出一个 CHEAT_CONFIG_PATH 环境变量来指定它的路径(可保存在 github 上):
echo "
# cheat config
export CHEAT_CONFIG_PATH=~/.local/cheat/conf.yml
" >> ~/.bashrc
手动 安装
cheat github: https://github.com/cheat/cheat
官网安装方式
On Unix-like systems, you may simply paste the following snippet into your terminal:
cd /tmp \
  && wget https://github.com/cheat/cheat/releases/download/4.4.0/cheat-linux-amd64.gz \
  && gunzip cheat-linux-amd64.gz \
  && chmod +x cheat-linux-amd64 \
  && sudo mv cheat-linux-amd64 /usr/local/bin/cheat \
  && source ~/.bashrc
我的方式
cd ~ \
&& wget https://github.com/cheat/cheat/releases/download/4.4.0/cheat-linux-amd64.gz \
&& gunzip cheat-linux-amd64.gz \
&& chmod +x cheat-linux-amd64 \
&& mv cheat-linux-amd64 ~/bin/cheat
拷贝其他好用的文件到 ~/bin
mkdir -p ~/bin \
&& cp ~/myconf/niceTools/* ~/bin \
&& chmod a+x ~/bin/{icdiff,ncdu} \
&& source ~/.bashrc
snap 安装 (不建议)
sudo snap install cheat
**注意:**使用 snap 方式安装,之后使用 .local 文件会有问题,

这是一个有效的提示,因为 snap 版本不支持用户主目录中的点文件夹
帮助
#查看帮助
cheat --help
#查看 cheatsheet 目录
cheat -d
# 初始化一个 config 文件
mkdir -p ~/.config/cheat && cheat --init > ~/.config/cheat/conf.yml
# 查看配置文件路径
cheat --conf
修改 cheat 编辑器为 vim
打开 conf.yml 文件


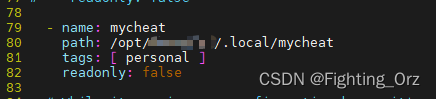
添加自己的 cheat 目录
修改 conf.yml 文件

添加常用工具
mkdir ~/bin \
&& echo "export PATH=~/bin:$PATH" >> ~/.bashrc \
&& cp ~/myconf/niceTools/{icdiff,ncdu} ~/bin/ \
&& chmod a+x ~/bin/{icdiff,ncdu}
安装 chrome
首先使用Ctrl+Alt+T键盘快捷键或单击终端图标,打开终端。然后使用wget命令下载最新的Google Chrome deb软件包。
在Ubuntu上安装软件包需要root权限。 请以具有sudo权限的用户运行以下命令,以在系统上安装chrome.deb软件安装包。出现提示时,输入您的用户密码,安装将开始。
wget https://dl.google.com/linux/direct/google-chrome-stable_current_amd64.deb
sudo apt install ./google-chrome-stable_current_amd64.deb
至此,您已经在Ubuntu系统上安装了Chrome。
在活动搜索栏中,键入Google Chrome,然后单击图标以启动chrome应用程序。也可以在终端中键入 google-chrome 从命令行启动Chrome。
安装 vscode
1 安装Snap软件包,执行如下命令
sudo apt install snapd
2 命令行安装 vscode
sudo snap install --classic code
- 卸载vscode
要删除VS代码,请使用删除标志运行snap命令:
sudo snap remove vscode


 1935
1935


 被折叠的 条评论
为什么被折叠?
被折叠的 条评论
为什么被折叠?
 到【灌水乐园】发言


