


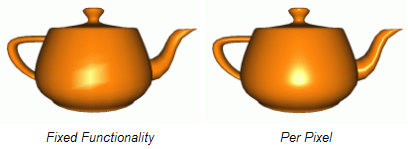
逐像素的方向光(Directional Light per Pixel)
这一节将把前面的shader代码改为逐像素计算的方向光。我们需要将工作按照两个shader拆分,以确定哪些是需要逐像素操作的。
首先看看每个顶点接收到的信息:
•法线
•半向量
•光源方向
我们需要将法线变换到视点空间然后归一化。我们还需要将半向量和光源方向也归一化,不过它们已经位于视点空间中了。这些归一化之后的向量会进行插值,然后送入片断shader,所以需要声明易变变量保存这些向量。
我们也可以在顶点shader中完成一些与光和材质相关的计算,这样可以帮助平衡顶点shader和片断shader的负载。
顶点shader代码可以写成如下形式:

本节内容Shader Designer的工程下载地址:
http://www.lighthouse3d.com/wp-content/uploads/2011/03/dirpixsd.zip
逐像素的点光(Point Light Per Pixel)
本节基于前面有关方向光的内容,大部分代码都相同。本节内容主要涉及方向光和点光的不同之处。方向光一般假设光源在无限远的地方,所以到达物体时是平行光。相反,点光源有一个空间中的位置,并向四面八方辐射光线。此外,点光的强度会随到达顶点的距离而衰弱。
对于OpenGL程序来说,这两种光的区别主要有:
•光源的position域的w分量:对方向光来说它是0,表面这个position实际是一个方向(direction);对点光来说,这个分量是1。
•点光源的衰减由三个系数决定:一个常数项,一个线性项和一个二次项。
对方向光来说,光线的方向对所有顶点相同,但是对点光来说,方向是从顶点指向光源位置的向量。因此对我们来说需要修改的就是在顶点shader中加入计算光线方向的内容。
在OpenGL中衰减是按照如下公式计算的:
式中k0是常数衰减系数,k1是线性衰减系数,k2是二次衰减系数,d是光源位置到顶点的距离。
注意衰减与距离是非线性关系,所以我们不能逐顶点计算衰减再在片断shader中使用插值结果,不过我们可以在顶点shader中计算距离,然后在片断shader中使用距离的插值计算衰减。
使用点光计算颜色值的公式为:

在上面公式中,环境光部分必须分解为两项:使用光照模型的全局环境光设置和光源中的环境光设置。顶点shader也必须分别计算这两个环境光成分。新的顶点shader如下:
本节内容Shader Designer工程下载地址:
http://www.lighthouse3d.com/wp-content/uploads/2011/03/pointlightsd.zip
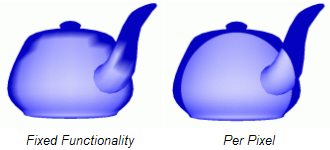
逐像素的聚光(Spot Light Per Pixel)
本节内容与上一节基本一致,唯一不同的就是聚光不同于点光,其发出的光线被限制在一个圆锥体中。
对于OpenGL程序来说,这两种光的区别主要有:
•聚光包含一个方向向量spotDirection,表示圆锥体的轴。
•圆锥体包含一个角度,在GLSL中可以使用应用程序设置的角度值以及对应的余弦值spotCosCutoff。
•最后还有一个衰减速率spotExponent,它表示从圆锥的中心轴向外表面变化时光强度的衰减。
聚光的顶点shader与点光完全相同,我们只需要对片断shader进行一些修改。只有当当前片断位于聚光的光锥内时,才需要对散射光、镜面反射光和环境光成分进行着色。所以我们首先要检查这个条件。
光源与某点连线向量以及聚光方向向量(spotDirection)之间夹角的余弦值必须大于spotCosCutoff,否则此点位于聚光之外,只能接收到全局环境光。

上式中spotDirection来自OpenGL中设置的状态,lightDir是光源到某点的向量,spotExp是聚光衰减率,这个值也是在OpenGL程序中设置的,它用来控制从聚光光锥中心到边缘的衰减。spotExp越大衰减越快,如果为0表示在光锥内光强是常数。
本节内容Shader Designer的工程下载地址:
http://www.lighthouse3d.com/wp-content/uploads/2011/03/spotlightsd.zip
这一节将把前面的shader代码改为逐像素计算的方向光。我们需要将工作按照两个shader拆分,以确定哪些是需要逐像素操作的。
首先看看每个顶点接收到的信息:
•法线
•半向量
•光源方向
我们需要将法线变换到视点空间然后归一化。我们还需要将半向量和光源方向也归一化,不过它们已经位于视点空间中了。这些归一化之后的向量会进行插值,然后送入片断shader,所以需要声明易变变量保存这些向量。
我们也可以在顶点shader中完成一些与光和材质相关的计算,这样可以帮助平衡顶点shader和片断shader的负载。
顶点shader代码可以写成如下形式:
- varying vec4 diffuse,ambient;
- varying vec3 normal,lightDir,halfVector;
- void main()
- {
- /* first transform the normal into eye space and
- normalize the result */
- normal = normalize(gl_NormalMatrix * gl_Normal);
- /* now normalize the light's direction. Note that
- according to the OpenGL specification, the light
- is stored in eye space. Also since we're talking about
- a directional light, the position field is actually direction */
- lightDir = normalize(vec3(gl_LightSource[0].position));
- /* Normalize the halfVector to pass it to the fragment shader */
- halfVector = normalize(gl_LightSource[0].halfVector.xyz);
- /* Compute the diffuse, ambient and globalAmbient terms */
- diffuse = gl_FrontMaterial.diffuse * gl_LightSource[0].diffuse;
- ambient = gl_FrontMaterial.ambient * gl_LightSource[0].ambient;
- ambient += gl_FrontMaterial.ambient * gl_LightModel.ambient;
- gl_Position = ftransform();
- }
varying vec4 diffuse,ambient;
varying vec3 normal,lightDir,halfVector;

void main()
{
    /* first transform the normal into eye space and
    normalize the result */
    normal = normalize(gl_NormalMatrix * gl_Normal);
    /* now normalize the light's direction. Note that
    according to the OpenGL specification, the light
    is stored in eye space. Also since we're talking about
    a directional light, the position field is actually direction */
    lightDir = normalize(vec3(gl_LightSource[0].position));
    /* Normalize the halfVector to pass it to the fragment shader */
    halfVector = normalize(gl_LightSource[0].halfVector.xyz);
    /* Compute the diffuse, ambient and globalAmbient terms */
    diffuse = gl_FrontMaterial.diffuse * gl_LightSource[0].diffuse;
    ambient = gl_FrontMaterial.ambient * gl_LightSource[0].ambient;
    ambient += gl_FrontMaterial.ambient * gl_LightModel.ambient;

    gl_Position = ftransform();
}- varying vec4 diffuse,ambient;
- varying vec3 normal,lightDir,halfVector;
- void main()
- {
- vec3 n,halfV;
- float NdotL,NdotHV;
- /* The ambient term will always be present */
- vec4 color = ambient;
- /* a fragment shader can't write a varying variable, hence we need
- a new variable to store the normalized interpolated normal */
- n = normalize(normal);
- /* compute the dot product between normal and ldir */
- NdotL = max(dot(n,lightDir),0.0);
- ...
varying vec4 diffuse,ambient;
varying vec3 normal,lightDir,halfVector;

void main()
{
    vec3 n,halfV;
    float NdotL,NdotHV;
    /* The ambient term will always be present */
    vec4 color = ambient;
    /* a fragment shader can't write a varying variable, hence we need
    a new variable to store the normalized interpolated normal */
    n = normalize(normal);
    /* compute the dot product between normal and ldir */
    NdotL = max(dot(n,lightDir),0.0);
...- ...
- if (NdotL > 0.0)
- {
- color += diffuse * NdotL;
- halfV = normalize(halfVector);
- NdotHV = max(dot(n,halfV),0.0);
- color += gl_FrontMaterial.specular *
- gl_LightSource[0].specular *
- pow(NdotHV, gl_FrontMaterial.shininess);
- }
- gl_FragColor = color;
    ...
    if (NdotL > 0.0)
    {
        color += diffuse * NdotL;
        halfV = normalize(halfVector);
        NdotHV = max(dot(n,halfV),0.0);
        color += gl_FrontMaterial.specular *
                gl_LightSource[0].specular *
                pow(NdotHV, gl_FrontMaterial.shininess);
    }

    gl_FragColor = color;
}http://www.lighthouse3d.com/wp-content/uploads/2011/03/dirpixsd.zip
逐像素的点光(Point Light Per Pixel)
本节基于前面有关方向光的内容,大部分代码都相同。本节内容主要涉及方向光和点光的不同之处。方向光一般假设光源在无限远的地方,所以到达物体时是平行光。相反,点光源有一个空间中的位置,并向四面八方辐射光线。此外,点光的强度会随到达顶点的距离而衰弱。
对于OpenGL程序来说,这两种光的区别主要有:
•光源的position域的w分量:对方向光来说它是0,表面这个position实际是一个方向(direction);对点光来说,这个分量是1。
•点光源的衰减由三个系数决定:一个常数项,一个线性项和一个二次项。
对方向光来说,光线的方向对所有顶点相同,但是对点光来说,方向是从顶点指向光源位置的向量。因此对我们来说需要修改的就是在顶点shader中加入计算光线方向的内容。
在OpenGL中衰减是按照如下公式计算的:
注意衰减与距离是非线性关系,所以我们不能逐顶点计算衰减再在片断shader中使用插值结果,不过我们可以在顶点shader中计算距离,然后在片断shader中使用距离的插值计算衰减。
使用点光计算颜色值的公式为:
- varying vec4 diffuse,ambientGlobal,ambient;
- varying vec3 normal,lightDir,halfVector;
- varying float dist;
- void main()
- {
- vec4 ecPos;
- vec3 aux;
- normal = normalize(gl_NormalMatrix * gl_Normal);
- /* these are the new lines of code to compute the light's direction */
- ecPos = gl_ModelViewMatrix * gl_Vertex;
- aux = vec3(gl_LightSource[0].position-ecPos);
- lightDir = normalize(aux);
- dist = length(aux);
- halfVector = normalize(gl_LightSource[0].halfVector.xyz);
- /* Compute the diffuse, ambient and globalAmbient terms */
- diffuse = gl_FrontMaterial.diffuse * gl_LightSource[0].diffuse;
- /* The ambient terms have been separated since one of them */
- /* suffers attenuation */
- ambient = gl_FrontMaterial.ambient * gl_LightSource[0].ambient;
- ambientGlobal = gl_FrontMaterial.ambient * gl_LightModel.ambient;
- gl_Position = ftransform();
- }
varying vec4 diffuse,ambientGlobal,ambient;
varying vec3 normal,lightDir,halfVector;
varying float dist;

void main()
{
    vec4 ecPos;
    vec3 aux;
    normal = normalize(gl_NormalMatrix * gl_Normal);

    /* these are the new lines of code to compute the light's direction */
    ecPos = gl_ModelViewMatrix * gl_Vertex;
    aux = vec3(gl_LightSource[0].position-ecPos);
    lightDir = normalize(aux);
    dist = length(aux);
    halfVector = normalize(gl_LightSource[0].halfVector.xyz);

    /* Compute the diffuse, ambient and globalAmbient terms */
    diffuse = gl_FrontMaterial.diffuse * gl_LightSource[0].diffuse;
    /* The ambient terms have been separated since one of them */
    /* suffers attenuation */
    ambient = gl_FrontMaterial.ambient * gl_LightSource[0].ambient;
    ambientGlobal = gl_FrontMaterial.ambient * gl_LightModel.ambient;
    gl_Position = ftransform();
}- varying vec4 diffuse,ambientGlobal, ambient;
- varying vec3 normal,lightDir,halfVector;
- varying float dist;
- void main()
- {
- vec3 n,halfV,viewV,ldir;
- float NdotL,NdotHV;
- vec4 color = ambientGlobal;
- float att;
- /* a fragment shader can't write a varying variable, hence we need
- a new variable to store the normalized interpolated normal */
- n = normalize(normal);
- /* compute the dot product between normal and normalized lightdir */
- NdotL = max(dot(n,normalize(lightDir)),0.0);
- if (NdotL > 0.0)
- {
- att = 1.0 / (gl_LightSource[0].constantAttenuation +
- gl_LightSource[0].linearAttenuation * dist +
- gl_LightSource[0].quadraticAttenuation * dist * dist);
- color += att * (diffuse * NdotL + ambient);
- halfV = normalize(halfVector);
- NdotHV = max(dot(n,halfV),0.0);
- color += att * gl_FrontMaterial.specular * gl_LightSource[0].specular *
- pow(NdotHV,gl_FrontMaterial.shininess);
- }
- gl_FragColor = color;
- }
varying vec4 diffuse,ambientGlobal, ambient;
varying vec3 normal,lightDir,halfVector;
varying float dist;

void main()
{
    vec3 n,halfV,viewV,ldir;
    float NdotL,NdotHV;
    vec4 color = ambientGlobal;
    float att;
    /* a fragment shader can't write a varying variable, hence we need
    a new variable to store the normalized interpolated normal */
    n = normalize(normal);
    /* compute the dot product between normal and normalized lightdir */
    NdotL = max(dot(n,normalize(lightDir)),0.0);
    if (NdotL > 0.0)
    {
        att = 1.0 / (gl_LightSource[0].constantAttenuation +
                gl_LightSource[0].linearAttenuation * dist +
                gl_LightSource[0].quadraticAttenuation * dist * dist);
        color += att * (diffuse * NdotL + ambient);
        halfV = normalize(halfVector);
        NdotHV = max(dot(n,halfV),0.0);
        color += att * gl_FrontMaterial.specular * gl_LightSource[0].specular *
                        pow(NdotHV,gl_FrontMaterial.shininess);
    }
    gl_FragColor = color;
}http://www.lighthouse3d.com/wp-content/uploads/2011/03/pointlightsd.zip
逐像素的聚光(Spot Light Per Pixel)
本节内容与上一节基本一致,唯一不同的就是聚光不同于点光,其发出的光线被限制在一个圆锥体中。
对于OpenGL程序来说,这两种光的区别主要有:
•聚光包含一个方向向量spotDirection,表示圆锥体的轴。
•圆锥体包含一个角度,在GLSL中可以使用应用程序设置的角度值以及对应的余弦值spotCosCutoff。
•最后还有一个衰减速率spotExponent,它表示从圆锥的中心轴向外表面变化时光强度的衰减。
聚光的顶点shader与点光完全相同,我们只需要对片断shader进行一些修改。只有当当前片断位于聚光的光锥内时,才需要对散射光、镜面反射光和环境光成分进行着色。所以我们首先要检查这个条件。
光源与某点连线向量以及聚光方向向量(spotDirection)之间夹角的余弦值必须大于spotCosCutoff,否则此点位于聚光之外,只能接收到全局环境光。
- ...
- n = normalize(normal);
- /* compute the dot product between normal and ldir */
- NdotL = max(dot(n,normalize(lightDir)),0.0);
- if (NdotL > 0.0)
- {
- spotEffect = dot(normalize(gl_LightSource[0].spotDirection),
- normalize(-lightDir));
- if (spotEffect > gl_LightSource[0].spotCosCutoff)
- {
- /* compute the illumination in here */
- }
- }
- gl_FragColor = ...
...

n = normalize(normal);

/* compute the dot product between normal and ldir */
NdotL = max(dot(n,normalize(lightDir)),0.0);

if (NdotL > 0.0)
{
    spotEffect = dot(normalize(gl_LightSource[0].spotDirection),
            normalize(-lightDir));
    if (spotEffect > gl_LightSource[0].spotCosCutoff)
    {
        /* compute the illumination in here */
    }
}

gl_FragColor = ...- spotEffect = pow(spotEffect, gl_LightSource[0].spotExponent);
- att = spotEffect / (gl_LightSource[0].constantAttenuation +
- gl_LightSource[0].linearAttenuation * dist +
- gl_LightSource[0].quadraticAttenuation * dist * dist);
- color += att * (diffuse * NdotL + ambient);
- halfV = normalize(halfVector);
- NdotHV = max(dot(n,halfV),0.0);
- color += att * gl_FrontMaterial.specular *
- gl_LightSource[0].specular *
- pow(NdotHV,gl_FrontMaterial.shininess);
spotEffect = pow(spotEffect, gl_LightSource[0].spotExponent);
att = spotEffect / (gl_LightSource[0].constantAttenuation +
        gl_LightSource[0].linearAttenuation * dist +
        gl_LightSource[0].quadraticAttenuation * dist * dist);

color += att * (diffuse * NdotL + ambient);

halfV = normalize(halfVector);
NdotHV = max(dot(n,halfV),0.0);
color += att * gl_FrontMaterial.specular *
            gl_LightSource[0].specular *
pow(NdotHV,gl_FrontMaterial.shininess);http://www.lighthouse3d.com/wp-content/uploads/2011/03/spotlightsd.zip


 2万+
2万+


 被折叠的 条评论
为什么被折叠?
被折叠的 条评论
为什么被折叠?
 到【灌水乐园】发言


