


1、Spring AOP几个概念阐述
1.通知(Advice):
通知定义了切面是什么以及何时使用。描述了切面要完成的工作和何时需要执行这个工作。
2.连接点(Joinpoint):
程序能够应用通知的一个“时机”,这些“时机”就是连接点,例如方法被调用时、异常被抛出时等等。
3.切入点(Pointcut)
通知定义了切面要发生的“故事”和时间,那么切入点就定义了“故事”发生的地点,例如某个类或方法的名称,Spring中允许我们方便的用正则表达式来指定
4.切面(Aspect)
通知和切入点共同组成了切面:时间、地点和要发生的“故事”
5.引入(Introduction)
引入允许我们向现有的类添加新的方法和属性(Spring提供了一个方法注入的功能)
6.目标(Target)
即被通知的对象,如果没有AOP,那么它的逻辑将要交叉别的事务逻辑,有了AOP之后它可以只关注自己要做的事(AOP让他做爱做的事)
7.代理(proxy)
应用通知的对象,详细内容参见设计模式里面的代理模式
8.织入(Weaving)
把切面应用到目标对象来创建新的代理对象的过程,织入一般发生在如下几个时机:
(1)编译时:当一个类文件被编译时进行织入,这需要特殊的编译器才可以做的到,例如AspectJ的织入编译器
(2)类加载时:使用特殊的ClassLoader在目标类被加载到程序之前增强类的字节代码
(3)运行时:切面在运行的某个时刻被织入,SpringAOP就是以这种方式织入切面的,原理应该是使用了JDK的动态代理技术
9.通知器(Advisor)
定义应该使用哪个通知(advice)并在哪个关注点(pointcut)使用它,也就是通过Advisor把advice以及pointcut结合起来。
在spring中一个典型的advisor就是DefaultPointcutAdvisor,如下代码所示:
public class DefaultPointcutAdvisor extends AbstractGenericPointcutAdvisor implements Serializable {

	private Pointcut pointcut = Pointcut.TRUE;


	/**
	 * Create a DefaultPointcutAdvisor, specifying Pointcut and Advice.
	 * @param pointcut the Pointcut targeting the Advice
	 * @param advice the Advice to run when Pointcut matches
	 */
	public DefaultPointcutAdvisor(Pointcut pointcut, Advice advice) {
		this.pointcut = pointcut;
		setAdvice(advice);
	}
它的两个属性就是pointcut以及advice,这里pointcut的实现是一个典型的懒汉单例模式实现,看其代码如下:
class TruePointcut implements Pointcut, Serializable {

	public static final TruePointcut INSTANCE = new TruePointcut();

	/**
	 * Enforce Singleton pattern.
	 */
	private TruePointcut() {
	}
使用static变量确保其只会被初始化一次,同时将类的构造函数设置为私有也保证了在当前的TruePointcut当中。
在pointcut当中有两个方法分别是classfilter和methodMatcher,这两个对象实现也是类似的单例模式。单例模式确保了资源的单一性,在这里使用单例模式有点作为util使用的含义。
2、AOPProxy代理对象的建立
在spring的AOP实现原理中一个重要的设计模式就是代理模式,那么代理模式里面最重要的一个点就是proxy,这里就阐述下这个proxy的建立过程。
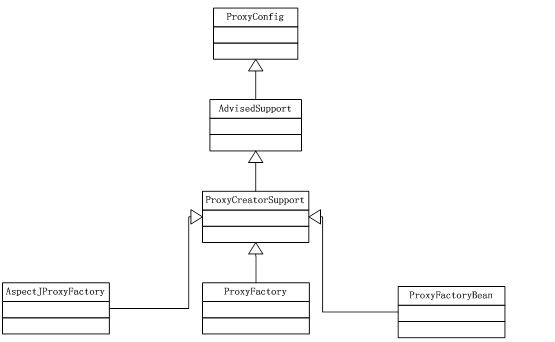
在这个继承关系中,最底层的三个proxy类都有共同的三个基类: ProxyConfig、AdvisedSupport、ProxyCreatorSupport。
ProxyConfig:可以看做是一个数据基类,它为最底层的三个子类提供配置属性。
AdvisedSupport:封装了AOP对通知及通知器的相关操作,对于不同的aop代理对象的生成是一样的,对于具体的aop对象的创建就交给子类去操作。
ProxyCreatorSupport:是子类创建aop对象的辅助类。
AOP proxy创建时序图

从时序图可以看出首先是初始化advisorchain,就是从defaultListableBeanFactory中获取advisor的配置信息,并将它加入到一个List当中。主要代码逻辑如下:
for (String name : this.interceptorNames) {
				if (logger.isTraceEnabled()) {
					logger.trace("Configuring advisor or advice '" + name + "'");
				}

				if (name.endsWith(GLOBAL_SUFFIX)) {
					if (!(this.beanFactory instanceof ListableBeanFactory)) {
						throw new AopConfigException(
								"Can only use global advisors or interceptors with a ListableBeanFactory");
					}
					addGlobalAdvisor((ListableBeanFactory) this.beanFactory,
							name.substring(0, name.length() - GLOBAL_SUFFIX.length()));
				}

				else {
					// If we get here, we need to add a named interceptor.
					// We must check if it's a singleton or prototype.
					Object advice;
					if (this.singleton || this.beanFactory.isSingleton(name)) {
						// Add the real Advisor/Advice to the chain.
						advice = this.beanFactory.getBean(name);
					}
					else {
						// It's a prototype Advice or Advisor: replace with a prototype.
						// Avoid unnecessary creation of prototype bean just for advisor chain initialization.
						advice = new PrototypePlaceholderAdvisor(name);
					}
					addAdvisorOnChainCreation(advice, name);
				}
			}
遍历interceptorNames,再依据name去ioc容器中查找到相应对象并且添加。如果非全局切面,那么就查找单个对应切面的类,并且判断是否是单例,如果是单例就直接从容器中获取,如果不是单例就额外处理。最后添加到advisor的chain当中。
接下来就是生成单例的代理对象:private synchronized ObjectgetSingletonInstance() {
if(this.singletonInstance == null) {
this.targetSource= freshTargetSource();
if(this.autodetectInterfaces && getProxiedInterfaces().length == 0&& !isProxyTargetClass()) {
//Rely on AOP infrastructure to tell us what interfaces to proxy.
ClasstargetClass = getTargetClass();
if(targetClass == null) {
thrownew FactoryBeanNotInitializedException("Cannot determine target class forproxy");
}
setInterfaces(ClassUtils.getAllInterfacesForClass(targetClass,this.proxyClassLoader));
}
//Initialize the shared singleton instance.
super.setFrozen(this.freezeProxy);
this.singletonInstance= getProxy(createAopProxy());
}
returnthis.singletonInstance;
}首先根据aop框架获取代理的接口,并设置代理接口,之后就是获取代理类。从上面的时序图也可以看到到了aopproxy的创建。
public AopProxy createAopProxy(AdvisedSupport config) throws AopConfigException {
		if (config.isOptimize() || config.isProxyTargetClass() || hasNoUserSuppliedProxyInterfaces(config)) {
			Class targetClass = config.getTargetClass();
			if (targetClass == null) {
				throw new AopConfigException("TargetSource cannot determine target class: " +
						"Either an interface or a target is required for proxy creation.");
			}
			if (targetClass.isInterface()) {
				return new JdkDynamicAopProxy(config);
			}
			if (!cglibAvailable) {
				throw new AopConfigException(
						"Cannot proxy target class because CGLIB2 is not available. " +
						"Add CGLIB to the class path or specify proxy interfaces.");
			}
			return CglibProxyFactory.createCglibProxy(config);
		}
		else {
			return new JdkDynamicAopProxy(config);
		}
	}
创建首先判断是代理对象是否是接口,是接口的就使用jdk动态创建,其余的就采用cglib动态创建。其实最终就是创建一个Cglib2AopProxy或JdkDynamicAopProxy。也就是说着一步就是创建一个aopproxy的对象,接下来就是依据这个对象去生成我们需要的代理类。就是getproxy的过程。
JDK生成proxy对象的过程
public Object getProxy(ClassLoader classLoader) {
		if (logger.isDebugEnabled()) {
			logger.debug("Creating JDK dynamic proxy: target source is " + this.advised.getTargetSource());
		}
		Class[] proxiedInterfaces = AopProxyUtils.completeProxiedInterfaces(this.advised);
		findDefinedEqualsAndHashCodeMethods(proxiedInterfaces);
		return Proxy.newProxyInstance(classLoader, proxiedInterfaces, this);
	}
首先使用上面一步初始化设置的JdkDynamicAopProxy时设置的advised来加载proxy的接口,并依据这个实际接口和classload来实例化一个实际对象,具体的实现是Proxy.newProxyInstance(classLoader, proxiedInterfaces, this).在jdk的代理生成对象时,只需要传递一个InvocationHandler给到proxy,它的方法被调用时就会触发InvocationHandler的invoke方法,这个invoke方法的重点逻辑如下:
List<Object> chain = this.advised.getInterceptorsAndDynamicInterceptionAdvice(method, targetClass);
			if (chain.isEmpty()) {
				retVal = AopUtils.invokeJoinpointUsingReflection(target, method, args);
			}
			else {
				invocation = new ReflectiveMethodInvocation(proxy, target, method, args, targetClass, chain);
				retVal = invocation.proceed();
			}
invocation.proceed();就会将chain里面的切面执行到。
CGLIB的proxy创建:
// Configure CGLIB Enhancer...
			Enhancer enhancer = createEnhancer();
			if (classLoader != null) {
				enhancer.setClassLoader(classLoader);
				if (classLoader instanceof SmartClassLoader &&
						((SmartClassLoader) classLoader).isClassReloadable(proxySuperClass)) {
					enhancer.setUseCache(false);
				}
			}
			enhancer.setSuperclass(proxySuperClass);
			enhancer.setStrategy(new UndeclaredThrowableStrategy(UndeclaredThrowableException.class));
			enhancer.setInterfaces(AopProxyUtils.completeProxiedInterfaces(this.advised));
			enhancer.setInterceptDuringConstruction(false);

			Callback[] callbacks = getCallbacks(rootClass);
			enhancer.setCallbacks(callbacks);
			enhancer.setCallbackFilter(new ProxyCallbackFilter(
					this.advised.getConfigurationOnlyCopy(), this.fixedInterceptorMap, this.fixedInterceptorOffset));

			Class[] types = new Class[callbacks.length];
			for (int x = 0; x < types.length; x++) {
				types[x] = callbacks[x].getClass();
			}
			enhancer.setCallbackTypes(types);

			// Generate the proxy class and create a proxy instance.
			Object proxy;
			if (this.constructorArgs != null) {
				proxy = enhancer.create(this.constructorArgTypes, this.constructorArgs);
			}
			else {
				proxy = enhancer.create();
			}

			return proxy;
就是使用enhance来设置Callbacks,当method被触发时。这些回调会被触发执行。所以他们的基本原理是相同的,只是jdk的是包装在里面进行invoke回调,而cglib的是显式的设置回调。
3、AOPProxy的设计模式
在aopproxy的设计中上面已经说到主要采用了代理模式。代理模式的作用是:为其他对象提供一种代理以控制对这个对象的访问。代理模式的uml图如下:

在aopproxy中所谓的proxy就是aopproxy所生成的各类系统的注入对象,而request就是对象定义的切点,在这个切点被调用的时候首先会被aopproxy所生成的一个代理对象所捕获,先需要执行aopproxy在配置中所定义的advice,例如dobefore,doafter或dothrows等等。而这个执行过程对于客户端调用来说是透明的。
代理模式的优点:
能够协调调用者和被调用者,在一定程度上降低了系统的耦合度。
代理模式的缺点
由于在客户端和真实主题之间增加了代理对象,因此有些类型的代理模式可能会造成请求的处理速度变慢。
实现代理模式需要额外的工作,有些代理模式的实现非常复杂。


 1208
1208

 被折叠的 条评论
为什么被折叠?
被折叠的 条评论
为什么被折叠?
 到【灌水乐园】发言


