异常处理
4.1 异常与异常类
4.2 异常处理的两种方式
Java程序运行过程中所发生的异常事件可分为两类:
错误(Error):JVM系统内部错误、资源耗尽等严重情况
违例(Exception): 其它因编程错误或偶然的外在因素导致的一般性问题,例如:
对负数开平方根
空指针访问
试图读取不存在的文件
网络连接中断
Java异常举例:
public class Test {
public static void main(String[] args) {
String friends[]={"lisa","bily","kessy"};
for(int i=0;i<5;i++) {
System.out.println(friends[i]);
}
System.out.println("/nthis is the end");
}
}
程序Test运行结果:java Test
lisa
bily
kessy
Exception in thread "main" java.lang.ArrayIndexOutOfBoundsException
at Test12_1.main(Test12_1.java:5)
Press any key to continue...
用starUML研究源码
starUML是一个很好的UML建模工具,同时也是研究源代码极好的工具之一。因为是开源免费产品,所以我很喜欢用它!
如何做呢?
正向、逆向?
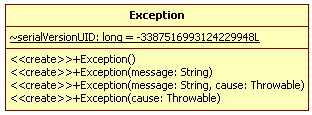
用starUML逆向工程得到图:(java.lang下的Exception类)
常见异常
RuntimeException
错误的类型转换
数组下标越界
空指针访问
IOExeption
从一个不存在的文件中读取数据
越过文件结尾继续读取
连接一个不存在的URL
异常处理机制
Throw:Java程序的执行过程中如出现异常,会自动生成一个异常类对象,该异常对象将被提交给Java运行时系统,这个过程称为抛出(throw)异常。
Catch:当Java运行时系统接收到异常对象时,会寻找能处理这一异常的代码并把当前异常对象交给其处理,这一过程称为捕获(catch)异常。
终止:如果Java运行时系统找不到可以捕获异常的方法,则运行时系统将终止,相应的Java程序也将退出。
程序员只能处理违例(Exception),而对错误(Error)无能为力。
异常处理举例
public class Test {
public static void main(String[] args) {
String friends[]={"lisa","bily","kessy"};
try {
for(int i=0;i<5;i++) {
System.out.println(friends[i]);
}
}
catch (java.lang.ArrayIndexOutOfBoundsException e) {
System.out.println("index err");
}
System.out.println("/nthis is the end");
}
}
程序Test运行结果:java Test
lisa
bily
kessy
index err
this is the end
Press any key to continue...
捕获异常
捕获异常是通过try-catch-finally语句实现的。
try {
...... //可能产生异常的代码
} catch ( ExceptionName1 e ) {
...... //当产生ExceptionName1型异常时的处置措施
} catch ( ExceptionName2 e ) {
...... //当产生ExceptionName2型异常时的处置措施
} [ finally{
...... //无条件执行的语句
} ]
try
捕获异常的第一步是用try{…}语句块选定捕获异常的范围。
catch
在catch语句块中是对异常对象进行处理的代码,每个try语句块可以伴随一个或多个catch语句,用于处理可能产生的不同类型的异常对象。与其它对象一样,可以访问一个异
常对象的成员变量或调用它的方法。
getMessage( ) 方法,用来得到有关异常事件的信息
printStackTrace( )用来跟踪异常事件发生时执行堆栈的内容。
finally
捕获异常的最后一步是通过finally语句为异常处理提供一个统一的出口,使得在控制流转到程序的其它部分以前,能够对程序的状态作统一的管理。不论在try代码块中是否发生
了异常事件,finally块中的语句都会被执行。finally语句是可选的。
try {
startFaucet();
waterLawn();
}
catch (BrokenPipeException e) {
logProblem();
}
finally {
stopFaucet();
}
IOException异常处理举例
import java.io.*;
public class Test12_3 {
public static void main(String[] args) {
FileInputStream in=new FileInputStream("myfile.txt");
int b;
b = in.read();
while(b!= -1) {
System.out.print((char)b);
b = in.read();
}
in.close();
}
}
java.io.FileNotFoundException
java.io.IOException
import java.io.*;
public class Test12_4{
public static void main(String[] args){
try {
FileInputStream in=new FileInputStream("myfile.txt");
int b; b = in.read();
while(b!= -1) {
System.out.print((char)b);
b = in.read();
}
in.close();
} catch (IOException e) {
System.out.println(e);
} finally {
System.out.println(" It’s ok!");
}
}
}
声明抛弃异常
声明抛弃异常是Java中处理异常的第二种方式
如果一个方法(中的语句执行时)可能生成某种异常,但是并不能确定如何处理这种异常,则此方法应声明抛弃异常,表明该方法将不对这些异常进行处理,而由该方法的调用者负
责处理
声明抛弃举例:
public void readFile(String file) throws IOException
{
……
// 读文件的操作可能产生IOException类型的异常
FileInputStream fis = new FileInputStream(file);
..……
}
声明抛弃异常举例
import java.io.*;
public class Test12_5{
public static void main(String[ ] args){
Test12_5 t = new Test12_5();
try {
t.readFile();
} catch(IOException e) {System.out.println(e); }
}
public void readFile() throws IOException {
FileInputStream in=new FileInputStream("myfile.txt");
int b; b = in.read();
while(b!= -1) {
System.out.print((char)b);
b = in.read();
}
in.close();
}
}
重写方法声明抛弃异常原则
重写方法不能抛出比被重写方法范围更大的异常类型
public class TestA {
public void methodA() throws IOException {
……
}
}
public class B1 extends TestA {
public void methodA() throws FileNotFoundException {
……
}
}
public class B2 extends TestA {
public void methodA() throws Exception {
……
}
}
人工抛出异常
Java异常类对象除在程序执行过程中出现异常时由系统自动生成并抛出,也可根据需要人工创建并抛出。
首先要生成异常对象,然后通过throw语句实现抛出操作(提交给Java运行环境)。
IOException e =new IOException();
throw e;
可以抛出的异常必须是Throwable或其子类的实例。下面的语句在编译时将会产生语法错误:
throw new String("want to throw");
创建用户自定义异常类
用户自定义异常类MyException,用于描述数据取值范围错误信息:
class MyException extends Exception {
private int idnumber;
public MyException(String message, int id) {
super(message);
this.idnumber = id;
}
public int getId() {
return idnumber;
}
}
使用用户自定义异常类
public class Test12_6 {
public void regist(int num) throws MyException {
if (num < 0) {
throw new MyException("人数为负值,不合理",3);
}
System.out.println("登记人数" + num);
}
public void manager() {
try {
regist(100);
} catch (MyException e) {
System.out.print("登记失败,出错种类"+e.getId()));
}
System.out.print("本次登记操作结束");
}
public static void main(String args[]){
Test12_6 t = new Test12_6();
t.manager();
}
}
Junit 测试
* 在junit3.8中,测试方法满足如下原则
* 1)public的
* 2)void的
* 3)无方法参数
* 4)方法名称必须以test开头
假如有如下代码:
public class Calculator
{
public int add(int a, int b)
{
return a + b;
}
public int minus(int a, int b)
{
return a - b;
}
public int multiply(int a, int b)
{
return a * b;
}
public int divide(int a, int b) throws Exception
{
return a / b;
}
}
我们要对它进行测试:
package com.test.junit3;
import junit.framework.Assert;
import junit.framework.TestCase;
public class CalculatorTest extends TestCase
{
public void testAdd()
{
Calculator cal = new Calculator();
int result = cal.add(1,2);
Assert.assertEquals(3,result);
}
public void testMinus()
{
Calculator cal = new Calculator();
int result = cal.minus(1,2);
Assert.assertEquals(-1,result);
}
public void testMultiply()
{
Calculator cal = new Calculator();
int result = cal.multiply(2,3);
Assert.assertEquals(6,result);
}
public void testDivide()
{
Calculator cal = new Calculator();
int result = cal.divide(6,4);
Assert.assertEquals(1,result);
}
public void testDivide2()
{
Calculator cal = new Calculator();
cal.divide(4,0);
}
}
发现testDivide2()测试没有通过。
于是修改Calculator
public int divide(int a, int b) throws Exception
{
if(0 == b)
{
throw new Exception("除数不能为零!");
}
return a / b;
}
接着修改:
public void testDivide()
{
int result = 0;
try
{
result = cal.divide(6,4);
}
catch (Exception e)
{
e.printStackTrace();
//Assert.fail();
}
Assert.assertEquals(1,result);
}
public void testDivide2()
{
Throwable tx = null;
try
{
cal.divide(4,0);
//System.out.println(“hello”);
//Assert.fail();//断言失败,这行代码一旦执行,说明失败了
}
catch(Exception ex)
{
tx = ex;
}
Assert.assertNotNull(tx);
Assert.assertEquals(Exception.class,tx.getClass());
Assert.assertEquals("除数不能为零!",tx.getMessage());
}
好,到目前比较完整的Junit测试已经完成。我们要做的是,改进这些代码。
修改:
/**
* Dont't Repeat Yourself
*/
private Calculator cal;
public void setUp()
{
//System.out.println(“hello”);
cal = new Calculator();
}
public void tearDown()
{
// System.out.println(“world”);
}
然后将CalculatorTest 中的Calculator cal = new Calculator(); 删掉。
至此,测试代码就比较完善了。
从上面我详细的描述了“异常/异常处理”,并且从其引出了Junit的使用方法。涉及到了Junit的核心内容。详细的Junit使用方法可以参考相关书籍。


 4757
4757

 被折叠的 条评论
为什么被折叠?


