


Ts
Vue官网的Ts说明
Ts官网配置
为什么 Vue 3 是用 TypeScript 编写的???
静态类型系统可以帮助防止许多潜在的运行时错误
定义 Vue 组件
要让 TypeScript 正确推断 Vue 组件选项中的类型,需要使用 defineComponent 全局方法定义组件:
import { defineComponent } from 'vue'
const Component = defineComponent({
  // 已启用类型推断
})
如果你使用的是单文件组件,则通常会被写成:
<script lang="ts">
	import { defineComponent } from 'vue'
	export default defineComponent({
	  // 已启用类型推断
	})
</script>
在写vue的ts代码时候,很明显代码提示变强了
与 Options API 一起使用
对一个数字 做split操作时候,ts立马检测出错误来
this.count.split('') // => Property 'split' does not exist on type 'number'
如果你有一个复杂的类型或接口,你可以使用 type assertion 对其进行指明
interface Book {
  title: string

  year: number
}
const Component = defineComponent({
  data() {
    return {
      book: {
        title: 'Vue 3 Guide',
        year: 2020
      } as Book
    }
  }
})
为 globalProperties 扩充类型
Vue 3 提供了一个 globalProperties 对象,用来添加可以被任意组件实例访问的全局 property。例如一个插件想要注入一个共享全局对象或函数。
// 用户定义
import axios from 'axios'
const app = Vue.createApp({})
app.config.globalProperties.$http = axios
// 验证数据的插件
export default {
  install(app, options) {
    app.config.globalProperties.$validate = (data: object, rule: object) => {
      // 检查对象是否合规
    }
  }
}
为了告诉 TypeScript 这些新 property,我们可以使用模块扩充 (module augmentation)。
在上述示例中,我们可以添加以下类型声明:
import axios from 'axios'
declare module '@vue/runtime-core' {
  export interface ComponentCustomProperties {
    $http: typeof axios
    $validate: (data: object, rule: object) => boolean
  }
}
我们可以把这些类型声明放在同一个文件里,或一个项目级别的 *.d.ts 文件 (例如在 TypeScript 会自动加载的 src/typings 文件夹中)。对于库/插件作者来说,这个文件应该被定义在 package.json 的 types property 里。
//node_modules/vue-router/package.json
{
	"types": "dist/vue-router.d.ts",
}
“types”: “dist/vue-router.d.ts”,
当命令行上指定了输入文件时,tsconfig.json文件会被忽略。
在声明文件tsconfig.json的exclude和include或者使用files字段下指定要检测的文件路径;
files 只能使用相对路径 或者绝对路径
include/exclude 可以使用模糊匹配的字符代替 某一特征名的文件 点击下方链接查看说明
tsconfig.json文件可以是个空文件,那么所有默认的文件都会以默认配置选项编译。
默认所有可见的"@types"包会在编译过程中被包含进来,包括node_modules 内所有的
如果指定了typeRoots,只有typeRoots下面的包才会被包含进来
{
   "compilerOptions": {
       "typeRoots" : ["./typings"]
   }
}
如果指定了types,只有被列出来的包才会被包含进来
这个tsconfig.json文件将仅会包含 ./node_modules/@types/node,./node_modules/@types/lodash和./node_modules/@types/express
{
   "compilerOptions": {
        "types" : ["node", "lodash", "express"]
   }
}
默认所有可见的"@types"包会在编译过程中被包含进来 简单说就是 这样./node_modules/@types/,…/node_modules/@types/和…/…/node_modules/@types/
指定"types": [ ]来禁用自动引入@types包
可以继承别的包属性
 "extends": "./configs/base",
vite
基于浏览器原生ES imports的开发服务器,利用浏览器去解析imports,在服务器端按需编译返回,完全
跳过了打包这个概念,服务器随其随用
同时不仅有vue文件支持,还搞定了热更新,而且热更新的速度不会随着模块增加而变慢
使用vite创建vue项目 create-vite-app包
npm init @vitejs/app <project-name>//可以选择创建vue项目  也可以创建react项目
cd <project-name>
npm install
npm run dev
vue官网提供的
安装vue3项目
Vue Router
Vue cli
blog
Vue3 api文档
从vue2迁徙
应用配置	 配置app.config.*   globalProperties
		app.config.globalProperties.objaaaaaaaaa = {a:1,b:2}
		getCurrentInstance()?.appContext.config.globalProperties
应用API

全局API
	createApp
	h
	defineComponent
	defineAsyncComponent
	defineCustomElement
	resolveDynamicComponent
	resolveDirective
	withDirectives
	createRenderer
	nextTick
	mergeProps
	useCssModule
	version
选项
	Data
		data
		props
		computed
		methods
		watch
		emits
		expose
	DOM
		template
		render
	生命周期钩子
		beforeCreate
		created
		beforeMount
		mounted
		beforeUpdate
		updated
		activated
		deactivated
		beforeUnmount
		unmounted
		errorCaptured
		renderTracked
		renderTriggered
	选项/资源
		directives
		components
	组合
		mixins
		extends
		provide / inject
		setup
	杂项
		name
		inheritAttrs
		compilerOptions
		delimiters
实例property
	$data
	$props
	$el
	$options
	$parent
	$root
	$slots
	$refs
	$attrs
实例方法
	$watch
	$emit
	$forceUpdate
	$nextTick
指令
	v-text
	v-html
	v-show
	v-if
	v-else
	v-else-if
	v-for
	v-on
	v-bind
	v-model
	v-slot
	v-pre
	v-cloak
	v-once
	v-memo
	v-is
特殊attribute
	key
	ref
	is
内置组件
	component
	transition
	transition-group
	keep-alive
	slot
	teleport
响应性API
	响应性基础API
		reactive
		readonly
		isProxy
		isReactive
		isReadonly
		toRaw
		markRaw
		shallowReactive
		shallowReadonly
	Refs
		ref
		unref
		toRefs
		isRef
		customRef
		shallowRef
		triggerRef
	Computed 与 watch
		computed
		watchEffect
		watchPostEffect
		watchSyncEffect
		watch
			侦听单一源
			侦听多个源
			与watchEffect相同的行为
	Effect 作用域API
		effectScope
		getCurrentScope
		onScopeDispose
组合式API
	setup
	生命周期钩子
	Provide / Inject
	getCurrentInstance
单文件组件
	规范
	工具
	<script setup>
vue3常用方法的使用
<body>
    <div id="app">
        <button @click="add">afdas</button>
        {{count}}
        {{doubleCount}}
    </div>
    <script>
        const { reactive, createApp, computed, watch, onMounted, ref , toRefs } = Vue
        createApp({
            // beforeCreate之前使用
            setup(props, context) {
                // 响应式数据
                const state = reactive({
                    count: 1,
                    doubleCount: computed(() => state.count * 2),
                })

                // 单个原始值响应化
                const counter = ref(1)//{_isRef:true,value:1}
                setTimeout(() => {
                    counter.value++ //要修改需要.value
                }, 2000);

                // 声明一个函数
                function add() {
                    state.count++
                }

                watch(() => {
                    console.log('count变了', state.count) // 这里用到了 会被依赖收集 变化就触发了
                })
                onMounted(() => {
                    console.log('onMounted')
                })

                return { ...toRefs(state), add }
            }
        }).mount('#app')
    </script>
</body>
setup
初始化props 和 beforeCreate 之间处理的setup函数
setup(props){}//porps值基于proxy代理的响应式数据
watchEffect
import { watchEffect } from '@vue/runtime-core'
setup(props){  //setup内的props不可以解构出title否则 无法监听到title的更新
   watchEffect(()=>{
     console.log(props.title) // 监听props更新
   })
}
ref设置响应式数据 原理:defineProperty监听value值
方式一
//ref构建响应式数据 在js中需要.value去访问,在template模板中,只需要对应
<template>
	<div>{{supNum}}</div> <div>{{oppNum}}</div>
</template>
import { ref } from '@vue/runtime-core'
setup(props){
   let supNum = ref(0);
   let oppNum = ref(0);
   function change(lx){
     lx === 0 ? supNum.value++ : oppNum.value++;
   }
   return {
     supNum,
     oppNum,
     change
   }
 }
方式二
<template>
	<div>{{state.supNum}}</div> <div>{{state.oppNum}}</div>
</template>
import { ref } from '@vue/runtime-core'
setup(props){
   let state = ref({
     supNum:0,
     oppNum:0
   })
   function change(lx){
     console.log('ok')
     lx === 0 ? state.supNum.value++ : state.oppNum.value++;
   }
   return {
     state,
     change
   }
 }
unref 解析出ref包装的内部数据,不用再用.value去访问
let supNum= ref(0)
console.log(unref(supNum))// 0
val = isRef(val) ? val.value : val  //isRef检查值是否为一个 ref 对象
toRefs可以将state中的每一项都设置为响应式 和 toRef
<template>
	<div>{{state.supNum}}</div> <div>{{state.oppNum}}</div>
</template>
import { reactive , toRefs } from '@vue/runtime-core'
// Proxy对于数据或者并未初始化的对象成员都可以随意修改值,而且具备响应式的效果
setup(props){
   let state = reactive({
     supNum:0,
     oppNum:0,
     arr:[1,2]
   })
    state.arr[0] = 3
    state.name = 'zanlan'
   function change(lx){
     console.log('ok')
     lx === 0 ? state.supNum++ : state.oppNum++;
   }
  //针对某一个时,则用toRef(state, 'foo')
	return {
      ...toRefs(state),
      change
    }
 }
reactive设置响应式数据 原理:Proxy对数据进行深度的监听
<template>
	<div>{{state.supNum}}</div> <div>{{state.oppNum}}</div>
</template>
import { reactive } from '@vue/runtime-core'
// Proxy对于数据或者并未初始化的对象成员都可以随意修改值,而且具备响应式的效果
setup(props){
   let state = reactive({
     supNum:0,
     oppNum:0
   })
    state.arr[0] = 3
    state.name = 'zanlan'
   function change(lx){
     console.log('ok')
     lx === 0 ? state.supNum++ : state.oppNum++;
   }
   return {
     state,
     change
   }
 }
toRaw
const foo = {}
const reactiveFoo = reactive(foo)
toRaw(reactiveFoo) === foo // true
readonly 设置只读属性
readonly(reactive({ count: 0 })).count ++ // 变更副本将失败并导致警告
isProxy 检查对象是否是由 reactive 或 readonly 创建的 proxy。
isProxy(reactive({ count: 0 })) //true
isReactive 检查对象是否是由 reactive 创建的响应式代理。
isReactive(reactive({ count: 0 })) //true
isReadonly 检查对象是否是由 readonly 创建的只读代理。
isReadonly(readonly(reactive({ count: 0 }))) // true
computed
不可以手动修改
const plusOne = computed(()=>ref(0).value + 1)
plusOne.value // 2
plusOne++ // 报错
如果想修改计算属性的值,可以再传一个set函数,包裹于对象里
const count = ref(1);
const plusOne = computed({
	get:()=>count.value + 1,
	set:val => {count.value = val - 1 }
})
plusOne.value = 1 ;
plusOne.value // 0
生命周期函数
beforeCreate         setup
created              setup
beforeMount          onBeforeMount
mounted              onMounted
beforeUpdate         onBeforeUpdate
updated              onUpdated
beforeDestroy        onBeforeUnmount
destroyed            onUnmounted
errorCaptured        onErrorCaptured
vuejs的github仓库
vue源码地址
vue-router源码地址
vue-cli源码地址
vuex源码地址
devtools源码地址

开源项目链接
vue-pure-admin
项目源码GitHub地址
项目源码码云地址
项目学习地址
vue-pure-admin (opens new window)是一个免费开源的中后台模版。使用了最新的vue3 vite2 Element-Plus TypeScript等主流技术开发,开箱即用的中后台前端解决方案,也可用于学习参考。
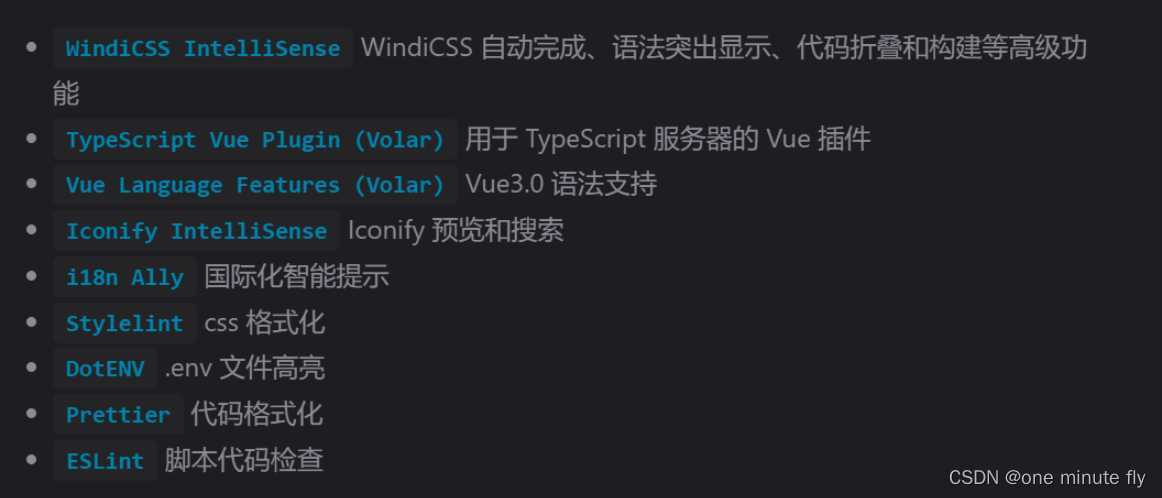
安装的vscode插件
定义组件
import { h, defineComponent } from "vue";

var IconifyIconOffline =  defineComponent({
  name: "IconifyIcon",
  components: { IconifyIcon },//这是另外一个组件
  props: {
    icon: {
      type: String,
      default: ""
    }
  },
  render() {
    const attrs = this.$attrs;
    return h(
      IconifyIcon,
      {
        icon: `${this.icon}`,
        ...attrs
      },
      {
        default: () => []
      }
    );
  }
});
const app = createApp(App);
app.component("IconifyIconOffline", IconifyIconOffline);

app.mount("#app");


 4万+
4万+


 被折叠的 条评论
为什么被折叠?
被折叠的 条评论
为什么被折叠?
 到【灌水乐园】发言


