


剩余参数和展开运算符
剩余参数
什么是剩余参数
// 1.认识剩余参数
const add = (x, y, z, ...args) => {};

// 2.剩余参数的本质
const add = (x, y, ...args) => {
    console.log(x, y, args);
};
// add();
// add(1);
// add(1, 2);
add(1, 2, 3, 4, 5);

// 剩余参数永远是个数组,即使没有值,也是空数组

// 3, 4, 5->[3, 4, 5]
剩余参数的注意事项
// 1.箭头函数的剩余参数
// 箭头函数的参数部分即使只有一个剩余参数,也不能省略圆括号
const add = (...args) => {};

// 2.使用剩余参数替代 arguments 获取实际参数
const add1 = function () {
    console.log(arguments);
};
add1(1,2); //[1, 2, callee: ƒ, Symbol(Symbol.iterator): ƒ]
const add2 = (...args) => {
    console.log(args);
};
add2(1, 2);  //[1,2]

// 3.剩余参数的位置
// 剩余参数只能是最后一个参数,之后不能再有其他参数,否则会报错
const add = (x, y, ...args) => {
    console.log(args);
};
剩余参数的应用
// 1.完成 add 函数
const add = (...args) => {
    let sum = 0;
    for (let i = 0; i < args.length; i++) {
        sum += args[i];
    }
    // reduce
    return sum;
};
console.log(add());       //0
console.log(add(1, 1));	  //2
console.log(add(1, 2, 3));//6

// 2.与解构赋值结合使用
// 剩余参数不一定非要作为函数参数使用
const [num, ...args] = [1, 2, 3, 4]; //args = [2,3,4]
//剩余参数必须是最后一个
const [...args,num] = [1, 2, 3, 4];
console.log(num, args); //Rest element must be last element

const func = ([num, ...args]) => {};
func([1, 2, 3]);

const { x, y, ...z } = { a: 3, x: 1, y: 2, b: 4 };  //z:{a: 3, b: 4}
// 必须是最后一个
const { x, ...z, y } = { a: 3, x: 1, y: 2, b: 4 };  //Uncaught SyntaxError: Rest element must be last element

const func = ({ x, y, ...z }) => {};
func({ a: 3, x: 1, y: 2, b: 4 });
数组的展开运算
数组展开运算符的基本用法
// 1.认识展开运算符
// [3, 1, 2];
// Math.min

console.log(Math.min([3, 1, 2]));  //NaN
console.log(Math.min(3, 1, 2));	   //1

// [3, 1, 2]->3, 1, 2

// 2.数组展开运算符的基本用法
console.log(Math.min(...[3, 1, 2]));
// 相当于
console.log(Math.min(3, 1, 2));
区分剩余参数和展开运算符
// 1.根本区别
// 展开运算符
// [3,1,2]->3,1,2

// 剩余参数
// 3,1,2->[3,1,2]

// 2.区分剩余参数和展开运算符

// 剩余参数
const add = (...args) => {
    console.log(args);  //[1,2,3]
    // 展开运算符
    console.log(...args);  //1,2,3
    console.log(...[1, 2, 3]); //1,2,3
};
add(1, 2, 3);

console.log([...[1, 2, 3], 4]);  //1,2,3,4
// [1, 2, 3]->1,2,3
数组展开运算符的应用
// 1.复制数组
const a = [1, 2];
const b = a;
a[0] = 3;
console.log(b);

const d = [1,2];
const c = [...d];
//等价于const c = [1, 2];
d[0] = 3;
console.log(d);
console.log(c);

// 2.合并数组
const a = [1, 2];
const b = [3];
const c = [4, 5];

console.log([...a, ...b, ...c]);
console.log([...b, ...a, ...c]);
console.log([1, ...b, 2, ...a, ...c, 3]);

// 3.字符串转为数组
// 字符串可以按照数组的形式展开
console.log(...'alex');
console.log('a', 'l', 'e', 'x');
console.log([...'alex']);
console.log('alex'.split(''));
// reverse

// 4.常见的类数组转化为数组
// arguments
function func() {
    // console.log(arguments.push);
    console.log([...arguments]);
}
func(1, 2);

// NodeList
console.log(document.querySelectorAll('p'));
console.log([...document.querySelectorAll('p')].push);
数组展开运算符的应用
// 1.复制数组
const a = [1, 2];
const b = a;
a[0] = 3;
console.log(b);  //[3,2]

const d = [1,2];
const c = [...d];
//等价于const c = [1, 2];
d[0] = 3;
console.log(d);  //[3,2]
console.log(c);  //[1,2]

// 2.合并数组
const a = [1, 2];
const b = [3];
const c = [4, 5];

console.log([...a, ...b, ...c]);    //[1, 2, 3, 4, 5]
console.log([...b, ...a, ...c]);	//[3, 1, 2, 4, 5]
console.log([1, ...b, 2, ...a, ...c, 3]);  //[1, 3, 2, 1, 2, 4, 5, 3]

// 3.字符串转为数组
// 字符串可以按照数组的形式展开
console.log(...'alex');  //a l e x
console.log('a', 'l', 'e', 'x');  //a l e x
console.log([...'alex']); // ['a', 'l', 'e', 'x']
console.log('alex'.split('')); // ['a', 'l', 'e', 'x']
// reverse
console.log([..."re"].reverse().join(""))  //"er"

// 4.常见的类数组转化为数组
// arguments
function func() {
    console.log(arguments.push);  //undefined
    console.log([...arguments]); //[1,2]
    console.log([...arguments]);  //ƒ push() { [native code] }
}
func(1, 2);

// NodeList
console.log(document.querySelectorAll('p'));
console.log([...document.querySelectorAll('p')].push); //ƒ push() { [native code] }
对象的展开运算符
对象的展开运算符的基本用法
// 1.展开对象
// 对象不能直接展开,必须在 {} 中展开
const apple = {
    color: '红色',
    shape: '球形',
    taste: '甜'
};
console.log(...apple);     //Uncaught TypeError: Found non-callable @@iterator
console.log([...apple]);   //Uncaught TypeError: apple is not iterable

// 对象的展开:把属性罗列出来,用逗号分隔,放到一个 {} 中,构成新对象
console.log({ ...apple });  //{color: '红色', shape: '球形', taste: '甜'}
console.log({ ...apple } === apple);   //false

// 2.合并对象
const apple = {
    color: '红色',
    shape: '球形',
    taste: '甜'
};
const pen = {
    color: '黑色',
    shape: '圆柱形',
    use: '写字'
};
console.log({ ...pen });  //{color: '黑色', shape: '圆柱形', use: '写字'}
console.log({ ...apple, ...pen }); //{color: '黑色', shape: '圆柱形', taste: '甜', use: '写字'}

// 新对象拥有全部属性,相同属性,后者覆盖前者
console.log({ ...pen, ...apple });
// 相当于
console.log({
    use: '写字',
    color: '红色',
    shape: '球形',
    taste: '甜'
});

console.log({ pen, apple });  //{pen: {…}, apple: {…}}
console.log({ ...pen, apple });
//{color: '黑色', shape: '圆柱形', use: '写字', apple: {…}}
对象展开运算符的注意事项
// 1.空对象的展开
// 如果展开一个空对象,则没有任何效果
console.log({ ...{} }); //{}
console.log({ ...{}, a: 1 });  //{a:1}

// 2.非对象的展开
// 如果展开的不是对象,则会自动将其转为对象,再将其属性罗列出来
console.log({ ...1 });   //{}
console.log(new Object(1)); //Number{1}
console.log({ ...undefined }); //{}
console.log({ ...null });      //{}
console.log({ ...true });	   //{}

// 如果展开运算符后面是字符串,它会自动转成一个类似数组的对象,因此返回的不是空对象
console.log({ ...'alex' });  //{0: 'a', 1: 'l', 2: 'e', 3: 'x'}
console.log([...'alex']);    //['a', 'l', 'e', 'x']
console.log(...'alex');		 //a l e x

console.log({ ...[1, 2, 3] });  //{0: 1, 1: 2, 2: 3}

// 3.对象中对象属性的展开
// 不会展开对象中的对象属性
const apple = {
    feature: {
        taste: '甜'
    }
};
const pen = {
    feature: {
        color: '黑色',
        shape: '圆柱形'
    },
    use: '写字'
};
console.log({ ...apple });  //{feature: taste: '甜'}}

 console.log({ ...apple, ...pen });  //{feature: {color: '黑色', shape: '圆柱形'}, use: '写字'}

// 相当于
console.log({
    feature: {
        color: '黑色',
        shape: '圆柱形'
    },
    use: '写字'
});
对象展开运算符的应用
// 1.复制对象
const a = { x: 1, y: 2 };
// const b = a;

const c = { ...a };
console.log(c, c === a);

// 2.用户参数和默认参数
//利用解构赋值的默认值来设置参数的默认值
const logUser = ({
    username = 'ZhangSan',
    age = 0,
    sex = 'male'
} = {}) => {   //注意这里加了个函数参数默认值,如果不加"={}"的话直接使用logUser()会报错
    console.log(username, age, sex);
};
logUser(); //ZhangSan 0 male
logUser({}); //ZhangSan 0 male
logUser({age:1,sex:"female"}); //ZhangSan 1 female

//利用对象展开运算符来设置默认值,这里不需要给参数设置默认值
const logUser = userParam => {
    const defaultParam = {
        username: 'ZhangSan',
        age: 0,
        sex: 'male'
    };
    const param = { ...defaultParam, ...userParam };
    //如果此时logUser()来进行调用的话就相当于logUser(undefined); 而{...undefined}={} -> {......defaultParam, {}},依然会使用
    // const param = { ...defaultParam, ...undefined };
    console.log(param.username);
    // const { username, age, sex } = { ...defaultParam, ...userParam };
    // console.log(username, age, sex);
};
logUser();  //ZhangSan
Set和Map数据结构
Set
什么是set
// 1.什么是 Set
// 集合

// [1, 2];
// 数组是一系列有序的数据集合

// Set 是一系列无序、没有重复值的数据集合

// 2.理解 Set
console.log([1, 2, 1]);  //[1,2,1]
console.log(new Array(1, 2, 1));	//[1,2,1]

const s = new Set();
s.add(1);
s.add(2);

// Set 中不能有重复的成员
s.add(1);
console.log(s); //{1,2}

// Set 没有下标去标示每一个值,所以 Set 是无序的,也不能像数组那样通过下标去访问 Set 的成员
set的实例方法和属性
// 1.方法
// add
const s = new Set();
s.add(1).add(2).add(2);
console.log(s); //{1,2}

// has
console.log(s.has(1));  //true
console.log(s.has(3));  //false

// delete
s.delete(1);

// // 使用 delete 删除不存在的成员,什么都不会发生,也不会报错
s.delete(3);
console.log(s);  //{2}

// clear
s.clear();
console.log(s);  //{}

// forEach
s.forEach(function (value, key, set) {
// Set 中 value = key
   console.log(value, key, set === s);
   console.log(this);  //document,如果forEach的第2个参数不指定的话就是Window
 }, document);  //如果这里是箭头函数即使加了document其this仍然指向Window
 console.log(s);

// 按照成员添加进集合的顺序遍历
const  s = new Set([2,1,2]);
console.log(s);   //{2,1}

// 2.属性
// size
console.log(s.size);
console.log(s);
Set构造函数的参数
// 1.数组
const s = new Set([1, 2, 1]);
console.log(s);  //{1,2}

// 2.字符串、arguments、NodeList、Set 等
console.log(new Set('hih')); //{'h','i'};
function func() {
    console.log(new Set(arguments));
}
func(1, 2, 1); {1,2}
console.log(new Set(document.querySelectorAll('p')));

const s = new Set([1, 2, 1]);
console.log(new Set(s) === s);  //false
console.log(s);
Set的注意事项
 // 1.判断重复的方式
const s = new Set([1, 2, 1]);   //{1,2}
const s = new Set([NaN, 2, NaN]);	//{NaN, 2}

console.log(1 === 1);  //true
console.log(NaN === NaN);	//false

// Set 对重复值的判断基本遵循严格相等(===)
// 但是对于 NaN 的判断与 === 不同,Set 中 NaN 等于 NaN
console.log(s);

const s = new Set();
s.add({}).add({});
console.log({} === {}); //false
console.log(s); // {{},{}}

// 2.什么时候使用 Set
// ① 数组或字符串去重时
// ② 不需要通过下标访问,只需要遍历时
// ③ 为了使用 Set 提供的方法和属性时(add delete clear has forEach size 等)
Set的应用
// 1.数组去重
// [1, 2, 1];
const s = new Set([1, 2, 1]);
console.log(s);
// s.forEach

const s = new Set([1,2,1]);
console.log(...s);  //1 2
console.log([...s]);  //[1,2]
console.log([...new Set([1, 2, 1])]); //[1,2]

// 2.字符串去重
// 'abbacbd';
const s = new Set('abbacbd');
console.log([...s].join('')); //abcd
console.log(s);  //Set(4) {'a', 'b', 'c', 'd'}

console.log([...new Set('abbacbd')].join(''));  //abcd

// 3.存放 DOM 元素
console.log(document.querySelectorAll('p'));
// for()
const s = new Set(document.querySelectorAll('p'));
console.log(s);
s.forEach(function (elem) {
    // console.log(elem);
    elem.style.color = 'red';
    elem.style.backgroundColor = 'yellow';
});
Map
Map是什么
// 1.认识 Map
// 映射

// Map 和对象都是键值对的集合

// 键->值,key->value
const person = {
    name: 'alex',
    age: 18
};

const m = new Map();
m.set('name', 'alex');
m.set('age', 18);
console.log(m); //{'name' => 'alex', 'age' => 18}

// 2.Map 和对象的区别
// 对象一般用字符串当作键
const obj = {
    name: 'alex',
    true: 'true',
    [{}]: 'object'
};
console.log(obj);   //{name: 'alex', true: 'true', [object Object]: 'object'}
console.log({}.toString());  //[object Object]

// 基本数据类型:数字、字符串、布尔值、undefined、null
// 引用数据类型:对象([]、{}、函数、Set、Map 等)
// 以上都可以作为 Map 的键
const m = new Map();
m.set('name', 'alex');
m.set(true, 'true');
m.set({}, 'object');
m.set(new Set([1, 2]), 'set');
m.set(undefined, 'undefined');
console.log(m); //Map(5) {'name' => 'alex', true => 'true', {…} => 'object', Set(2) => 'set', undefined => 'undefined'}
Map 实例的属性和方法
// 1.方法
// set
const m = new Map();

// 使用 set 添加的新成员,键如果已经存在,后添加的键值对覆盖已有的
m.set('age', 18).set(true, 'true').set('age', 20);
console.log(m);  //{'age' => 20, true => 'true'}

// set get
// add

// get
console.log(m);  //{'age' => 20, true => 'true'}
console.log(m.get('age'));  //20
// get 获取不存在的成员,返回 undefined
console.log(m.get('true'));  //undefined
console.log(m.get(true));	 //true

// has
console.log(m.has('age'));   //true
console.log(m.has('true'));  //false

// delete
m.delete('age');  //true
m.delete('name'); //false

// // 使用 delete 删除不存在的成员,什么都不会发生,也不会报错
console.log(m);
//{true => 'true'}

// clear
m.clear();
console.log(m); //{}

// forEach
m.forEach(function (value, key, map) {
    console.log(value, key, map === m); //20 'age' true, true true true
    //console.log(this);  //document
}, document);

// 2.属性
// size
// 对象没有类似的属性
console.log(m.size);
Map 构造函数的参数
// 1.数组
console.log(new Map(['name', 'alex', 'age', 18])); //Uncaught TypeError: Iterator value name is not an entry object
// 只能传二维数组,而且必须体现出键和值

console.log(
    new Map([
        ['name', 'alex'],
        ['age', 18]
    ])
);  //{'name' => 'alex', 'age' => 18}

// 2.Set、Map 等
// Set
// Set 中也必须体现出键和值
const s = new Set([
    ['name', 'alex'],
    ['age', 18]
]);
console.log(s); //Set(2) {Array(2), Array(2)}
console.log(new Map(s));  //Map(2) {'name' => 'alex', 'age' => 18}

// Map
// 复制了一个新的 Map
const m1 = new Map([
    ['name', 'alex'],
    ['age', 18]
]);
console.log(m1); //Map(2) {'name' => 'alex', 'age' => 18}
const m2 = new Map(m1);
console.log(m2, m2 === m1); // Map(2) {'name' => 'alex', 'age' => 18} false
Map 的注意事项
// 1.判断键名是否相同的方式
// 基本遵循严格相等(===)
// 例外就是 NaN,Map 中 NaN 也是等于 NaN
console.log(NaN === NaN);  //false
const m = new Map();
m.set(NaN, 1).set(NaN, 2);
console.log(m);  //{NaN => 2}

// 2.什么时候使用 Map
// 如果只是需要 key -> value 的结构,或者需要字符串以外的值做键,使用 Map 更合适
// forEach for in
// size

// 只有模拟现实世界的实体时,才使用对象
const person = {};
Map 的应用
<p>1</p>
<p>2</p>
<p>3</p>
<script>
const [p1, p2, p3] = document.querySelectorAll('p');
console.log(p1, p2, p3);
const m = new Map();
m.set(p1, 'red');
m.set(p2, 'green');
m.set(p3, 'blue');
m.forEach((color, elem) => {
elem.style.color = color;
});
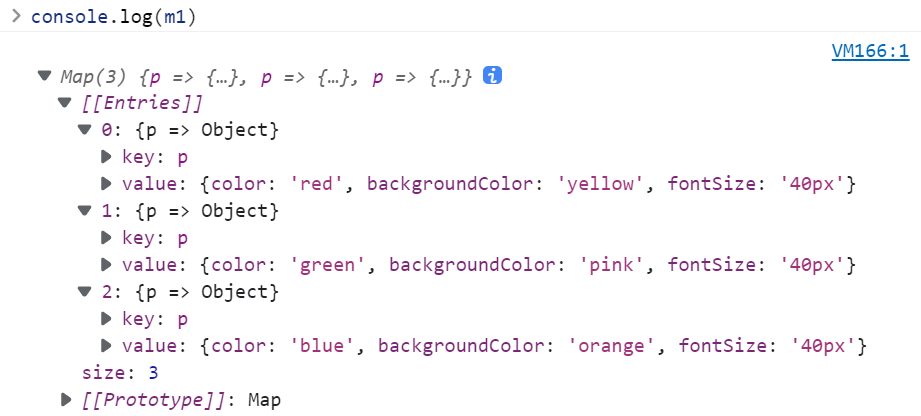
const m1 = new Map([
[
p1,
{
color: 'red',
backgroundColor: 'yellow',
fontSize: '40px'
}
],
[
p2,
{
color: 'green',
backgroundColor: 'pink',
fontSize: '40px'
}
],
[
p3,
{
color: 'blue',
backgroundColor: 'orange',
fontSize: '40px'
}
]
]);
m1.forEach((propObj, elem) => {
for (const p in propObj) {
elem.style[p] = propObj[p];
}
});
console.log(m1);
</script>
遍历器与for…of循环
Iterator是什么
// 1.Iterator 的作用
// Iterator:遍历器(迭代器)
// for()
// [1,2].forEach
// new Set().forEach

// Iterator 也是用来遍历的

// 2.寻找 Iterator

console.log([1, 2][Symbol.iterator]());   //Array Iterator {}

const it = [1, 2][Symbol.iterator]();
console.log(it);      //  Array Iterator {}

// 3.使用 Iterator
const it = [1, 2][Symbol.iterator]();
console.log(it.next()); // {value: 1, done: false}
console.log(it.next()); // {value: 2, done: false}
console.log(it.next()); // {value: undefined, done: true}
console.log(it.next()); // {value: undefined, done: true}

// it:可遍历对象(可迭代对象)
// Symbol.iterator:可遍历对象的生成方法

// 4.什么是 Iterator
// Symbol.iterator(可遍历对象的生成方法) -> it(可遍历对象) -> it.next() -> it.next() -> ...(直到 done 为 true)
Iterator解惑
// 1.为什么需要 Iterator 遍历器
// 遍历数组:for 循环和 forEach 方法
// 遍历对象:for in 循环

// Iterator 遍历器是一个统一的遍历方式

console.log([][Symbol.iterator]()); //Array Iterator {}
console.log({}[Symbol.iterator]);  //undefined

// 2.如何更方便的使用 Iterator
// Symbol.iterator->it->next()

// 我们一般不会直接使用 Iterator 去遍历
// for..of
for…of用法
// 1.认识 for...of
const arr = [1, 2, 3];
const it = arr[Symbol.iterator]();
// console.log(it.next());
// console.log(it.next());
// console.log(it.next());
// console.log(it.next());
let next = it.next();
console.log(next);  //{value: 1, done: false}
while (!next.done) {
    console.log(next.value);
    next = it.next();
    console.log(next);
}// 1 2 3
for (const item of arr) {
    console.log(item);
}//1 2 3
// // for...of 循环只会遍历出那些 done 为 false 时,对应的 value 值

// 2.与 break、continue 一起使用
const arr = [1, 2, 3];
for (const item of arr) {
    if (item === 2) {
        // break;
        continue;
    }
    console.log(item);
}//1 3

// arr.forEach()

// 3.在 for...of 中取得数组的索引
const arr = [1, 2, 3];

// keys() 得到的是索引的可遍历对象,可以遍历出索引值
console.log(arr.keys());  //Array Iterator {}
for (const key of arr.keys()) {
    console.log(key);  //0 1 2 (索引值)
}
// values() 得到的是值的可遍历对象,可以遍历出值
for (const value of arr.values()) {
    console.log(value);
} //1 2 3

for (const value of arr) {
    console.log(value);
} //1 2 3

// entries() 得到的是索引+值组成的数组的可遍历对象
for (const entries of arr.entries()) {
    console.log(entries);
}
//[0,1]
//[1,2]
//[2,3]
for (const [index, value] of arr.entries()) {
    console.log(index, value);
}
//0 1
//1 2
//2 3
原生可遍历和非原生可遍历
// 1.什么是可遍历
// 只要有 Symbol.iterator 方法,并且这个方法可以生成可遍历对象,就是可遍历的

// 只要可遍历,就可以使用 for...of 循环来统一遍历

// 2.原生可遍历的有哪些
// 数组
// 字符串
// Set
// Map
// arguments
// NodeList

for (const item of [1, 2, 3]) {
    console.log(item);
}//1 2 3

for (const item of 'hi') {
    console.log(item);
}//h i

for (const item of new Set([1, 2])) {
    console.log(item);
}//1 2

for (const elem of document.querySelectorAll('p')) {
    console.log(elem);
    elem.style.color = 'red';
}
//<p style="color: red;">1</p>
//<p style="color: red;">2</p>
//<p style="color: red;">3</p>

// 3.非原生可遍历的有哪些
// 一般的对象
const person = { sex: 'male', age: 18 };
// console.log(person[Symbol.iterator]());Uncaught TypeError: person[Symbol.iterator] is not a function

// {next()} {value,done}
person[Symbol.iterator] = () => {
    let index = 0;
    return {
        next() {
            index++;

            if (index === 1) {
                return {
                    value: person.age,
                    done: false
                };
            } else if (index === 2) {
                return {
                    value: person.sex,
                    done: false
                };
            } else {
                return {
                    done: true
                };
            }
        }
    };
};

for (const item of person) {
    console.log(item);
} //18 male
// for in

// 有 length 和索引属性的对象
const obj = {
    '0': 'alex',
    '1': 'male',
    length: 2
};

obj[Symbol.iterator] = Array.prototype[Symbol.iterator];

obj[Symbol.iterator] = () => {
    let index = 0;

    return {
        next() {
            let value, done;
            if (index < obj.length) {
                value = obj[index];
                done = false;
            } else {
                value = undefined;
                done = true;
            }

            index++;

            return {
                value,
                done
            };
        }
    };
};
for (const item of obj) {
    console.log(item);
}//alex male
使用Iterator的场合
// 原生可遍历的
// Array 数组
// String 字符串
// Set
// Map
// 函数的 arguments 对象
// NodeList 对象

// for...of

// 1.数组的展开运算符
console.log(...[1, 2, 3]);  //1 2 3
console.log(1, 2, 3);		//1 2 3
console.log(...'str');		//s t r
console.log(...new Set([1, 2, 3])); //1 2 3
console.log(...{}); //× Uncaught TypeError: Found non-callable @@iterator

// 2.数组的解构赋值
//只要可遍历(有Symbol.iterator,没有的可自行添加设置)就可以进行解构赋值
const [a, b] = [1, 2];
const [a, b] = [...[1, 2]];
const [a, b] = 'hi';
const [a, b] = [...'hi'];
const [a, b] = [...new Set([3, 4])];

console.log(a, b);

// 3.Set 和 Map 的构造函数
// new Set(iterator)
// new Map(iterator)
ES6新增方法
字符串的新增方法
includes()函数
//1 基本用法
console.log('abc'.includes('a'));
console.log('abc'.includes('ab'));
console.log('abc'.includes('bc'));
console.log('abc'.includes('ac'));  // false

// 2.第二个参数
// 表示开始搜索的位置,默认是 0
console.log('abc'.includes('a'));
console.log('abc'.includes('a', 0));
console.log('abc'.includes('a', 1)); // false

// 3.应用
// https://www.imooc.com/course/list
// https://www.imooc.com/course/list?c=fe&sort=pop&name=value
let url = 'https://www.imooc.com/course/list?';
const addURLParam = (url, name, value) => {
    url += url.includes('?') ? '&' : '?';

    url += `${name}=${value}`;

    return url;
};
url = addURLParam(url, 'c', 'fe');
console.log(url);
url = addURLParam(url, 'sort', 'pop');
console.log(url);
padStart()方法和padEnd()方法
补全字符串长度
// 1.基本用法
console.log('x'.padStart(5, 'ab')); //ababx
console.log('x'.padEnd(5, 'ab'));   //xabab
console.log('x'.padEnd(4, 'ab'));	//xaba

// 2.注意事项
// 原字符串的长度,等于或大于最大长度,不会消减原字符串,字符串补全不生效,返回原字符串
console.log('xxx'.padStart(2, 'ab')); //xxx
console.log('xxx'.padEnd(2, 'ab'));	  //xxx

// 用来补全的字符串与原字符串长度之和超过了最大长度,截去超出位数的补全字符串,原字符串不动
console.log('abc'.padStart(10, '0123456789'));  //0123456abc
console.log('abc'.padEnd(10, '0123456789'));    //abc0123456

// 如果省略第二个参数,默认使用空格补全长度
console.log('x'.padStart(4));   //***x 这里的*代表空格
console.log('x'.padEnd(4));     //x***

// 3.应用
// 显示日期格式
// 2020
// 10
// 10

// 2020-10-10
// 2020-01-01

console.log('10'.padStart(2, 0)); //10
console.log('1'.padStart(2, 0));  //01
trimStart()方法和trimEnd()方法
清除字符串的首或尾空格,中间的空格不会清除
// 1.基本用法
const s = '  a b c  ';
console.log(s);		//  a b c  ;
console.log(s.trimStart()); //a b c  ;
console.log(s.trimLeft());  //a b c  ;
console.log(s.trimEnd());   //  a b c;
console.log(s.trimRight()); //  a b c;
console.log(s.trim());      //a b c;

// 2.应用
const usernameInput = document.getElementById('username');
const btn = document.getElementById('btn');

btn.addEventListener(
    'click',
    () => {
        console.log(usernameInput.value);

        // 验证
        console.log(usernameInput.value.trim());
        if (usernameInput.value.trim() !== '') {
            // 可以提交
            console.log('可以提交');
        } else {
            // 不能提交
            console.log('不能提交');
        }

        // 手动提交
    },
    false
);
数组的新增方法
includes()方法
// 1.基本用法
// 判断数组中是否含有某个成员
console.log([1, 2, 3].includes('2')); // false
console.log([1, 2, 3].includes(2));   //true
// 第二个参数表示搜索的起始位置,默认值是 0
console.log([1, 2, 3].includes(2, 2));
// 基本遵循严格相等(===),但是对于 NaN 的判断与 === 不同,includes 认为 NaN === NaN
console.log(NaN === NaN);   //false;
console.log([1, 2, NaN].includes(NaN));  //true

// 2.应用
// 去重
// [1, 2, 1];

const arr = [];
for (const item of [1, 2, 1]) {
    if (!arr.includes(item)) {
        arr.push(item);
    }
}
console.log(arr);  //[1,2]
map()方法
定义:map() 方法返回一个新数组,其结果是该数组中的每个元素调用一次提供的函数后的返回值。
语法:arr.map(function callback(currentValue[,index[,array]]) {}[, thisArg])
实例:
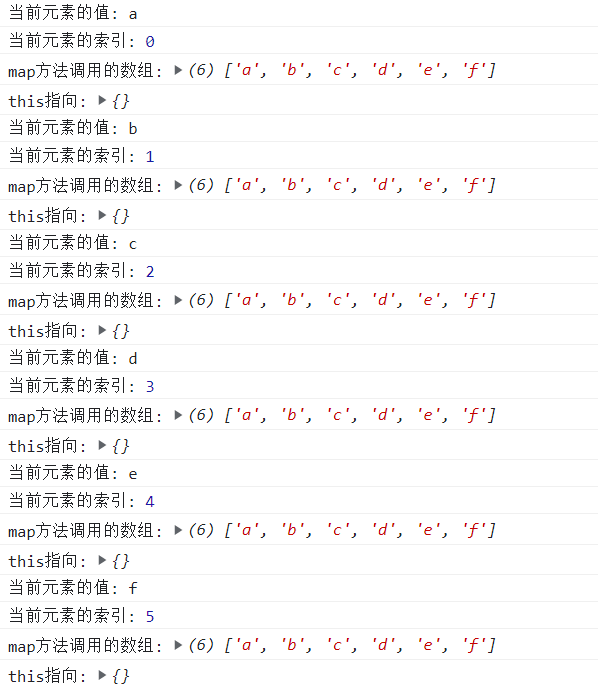
var array = ['a','b','c','d','e','f']
array.map((function(currentValue,index,arr){  // 这里function外部的括号也可以去掉
          console.log("当前元素的值:",currentValue)
		  console.log("当前元素的索引:",index)
		  console.log("map方法调用的数组:",arr)
          console.log("this指向:",this)
          }),{})
// thisArg是{} 所以打印的指向的是{},如果省略了 thisValue,this默认指向的是全局对象 window
输出:
var num = [1, 2, 3, 4];
var filterNum = num.map(function(num, index){
	if(index < 3){
		return num;
	}
})
//index goes from 0,so the filterNum are 1,2,3 and undefined.
//filterNum: [1, 2, 3, undefined]
//num: [1, 2, 3, 4]

var newNum = num.map((curValue,index,arr) => {return curValue*2})
var newNum = num.map((curValue,index,arr) =>  curValue*2)
var newNum = num.map(curValue => curValue*2)
Array.from()方法
将其他数据类型转换成数组
// 1.基本用法
console.log(Array.from('str'));  //['s', 't', 'r']

// 2.哪些可以通过 Array.from() 转换成数组
// 2.1.所有可遍历的
// 数组、字符串、Set、Map、NodeList、arguments
console.log(Array.from(new Set([1, 2, 1])));  //[1,2]
console.log([...new Set([1, 2, 1])]);  //[1,2]

// 2.2.拥有 length 属性的任意对象
const obj = {
    '0': 'a',
    '1': 'b',
    name: 'Alex',
    length: 3
};
console.log(Array.from(obj)); //['a', 'b', undefined]
console.log([...obj]);  //obj is not iterable

// 3.第二个参数
// 作用类似于数组的 map 方法,用来对每个元素进行处理,将处理后的值放入返回的数组
console.log(
    [1, 2].map(value => {
        return value * 2;
    })
);   //[2, 4]
console.log(Array.from('12', value => value * 2));  //[2, 4]
console.log(Array.from('12').map(value => value * 2));  //[2, 4]

// 4.第三个参数,可以修改this指向,默认指向window
Array.from(
    '12',
    value => {
        console.log(this);  //this->Window 箭头函数在声明时this指向就已经确定了
    },
    document
);  // [undefined, undefined]
Array.from(
    '12',
    function () {
        console.log(this);  //this->document 普通函数可以指定this指向
    },
    document
);  // [undefined, undefined]
find()和findIndex()方法
find():找到满足条件的一个立即返回
findIndex():找到满足条件的一个,立即返回其索引
// 1.基本用法
console.log(
    [1, 5, 10, 15].find((value, index, arr) => {
        // console.log(value, index, arr);
        console.log(this);  //Window
        return value > 9;
    }, document)
);  //10

[1, 5, 10, 15].find(function (value, index, arr) {
    console.log(value, index, arr); // 1 0 [1,5,10,15]
    console.log(this);  //document
    return value > 9;
}, document);

console.log(
    [1, 5, 10, 15].findIndex((value, index, arr) => {
        // console.log(value, index, arr);
        return value > 9;
    }, document)
);  //2

// 2.应用
const students = [
    {
        name: '张三',
        sex: '男',
        age: 16
    },
    {
        name: '李四',
        sex: '女',
        age: 22
    },
    {
        name: '王二麻子',
        sex: '男',
        age: 32
    }
];
console.log(students.find(value => value.sex === '女'));  //{name: '李四', sex: '女', age: 22}
console.log(students.findIndex(value => value.sex === '女'));  //1
对象的新增方法
Object.assign()方法
用来合并对象
// 1.基本用法
// Object.assign(目标对象, 源对象1,源对象2,...): 目标对象
const apple = {
    color: '红色',
    shape: '圆形',
    taste: '甜'
};
const pen = {
    color: '黑色',
    shape: '圆柱形',
    use: '写字'
};
console.log(Object.assign(apple, pen));  //{color: '黑色', shape: '圆柱形', taste: '甜', use: '写字'}

// Object.assign 直接合并到了第一个参数中,返回的就是合并后的对象
console.log(apple);  //{color: '黑色', shape: '圆柱形', taste: '甜', use: '写字'}
console.log(Object.assign(apple, pen) === apple);  //true
可以合并多个对象
// 可以合并多个对象
const apple = {
    color: '红色',
    shape: '圆形',
    taste: '甜'
};
const pen = {
    color: '黑色',
    shape: '圆柱形',
    use: '写字'
};
console.log(Object.assign({}, apple, pen));  //{color: '黑色', shape: '圆柱形', taste: '甜', use: '写字'}
console.log(apple);  //{color: '红色', shape: '圆形', taste: '甜'}
console.log({ ...apple, ...pen });  //{color: '黑色', shape: '圆柱形', taste: '甜', use: '写字'}
注意事项
// 2.注意事项
// 2.1.基本数据类型作为源对象
// 与对象的展开类似,先转换成对象,再合并
console.log(Object.assign({}, undefined));  //{}
console.log(Object.assign({}, null));  //{}
console.log(Object.assign({}, 1));  //{}
console.log(Object.assign({}, true));  //{}
console.log(Object.assign({}, 'str'));  //{0: 's', 1: 't', 2: 'r'}

// 2.2.同名属性的替换
// 后面的直接覆盖前面的
const apple = {
    color: ['红色', '黄色'],
    shape: '圆形',
    taste: '甜'
};
const pen = {
    color: ['黑色', '银色'],
    shape: '圆柱形',
    use: '写字'
};
console.log(Object.assign({}, apple, pen));  //{color: ['黑色', '银色'], shape: '圆柱形', taste: '甜', use: '写字'}
主要应用:合并默认参数和用户参数
// 3.应用
// 合并默认参数和用户参数
const logUser = userOptions => {  //这里不需要未userOptions设置默认参数,例如(userOptions={}),因为默认为undefined,undefined在合并时会被先转化为空对象 -> {}再进行合并
    const DEFAULTS = {
        username: 'ZhangSan',
        age: 0,
        sex: 'male'
    };

    const options = Object.assign({}, DEFAULTS, userOptions);
    // const options = Object.assign({}, DEFAULTS, undefined);  //如果用户不传参数相当于合并undefined
    console.log(options);
};
logUser();  //{username: 'ZhangSan', age: 0, sex: 'male'}
logUser({});  //{username: 'ZhangSan', age: 0, sex: 'male'}
logUser({ username: 'Alex' });  //{username: 'Alex', age: 0, sex: 'male'}
Object.keys()、Objects.values()和Object.entries()方法
 // 1.基本用法
const person = {
    name: 'Alex',
    age: 18
};

console.log(Object.keys(person));    // ['name', 'age']
console.log(Object.values(person));  // ['Alex', 18]
console.log(Object.entries(person)); //  [['name', 'Alex'],['age', 18]]

// 2.与数组类似方法的区别
console.log([1, 2].keys());    //Array Iterator {}
console.log([1, 2].values());  //Array Iterator {}
console.log([1, 2].entries()); //Array Iterator {}
console.log(person.keys);  //undefined

// 数组的 keys()、values()、entries() 等方法是实例方法,返回的都是 Iterator
// 对象的 Object.keys()、Object.values()、Object.entries() 等方法是构造函数方法,返回的是数组

// 3.使用 for...of 循环遍历对象
const person = {
    name: 'Alex',
    age: 18
};
for (const key of Object.keys(person)) {
    console.log(key);  //name age
}
for (const value of Object.values(person)) {
    console.log(value);  //Alex 18
}
for (const entries of Object.entries(person)) {
    console.log(entries);  //['name', 'Alex']; ['age', 18]
}
for (const [key, value] of Object.entries(person)) {
    console.log(key, value);  //name Alex; age 18
}

//  Object.keys()/values()/entires() 并不能保证顺序一定是你看到的样子,这一点和 for in 是一样的


 800
800


 被折叠的 条评论
为什么被折叠?
被折叠的 条评论
为什么被折叠?
 到【灌水乐园】发言


