


前言
相关arduino 全部分类:
https://blog.csdn.net/freewebsys/category_8799254.html
本文的原文连接是:
https://blog.csdn.net/freewebsys/article/details/104172389
未经博主允许不得转载。
博主地址是:http://blog.csdn.net/freewebsys
1,关于arduino ESP8266WiFi
esp8266 本身自带wifi 所以直接 使用 #include <ESP8266WiFi.h> 库即可。
然后配置好用户名密码,就可以和笔记本电脑进行tcp通讯了。
https://github.com/esp8266/Arduino
这个lib库里面有好多的样例,安装进行操作就行。
同理,其他使用的方法也可以直接参考这个项目。
2,使用
arduino 代码:输入wifi的用户名密码,和笔记本的主机ip,和端口。
在 setup 里面链接wifi,然后使用 WiFiClient client; 进行tcp 连接。
并 使用 client.println(“hello from ESP8266”); 发送消息。
char ch = static_cast(client.read());
Serial.print(ch);
并且读取数据。我本机电脑是 192.168.1.3 ,直接写死就行了。
/*
    This sketch establishes a TCP connection to a "quote of the day" service.
    It sends a "hello" message, and then prints received data.
*/

#include <ESP8266WiFi.h>


#ifndef STASSID
#define STASSID "ssid"
#define STAPSK  "password"
#endif

const char* ssid     = STASSID;
const char* password = STAPSK;

const char* host = "192.168.1.3";
const uint16_t port = 8080;

void setup() {
  Serial.begin(9600); //115200

  // We start by connecting to a WiFi network

  Serial.println();
  Serial.println();
  Serial.print("Connecting to ");
  Serial.println(ssid);

  /* Explicitly set the ESP8266 to be a WiFi-client, otherwise, it by default,
     would try to act as both a client and an access-point and could cause
     network-issues with your other WiFi-devices on your WiFi-network. */
  WiFi.mode(WIFI_STA);
  WiFi.begin(ssid, password);

  while (WiFi.status() != WL_CONNECTED) {
    delay(500);
    Serial.print(".");
  }

  Serial.println("");
  Serial.println("WiFi connected");
  Serial.println("IP address: ");
  Serial.println(WiFi.localIP());
}

void loop() {
  Serial.print("connecting to ");
  Serial.print(host);
  Serial.print(':');
  Serial.println(port);

  // Use WiFiClient class to create TCP connections
  WiFiClient client;
  if (!client.connect(host, port)) {
    Serial.println("connection failed");
    delay(5000);
    return;
  }

  // This will send a string to the server
  Serial.println("sending data to server");
  if (client.connected()) {
    client.println("hello from ESP8266");
  }

  // wait for data to be available
  unsigned long timeout = millis();
  while (client.available() == 0) {
    if (millis() - timeout > 5000) {
      Serial.println(">>> Client Timeout !");
      client.stop();
      delay(60000);
      return;
    }
  }

  // Read all the lines of the reply from server and print them to Serial
  Serial.println("receiving from remote server");
  // not testing 'client.connected()' since we do not need to send data here
  while (client.available()) {
    char ch = static_cast<char>(client.read());
    Serial.print(ch);
  }

  // Close the connection
  Serial.println();
  Serial.println("closing connection");
  client.stop();

  delay(2000); // execute once every 2 second, don't flood remote service
}
golang tcp demo sever:写一个服务端代码:
package main
import (
        "net"
        "log"
	"os"
	"strings"
)
func main() {

	listener, err := net.Listen("tcp", ":8080")
	if err != nil {
		log.Fatal("ListenAndServe: ", err)
		os.Exit(1)
	}

	defer listener.Close()
 	for {
		conn, err := listener.Accept()
		if err != nil {
			log.Println(err)
			continue
		}
		go handleConn(conn)
	}
}


func handleConn(conn net.Conn) {
	defer conn.Close()
	for {
		data := make([]byte, 10)
		_, err := conn.Read(data)
		if err != nil {
			log.Println("read error: " , err)
			break
		}
		strData := string(data)
		log.Println("Received:", strData)

		upper := strings.ToUpper(strData)
		_, err = conn.Write([]byte(upper))
		if err != nil {
			log.Println(err)
			break
		}

		log.Println("Send:", upper)
	}
}
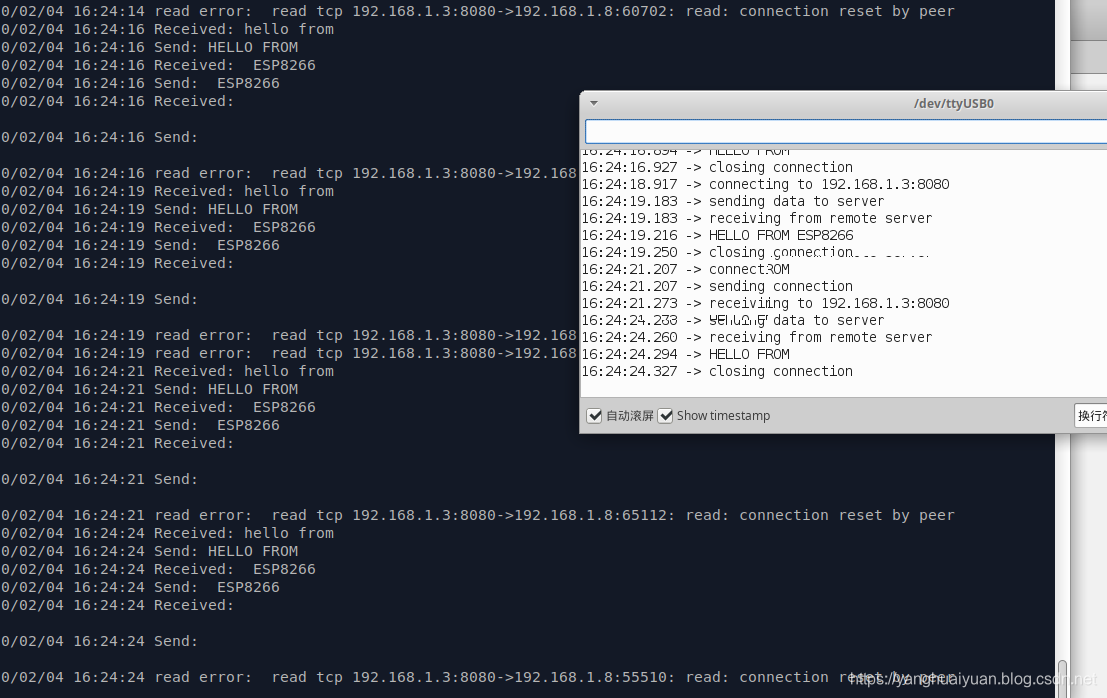
测试效果:
3,总结
arduino 现在已经非常的成熟了,是一个非常成熟的解决方案了。
本文的原文连接是:
https://blog.csdn.net/freewebsys/article/details/104172389


 1103
1103


 被折叠的 条评论
为什么被折叠?
被折叠的 条评论
为什么被折叠?
 到【灌水乐园】发言


