


文章目录
1、背景
此处简单记录一下,elasticsearch8和kibana8在Centos7下的单机安装步骤。
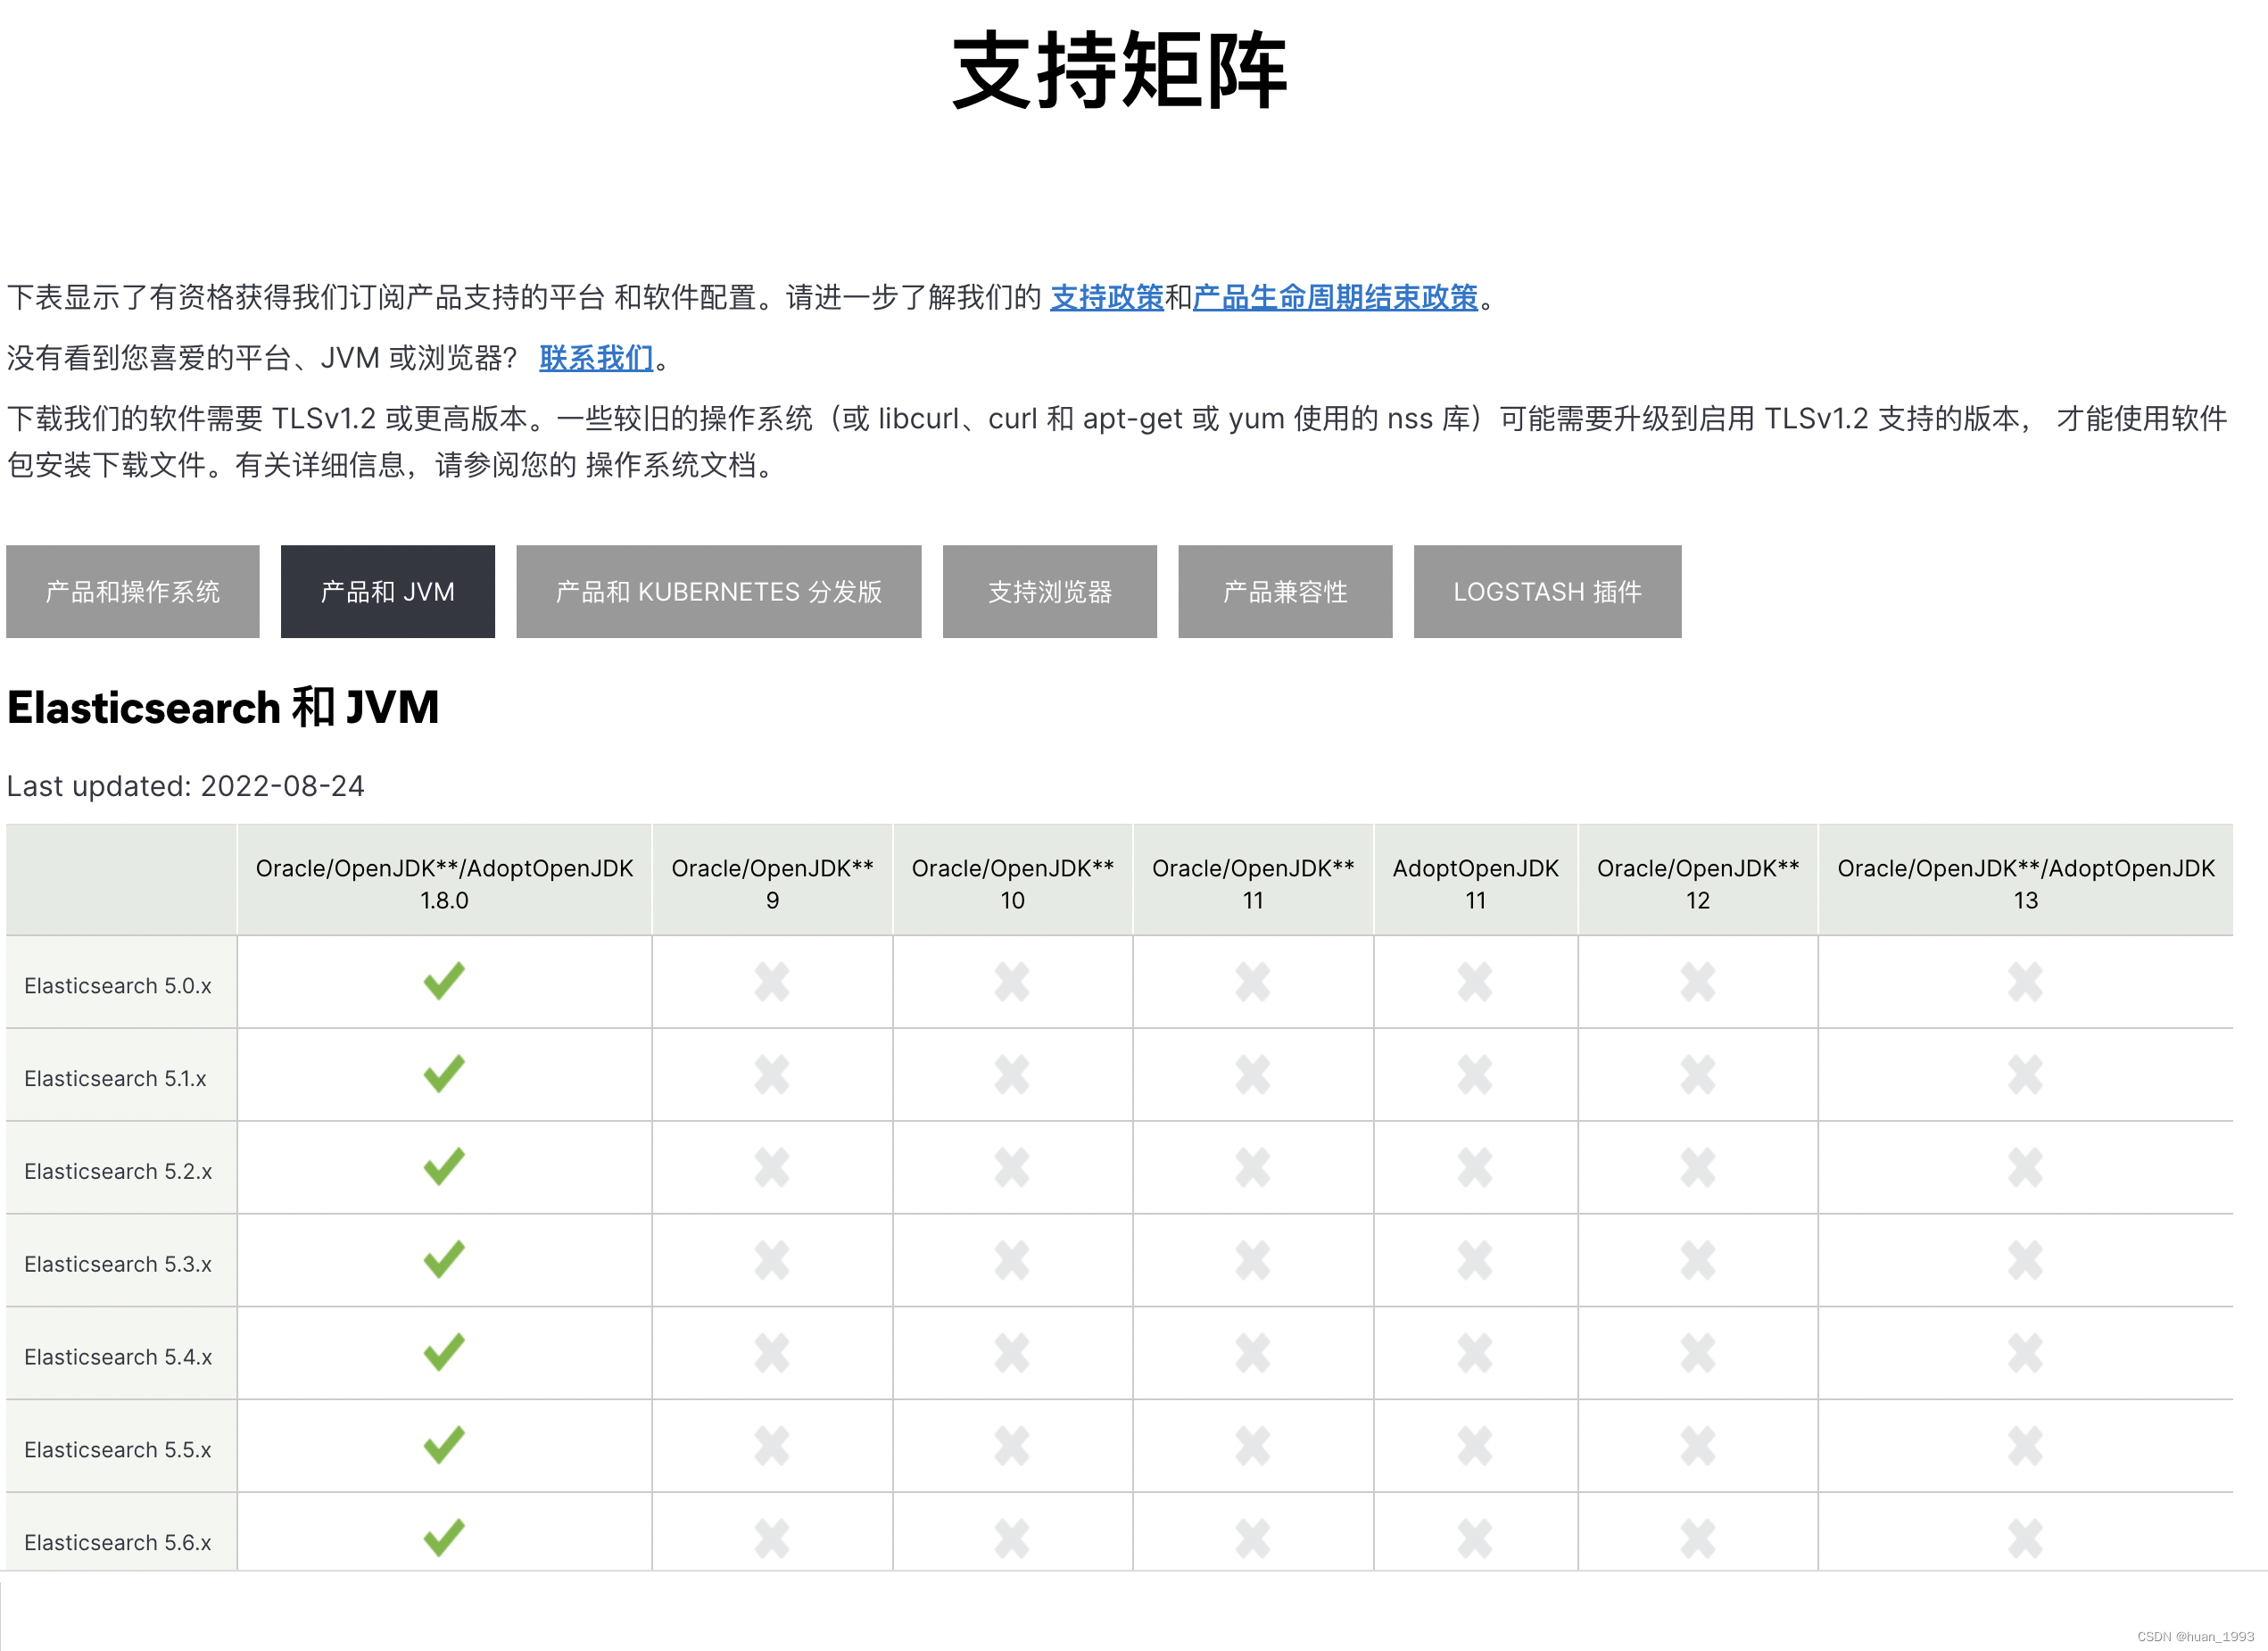
2、es对jdk和操作系统的要求等
不同版本的es对jdk和操作系统的要求不等,我们选择合适的版本,可以通过如下 https://www.elastic.co/cn/support/matrix#matrix_kubernetes进行确认。
3、安装步骤
3.1 下载对应版本的es
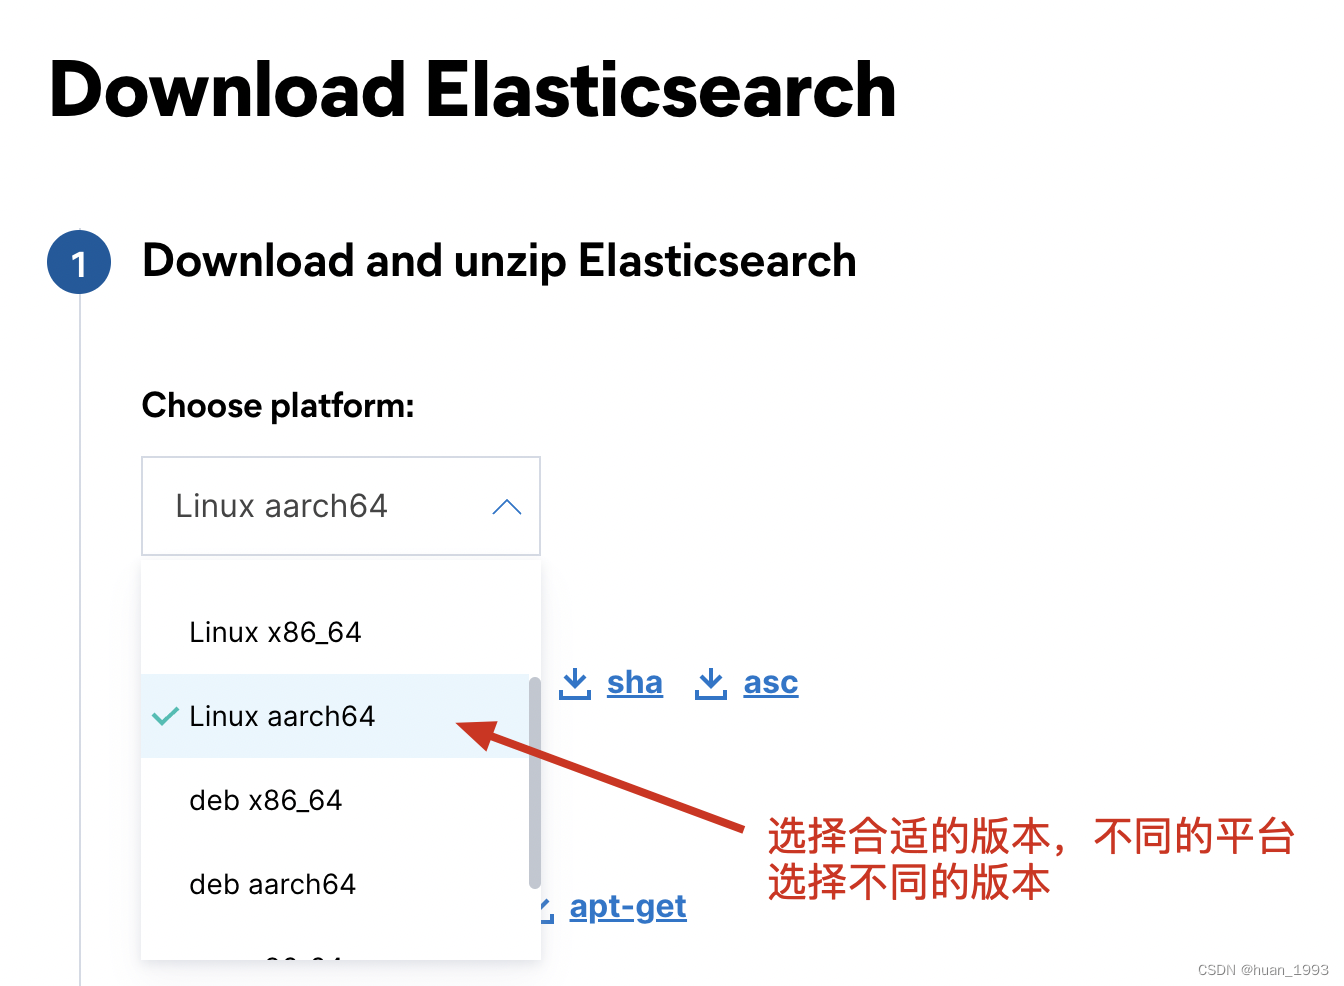
下载地址:https://www.elastic.co/cn/downloads/elasticsearch
3.2 创建es账户
需要为es单独创建一个用户,使用root账户启动es会报错。
[root@appbasic ~]# useradd es
[root@appbasic ~]# passwd es
[root@appbasic es]# tar -zxf elasticsearch-8.4.3-linux-aarch64.tar.gz
[root@appbasic es]# chown es -R elasticsearch-8.4.3
[root@appbasic es]# su - es
Last login: Sun Oct 30 11:13:55 CST 2022 from 192.168.121.1 on pts/1
[es@appbasic ~]$ cd /usr/local/es/elasticsearch-8.4.3
[es@appbasic elasticsearch-8.4.3]$ mkdir datas
[es@appbasic elasticsearch-8.4.3]$
3.3 修改es配置
3.3.1 修改es配置
vim config/elasticsearch.yml
# 集群名
cluster.name: es-cluster
# 节点名
node.name: es-node01
# 数据目录
path.data: /usr/local/es/elasticsearch-8.4.3/datas
# 日志目录
path.logs: /usr/local/es/elasticsearch-8.4.3/logs
# es绑定到的地址
network.host: 192.168.121.138
# es启动后前端访问的端口
http.port: 9200

http.cors.enabled: true
http.cors.allow-origin: "*"
3.3.3 修改jvm配置
vim config/jvm.options
可以根据实际情况 修改一下 -Xms 和 -Xmx 等参数
3.4 修改系统配置
3.4.1 修改用户打开的文件数限制
- 通过
ulimit -n查看当前用户可打开的文件数 - 修改用户可打开的文件数限制
vim /etc/security/limits.conf
es               soft    nofile          65536
es               hard    nofile          65536
参考链接: https://www.elastic.co/guide/en/elasticsearch/reference/current/setting-system-settings.html#ulimit
3.4.2 禁用swap
/etc/fstab
注释掉所有行中存在 swap 的行。
# /dev/mapper/cl_fedora-swap none swap defaults 0 0
参考链接: https://www.elastic.co/guide/en/elasticsearch/reference/current/setup-configuration-memory.html
3.4.3 修改虚拟内存
vim /etc/sysctl.conf
在此文件的最后一行增加 vm.max_map_count=262144。
参考链接:https://www.elastic.co/guide/en/elasticsearch/reference/current/vm-max-map-count.html
3.4.4 提高线程数
vim /etc/security/limits.conf
es               soft     nproc          65536
es               hard    nproc          65536
参考文档:https://www.elastic.co/guide/en/elasticsearch/reference/current/max-number-of-threads.html
以上配置配置完之后,重启一下系统,使系统配置生效。
3.5 放开9200端口
firewall-cmd --zone=public --add-port=9200/tcp --permanent
firewall-cmd --reload
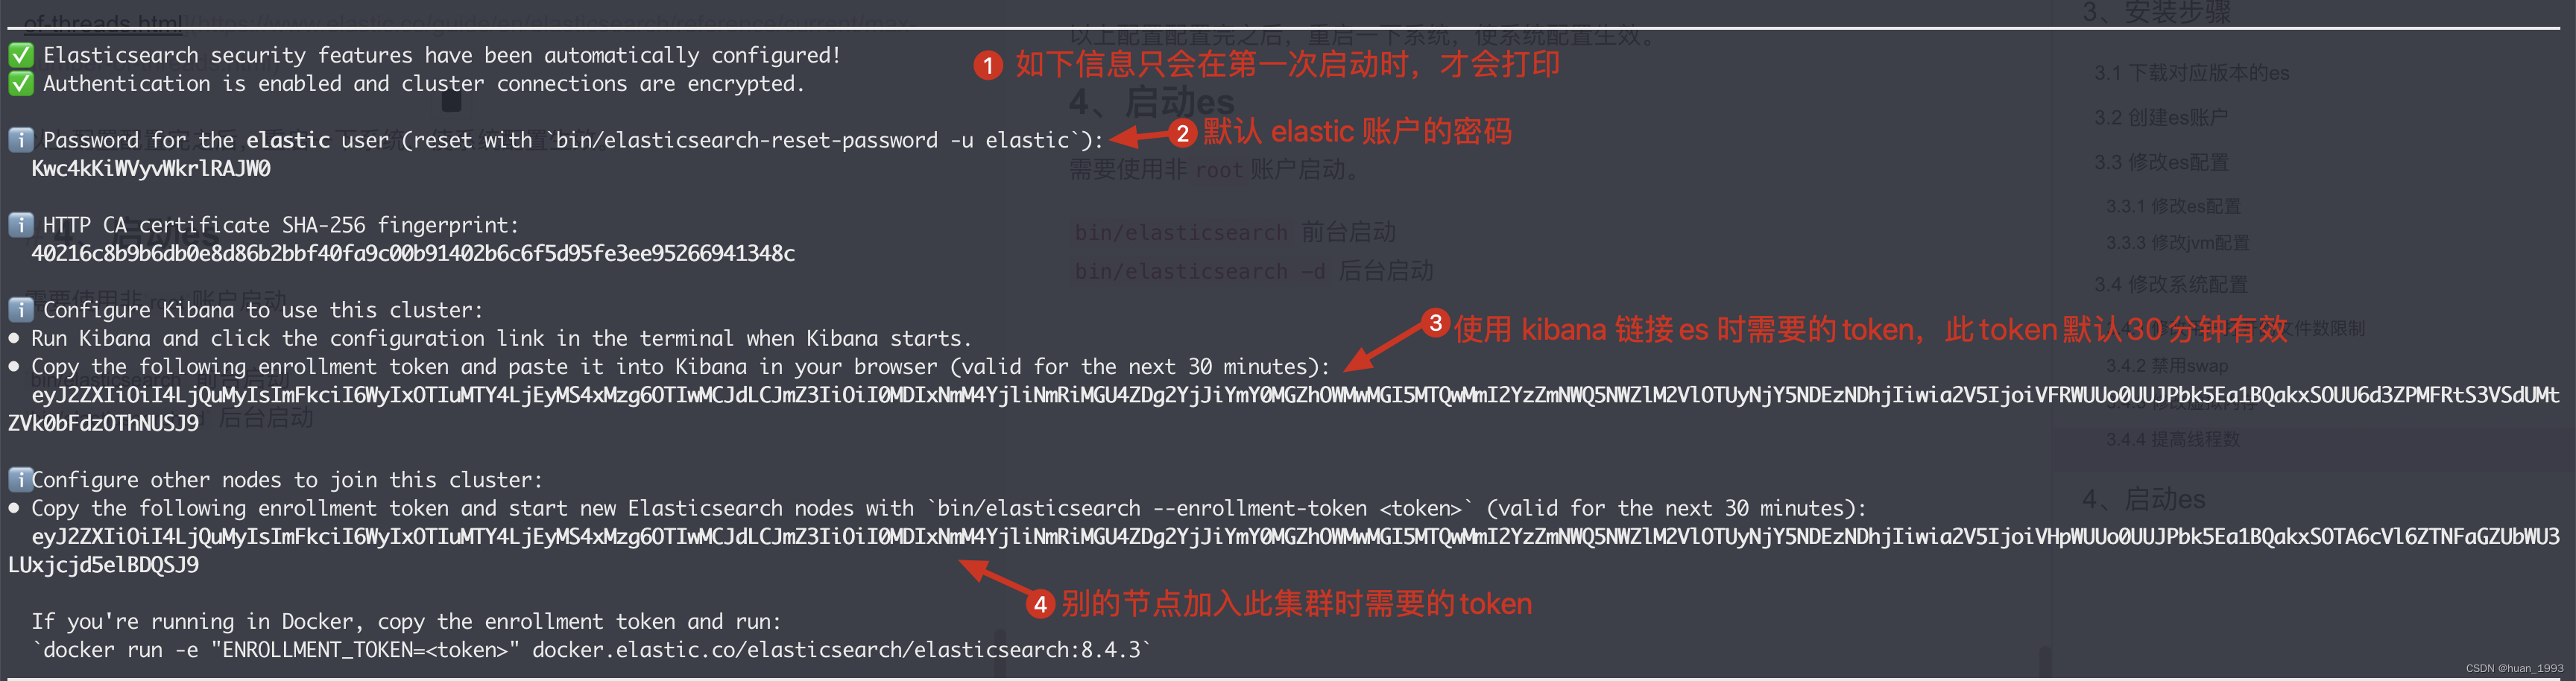
4、启动es
需要使用非root账户启动。
bin/elasticsearch 前台启动
bin/elasticsearch -d 后台启动
5、重置 elastic 账户密码
[es@appbasic elasticsearch-8.4.3]$ bin/elasticsearch-reset-password --username elastic -i
warning: ignoring JAVA_HOME=/usr/local/jdk8; using bundled JDK
WARNING: Group of file [/usr/local/es/elasticsearch-8.4.3/config/users] used to be [root], but now is [es]
WARNING: Group of file [/usr/local/es/elasticsearch-8.4.3/config/users_roles] used to be [root], but now is [es]
This tool will reset the password of the [elastic] user.
You will be prompted to enter the password.
Please confirm that you would like to continue [y/N]y


Enter password for [elastic]:
Re-enter password for [elastic]:
Password for the [elastic] user successfully reset.
[es@appbasic elasticsearch-8.4.3]$
6、访问 es
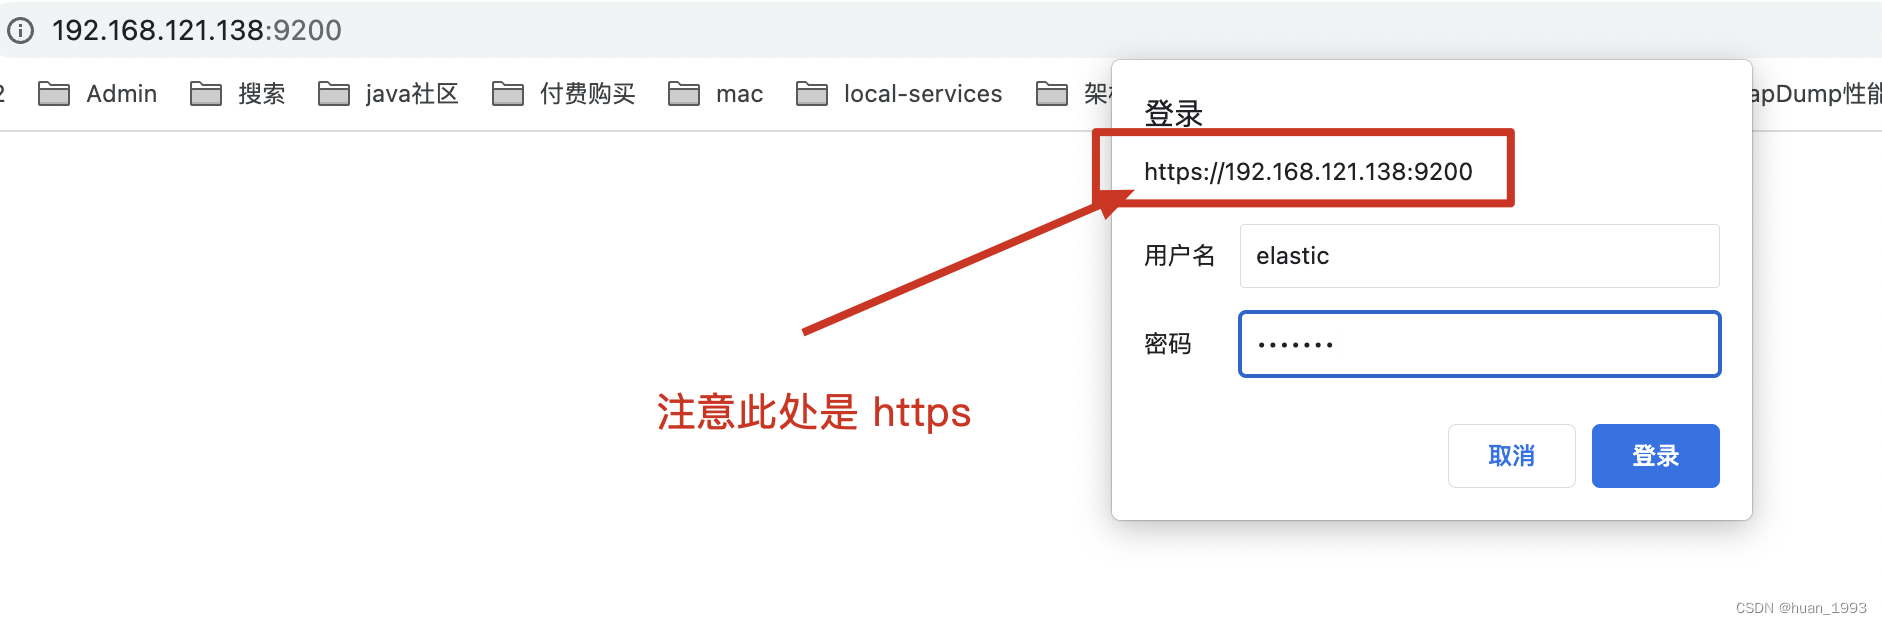
出现如下信息,说明访问成功。
  "name": "es-node01",
  "cluster_name": "es-cluster",
  "cluster_uuid": "OJsQ_w1ZTKWepM-u8-U-tg",
  "version": {
    "number": "8.4.3",
    "build_flavor": "default",
    "build_type": "tar",
    "build_hash": "42f05b9372a9a4a470db3b52817899b99a76ee73",
    "build_date": "2022-10-04T07:17:24.662462378Z",
    "build_snapshot": false,
    "lucene_version": "9.3.0",
    "minimum_wire_compatibility_version": "7.17.0",
    "minimum_index_compatibility_version": "7.0.0"
  },
  "tagline": "You Know, for Search"
}
7、kibana连接到es
7.1 修改kibana配置
vim /usr/local/kibana/kibana-8.4.3/config/kibana.yml
server.port: 5601
server.host: "192.168.121.138"
# elasticsearch.hosts: ["https://192.168.121.138:9200"] 和 es用户民密码都不用配置
注意:
如果上方的配置中增加了 如下配置 ( elasticsearch.username 和 elasticsearch.password) 或者 elasticsearch.hosts) 则可能出现如下异常
`[2022-10-30T18:31:29.858+08:00][ERROR][elasticsearch-service] Unable to retrieve version information from Elasticsearch nodes. self signed certificate in certificate chain`
解决方案:
执行如下命令
bin/kibana-setup --enrollment-token <enrollment-token>
<enrollment-token>通过如下命令获取:bin/elasticsearch-create-enrollment-token --scope kibana
7.2 启动kibana
bin/kibana

从上图中可以 访问地址为 http://192.168.121.138:5601/?code=634917
7.3 配置kibana
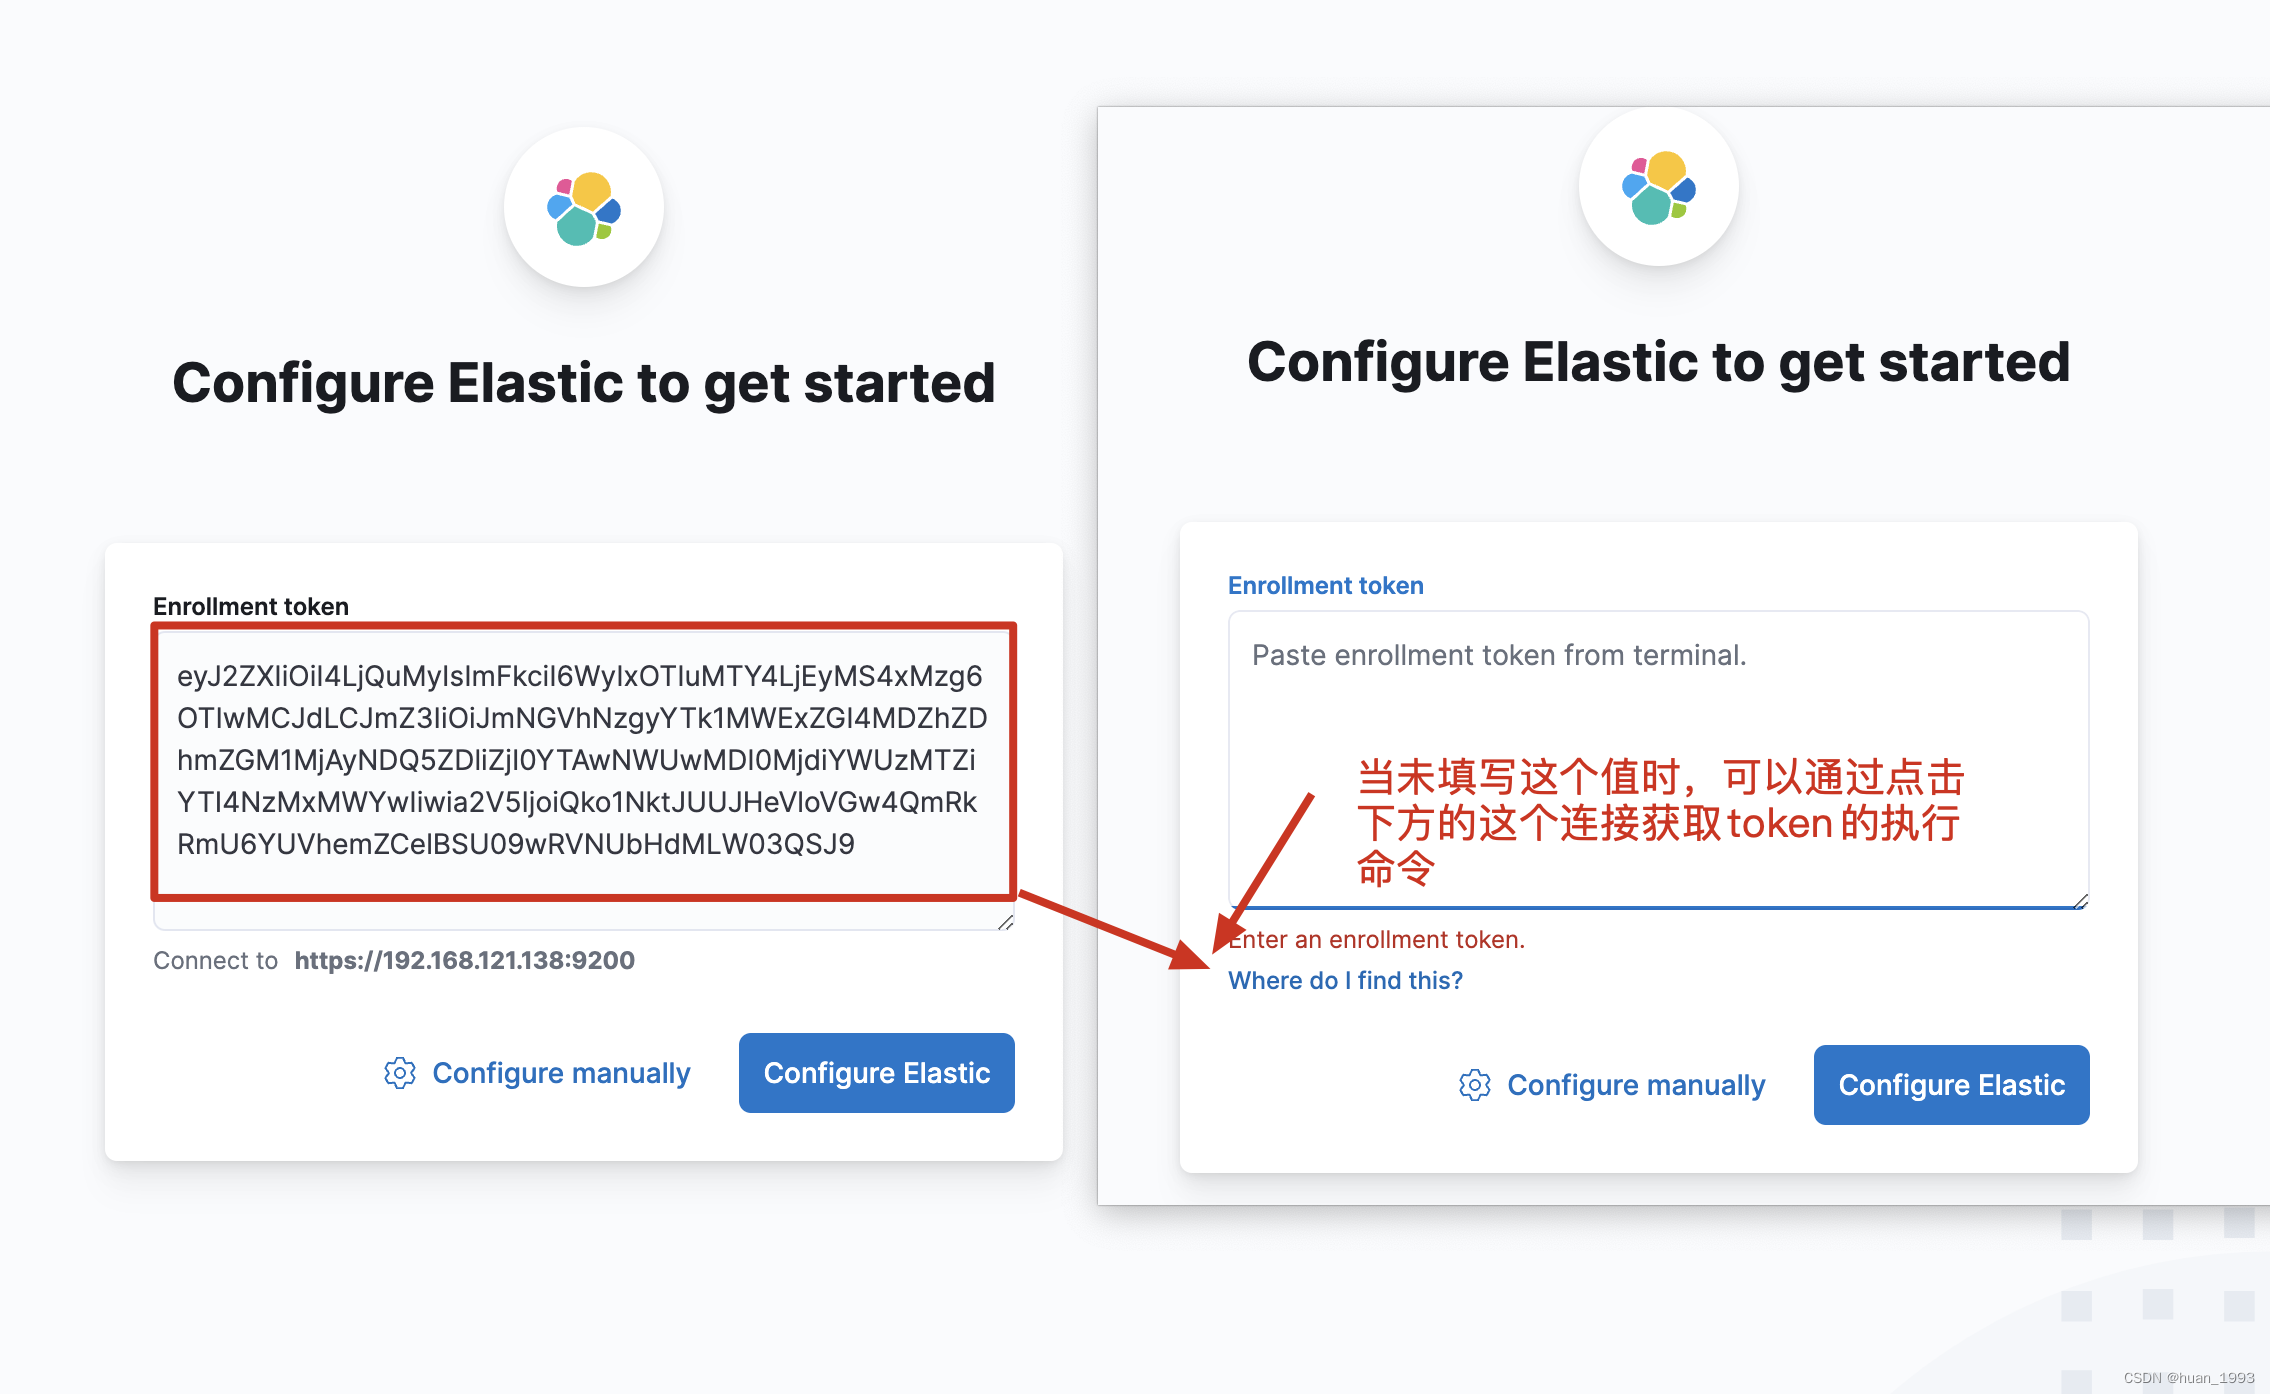
点击蓝色的按钮,就开始配置 elastic 了。


 4283
4283


 被折叠的 条评论
为什么被折叠?
被折叠的 条评论
为什么被折叠?
 到【灌水乐园】发言


