


博客结构
用简单通俗的话来记录自己对架构的理解
1.内存增长分析
(1).内存增长问题定位
采用adb shell dumpsys meminfo + AS Profiler工具结合
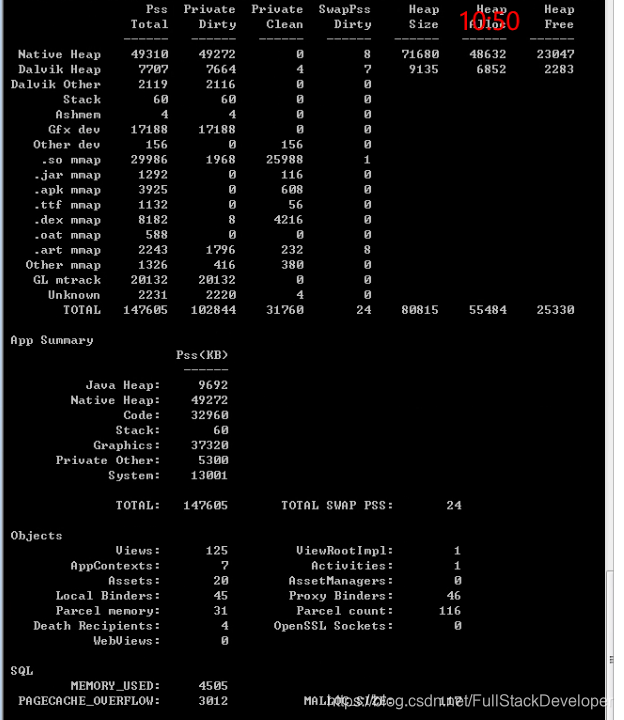
可以从App Summary中看到,现在内存中占用最多的是NativeHeap。然后是Graphics,最后是Code。Graphics是GL这块的内存,一般对于应用层没有更好的办法优化,Code的代码块映射,我们可以从结合mmap文件进行分析,确定是哪里存在更多的冗余代码,进行突破。
对于Native Heap,主要是Native分配的内存。
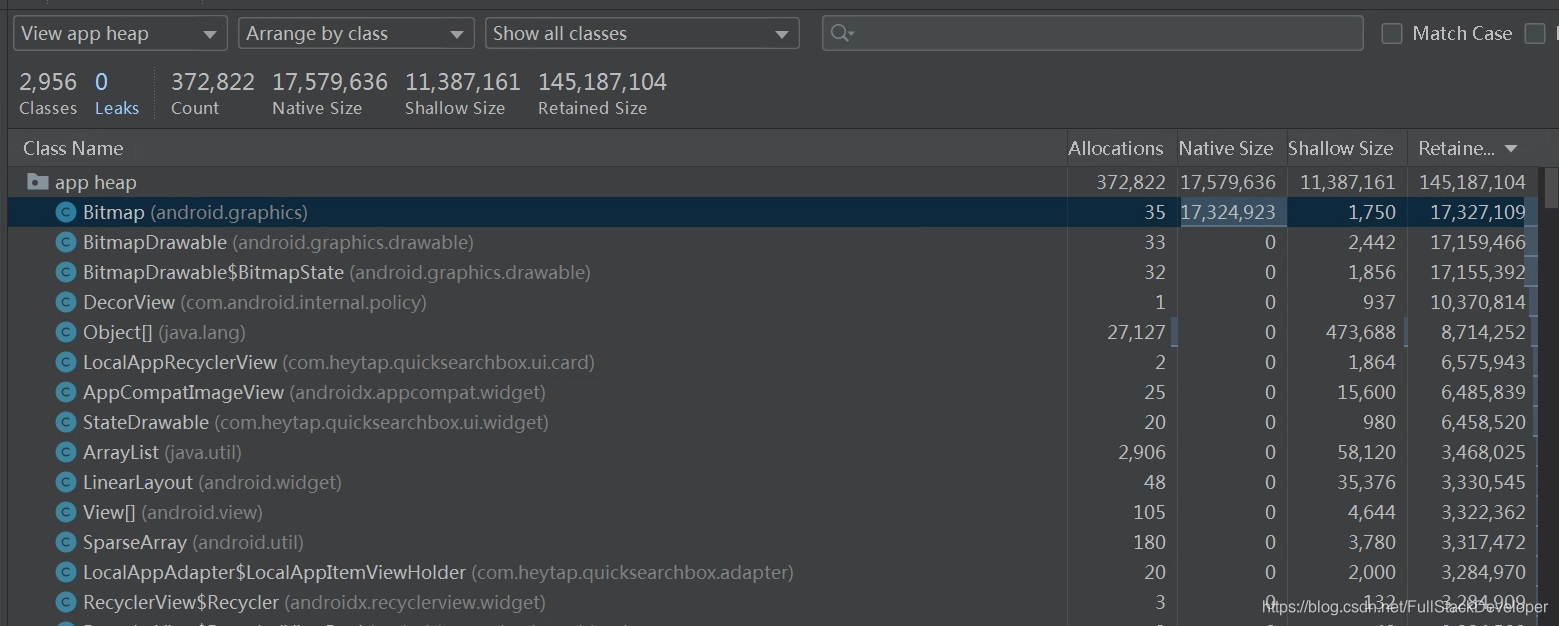
结合Profiler的对象的分配,Bitmap的NativeSize这么高,所以,认定Bitmap是攻克点。
当然,我是习惯用命令行了,实际上,可以直接使用Profiler就可以查看Native Heap的分布。
2.Bitmap详解
(1).Bitmap的大小计算
一张 864x582 的 PNG 图片,我把它放到 drawable-xhdpi 目录下,在红米 Note3 上加载,占用内存是多少(1920x1080像素 ,5.5英寸 )? 我们清晰的知道 图片大小 = 宽 * 高 * 单个像素点所占字节数,那么这么一算大小应该是 864x582x4 = 2011392 ,但最终调用代码 Bitmap.getByteCount() 发现是 3465504。 难道我们刚刚所讲的公式不对?其实这里的宽高是 Bitmap 的宽高并不是资源图片的宽高:
Bitmap 大小 = bitmap.getWidth() * bitmap.getHeight() * 单个像素点所占字节数 = 1134 * 764 * 4 = 3465504。
那么Bitmap的宽高是如何来的呢?
Bitmap对于drawable的创建,是从BitmapFactory.decodeXX()。
所以,我们直接看BitmapFactory:
   public static Bitmap decodeResource(Resources res, int id, Options opts) {
        validate(opts);
        Bitmap bm = null;
        InputStream is = null;

        try {
            final TypedValue value = new TypedValue();
            is = res.openRawResource(id, value);

            bm = decodeResourceStream(res, value, is, null, opts);
        } catch (Exception e) {
            /*  do nothing.
                If the exception happened on open, bm will be null.
                If it happened on close, bm is still valid.
            */
        } finally {
            try {
                if (is != null) is.close();
            } catch (IOException e) {
                // Ignore
            }
        }

        if (bm == null && opts != null && opts.inBitmap != null) {
            throw new IllegalArgumentException("Problem decoding into existing bitmap");
        }

        return bm;
    }

    public static Bitmap decodeResourceStream(@Nullable Resources res, @Nullable TypedValue value,
            @Nullable InputStream is, @Nullable Rect pad, @Nullable Options opts) {
        validate(opts);
        if (opts == null) {
            opts = new Options();
        }

        if (opts.inDensity == 0 && value != null) {
            final int density = value.density;
            if (density == TypedValue.DENSITY_DEFAULT) {
                opts.inDensity = DisplayMetrics.DENSITY_DEFAULT;
            } else if (density != TypedValue.DENSITY_NONE) {
                opts.inDensity = density;
            }
        }
        // 获取当前手机设备的 dpi
        if (opts.inTargetDensity == 0 && res != null) {
            opts.inTargetDensity = res.getDisplayMetrics().densityDpi;
        }

        return decodeStream(is, pad, opts);
    }

    // 省略部分跟踪代码 ......

    private static native Bitmap nativeDecodeStream(InputStream is, byte[] storage,
            Rect padding, Options opts);
Bitmap的创建直接从Java层到了Native。大家在 http://androidxref.com/ 上看,因为不同版本之间有差异,我们先只看一个版本。
这里以 Android N 版本为例:
/frameworks/base/core/jni/android/graphics/BitmapFactory.cpp
//代码比较长,只择取最关键部分,省得大家疲惫

static jobject doDecode(JNIEnv *env, SkStreamRewindable *stream, jobject padding, jobject options) {
    // This function takes ownership of the input stream.  Since the SkAndroidCodec
    // will take ownership of the stream, we don't necessarily need to take ownership
    // here.  This is a precaution - if we were to return before creating the codec,
    // we need to make sure that we delete the stream.
    std::unique_ptr<SkStreamRewindable> streamDeleter(stream);

    // Set default values for the options parameters.
    int sampleSize = 1;
    // 是否只是获取图片的大小
    bool onlyDecodeSize = false;
    SkColorType prefColorType = kN32_SkColorType;
    bool isMutable = false;
    float scale = 1.0f;
    bool requireUnpremultiplied = false;
    jobject javaBitmap = NULL;

    // Update with options supplied by the client.
    // 解析 options 参数
    if (options != NULL) {
        sampleSize = env->GetIntField(options, gOptions_sampleSizeFieldID);
        // Correct a non-positive sampleSize.  sampleSize defaults to zero within the
        // options object, which is strange.
        if (sampleSize <= 0) {
            sampleSize = 1;
        }

        if (env->GetBooleanField(options, gOptions_justBoundsFieldID)) {
            onlyDecodeSize = true;
        }

        // initialize these, in case we fail later on
        env->SetIntField(options, gOptions_widthFieldID, -1);
        env->SetIntField(options, gOptions_heightFieldID, -1);
        env->SetObjectField(options, gOptions_mimeFieldID, 0);
        // 解析 ColorType ,复用参数等等
        jobject jconfig = env->GetObjectField(options, gOptions_configFieldID);
        prefColorType = GraphicsJNI::getNativeBitmapColorType(env, jconfig);
        isMutable = env->GetBooleanField(options, gOptions_mutableFieldID);
        requireUnpremultiplied = !env->GetBooleanField(options, gOptions_premultipliedFieldID);
        javaBitmap = env->GetObjectField(options, gOptions_bitmapFieldID);
        // 计算缩放的比例
        if (env->GetBooleanField(options, gOptions_scaledFieldID)) {
            // 获取图片当前 xhdpi 的 density
            const int density = env->GetIntField(options, gOptions_densityFieldID);
            // 获取当前设备的 dpi
            const int targetDensity = env->GetIntField(options, gOptions_targetDensityFieldID);
            const int screenDensity = env->GetIntField(options, gOptions_screenDensityFieldID);
            if (density != 0 && targetDensity != 0 && density != screenDensity) {
                // scale = 当前设备的 dpi / xhdpi 的 density
                // scale = 420/320 = 1.3125    ------------///1111111
                scale = (float) targetDensity / density;
            }
        }
    }

    // Create the codec.
    NinePatchPeeker peeker;
    std::unique_ptr<SkAndroidCodec> codec(SkAndroidCodec::NewFromStream(streamDeleter.release(),
                                                                        280 & peeker));
    if (!codec.get()) {
        return nullObjectReturn("SkAndroidCodec::NewFromStream returned null");
    }

    // Do not allow ninepatch decodes to 565.  In the past, decodes to 565
    // would dither, and we do not want to pre-dither ninepatches, since we
    // know that they will be stretched.  We no longer dither 565 decodes,
    // but we continue to prevent ninepatches from decoding to 565, in order
    // to maintain the old behavior.
    if (peeker.mPatch && kRGB_565_SkColorType == prefColorType) {
        prefColorType = kN32_SkColorType;
    }
    // 获取当前图片的大小
    // Determine the output size.
    SkISize size = codec->getSampledDimensions(sampleSize);

    int scaledWidth = size.width();
    int scaledHeight = size.height();
    bool willScale = false;
    // 处理 simpleSize 压缩,我们这里没穿,上面默认是 1
    // Apply a fine scaling step if necessary.
    if (needsFineScale(codec->getInfo().dimensions(), size, sampleSize)) {
        willScale = true;
        scaledWidth = codec->getInfo().width() / sampleSize;
        scaledHeight = codec->getInfo().height() / sampleSize;
    }

    // Set the options and return if the client only wants the size.
    if (options != NULL) {
        jstring mimeType = encodedFormatToString(env, codec->getEncodedFormat());
        if (env->ExceptionCheck()) {
            return nullObjectReturn("OOM in encodedFormatToString()");
        }
        // 设置 options 对象中的 outWidth 和 outHeight
        env->SetIntField(options, gOptions_widthFieldID, scaledWidth);
        env->SetIntField(options, gOptions_heightFieldID, scaledHeight);
        env->SetObjectField(options, gOptions_mimeFieldID, mimeType);
        // 如果只是获取大小直接 return null 这里是 nullptr 而不是 NULL
        if (onlyDecodeSize) {
            return nullptr;
        }
    }

    // Scale is necessary due to density differences.
    if (scale != 1.0f) {
        willScale = true;
        // 计算 scaledWidth 和 scaledHeight ------------///22222222
        // scaledWidth = 864 * 1.3125 + 0.5f = 1134 + 0.5f = 1134
        scaledWidth = static_cast<int>(scaledWidth * scale + 0.5f);
        // scaledHeight = 582 * 1.3125 + 0.5f = 763.875 + 0.5f = 764
        scaledHeight = static_cast<int>(scaledHeight * scale + 0.5f);
    }
    ........
    ........
    ........
}
来,让我们一起梳理一下思路,大家注意看下我做的备注------------///1和2。这两处是计算Bitmap大小的关键。
1.利用当前手机dpi与图片所在的drawable/mipmap的dpi比值,从而确定缩放率
2.利用当前的drawable分辨率计算Bitmap的宽高:scaledWidth * scale + 0.5f
这样的话,大家就清晰了吧?如果要优化本地的图片加载的内存,让我们的设计师动起来。
(2).Bitmap内存申请
(a)Bitmap的内存组成
Bitmap 的内存申请不同版本间有些许差异,Bitmap对象的构建分为两部分:
一部分是Bitmap对象内存,另一个是像素的内存
在 3.0-7.0 的 bitmap 像素内存都是存放在 Java heap 中的,而 8.0 以后则是放在 Native heap 中的。
我使用的是android 10.0,所以是Native heap比较大。
(b)Bitmap的像素内存最終为啥还是选择了Native内存?
其实,更好的防止OOM。
什么这么说呢?
创建一个2G的Bitmap,在8.0以前,会立即OOM,而在8.0之后则不会。
(3).Bitmap的内存回收机制
总结:其实无论是 Android M 前还是之后,释放 Native 层的 Bitmap 对象的思想都是去监听 Java 层的 Bitmap 是否被释放,一旦当 Java 层的 Bitmap 对象被释放则立即去释放 Native 层的 Bitmap 。只不过 Android M 前是基于 Java 的 GC 机制,而 Android M 后是注册 native 的 Finalizer 方法。
android只在2.3之前,是需要手动释放。bitmap.recycle();
看下8.0的Finalizer方法
/frameworks/base/graphics/java/android/graphics/Bitmap.java
 Bitmap(long nativeBitmap, byte[] buffer, int width, int height, int density,
            boolean isMutable, boolean requestPremultiplied,
            byte[] ninePatchChunk, NinePatchInsetStruct ninePatchInsets) {
        if (nativeBitmap == 0) {
            throw new RuntimeException("internal error: native bitmap is 0");
        }

        mWidth = width;
        mHeight = height;
        mIsMutable = isMutable;
        mRequestPremultiplied = requestPremultiplied;
        mBuffer = buffer;

        mNinePatchChunk = ninePatchChunk;
        mNinePatchInsets = ninePatchInsets;
        if (density >= 0) {
            mDensity = density;
        }

        mNativePtr = nativeBitmap;
        // 这个对象对象来回收
        mFinalizer = new BitmapFinalizer(nativeBitmap);
        int nativeAllocationByteCount = (buffer == null ? getByteCount() : 0);
        mFinalizer.setNativeAllocationByteCount(nativeAllocationByteCount);
    }

    private static class BitmapFinalizer {
        private long mNativeBitmap;

        // Native memory allocated for the duration of the Bitmap,
        // if pixel data allocated into native memory, instead of java byte[]
        private int mNativeAllocationByteCount;

        BitmapFinalizer(long nativeBitmap) {
            mNativeBitmap = nativeBitmap;
        }

        public void setNativeAllocationByteCount(int nativeByteCount) {
            if (mNativeAllocationByteCount != 0) {
                VMRuntime.getRuntime().registerNativeFree(mNativeAllocationByteCount);
            }
            mNativeAllocationByteCount = nativeByteCount;
            if (mNativeAllocationByteCount != 0) {
                VMRuntime.getRuntime().registerNativeAllocation(mNativeAllocationByteCount);
            }
        }

        @Override
        public void finalize() {
            try {
                super.finalize();
            } catch (Throwable t) {
                // Ignore
            } finally {
                // finalize 这里是 GC 回收该对象时会调用
                setNativeAllocationByteCount(0);
                nativeDestructor(mNativeBitmap);
                mNativeBitmap = 0;
            }
        }
    }

    private static native void nativeDestructor(long nativeBitmap);
(4).Bitmap的复用
被复用的 Bitmap 必须为 Mutable(通过 BitmapFactory.Options 设置)
4.4 之前,将要解码的图像(无论是资源还是流)必须是 jpeg 或 png 格式且和被复用的 Bitmap 大小一样,其中BitmapFactory.Options#inSampleSize 字段必须设置为 1,要求比较严苛
4.4 以后,将要解码的图像的内存需要小于等于要复用的 Bitmap 的内存
/ 不复用的写法,消耗内存 32 M
  logMemory();
  Bitmap bitmap1 = BitmapFactory.decodeResource(getResources(), R.drawable.test2);
  Bitmap bitmap2 = BitmapFactory.decodeResource(getResources(), R.drawable.test2);
  logMemory();
  // 复用的写法,消耗内存 16 M
  logMemory();
  BitmapFactory.Options options = new BitmapFactory.Options();
  options.inMutable = true;
  Bitmap bitmap1 = BitmapFactory.decodeResource(getResources(), R.drawable.test2, options);
  options.inBitmap = bitmap1;
  Bitmap bitmap2 = BitmapFactory.decodeResource(getResources(), R.drawable.test2, options);
  logMemory();
(5).Bitmap的类型分类
private static Config sConfigs[] = {
            null, ALPHA_8, null, RGB_565, ARGB_4444, ARGB_8888, RGBA_F16, HARDWARE
        };
| 类型 | 诠释 |
|---|---|
| ALPHA_8 | 每个像素存储为单个半透明(alpha)通道。 每个像素需要1个字节的内存,只保存透明度,不保存颜色。似乎很不常用,应该是只存储ALPHA通道的一种遮罩类型图。创建此类型图后,无法在上面画颜色。 |
| ARGB_4444 | 每个像素存储在2个字节上,即A=4,R=4,G=4,B=4,那么一个像素点占4+4+4+4=16位,此字段在API级别13中已弃用。由于此类型的图片配置导致画质质量较差,建议使用此字段ARGB_8888。 |
| ARGB_8888 | 每个像素存储在4个字节上。即A=8,R=8,G=8,B=8,那么一个像素点占8+8+8+8=32位。 每个通道(RGB和alpha为半透明)以8位精度(256个可能值)存储。这种配置非常灵活,可提供最佳质量。应尽可能使用它。 |
| HARDWARE | 特殊配置,位图仅存储在图形内存中。 |
| ARGB_8888 | 每个像素存储在4个字节上。即A=8,R=8,G=8,B=8,那么一个像素点占8+8+8+8=32位。 每个通道(RGB和alpha为半透明)以8位精度(256个可能值)存储。这种配置非常灵活,可提供最佳质量。应尽可能使用它。 |
| HARDWARE | 特殊配置,位图仅存储在图形内存中。 |
| RGBA_F16 | 每个像素存储在8个字节上。每个通道(RGB和半透明的alpha)存储为半精度浮点值。此配置特别适用于宽色域和HDR内容。 |
| HARDWARE | 特殊配置,位图仅存储在图形内存中。 |
| RGB_565 | 每个像素存储在2个字节上,只有RGB通道被编码:红色以5位精度存储(32个可能值),绿色存储6位精度(64个可能值),蓝色存储5位精确。 此配置可能会产生轻微的视觉瑕疵,具体取决于源的配置。例如,没有抖动,结果可能会显示绿色。为了获得更好的结果,应该应用抖动。当使用不需要高色彩保真度的不透明位图时,此配置可能很有用。 |
(6).通道与位深
Bitmap的像素使用不同的通道进行表示。正如我们所知,颜色是由红绿蓝组成,这是基础色,这是我们学的初中技术知识。那么所有的颜色都是由它来表示。那么各个通道对应的值对应于对应的值表示。
这么说是不是有点枯燥。举个例子:
ARGB_4444这种类型的Bitmap实际表示的就是使用四通道:Alpha(透明度)、Red(红色)、Green(绿色)、Blue(蓝色)来表示,而后面的_4444则表示使用4位分别表示以上四个通道。那么一个像素所占内存:(4*4)/8= 2 Bit。这也是我们实际上在对图片的透明度和精确度无要求时,尽量是用的RGB_565的一个原因。
位深实际上理解是表示一个通道说使用的内存,而质量压缩,实际上就是进行位深的优化,它可以减少存储的大小的,但是,无法减少内存大小。
(7).Bitmap两种压缩方式
(a)质量压缩
不改变内存大小,只改变占用空间大小。本质是改变位深。
实现方式:
   /**
  * 压缩图片
  *
  * @param bitmap
  *          被压缩的图片
  * @param sizeLimit
  *          大小限制
  * @return
  *          压缩后的图片
  */
 private Bitmap compressBitmap(Bitmap bitmap, long sizeLimit) {
     ByteArrayOutputStream baos = new ByteArrayOutputStream();
     int quality = 100;
     bitmap.compress(Bitmap.CompressFormat.JPEG, quality, baos);

     // 循环判断压缩后图片是否超过限制大小
     while(baos.toByteArray().length / 1024 > sizeLimit) {
         // 清空baos
         baos.reset();
         bitmap.compress(Bitmap.CompressFormat.JPEG, quality, baos);
         quality -= 10;
     }

     Bitmap newBitmap = BitmapFactory.decodeStream(new ByteArrayInputStream(baos.toByteArray()), null, null);

     return newBitmap;
 }
(b)尺寸压缩
改变内存大小,同时改变占用空间大小。本质是减少像素。
实现方式:
(1)利用采样率压缩:
 public static Bitmap decodeSampledBitmapFromResource(Resources res, int resId,int reqWidth, int reqHeight) {
    final BitmapFactory.Options options = new BitmapFactory.Options();
    // 先将inJustDecodeBounds设置为true不会申请内存去创建Bitmap,返回的是一个空的Bitmap,但是可以获取
    //图片的一些属性,例如图片宽高,图片类型等等。
    options.inJustDecodeBounds = true;
    BitmapFactory.decodeResource(res, resId, options);

    // 计算inSampleSize
    options.inSampleSize = calculateInSampleSize(options, reqWidth, reqHeight);

    // 加载压缩版图片
    options.inJustDecodeBounds = false;
    // 根据具体情况选择具体的解码方法
    return BitmapFactory.decodeResource(res, resId, options);
  }

  public static int calculateInSampleSize(BitmapFactory.Options options, int reqWidth, int reqHeight) {
      // 原图片的宽高
      final int height = options.outHeight;
      final int width = options.outWidth;
      int inSampleSize = 1;

      if (height > reqHeight || width > reqWidth) {
          final int halfHeight = height / 2;
          final int halfWidth = width / 2;

          // 计算inSampleSize值
          while ((halfHeight / inSampleSize) >= reqHeight
            && (halfWidth / inSampleSize) >= reqWidth) {
                  inSampleSize *= 2;
           }
      }

      return inSampleSize;
  }
(2)Matrix 缩放法:
	Matrix matrix = new Matrix();
	matrix.setScale(0.5f, 0.5f);
	bm = Bitmap.createBitmap(bit, 0, 0, bit.getWidth(),bit.getHeight(), matrix, true);

(3)根据宽高比,采用最小压缩值开源:
Compressor:https://github.com/zetbaitsu/Compressor
这个开源库就是在普通的压缩算法上做了优化改进,源码很容易看懂,推荐!

(4)根据压缩效果前后对比确定压缩比
目前成熟的开源库有Luban:https://github.com/Curzibn/Luban
这个开源库算法比较复杂,根据效果图前后对比逆向推算了微信朋友圈的压缩,最后效果和微信差不多。
3.Bitmap的优化策略
(1).多屏幕适配本地图片
相同的图片放在不同的drawable/mipmap文件夹下,会对应于不同的dpi,从而会影响Bitmap大小的计算。详情可以看第一部分Bitmap的宽高计算。
(2).等比例压缩图片分辨率
使用Luban算法进行图片分辨率压缩
(3).Bitmap创建时复用,减少Native的内存大小
可见本文中的Bitmap的复用
(4).灵活选择Bitmap的类型
对于不需要透明度的图片,选择RGB_565,降低每个Bitmap的单个像素分辨率大小。
对于图片质量要求没有这么高的,选择ARGB_4444.
(5).减少Bitmap的缓存
以RecyclerView为例,
(1)默认离屏的缓存数据为2个,改为1个
recyclerView.setItemViewCacheSize(int);
(2)每种Type的Item默认是5个,也可以减少。
(3)Glide不进行内存缓存设置
 .skipMemoryCache(true) // 不使用内存缓存
  .diskCacheStrategy(DiskCacheStrategy.NONE) // 不使用磁盘缓存
  .into(imageView);
(6).Java层及时Bitmap的回收
(1)Bitmap的recycle。这个是针对8.0之前进行内存回收
(2)Glide的Bitmap回收:此处的结合更多是和Adapter的onViewRecycler一起使用
Glide.with(context).clear(imageView);
4.站在巨人肩膀
1.源码地址查看
http://androidxref.com/
2.Bitmap原理深入解析
https://www.jianshu.com/p/e430b95010c7


 8261
8261


 被折叠的 条评论
为什么被折叠?
被折叠的 条评论
为什么被折叠?
 到【灌水乐园】发言


