


 本文深入剖析ECharts 3.0底层库zrender中的Painter模块,讲解其在渲染、构造、操作及Hover图层等方面的功能。Painter负责canvas及DOM元素处理,协调Shape绘制,并提供渲染、刷新等方法。分析了渲染结构,包括正常和Hover层的canvas创建,以及Painter对象的构建和遍历渲染过程。
上一篇介绍了zrender的总体结构,这一篇我们就详细介绍View层–Painter(Painter.js)。
一些demo和没有在博客中介绍的源码请进我的github仓库。
Painter利用canvas负责真正的绘图操作。
* 1.负责canvas及其周边DOM元素的创建与处理
* 2.负责调用各个Shape(预定义好的)进行绘制
* 3.提供基本的操作方法,渲染(render)、刷新(refresh)、尺寸变化(resize)、擦除(clear)等
1.渲染结构分析
两个例子都是渲染到div上。
<div id="main" style="width:1000px;height:600px;margin:0;"></div>zrender 3.x版本渲染结果(demo/demo1/demo3-chart.html)
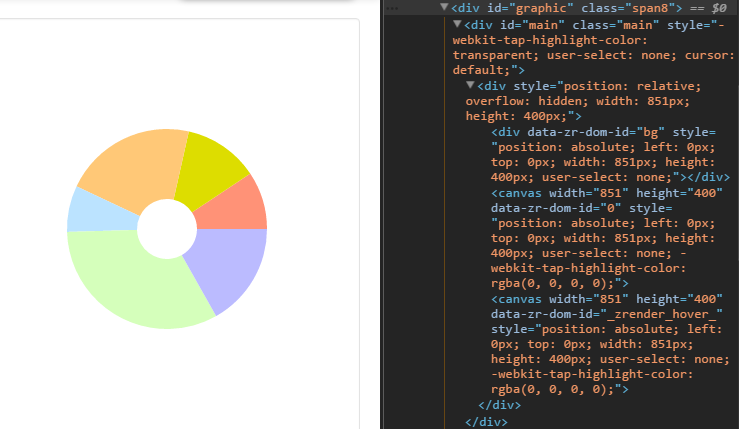
我们可以看到渲染结果都会新建一层div(从下面的分析我们可以得到这个div就是_domRoot),里面嵌套canvas。如果有使用addHover(有hover层,data-zr-dom-id=”zr_100000”)的话,hover层会单独列一个canvas画布。
sector.on('mouseover', function() {

    zr.addHover(this, {
        stroke: 'yellow',
        lineWidth: 10,
        opacity: 1
    });
    zr.refresh();
});
sector.on('mouseout', function() {

    zr.removeHover(this);
});<div id="main" style="width: 1000px; height: 600px; margin: 0px; -webkit-tap-highlight-color: transparent; user-select: none;">
<div style="position: relative; overflow: hidden; width: 1000px; height: 600px; padding: 0px; margin: 0px; border-width: 0px; cursor: default;">
<canvas width="1000" height="600" data-zr-dom-id="zr_0" style="position: absolute; left: 0px; top: 0px; width: 1000px; height: 600px; user-select: none; -webkit-tap-highlight-color: rgba(0, 0, 0, 0); padding: 0px; margin: 0px; border-width: 0px;"></canvas>
<canvas width="1000" height="600" data-zr-dom-id="zr_100000" style="position: absolute; left: 0px; top: 0px; width: 1000px; height: 600px; user-select: none; -webkit-tap-highlight-color: rgba(0, 0, 0, 0); padding: 0px; margin: 0px; border-width: 0px;"></canvas>
</div>
</div>2.构造函数
 最低0.47元/天 解锁文章


 被折叠的 条评论
为什么被折叠?
被折叠的 条评论
为什么被折叠?
 到【灌水乐园】发言


