


一、安装jupyter lab
conda search jupyterlab根据base的python版本,选择对应的版本
conda install jupyterlab==3.0.14该方法优点是可以快速的启动JupyterLab,缺点是需要记住大量参数写法。以下是一些常见参数的说明:
--ip='*'设置可访问的IP地址,*为所有--port=8701设置服务端口为8701--notebook-dir='/home/workspace'设置工作目录路径为'/home/workspace'--no-browser不自动打开浏览器--allow-root允许root用户运行(若登陆的是root用户需要添加该命令)
jupyter lab --ip='*' --port=8701 --notebook-dir='/home/workspace' --no-browser --allow-root后台运行,记住最后要跟一个 &
nohup jupyter lab --ip='*' --port=8701 --notebook-dir='/home/workspace' --no-browser --allow-root > jupyter.log 2>&1 &3.2 修改配置文件参数运行
该方法优点是启动命令简洁,缺点是要准确的修改配置文件,下面对该方法进行介绍。
首先生成配置文件:
jupyter lab --generate-config添加内容:
c = get_config() #noqa
c.ServerApp.root_dir = '/home/workspace'
c.ServerApp.allow_remote_access = True
c.ServerApp.ip = '*'
c.LabApp.open_browser = False
c.ServerApp.port = 8701
c.ServerApp.iopub_data_rate_limit = 1.0e10
信息会写入下面路径:
/root/.jupyter/jupyter_lab_config.py,注意目录下有两个文件,一个是jupyter_lab_config.py,另一个是jupyter_Server_config.py 存储客户端登陆lab server的密码hash值
二、将python 环境安装到jupyter lab上
1.创建虚拟环境:conda create -n snp python=3.8.3
如果修改虚拟环境的路径为指定路径,为了避免进入虚拟环境每次需要输入路径信息,可以修改conda配置文件/home/用户名/.condarc,添加虚拟路径的上一级路径(注意:上一级)
envs_dirs:
- /data/pyenv/
2. python -m ipykernel install --name snp # 该命令在snp空间执行,如果在base上执行,虚拟环境切换不到snp
3.添加到Jupyter中:python -m ipykernel install --name snp #后面的环境名字需要更换
4.重启Jupyter,即可看到添加的虚拟环境
------------更新 2025-01
1.添加虚拟环境
今天在本地机器上,运行上面突然不好使,老提示错误:
$ python -m ipykernel install --name jpai
/usr/bin/python: No module named ipykernel
执行方案:参考链接(https://zhuanlan.zhihu.com/p/409063952)
在 --name 后面跟空格 + 虚拟环境名称
ipython kernel install --user --name 输出信息:
Installed kernelspec jupyter-ai in /home/*****/.local/share/jupyter/kernels/jupyter-ai
2.删除虚拟环境
jupyter kernelspec remove wx三、关闭服务
lsof -i:8701kill -9 。。。
四、修改jupyter server 密码
浏览器首次访问,提示下面界面:
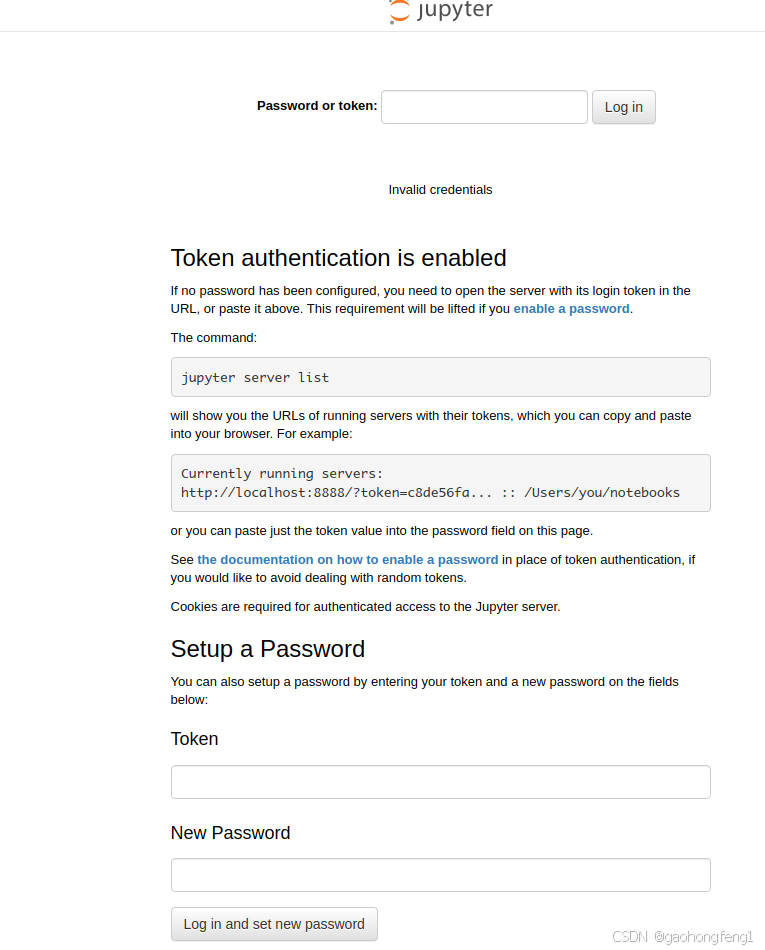
登录方法:
方法1: 在服务器启动jupyter lab时,日志打印了http 及token,将其复制浏览器地址栏,直接可访问。如果不知道是啥,可以在命令窗口输入 jupyter server list ,进行查看
方法2:在服务器端修改登录密码
在命令行下执行:
jupyter server password
/home/dzc/anaconda3/lib/python3.9/site-packages/jupyter_server/auth/security.py:172: UserWarning: Passwords do not match.
hashed_password = passwd(password)
Enter password:
Verify password:
[JupyterPasswordApp] Wrote hashed password to /root/.jupyter/jupyter_server_config.json

会将密码的hash信息存储在jupyter_server_config.json 里

五、后台启动
nohup jupyter lab --allow-root &
六、从客户端登录jupyter
① 浏览器方式:
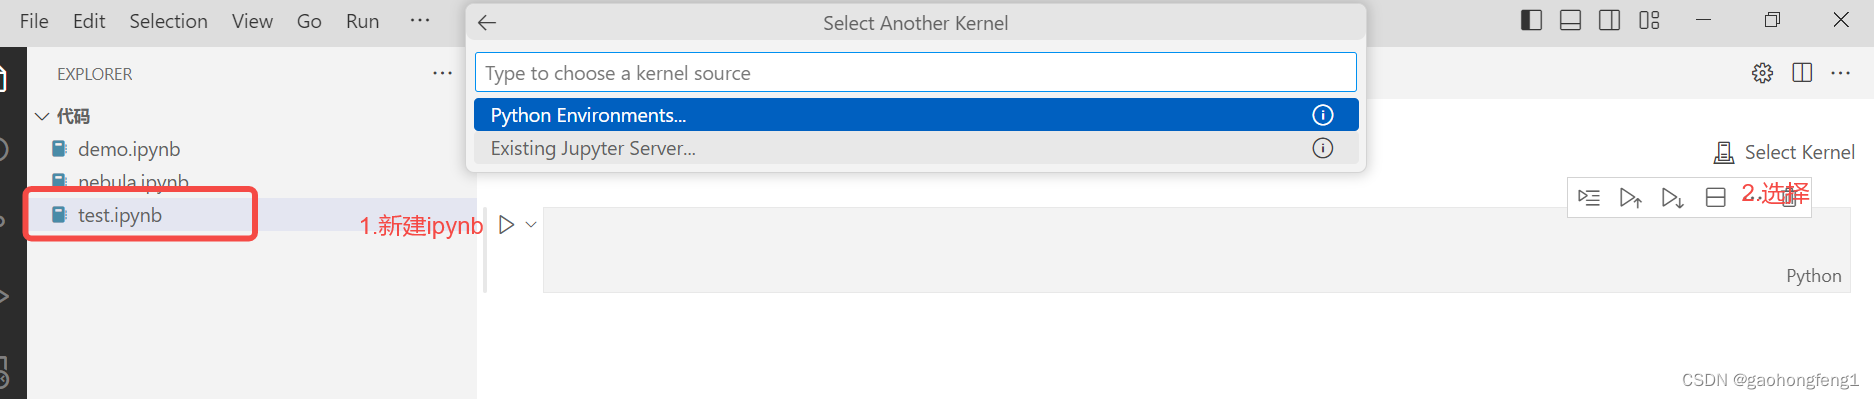
②vs code 方式
输入ip地址和端口号,根据提示输入上面设置的密码

输入密码,上面设置的

定义服务器名称

选择服务器上的python环境,作为vscode运行的环境,这里我选择nebula

选择之后,在右上角显示了当前的python环境


 2594
2594

 被折叠的 条评论
为什么被折叠?
被折叠的 条评论
为什么被折叠?
 到【灌水乐园】发言


