这篇文章主要介绍了SpringBoot上传图片的示例,帮助大家更好的理解和使用springboot框架,感兴趣的朋友可以了解下
说明:通常项目中,如果图片比较多的话,都会把图片放在专门的服务器上,而不会直接把图片放在业务代码所在的服务器上。下面的例子只是为了学习基本流程,所以放在了本地。
1、单张图片上传
1.1、前端用表单提交
前端代码:
| 1 2 3 4 5 6 7 8 9 10 11 12 13 | <!DOCTYPE html>
<html lang="en">
<head>
<meta charset="UTF-8">
<title>Title</title>
</head>
<body>
<form method="post" action="/uploads" enctype="multipart/form-data">
<input type="file" name="files" multiple>
<input type="submit" value="上传">
</form>
</body>
</html>
|
后端代码;
| 1 2 3 4 5 6 7 8 9 10 11 12 13 14 15 16 17 18 19 20 21 22 23 24 25 26 27 28 | SimpleDateFormat formatter = new SimpleDateFormat("/yyyy/MM/dd/");
@RequestMapping("/upload")
public String fileUpload(MultipartFile file, HttpServletRequest request){
String time = formatter.format(new Date());
//图片上传服务器后所在的文件夹
String realPath = request.getServletContext().getRealPath("/img") + time;
File folder = new File(realPath);
if(!folder.exists())
folder.mkdirs();
//通常需要修改图片的名字(防止重复)
String oldName = file.getOriginalFilename();
String newName = UUID.randomUUID() + oldName.substring(oldName.lastIndexOf("."));
try {
//将文件放到目标文件夹
file.transferTo(new File(folder, newName));
//通常还需要返回图片的URL,为了通用性,需要动态获取协议,不要固定写死
String returnUrl = request.getScheme() + "://" + request.getServerName() + ":" + request.getServerPort() + "/img" + time + newName;
return returnUrl;
} catch (IOException e) {
e.printStackTrace();
}
return null;
}
|
1.2、前端用ajax提交
前端代码与上面的略有不同,后台代码是一样的。
| 1 2 3 4 5 6 7 8 9 10 11 12 13 14 15 16 17 18 19 20 21 22 23 24 25 26 27 28 29 30 31 32 33 | <!DOCTYPE html>
<html lang="en">
<head>
<meta charset="UTF-8">
<title>Title</title>
</head>
<body>
<input type="file" id="file">
<input type="submit" value="上传" onclick="uploadFile()">
<h1 id="result"></h1>
</body>
<script src="https://apps.bdimg.com/libs/jquery/2.1.4/jquery.min.js">
</script>
<script>
function uploadFile() {
var file = $("#file")[0].files[0];
var formData = new FormData();
formData.append("file", file);
$.ajax({
type:"post",
url:"/upload",
processData:false,
contentType:false,
data:formData,
success:function (msg) {
$("#result").html(msg);
}
})
}
</script>
</html>
|
2、多个图片上传
前端代码:
| 1 2 3 4 5 6 7 8 9 10 11 12 13 | <!DOCTYPE html>
<html lang="en">
<head>
<meta charset="UTF-8">
<title>Title</title>
</head>
<body>
<form method="post" action="/uploads" enctype="multipart/form-data">
<input type="file" name="files" multiple>
<input type="submit" value="上传">
</form>
</body>
</html>
|

后台代码:
| 1 2 3 4 5 6 7 8 9 10 11 12 13 14 15 16 17 18 19 20 21 22 23 24 25 26 27 28 | @RequestMapping("/uploads")
public String fileUploads(MultipartFile[]files, HttpServletRequest request){
String time = formatter.format(new Date());
//图片上传服务器后所在的文件夹
String realPath = request.getServletContext().getRealPath("/img") + time;
File folder = new File(realPath);
if(!folder.exists())
folder.mkdirs();
for (MultipartFile file : files) {
//通常需要修改图片的名字(防止重复)
String oldName = file.getOriginalFilename();
String newName = UUID.randomUUID() + oldName.substring(oldName.lastIndexOf("."));
try {
//将文件放到目标文件夹
file.transferTo(new File(folder, newName));
//通常还需要返回图片的URL,为了通用性,需要动态获取协议,不要固定写死
String returnUrl = request.getScheme() + "://" + request.getServerName() + ":" + request.getServerPort() + "/img" + time + newName;
System.out.println(returnUrl);
} catch (IOException e) {
e.printStackTrace();
}
}
return null;
}
|
3、问题记录
在后台代码中,有一行需要注意下:
| 1 | String realPath = request.getServletContext().getRealPath("/img") + time;
|
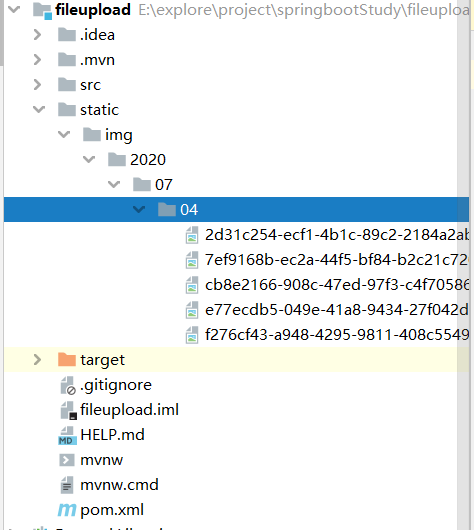
需要理解一下realPath究竟指的是什么。刚开始测试的时候,图片上传成功后,后台idea里找不到对应的图片,然后根据它返回的realPath,在C盘用户目录下的某个文件夹里找到了该图片(user/AppData/....)。
shift+shift 全局搜索 getCommonDocumentRoot这个方法,点进去,有个静态数组:COMMON_DOC_ROOTS
| 1 | private static final String[] COMMON_DOC_ROOTS = new String[]{"src/main/webapp", "public", "static"};
|
发现默认是指webapp下,或者根目录下的public、static文件夹(与src并列)。然而这些目录都没有,所以Spring定向到了工程目录以外的一个位置。
于是我在根目录下新建一个static文件夹,再次上传,果然有效了。
以上就是SpringBoot上传图片的示例的详细内容,更多关于SpringBoot上传图片的资料请关注脚本之家其它相关文章!
来源:https://www.jb51.net/article/199166.htm


 504
504


 被折叠的 条评论
为什么被折叠?
被折叠的 条评论
为什么被折叠?
 到【灌水乐园】发言


