


基于arcgis api for javascript 4.x中的卷帘功能
前言
提示:基于arcgis4.x版本下的swipe的多图层添加和移除操作,如果功能不符请检查是否由于版本不同造成的。
一、关于卷帘的官方解释
ArcMap中的"卷帘",顾名思义,就像卷帘门一样,当存在多个图层时,卷帘门的一侧显示的是一个图层的信息,而卷帘门的另一侧显示的是另一个图层的信息,感觉似乎有一点像透视眼,此外,还有一种难以描摹的美感。 将左半部分和右半部分分别截图保存,然后拖到ArcMap里。然后调用卷帘工具,具体步骤如下:- 单击主菜单中的窗口,然后单击影像分析。
- 单击影像分析 窗口中的栅格图层。
- 单击卷帘图层按钮 卷帘图层
- 最后,用鼠标拖动就可以看到效果了。
来源于:https://malagis.com/arcgis-swipe-layer-tool.html
二、卷帘的实现
1.简单的卷帘功能的实现
代码如下(示例):
<html>
  <head>
    <meta charset="utf-8" />
    <meta name="viewport" content="initial-scale=1,maximum-scale=1,user-scalable=no" />
    <title>简单的卷帘功能的实现</title>

    <style>
      html,
      body,
      #viewDiv {
        padding: 0;
        margin: 0;
        height: 100%;
        width: 100%;
      }

      #instruction {
        z-index: 99;
        position: absolute;
        top: 15px;
        left: 50%;
        padding: 5px;
        margin-left: -175px;
        height: 30px;
        width: 355px;
        background: rgba(25, 25, 25, 0.8);
        color: white;
      }
    </style>

    <link rel="stylesheet" href="https://js.arcgis.com/4.19/esri/themes/light/main.css" />
    <script src="https://js.arcgis.com/4.19/"></script>

    <script>
      require(["esri/tasks/Locator", "esri/Map", "esri/views/MapView"], (Locator, Map, MapView) => {
        // Set up a locator task using the world geocoding service
        const locatorTask = new Locator({
          url: "https://geocode.arcgis.com/arcgis/rest/services/World/GeocodeServer"
        });

        // Create the Map
        const map = new Map({
          basemap: "streets-navigation-vector"
        });

        // Create the MapView
        const view = new MapView({
          container: "viewDiv",
          map: map,
          center: [-71.6899, 43.7598],
          zoom: 12
        });

        /*******************************************************************
         * This click event sets generic content on the popup not tied to
         * a layer, graphic, or popupTemplate. The location of the point is
         * used as input to a reverse geocode method and the resulting
         * address is printed to the popup content.
         *******************************************************************/
        view.popup.autoOpenEnabled = false;
        view.on("click", (event) => {
          // Get the coordinates of the click on the view
          const lat = Math.round(event.mapPoint.latitude * 1000) / 1000;
          const lon = Math.round(event.mapPoint.longitude * 1000) / 1000;

          view.popup.open({
            // Set the popup's title to the coordinates of the location
            title: "Reverse geocode: [" + lon + ", " + lat + "]",
            location: event.mapPoint // Set the location of the popup to the clicked location
          });

          const params = {
            location: event.mapPoint
          };

          // Display the popup
          // Execute a reverse geocode using the clicked location
          locatorTask
            .locationToAddress(params)
            .then((response) => {
              // If an address is successfully found, show it in the popup's content
              view.popup.content = response.address;
            })
            .catch(() => {
              // If the promise fails and no result is found, show a generic message
              view.popup.content = "No address was found for this location";
            });
        });
      });
    </script>
  </head>

  <body>
    <div id="viewDiv"></div>
    <div id="instruction" class="esri-widget">
      Click any location on the map to see its street address
    </div>
  </body>
</html>
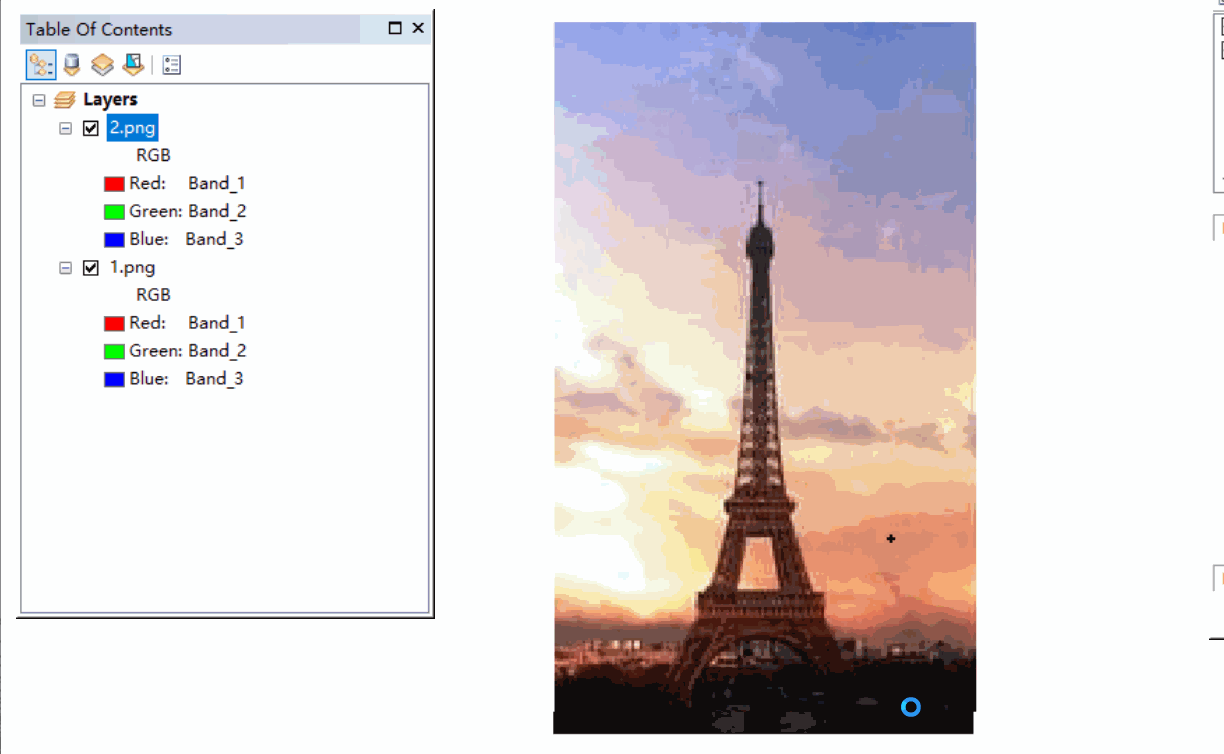
如图所示:
来源于:https://developers.arcgis.com/javascript/latest/sample-code/sandbox/index.html?sample=widgets-swipe
2.多图层卷帘的添加、选择和移除
由于项目保密性原因,实际项目效果图及项目代码不易公开,故用官方案例作实例说明
代码如下(示例):
<html>
<head>
<meta charset="utf-8" />
<meta name="viewport" content="initial-scale=1,maximum-scale=1,user-scalable=no" />
<title>卷帘多图层的添加、选择和删除</title>
<link rel="stylesheet" href="https://js.arcgis.com/4.19/esri/themes/dark/main.css" />
<script src="https://js.arcgis.com/4.19/"></script>
<style>
html,
body {
padding: 0;
margin: auto;
width: 90%;
height: 90%
}
#viewDiv {
padding-top: 80px;
margin: auto;
height: 90%;
width: 100%;
}
#rendererDiv {
padding: 10px;
width: 280px;
font-size: 16px;
}
</style>
<script>
const SwipeMap = {
swipe: null
}
require([
"esri/Map",
"esri/views/MapView",
"esri/layers/TileLayer",
"esri/widgets/LayerList",
"esri/widgets/Swipe",
"esri/widgets/Expand"
], function (Map, MapView, TileLayer, LayerList, Swipe, Expand) {
const map = new Map({
basemap: "satellite"
});
const infrared = new TileLayer({
url: "https://tiles.arcgis.com/tiles/P3ePLMYs2RVChkJx/arcgis/rest/services/WV03_Kilauea_20180519_ShortwaveInfrared/MapServer",
maxScale: 3000,
id: 'infrared'
});
const infrared1 = new TileLayer({
url: "https://tiles.arcgis.com/tiles/P3ePLMYs2RVChkJx/arcgis/rest/services/WV03_Kilauea_20180519_ShortwaveInfrared/MapServer",
maxScale: 3000,
id: 'infrared1'
});
const infrared2 = new TileLayer({
url: "https://tiles.arcgis.com/tiles/P3ePLMYs2RVChkJx/arcgis/rest/services/WV03_Kilauea_20180519_ShortwaveInfrared/MapServer",
maxScale: 3000,
id: 'infrared2'
});
const nearInfrared = new TileLayer({
url: "https://tiles.arcgis.com/tiles/P3ePLMYs2RVChkJx/arcgis/rest/services/WV03_Kilauea_20180519_NearInfrared/MapServer",
maxScale: 3000,
id: 'nearInfrared'
});
const nearInfrared1 = new TileLayer({
url: "https://tiles.arcgis.com/tiles/P3ePLMYs2RVChkJx/arcgis/rest/services/WV03_Kilauea_20180519_NearInfrared/MapServer",
maxScale: 3000,
id: 'nearInfrared1'
});
const nearInfrared2 = new TileLayer({
url: "https://tiles.arcgis.com/tiles/P3ePLMYs2RVChkJx/arcgis/rest/services/WV03_Kilauea_20180519_NearInfrared/MapServer",
maxScale: 3000,
id: 'nearInfrared2'
});
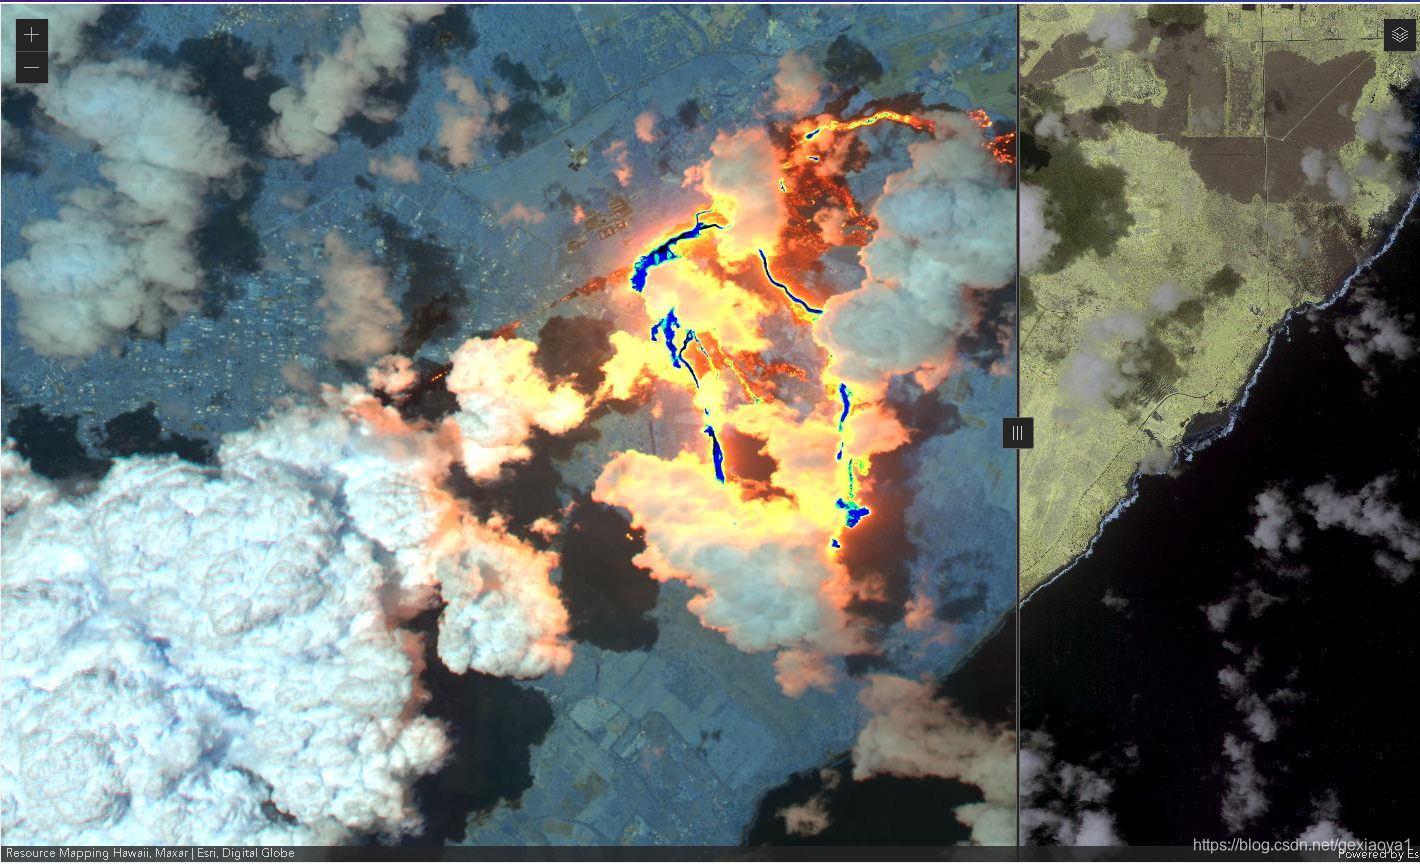
//在底图的基础上添加所需的图层,注意:图层添加的先后顺序会影响当前图层的层级index
//如果想更清楚的看到不同图层的卷帘效果,建议用不同的多个图层(因为我用相同图层和层级的原因,有些select之后卷帘会对比不明显)
map.addMany([infrared2, nearInfrared2, infrared1, nearInfrared1, infrared, nearInfrared]);
const view = new MapView({
container: "viewDiv",
map: map,
zoom: 14,
center: [-154.88, 19.46], // longitude, latitude
constraints: {
maxZoom: 17,
minZoom: 8
}
});
const expand = new Expand({
view: view,
content: document.getElementById("rendererDiv"),
expanded: true,
expandIconClass: "esri-icon-settings2"
})
view.ui.add(expand, "top-right");
const sel = document.getElementById("hillshadeType");
//卷帘层的选择、添加和移除
sel.addEventListener("change", function () {
let allLayers = view.allLayerViews.items
if (allLayers.length > 0) {
for (var i = 0; i < allLayers.length; i++) {
if (allLayers[i].layer.id == sel.value) {
// create a new Swipe widget
if (SwipeMap.swipe) {
//移除上一个卷帘层,如果不执行此操作,会有多个卷帘层同时存在
SwipeMap.swipe.destroy()
}
SwipeMap.swipe = new Swipe({
leadingLayers: [allLayers[i].layer],
position: 35, // set position of widget to 35%
view: view
});
// add the widget to the view
view.ui.add(SwipeMap.swipe);//卷帘图层添加操作
}
}
}
//自己理解的卷帘层原理:在当前图层中选出一个作为卷帘层A,
//A从当前地图的所有图层中抽离出来单独作为卷帘层存在,但如果A图层的层级index较低,
//卷帘功能虽然实现,但是会看不到卷帘效果,因为卷帘层A被其它图层覆盖,当切换其他图层作为卷帘层B时,A图层会恢复到初始状态,即和B之外的其他图层一样作为地图图层
});
});
</script>
</head>
<body>
<div id="viewDiv"></div>
<div id="rendererDiv" class="esri-widget">
<select id="hillshadeType" class="esri-input esri-select">
<option value="infrared" selected>infrared</option>
<option value="infrared1">infrared1</option>
<option value="infrared2">infrared2</option>
<option value="nearInfrared">nearInfrared</option>
<option value="nearInfrared1">nearInfrared1</option>
<option value="nearInfrared2">nearInfrared2</option>
</select>
</div>
</body>
</html>
总结
- 熟悉arcgis api for javascript的应该知道,刚开始学习的时候因为官方文档全部是英文的会造成一定程度上的理解困难,而且很多官方的说明和例子都过于基础,很多功能性api也在版本更新中逐渐被淘汰,网上资料可参考的较少,绝大多数都是基于多年前的老版本的博客,可借鉴性较少,故在项目功能实现中加以记录,不喜勿喷!


 173
173

 被折叠的 条评论
为什么被折叠?
被折叠的 条评论
为什么被折叠?
 到【灌水乐园】发言


