


Spring Boot带来的四大特性
- 自动配置(Automatic configuration)
- Starter依赖(Starter dependencies)
- CLI(Command-line interface)
- Actuator: 在运行时查看Spring Boot项目的内部信息
注:Spring Boot除了下面介绍的基本内容外,还包括Groovy和Grails等工具带来的许多新特性,但是为了掌握Spring Boot核心功能,这些基本功能已经够用,等日后根据需要学习了groovy部分再补充。
开发Spring Boot应用程序示例
使用Spring Initializer初始化Spring Boot项目
初始化Spring Boot项目有以下四种方式:
- 使用网站接口 (http://start.spring.io)
- 通过Spring Tool Suite工具
- 使用IntelliJ IDEA
- 使用Spring Boot CLI
这几种方式都需要联网下载一个空的Demo项目源码。
使用网站接口
在浏览器中输入http://start.spring.io,输入项目依赖和其它信息,点击按钮生成并下载一个zip项目压缩包。
重要输入项如下:
- 构建工具:gradle或maven
- Spring Boot版本
- 项目元数据:Group和Artifact
- 依赖的Spring Starters
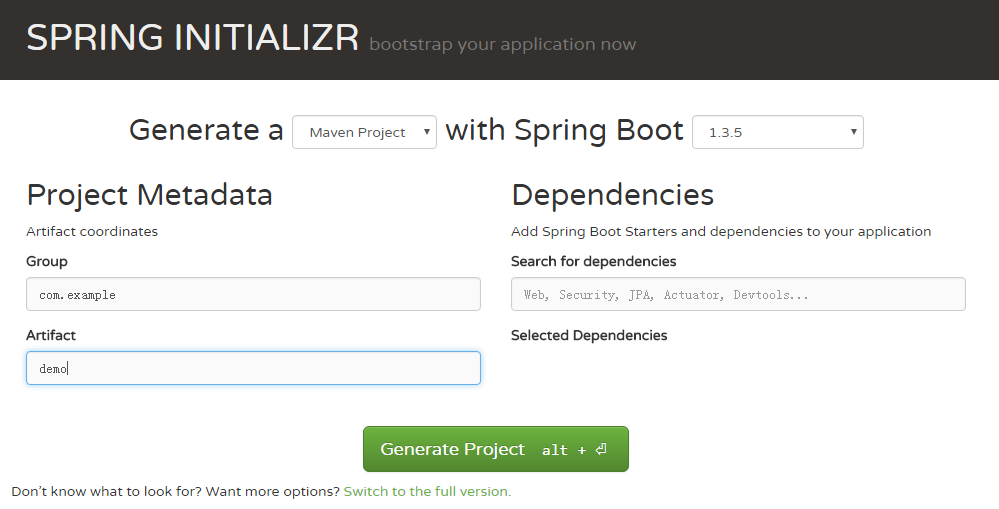
生成一个项目名为com.example.demo的maven项目,依赖于Web、Thymeleaf、JPA、H2,生成的project基本结构,如下:
readinglist
+-- pom.xml
+-- src
    +-- main
        +-- java
            +-- readinglist
                +-- ReadingListApplication.java
        +-- resources
            +-- application.properties
            +-- static
            +-- templates
    +-- test
        +-- java
            +-- readinglist
                +-- ReadingListApplicationTests.java
ReadingListApplication.java文件内容如下:
package readinglist;
import org.springframework.boot.SpringApplication;
import org.springframework.boot.autoconfigure.SpringBootApplication;

@SpringBootApplication
public class ReadingListApplication {
    public static void main(String[] args) {
        SpringApplication.run(ReadingListApplication.class, args);
    }
}
注意两点:
1. @SpringBootApplication由@Configuration、@ComponentScan、@EnableAutoConfiguration三个注解组成,使Spring能够自动扫描bean和自动化配置。
2. SpringApplication.run将启动应用程序。
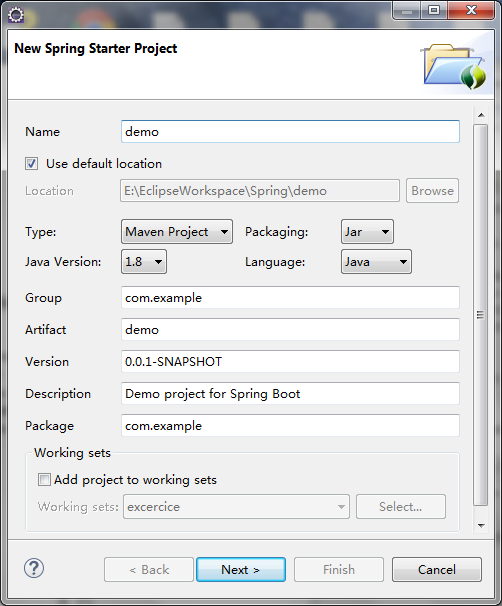
使用Spring Tool Suite或IDEA
在Eclipse开发工具,选择File -> New -> Spring Starter Project

使用CLI命令
示例如下:
spring init -dweb,data-jpa,h2,thymeleaf --build gradle readinglist使用Starter依赖——编辑Maven或Gradle
指定基于门面模式的依赖
Spring Boot提供了starter项目依赖,极大地简化了项目依赖的配置。
一个starter依赖就是一个maven pom,用于将完成某项功能的所有依赖组织到一起。
starter依赖是多个jar包的集合,不用担心starter中jar包版本及jar间的兼容性问题,它已经过充分的测试。
Sring Boot提供的starter列表:http://docs.spring.io/spring-boot/docs/1.4.0.M3/reference/htmlsingle/#using-boot-starter-poms
查看项目的所有依赖
gradle dependenciesmvn dependency:tree显示地覆盖start依赖
在某些特殊原因,我们还是需要指定自己的jar包(例如用于解决某个bug的最新版本jar包),在使用starter时,能够覆盖starterjar包指定我们需要的jar包。
# build.gradle
compile("org.springframework.boot:spring-boot-starter-web") {
    exclude group: 'com.fasterxml.jackson.core'
}
compile("com.fasterxml.jackson.core:jackson-databind:2.4.3")
<!-- pom.xml -->
<dependency>
<groupId>org.springframework.boot</groupId>
<artifactId>spring-boot-starter-web</artifactId>
<exclusions>
<exclusion>
<groupId>com.fasterxml.jackson.core</groupId>
</exclusion>
</exclusions>
</dependency>
<!-- 指定版本的jackson jar包 -->
<dependency>
<groupId>com.fasterxml.jackson.core</groupId>
<artifactId>jackson-databind</artifactId>
<version>2.4.3</version>
</dependency>自动化配置
Spring Boot自动化配置是指在程序启动时决定Spring哪些配置应用与不应用的过程。
每次启动应用程序时,执行近200项(覆盖安全、集成、持久化和Web开发等多个模块)这样的判断。
Spring的自动化配置让我们从复杂的程序配置中解脱出来,更加关注应用业务逻辑。
例如:
1. 如果在classpath路径下的JdbcTemplate是否可用?如果存在DataSource bean,将会自动配置一个JdbcTemplate bean
2. classpath下是否存在Thymeleaf?如果存在,将自动配置一个Thymeleaf模板resolver、view resolver和 template engine。
3. classpath下是否存在Spring Security?如果存在,配置一个基本web安全模式。
应用程序功能
# /src/main/java/readinglist/Book.java
package readinglist;
import javax.persistence.Entity;
import javax.persistence.GeneratedValue;
import javax.persistence.GenerationType;
import javax.persistence.Id;

@Entity
public class Book {
    @Id
    @GeneratedValue(strategy=GenerationType.AUTO)
    private Long id;
    private String reader;
    private String isbn;
    private String title;
    private String author;
    private String description;

    public Long getId() {
        return id;
    }
    public void setId(Long id) {
        this.id = id;
    }
    public String getReader() {
        return reader;
    }
    public void setReader(String reader) {
        this.reader = reader;
    }
    public String getIsbn() {
        return isbn;
    }
    public void setIsbn(String isbn) {
        this.isbn = isbn;
    }
    public String getTitle() {
        return title;
    }
    public void setTitle(String title) {
        this.title = title;
    }
    public String getAuthor() {
        return author;
    }
    public void setAuthor(String author) {
        this.author = author;
    }
    public String getDescription() {
        return description;
    }
    public void setDescription(String description) {
        this.description = description;
    }
}
# /src/main/java/readinglist/ReadingListRepository.java
package readinglist;
import java.util.List;
import org.springframework.data.jpa.repository.JpaRepository;
public interface ReadingListRepository extends JpaRepository<Book, Long> {
List<Book> findByReader(String reader);
}# /src/main/java/readinglist/ReadingListController.java
package readinglist;
import org.springframework.beans.factory.annotation.Autowired;
import org.springframework.stereotype.Controller;
import org.springframework.ui.Model;
import org.springframework.web.bind.annotation.PathVariable;
import org.springframework.web.bind.annotation.RequestMapping;
import org.springframework.web.bind.annotation.RequestMethod;
import java.util.List;
@Controller
@RequestMapping("/")
public class ReadingListController {
private ReadingListRepository readingListRepository;
@Autowired
public ReadingListController(
ReadingListRepository readingListRepository) {
this.readingListRepository = readingListRepository;
}
@RequestMapping(value="/{reader}", method=RequestMethod.GET)
public String readersBooks(@PathVariable("reader") String reader, Model model) {
List<Book> readingList =
readingListRepository.findByReader(reader);
if (readingList != null) {
model.addAttribute("books", readingList);
}
return "readingList";
}
@RequestMapping(value="/{reader}", method=RequestMethod.POST)
public String addToReadingList(@PathVariable("reader") String reader, Book book) {
book.setReader(reader);
readingListRepository.save(book);
return "redirect:/{reader}";
}
}
<!--  src/main/resources/templates/readingList.html -->
<html>
    <head>
        <title>Reading List</title>
        <link rel="stylesheet" th:href="@{/style.css}"></link>
    </head>
    <body>
        <h2>Your Reading List</h2>
        <div th:unless="${#lists.isEmpty(books)}">
            <dl th:each="book : ${books}">
                <dt class="bookHeadline">
                    <span th:text="${book.title}">Title</span> by
                    <span th:text="${book.author}">Author</span>
                    (ISBN: <span th:text="${book.isbn}">ISBN</span>)
                </dt>
                <dd class="bookDescription">
                    <span th:if="${book.description}" th:text="${book.description}">Description</span>
                    <span th:if="${book.description eq null}">No description available</span>
                </dd>
            </dl>
        </div>
        <div th:if="${#lists.isEmpty(books)}">
            <p>You have no books in your book list</p>
        </div>
        <hr/>
        <h3>Add a book</h3>
        <form method="POST">
            <label for="title">Title:</label>
            <input type="text" name="title" size="50"></input><br/>
            <label for="author">Author:</label>
            <input type="text" name="author" size="50"></input><br/>
            <label for="isbn">ISBN:</label>
            <input type="text" name="isbn" size="15"></input><br/>
            <label for="description">Description:</label><br/>
            <textarea name="description" cols="80" rows="5">
            </textarea><br/>
            <input type="submit"></input>
        </form>
    </body>
</html>
/* src/main/resources/static/style.css */
body {
background-color: #cccccc;
font-family: arial,helvetica,sans-serif;
}
.bookHeadline {
font-size: 12pt;
font-weight: bold;
}
.bookDescription {
font-size: 10pt;
}
label {
font-weight: bold;
}2.3 运行程序
运行应用程序,有以下几种方式
    Gradle: bootRun
    Maven: spring-boot:run
    Spring Suit Tools: Run As -> Spring Boot App
2.4 程序打包
打包格式:jar、war
Gradle:
Maven: mvn clean package
CLI:
配置定制(Customizing configuration)
配置定制有两种方式:明确地覆盖自动化配置和基于属性的扩展配置
覆盖Spring自动化配置的原理
在添加Spring Boot到应用程序中时,会添加spring-boot-autoconfigure.jar,它包含大量地配置类。
这些配置类在应用程序的classpath环境都可用,除非你明确指定了这些配置覆盖它们。
那些实现对这些配置类中的配置的覆盖呢?——使用条件注解@Condition
例如在应用程序中指定了JdbcTemplate,就会使用用户自定义,否则使用默认配置类中的JdbcTemplate。
实现这一目标的自定义Condition注解如下:
package readinglist;
import org.springframework.context.annotation.Condition;
import org.springframework.context.annotation.ConditionContext;
import org.springframework.core.type.AnnotatedTypeMetadata;

public class JdbcTemplateCondition implements Condition {
    @Override
    public boolean matches(ConditionContext context, AnnotatedTypeMetadata metadata) {
        try {
            context.getClassLoader().loadClass("org.springframework.jdbc.core.JdbcTemplate");
            return true;
        } catch (Exception e) {
            return false;
        }
    }
}
// 如果在classpath路径下JdbcTemplate可用,就会创建MyService bean,否则不创建。
@Conditional(JdbcTemplateCondition.class)
public MyService myService() {
//...
}Spring Boot定义了很多这样的条件类
| Conditional annotation | Configuration applied if…? |
|---|---|
| @ConditionalOnBean | …the specified bean has been configured |
| @ConditionalOnMissingBean | …the specified bean has not already been configured |
| @ConditionalOnClass | …the specified class is available on the classpath |
| @ConditionalOnMissingClass | …the specified class is not available on the classpath |
| @ConditionalOnExpression | …the given Spring Expression Language (SpEL) expression evaluates to true |
| @ConditionalOnJava | …the version of Java matches a specific value or rangeof versions |
| @ConditionalOnJndi | …there is a JNDI InitialContext available and optionally given JNDI locations exist |
| @ConditionalOnProperty | …the specified configuration property has a specific value |
| @ConditionalOnResource | …the specified resource is available on the classpath |
| @ConditionalOnWebApplication | …the application is a web application |
| @ConditionalOnNotWebApplication | …the application is not a web application |
使用Spring Security为例说明覆盖自动化配置
- 指定spring sercurity starter:
gradle构建时,在build.gradle中添加:
compile("org.springframework.boot:spring-boot-starter-security")maven构建时,在pom.xml文件中添加:
<dependency>
    <groupId>org.springframework.boot</groupId>
    <artifactId>spring-boot-starter-security</artifactId>
</dependency>
程序运行时,在控制台会输出随机生成的密码用于程序运行测试,如下
Using default security password: d9d8abe5-42b5-4f20-a32a-76ee3df658d9默认的安全配置几乎不可用,我们需要定义自己的安全配置类,能够配置页面权限以及获取用户权限。我们定义了安全配置类时,运行应用时会自动覆盖安全模块jar包中的默认配置。
// src/main/java/readinglist/SecurityConfig.java
package readinglist;
import org.springframework.beans.factory.annotation.Autowired;
import org.springframework.context.annotation.Configuration;
import org.springframework.security.config.annotation.authentication.builders.AuthenticationManagerBuilder;
import org.springframework.security.config.annotation.web.builders.HttpSecurity;

import org.springframework.security.config.annotation.web.configuration.EnableWebSecurity;
import org.springframework.security.config.annotation.web.configuration.WebSecurityConfigurerAdapter;
import org.springframework.security.core.userdetails.UserDetails;
import org.springframework.security.core.userdetails.UserDetailsService;
import org.springframework.security.core.userdetails.UsernameNotFoundException;

@Configuration
@EnableWebSecurity
public class SecurityConfig extends WebSecurityConfigurerAdapter {
    @Autowired
    private ReaderRepository readerRepository;

    @Override
    protected void configure(HttpSecurity http) throws Exception {
        http.authorizeRequests()
            .antMatchers("/").access("hasRole('READER')")
            .antMatchers("/**").permitAll()
            .and()
            .formLogin()
            .loginPage("/login")
            .failureUrl("/login?error=true");
    }

    @Override
    protected void configure(AuthenticationManagerBuilder auth) throws Exception {
        auth.userDetailsService(new UserDetailsService() {
            @Override
            public UserDetails loadUserByUsername(String username) throws UsernameNotFoundException {
                return readerRepository.findOne(username);
            }
        });
    }
}
// src/main/java/readinglist/ReaderRepository.java
package readinglist;
import org.springframework.data.jpa.repository.JpaRepository;
public interface ReaderRepository extends JpaRepository<Reader, String> {
}// src/main/java/readinglist/Reader.java
package readinglist;
import java.util.Arrays;
import java.util.Collection;
import javax.persistence.Entity;
import javax.persistence.Id;
import org.springframework.security.core.GrantedAuthority;
import org.springframework.security.core.authority.SimpleGrantedAuthority;
import org.springframework.security.core.userdetails.UserDetails;
@Entity
public class Reader implements UserDetails {
private static final long serialVersionUID = 1L;
@Id
private String username;
private String fullname;
private String password;
public String getUsername() {
return username;
}
public void setUsername(String username) {
this.username = username;
}
public String getFullname() {
return fullname;
}
public void setFullname(String fullname) {
this.fullname = fullname;
}
public String getPassword() {
return password;
}
public void setPassword(String password) {
this.password = password;
}
// UserDetails methods
@Override
public Collection<? extends GrantedAuthority> getAuthorities() {
return Arrays.asList(new SimpleGrantedAuthority("READER"));
}
@Override
public boolean isAccountNonExpired() {
return true;
}
@Override
public boolean isAccountNonLocked() {
return true;
}
@Override
public boolean isCredentialsNonExpired() {
return true;
}
@Override
public boolean isEnabled() {
return true;
}
}再看如何覆盖SpringBoot的自动化配置
通过以下两个示例说明,覆盖SpringBoot自动化配置的工作原理
例一
    @Bean
    @ConditionalOnMissingBean(JdbcOperations.class)
    public JdbcTemplate jdbcTemplate() {
        return new JdbcTemplate(this.dataSource);
    }
ConditionalOnMissingBean指定用于覆盖JdbcTemplate的条件:在
如果未配置JdbcOperations类型的Bean,将从jdbcTemplate()方法中获取JdbcTemplate的Bean对象
如配置了JdbcTemplate Bean的同时会自动配置JdbcOperations。
因此,如果我们定义了jdbcTemplate-Bean,SpringBoot自动化配置(这里的jdbcTemplate())将不会生效。
例二
    @Configuration
    @EnableConfigurationProperties
    @ConditionalOnClass({ EnableWebSecurity.class })
    @ConditionalOnMissingBean(WebSecurityConfiguration.class)
    @ConditionalOnWebApplication
    public class SpringBootWebSecurityConfiguration {
        //...
    }
SpringBootWebSecurityConfiguration配置能够生效的条件如下:
① EnableWebSecurity类有效
② 没用定义WebSecurityConfiguration-Bean
③ 必须是Web应用程序
使用属性配置
默认配置属性,请参考:http://docs.spring.io/spring-boot/docs/1.4.0.M3/reference/htmlsingle/#common-application-properties
在属性配置中指定配置属性,可以覆盖自动化的默认配置。
属性的指定方式:
- 命令行参数
- 来自java:comp/env的JNDI属性
- JVM系统属性
- 操作系统环境变量
- 以
random.*为前缀的随机生成属性 - 应用程序外部的application.properties或application.yml文件
- 应用程序内部的application.properties或application.yml文件
- 使用
@PropertySource指定的属性源 - 默认属性
其中,application.properties或application.yml文件可以存在于四个地方
- 应用程序运行目录的
/config子目录 - 应用程序运行目标
- 在以
config命名的包中 - 在classpath的根目录
优先级:从上到下依次降低
示例:在命令行中运行Spring Boot时会出现Spring Boot这几个大的艺术字,如何禁用它?
只需要指定spring.main.show-banner为false即可。
可以在application.yaml中指定
spring:
  main:
    show-banner: false
可以在application.properties指定
spring.main.show-banner=false也可以在命令行中运行程序时以参数指定属性
java -jar readinglist-0.0.1-SNAPSHOT.jar --spring.main.show-banner=false如命令行中不支持参数,在运行命令之前指定系统环境变量也行(注意:环境变量不支持点分隔,所以用下划线代替)
export spring_main_show_banner=false还有一些常用属性配置项如下:
禁用模板缓存
# 测试环境中禁用模板缓存
#   spring.thymeleaf.cache=false
#   spring.freemarker.cache=false
#   spring.groovy.template.cache=false
#   spring.velocity.cache=false
# 以thymeleaf为例
spring:
  thymeleaf:
    cache: false
指定内嵌服务器端口
# 指定服务器端口
server
  port:8000

##### 内嵌服务器配置ssl #####
# 先用jdk的keytool工具生成jks文件
#   keytool -keystore mykeys.jks -genkey -alias tomcat -keyalg RSA
# 在application.yaml文件中添加
server:
  port: 8443
  ssl:
    key-store: file:///path/to/mykeys.jks
    key-store-password: letmein
    key-password: letmein
#############################
配置日志
# 将日志写到文件中
logging.path=/var/logs/
logging.file=BookWorm.log
# 指定日志级别(默认INFO级别)
logging.level.root=WARN
logging.level.root.org.springframework.security=DEBUG
# 指定自己日志配置文件
logging.config.classpath:logging-config.xml
也可以yaml写法如下
logging:
  level:
  root: WARN
    org:
      springframework:
        security: DEBUG
另一个收缩写法(混合写法)
logging:
  level:
    root: WARN
      org.springframework.security: DEBUG
配置数据源
spring.datasource.url=jdbc:mysql://localhost/readinglist
spring.datasource.username=dbuser
spring.datasource.password=dbpass
# 无需指定driver,可根据数据库url推断
# spring.datasource.driver-class-name=com.mysql.jdbc.Driver

# 使用JNDI数据源(设置JNDI后,其它数据库连接配置将被忽略)
spring.datasource.jndi-name=java:/comp/env/jdbc/readingListDS
自定义属性配置Bean
假设要在readinglist.html中使用属性文件中的amazonID配置属性
<a th:href="'http://www.amazon.com/gp/product/'+ ${book.isbn}
    + '/tag=' + ${amazonID}"
    th:text="${book.title}">Title</a>
需要在ReadingListController中返回view前在model中指定amazonID属性。
而Controller中的associateId属性来自配置文件。
...
@Controller
@RequestMapping("/")
@ConfigurationProperties(prefix="amazon")
public class ReadingListController {
    // readersBooks方法修改如下
    @RequestMapping(method=RequestMethod.GET)
    public String readersBooks(Reader reader, Model model) {
        List<Book> readingList =readingListRepository.findByReader(reader);
        if (readingList != null) {
            model.addAttribute("books", readingList);
            model.addAttribute("reader", reader);
            model.addAttribute("amazonID", associateId);
        }
        return "readingList";
    }

    private String associateId;
    public void setAssociateId(String associateId) {
        this.associateId = associateId;
    }
}
@ConfigurationProperties指定待注入配置中以amazon为前缀的属性。
# application.properties
amazon.associateId=habuma-20
注:其一,Spring Boot自动化配置已经配置了@EnableConfigurationPropertiess,因此这里可以直接使用@ConfigurationProperties是没有问题的
其二,Spring Boot的属性解析器,能够自动识别驼峰标识和不同分隔符的属性,例如amazon.associate_id和amazon.associate-id,都可以识别并注入到Bean的associateId属性
可以将属性单独注入到一个类实体中,然后将实体注入到Controller,从实体取出所有属性。
@Component
@ConfigurationProperties("amazon")
public class AmazonProperties {
    private String associateId;
    public void setAssociateId(String associateId) {
        this.associateId = associateId;
    }
    public String getAssociateId() {
        return associateId;
    }
}
@Controller
@RequestMapping("/")
public class ReadingListController {
private ReadingListRepository readingListRepository;
private AmazonProperties amazonProperties;
@Autowired
public ReadingListController(ReadingListRepository readingListRepository,
// 将AmazonProperties实体注入进来,后面直接从AmazonProperties中属性值
AmazonProperties amazonProperties) {
this.readingListRepository = readingListRepository;
this.amazonProperties = amazonProperties;
}
}配置Profile
在不同的运行环境,开发、测试或生产环境,应用程序的配置可能有所不同,例如数据库配置、安全策略、缓存等。
创建好多个环境下的不同配置,然后在配置文件或命令行中指定特定的运行环境,启动特定环境下的配置。
@Profile("production")
@Configuration
@EnableWebSecurity
public class SecurityConfig extends WebSecurityConfigurerAdapter {
    //...
}在配置文件或命令行中指定属性spring.profiles.active=production,运行程序时,就会启动上述配置的Bean。
以上是通过@Profile注解定义的不同运行环境下的不同配置,还可以通过配置文件来定义不同运行环境下的配置。
属性文件定义不同运行环境下的配置
不同运行环境下的属性配置文件命名规则:application-{profile}.properties
application.properties中配置属性作为默认属性生效。根据spring.profiles.active属性(可以来自属性配置文件中,也可以来自命令行),
选择相应运行环境的属性配置文件覆盖application.properties中的默认属性。
Yaml文件定义不同运行环境下的配置
YAML文件也可以跟属性配置一样使用application-{profile}.yml模式来定义不同运行环境的配置。
此外,YAML可以根据自身特性,在一个文件中通过---分段来定义不同运行环境下的配置。
logging:
  level:
    root: INFO

---

spring:
  profiles: development

logging:
  level:
    root: DEBUG

---

spring:
  profiles: production

logging:
  path: /tmp/
  file: BookWorm.log
  level:
    root: WARN
自定义错误页面
Spring Boot自动化配置,默认提供了一个whitelabel的错误页面。
Spring Boot自动配置的error Handler,查找名称为error的view,如果找不到,则会显示whitelabel错误页面。
error视图,最终取决于视图解析的结果。能够被视图解析内容包括:
- ID为error,实现了View接口的Bean
- 名称为”error.html”的Thymeleaf模板(如果配置了Thymeleaf)
- 名称为”error.ftl”的FreeMarker模板(如果配置了Velocity)
- 名称为”error.jsp”的jsp模板(如果使用jsp作为视图)
在error视图中可用属性:
- timestamp:The time that the error occurred
- status:The HTTP status code
- error:The error reason
- exception:The class name of the exception
- message:The exception message (if the error was caused by an exception)
- errors:Any errors from a BindingResult exception (if the error was causedby an exception)
- trace:The exception stack trace (if the error was caused by an exception)
- path:The URL path requested when the error occurred
示例:src/main/resource/template/error.html
<html>
<head>
    <title>Oops!</title>
    <link rel="stylesheet" th:href="@{/style.css}"></link>
</head>
<body>
    <div class="errorPage">
        <span class="oops">Oops!</span><br/>
        <img th:src="@{/MissingPage.png}"></img>
        <p>There seems to be a problem with the page you requested
        (<span th:text="${path}"></span>).</p>
        <p th:text="${'Details: ' + message}"></p>
    </div>
</body>
</html>
测试
Spring Boot在运行应用程序时提供自动化配置,同样,在测试时也需要由Spring Boot完成这些基础自动化配置。
测试Spring Boot应用程序时,Spring Boot通过执行自动化配置和启动web服务器,对Spring的集成测试提供支持。
示例:
@RunWith(SpringJUnit4ClassRunner.class)
@ContextConfiguration(classes=AddressBookConfiguration.class)
public class AddressServiceTests {
    @Autowired
    private AddressService addressService;

    @Test
    public void testService() {
        Address address = addressService.findByLastName("Sheman");
        assertEquals("P", address.getFirstName());
        assertEquals("Sherman", address.getLastName());
        assertEquals("42 Wallaby Way", address.getAddressLine1());
        assertEquals("Sydney", address.getCity());
        assertEquals("New South Wales", address.getState());
        assertEquals("2000", address.getPostCode());
    }
}@RunWidth中指定SpringJUnit4ClassRunner类,表示启用集成测试,此类会加载Spring应用程序的context,并将context中的Bean注入到测试环境中。
@ContextConfiguration指定如何加载context。
多数情况下,使用@SpringApplicationConfiguration取代@ContextConfiguration,它可使用SpringApplication跟生产环境一样加载应用的context,
它比@ContextConfiguration提供更多特性,例如启用日志、加载属性文件(application.properties或application.yml)。
Web应用测试
Spring MVC代码示例:
@RequestMapping(method=RequestMethod.POST)
public String addToReadingList(Book book) {
    book.setReader(reader);
    readingListRepository.save(book);
    return "redirect:/readingList";
}
测试web应用正确方式是:发起HTTP请求的方式,并很好地评估它正确地处理了请求。
Spring Boot提供了两种方式:
- Spring Mock MVC:在不需要启动web应用服务器的情况下,最大限度地模拟servlet容器,实现对controller测试
- Web集成测试:在内嵌servlet容器(Tomcat或jetty)中启动应用进行测试
前者因为不需要启动web server,不需要启动浏览器,所以速度更快,但测试不够完整。而后者更接近真实环境,但是缺点也是明显的。
Mocking Spring MVC
从Spring 3.2开始,Spring Framework就可以使用mocking Spring MVC来测试web应用。
它模拟HTTP请求,访问Controller。
可以使用MockMvcBuilders启动Mock MVC。MockMvcBuilders提供了以下两个静态方法:
- standaloneSetup():构建一个Mock MVC服务一个或多个手动创建和手动配置的controller
- webAppContextSetup():使用Spring应用的context来构建一个Mock MVC
这两个方法最大不同是,前者需要手动地实例化controller,并手动注入测试环境中。它只适合对单个controller集中测试的场景。
后者依靠Spring加载controllers以及它的依赖。
@RunWith(SpringJUnit4ClassRunner.class)
@SpringApplicationConfiguration(
classes = ReadingListApplication.class)
@WebAppConfiguration
public class MockMvcWebTests {
    @Autowired
    private WebApplicationContext webContext;
    private MockMvc mockMvc;

    @Before
    public void setupMockMvc() {
        mockMvc = MockMvcBuilders.webAppContextSetup(webContext).build();
    }

    @Test
    public void homePage() throws Exception {
        mockMvc.perform(MockMvcRequestBuilders.get("/readingList"))
            .andExpect(MockMvcResultMatchers.status().isOk())
            .andExpect(MockMvcResultMatchers.view().name("readingList"))
            .andExpect(MockMvcResultMatchers.model().attributeExists("books"))
            .andExpect(MockMvcResultMatchers.model().attribute("books", Matchers.is(Matchers.empty())));
    }

    @Test
    public void postBook() throws Exception {
        mockMvc.perform(MockMvcRequestBuilders.post("/readingList")
            .contentType(MediaType.APPLICATION_FORM_URLENCODED)
            .param("title", "BOOK TITLE")
            .param("author", "BOOK AUTHOR")
            .param("isbn", "1234567890")
            .param("description", "DESCRIPTION"))
            .andExpect(status().is3xxRedirection())
            .andExpect(header().string("Location", "/readingList"));

        Book expectedBook = new Book();
        expectedBook.setId(1L);
        expectedBook.setReader("craig");
        expectedBook.setTitle("BOOK TITLE");
        expectedBook.setAuthor("BOOK AUTHOR");
        expectedBook.setIsbn("1234567890");
        expectedBook.setDescription("DESCRIPTION");

        mockMvc.perform(MockMvcRequestBuilders.get("/readingList"))
            .andExpect(MockMvcResultMatchers.status().isOk())
            .andExpect(MockMvcResultMatchers.view().name("readingList"))
            .andExpect(MockMvcResultMatchers.model().attributeExists("books"))
            .andExpect(MockMvcResultMatchers.model().attribute("books", hasSize(1)))
            .andExpect(MockMvcResultMatchers.model().attribute("books", contains(samePropertyValuesAs(expectedBook))));
    }
}
Web安全测试
对Spring Security安全测试需要添加额外的jar包:spring-security-test
# build.gradle
testCompile("org.springframework.security:spring-security-test")
<!-- pom.xml -->
<dependency>
<groupId>org.springframework.security</groupId>
<artifactId>spring-security-test</artifactId>
<scope>test</scope>
</dependency>在创建MockMvc实例之前,指定使用Spring Security。
@Before
public void setupMockMvc() {
    mockMvc = MockMvcBuilders
        .webAppContextSetup(webContext)
        .apply(SecurityMockMvcConfigurers.springSecurity())
        .build();
}
Spring Security提供了两个注解用于执行授权的请求
- @WithMockUser:给定username、password、roles组成的UserDetails来加载security context
- @WithUserDetails:通过给定的username查找UserDetails对象来加载security context
@Test
//@WithMockUser(username="craig",password="password",roles="READER")
@WithUserDetails("craig")
public void homePage_authenticatedUser() throws Exception {
    Reader expectedReader = new Reader();
        expectedReader.setUsername("craig");
        expectedReader.setPassword("password");
        expectedReader.setFullname("Craig Walls");
    mockMvc.perform(get("/"))
        .andExpect(status().isOk())
        .andExpect(view().name("readingList"))
        .andExpect(model().attribute("reader", samePropertyValuesAs(expectedReader)))
        .andExpect(model().attribute("books", hasSize(0)))
}
集成测试
集成测试环境中,Spring Boot不仅要为测试创建应用context,还要启动一个内嵌的servlet container。
在应用运行在内嵌容器中,就可以发送一个真实的HTTP请求来评估结果。
示例:使用@WebIntegrationTest在内嵌容器中启动应用,并使用RestTemplate来发送HTTP请求,请求一个不存在的网页返回HTTP 404错误。
@RunWith(SpringJUnit4ClassRunner.class)
@SpringApplicationConfiguration(classes=ReadingListApplication.class)
@WebIntegrationTest
public class SimpleWebTest {
    @Test(expected=HttpClientErrorException.class)
    public void pageNotFound() {
        try {
            RestTemplate rest = new RestTemplate();
            rest.getForObject("http://localhost:8080/bogusPage", String.class);
            fail("Should result in HTTP 404");
        } catch (HttpClientErrorException e) {
            assertEquals(HttpStatus.NOT_FOUND, e.getStatusCode());
            throw e;
        }
    }
}
执行测试时,默认会在8080端口启动Tomcat(如果classpath下存在Jetty或Undertow,将启动这些容器)。
端口设定
server默认监听端口是8080,对于一个机器上的单个测试没有问题,但是如果被会导致测试失败。
可在@WebIntegrationTest中指定随机端口来解决:
@WebIntegrationTest(value={"server.port=0"})
// 或简写如下
@WebIntegrationTest("server.port=0")
//或指定属性
@WebIntegrationTest(randomPort=true)
指定server启动时使用随机端口,如何使用呢?
// 注入到成员变量中
@Value("${local.server.port}")
private int port;

// 使用成员变量
rest.getForObject("http://localhost:{port}/bogusPage", String.class, port);
使用Selenium测试HTMl网页
添加Selenium依赖
# build.gradle
testCompile("org.seleniumhq.selenium:selenium-java:2.45.0")
<!-- pom.xml -->
<dependency>
<groupId>org.seleniumhq.selenium</groupId>
<artifactId>selenium-java</artifactId>
<version>2.45.0</version>
<scope>test</scope>
</dependency>测试代码如下:
@RunWith(SpringJUnit4ClassRunner.class)
@SpringApplicationConfiguration(
classes=ReadingListApplication.class)
@WebIntegrationTest(randomPort=true)
public class ServerWebTests {
    @Value("${local.server.port}")
    private int port;

    private static FirefoxDriver browser;

    @BeforeClass
    public static void openBrowser() {
        // 使用Firefox驱动,也可以使用IE、Chrome等驱动,在应用启动时自动打开相应的浏览器。
        browser = new FirefoxDriver();
        browser.manage().timeouts().implicitlyWait(10, TimeUnit.SECONDS);
    }

    @AfterClass
    public static void closeBrowser() {
        browser.quit();
    }

    @Test
    public void addBookToEmptyList() {
        String baseUrl = "http://localhost:" + port;
        browser.get(baseUrl);
        assertEquals("You have no books in your book list", browser.findElementByTagName("div").getText());
        browser.findElementByName("title").sendKeys("BOOK TITLE");
        browser.findElementByName("author").sendKeys("BOOK AUTHOR");
        browser.findElementByName("isbn").sendKeys("1234567890");
        browser.findElementByName("description").sendKeys("DESCRIPTION");
        browser.findElementByTagName("form").submit();
        WebElement dl = browser.findElementByCssSelector("dt.bookHeadline");
        assertEquals("BOOK TITLE by BOOK AUTHOR (ISBN: 1234567890)",
        dl.getText());
        WebElement dt = browser.findElementByCssSelector("dd.bookDescription");
        assertEquals("DESCRIPTION", dt.getText());
    }
}
Actuator
Actuator在Spring Boot应用程序中提供各种endpoints,用于查看应用程序的内部信息,以及用于生产环境的监控和计量指标。
Actuator以REST endpoints、远程shell、JMX(Java Manager Extension)等三种方式提供这些特性。
这三种方式中,REST endpoints提供最完整的信息。
endpoints
能够查看的Actuator Endpoints信息如下:
| HTTP method | Path | Description |
|---|---|---|
| GET | /autoconfig | 提供自动化配置报告,描述自动化配置哪些条件通过哪些失败 |
| GET | /configprops | 显示beans注入了哪些配置属性(包括默认值) |
| GET | /beans | 显示应用程序context的所有beans以及它们之间的依赖关系 |
| GET | /dump | 查看线程活动快照 |
| GET | /env | 查看所有环境变量属性 |
| GET | /env/{name} | 查看指定名称的环境变量 |
| GET | /health | 查看关于应用程序的各类健康指标(由HealthIndicator的实现类提供的) |
| GET | /info | 查看关于应用程序以info为前缀的自定义信息 |
| GET | /mappings | 显示URI与controller对应关系,包括Actuator endpoints |
| GET | /metrics | 显示关于应用程序的多种统计信息,像内存使用、http请求统计等 |
| GET | /metrics/{name} | 根据名称显示某项统计信息 |
| POST | /shutdown | 在endpoints.shutdown.enabled设置true的情况下,访问些endpoints会立即关闭应用程序 |
| GET | /trace | 提供HTTP请求的基本追踪信息(像timestamp、headers等) |
所有这些endpoints可被分成三类:
- 配置类endpoints
- 计量类endpoints(metrics endpoints)
- 混杂类endpoints
查看方式
浏览器访问REST
Spring Boot应用中添加Actuator相关jar包
<!-- pom.xml -->
<dependency>
    <groupId>org.springframework.boot</groupId>
    <artifactId>spring-boot-starter-actuator</artifactId>
</dependency>
# build.gradle
compile 'org.springframework.boot:spring-boot-starter-actuator'例如应用程序启动时,访问路径:http://localhost:8080/readinglist,你可以访问beans信息如下:
http://localhost:8080/beans
远程shell访问Actuator
Spring Boot集成了CRaSH,内嵌于应用中,扩展了一些命令用于访问endpoints。
Spring Boot应用中添加Actuator相关jar包
<!-- pom.xml -->
<dependency>
    <groupId>org.springframework.boot</groupId>
    <artifactId>spring-boot-starter-remote-shell</artifactId>
</dependency>
# build.gradle
compile("org.springframework.boot:spring-boot-starter-remote-shell")然后运行应用程序,在(控制台)日志中可以看到用于远程SSH登陆密码,默认用户名user:
Using default security password: efe30c70-5bf0-43b1-9d50-c7a02dda7d79使用SSH工具,连接到应用的2000端口,用上面提供的密码登陆
ssh user@localhost -p 2000远程ssh能够访问命令如下:
| 命令 | 描述 |
|---|---|
| autoconfig | 以纯文件显示自动化配置的信息,类似于/autoconfig enpoint |
| beans | 类似于/beans endpoint |
| endpoint | 触发Actuator的endpoint,使用endpint list查看可执行的endpoint |
| metrics | 与/metrics endpoint类似 |
使用endpoint可以用endpint list查看可执行的endpoint,然后执行endpoint invoke health(例如执行health)
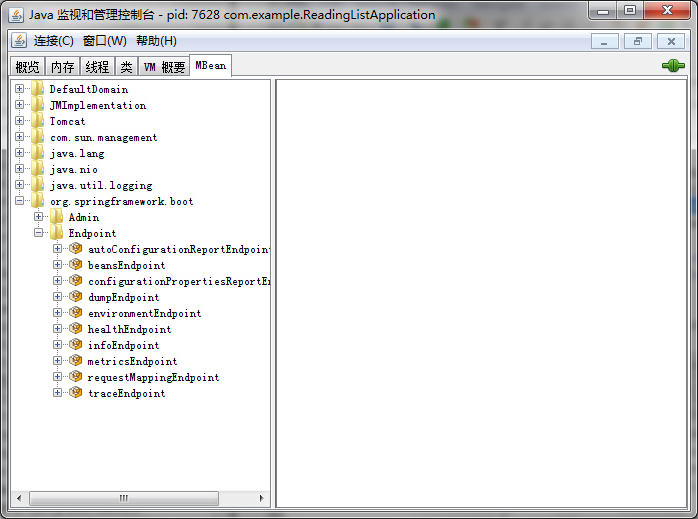
使用JMX监控应用程序
Java的JMX工具利用对MBeans管理实现对Java应用的监控。而Actuator将所有的endpoints作为MBeans,可在JMX工具中查看。
安装JDK时,可以找到Jconsole.exe程序(程序路径\JDK-Root\bin\JConsole.exe),将JConsoole.exe用作JMX管理工具。
查看MBeanstab页org.springframework.boot下面的内容。
定制Actuator
可以定制Actuator的哪些内容?
- 重命名endpoints
- 启用或禁用endpints
- 自定义metrics和gauges
- 为trace data创建自在定义的存储方式
- 添加自定义的健康指标(health indicators)
重命名endpoints
在配置属性中指定属性(无论用properties文件还是YAML文件)。
例如,将shutdown endpoint更名为kill,修改如下:
endpoints.shutdown.id=kill启用与禁用endpoints
示例:
1. 禁用metrics: endpoints.metrics.enable=false
2. 禁用所有endpoints,而只开启metrics:
endpoints.enable=false
endpoints.metrics.enable=true
添加自定义metrics和gauges
Actuator提供了CounterService和GaugeService两个接口及其实现,会在应用程序中自动注入,用于简单地记数和测值。
这两个接口内容如下
package org.springframework.boot.actuate.metrics;
public interface CounterService {
    void increment(String metricName);
    void decrement(String metricName);
    void reset(String metricName);
}
package org.springframework.boot.actuate.metrics;
public interface GaugeService {
void submit(String metricName, double value);
}在Controller中应用示例如下:
@Controller
@RequestMapping("/")
@ConfigurationProperties("amazon")
public class ReadingListController {
    ...
    private CounterService counterService;

    @Autowired
    public ReadingListController(
            ReadingListRepository readingListRepository,
            AmazonProperties amazonProperties,
            // 自动注入actuator提供的实现
            CounterService counterService,
            GaugeService gaugeService) {
        this.readingListRepository = readingListRepository;
        this.amazonProperties = amazonProperties;
        this.counterService = counterService;
        this.gaugeService = gaugeService;
    }
    ...
    @RequestMapping(method=RequestMethod.POST)
    public String addToReadingList(Reader reader, Book book) {
        book.setReader(reader);
        readingListRepository.save(book);
        counterService.increment("books.saved");
        gaugeService.submit("books.last.saved", System.currentTimeMillis());
        return "redirect:/";
    }
}Actuator也提供了PublicMetrics接口,用于复杂数据计量,接口内容如下:
package org.springframework.boot.actuate.endpoint;
public interface PublicMetrics {
    Collection<Metric<?>> metrics();
}
示例:
package readinglist;
import java.util.ArrayList;
import java.util.Collection;
import java.util.List;
import org.springframework.beans.factory.annotation.Autowired;
import org.springframework.boot.actuate.endpoint.PublicMetrics;
import org.springframework.boot.actuate.metrics.Metric;
import org.springframework.context.ApplicationContext;
import org.springframework.stereotype.Component;
import org.springframework.stereotype.Controller;
@Component
public class ApplicationContextMetrics implements PublicMetrics {
    private ApplicationContext context;

    @Autowired
    public ApplicationContextMetrics(ApplicationContext context) {
        this.context = context;
    }

    @Override
    public Collection<Metric<?>> metrics() {
        List<Metric<?>> metrics = new ArrayList<Metric<?>>();
        metrics.add(new Metric<Long>("spring.context.startup-date", context.getStartupDate()));
        metrics.add(new Metric<Integer>("spring.beans.definitions", context.getBeanDefinitionCount()));
        metrics.add(new Metric<Integer>("spring.beans", context.getBeanNamesForType(Object.class).length));
        metrics.add(new Metric<Integer>("spring.controllers", context.getBeanNamesForAnnotation(Controller.class).length));
        return metrics;
    }
}
创建自定义trace存储
trace endpoint默认是由内存存储的,且存储个数限制在100个以内。仅适用于开发环境,在生产环境就会因内存存储限制而丢失。
1.修改限制数
@Configuration
public class ActuatorConfig {
    @Bean
    public InMemoryTraceRepository traceRepository() {
        InMemoryTraceRepository traceRepo = new InMemoryTraceRepository();
        traceRepo.setCapacity(1000);
        return traceRepo;
    }
}2.修改存储方式:实现TraceRepository接口(例如使用mongoDB存储)
@Service
public class MongoTraceRepository implements TraceRepository {
    private MongoOperations mongoOps;
    @Autowired
    public MongoTraceRepository(MongoOperations mongoOps) {
        this.mongoOps = mongoOps;
    }
    @Override
    public List<Trace> findAll() {
        return mongoOps.findAll(Trace.class);
    }
    @Override
    public void add(Map<String, Object> traceInfo) {
        mongoOps.save(new Trace(new Date(), traceInfo));
    }
}添加健康指标:实现HealthIndicator接口
示例如下:
@Component
public class AmazonHealth implements HealthIndicator {
    @Override
    public Health health() {
        try {
            RestTemplate rest = new RestTemplate();
            rest.getForObject("http://www.amazon.com", String.class);
            return Health.up().build();
        } catch (Exception e) {
            return Health.down().withDetail("reason", e.getMessage()).build();
        }
    }
}查看到AmazonHealth健康指标如下:
{
    "amazonHealth": {
        "reson": "I/O error on GET request for ...",
        "status": "DOWN"
    }
}
保护Actuator安全
1.限制只有管理员权限才可访问某些endpoint(如shutdown), 并在内存中指定管理员
@Override
protected void configure(HttpSecurity http) throws Exception {
    http.authorizeRequests()
        .antMatchers("/").access("hasRole('READER')")
        //.antMatchers("/shutdown", "/metrics", "/configprops").access("hasRole('ADMIN')")
        .antMatchers("/shutdown").access("hasRole('ADMIN')")
        .antMatchers("/**").permitAll()
    .and()
        .formLogin()
        .loginPage("/login")
        .failureUrl("/login?error=true");
}

@Override
protected void configure(AuthenticationManagerBuilder auth) throws Exception {
    auth.userDetailsService(new UserDetailsService() {
            @Override
            public UserDetails loadUserByUsername(String username) throws UsernameNotFoundException {
                UserDetails user = readerRepository.findOne(username);
                if (user != null) {
                    return user;
                }
                throw new UsernameNotFoundException("User '" + username + "' not found.");
            }
        })
    .and()
        .inMemoryAuthentication()
        .withUser("admin").password("s3cr3t")
        .roles("ADMIN", "READER");
}
2.修改endpoint的context路径
默认路径是根路径’/’,不带项目名的。此路径可以修改,示例如下:
management.context-path=/mgmt然后设置访问权限
.antMatchers("/mgmt/**").access("hasRole('ADMIN')")部署
* Spring-Boot应用程序运行方式 *
- 1、在IDE中运行(IDE包括Spring ToolSuite或IntelliJ IDEA), Run As -> Spring Boot App
- 2、在Maven或Gradle的命令中运行
- Maven: spring-boot:run
- Gradle: bootRun
- 3、使用Maven或Gradle生成jar包,通过jar命令运行
- 4、在命令行中使用Spring Boot CLI运行Groovy脚本
- 5、使用Spring Boot CLI(将Groovy脚本)生成一个可在命令行中运行的jar文件
将Spring Boot项目生成war包
不考虑Groovy脚本,使用maven或gradle将应用程序打包成war包或jar包更适合。
如果打包为jar包内嵌java web容器(Tomcat或Jetty,默认Tomcat),可直接使用jar命令运行。
如果打包为war包,直接部署到已经存在的web容器中(Tomcat或Jetty),但是Spring Boot项目是自动化配置没有web.xml,需要作额外处理才能打包war使用(见下文)。
在使用maven或gradle工具生成的war包前需要如下几步:
1.配置SpringBootServletInitializer,用于代替web.xml
ReadingListServletInitializer.java
package readinglist;
import org.springframework.boot.builder.SpringApplicationBuilder;
import org.springframework.boot.context.web.SpringBootServletInitializer;

public class ReadingListServletInitializer extends SpringBootServletInitializer {
    @Override
    protected SpringApplicationBuilder configure(SpringApplicationBuilder builder) {
        return builder.sources(Application.class);
    }
}2.配置打包类型为war,并运行打包指令
—- Maven —-
# pom.xml
<packaging>war</packaging>
运行maven命令
mvn package—- gradle —-
apply plugin: 'war'
war {
    baseName = 'readinglist'
    version = '0.0.1-SNAPSHOT'
}
运行gradle命令
gradle build3.运行
直接将war放置于web容器指定目录,即可运行。
例如在Tomcat启动时,将war包放置于<tomcat-root>/webapps目录下,Tomcat会检测到war包,并立即自动解压运行。
注意:上述打war包过程中,未移除Application的main函数,因此war实际上还可作为jar包直接运行(它在内嵌的tomcat或jetty中运行)。
例如,在命令行中运行
java -jar readinglist-0.0.1-SNAPSHOT.war各种运行环境中运行
运行环境,一般分为开发环境、测试环境、生产环境等。
在不同的运行环境中,运行端口、数据库配置、日志配置、缓存配置等可能不一样。
如果不想在每个运行环境中都配置一次,可以提前配置好这些运行环境所需的配置,然后在运行时指定运行环境即可。
前面在介绍Spring Boot自动化配置中讲到profile,就是用来定义多种运行环境配置用的。
定义各运行环境的配置
- 使用
@Profile注解 - 使用properties文件:使用application.properties定义共享配置,
application-{env}.properties定义各个环境的差异配置 - 使用YAML文件:在一个yaml文件中用’—-‘分隔多个运行环境下的配置
* 指定运行环境 *
- 使用注解
@ActiveProfile - 在properties或yaml文件中指定
spring.profile.active=prod配置 - 定义环境变化:spring_profile_active=prod
- 运行jar的命令行参数:
jave -jar readinglist.jar -Dspring.profiles.active=prod
或
java -jar myapp.jar --spring.profiles.active=dev
示例:代码中使用
    @Profile('dev')
    @ActiveProfile('dev')
示例:在程序配置API指定spring.profiles.active
@Configuration
@EnableAutoConfiguration
@ComponentScan
public class ProfileApplication {
    public static void main(String[] args) throws Exception {
        new SpringApplicationBuilder(ProfileApplication.class)
            .profiles("dev")
            .run(args);
    }
}
示例:配置文件
application.properties文件中属性值
    spring.profiles.active=dev
多个配置文件
    application.properties (默认配置或公共配置)
    application-dev.properties
    application-prod.properties
集成maven和Spring boot的profile功能
原文地址:http://blog.csdn.net/lihe2008125/article/details/50443491
原理:
(1)maven命令行接受profile参数 -P
mvn clean package -Dmaven.test.skip=true -P dev -e(2)maven配置文件pom.xml的build元素配置
<profiles>
    <profile>
        <id>dev</id>
        <properties>
            <!-- 自定义属性profileActive -->
            <profileActive>dev</profileActive>
        </properties>
        <activation>
            <!-- 当前是默认profile -->
            <activeByDefault>true</activeByDefault>
        </activation>
    </profile>
    <profile>
        <id>test</id>
        <properties>
            <profileActive>test</profileActive>
        </properties>
    </profile>
</profiles>
<!-- 在子项目中引用自定义属性来指定不同的配置 -->
<build>
    <resources>
        <resource>
            <filtering>true</filtering>
            <directory>src/main/resources</directory>
            <excludes>
                <exclude>application-dev.properties</exclude>
                <exclude>application-test.properties</exclude>
                <exclude>application-prod.properties</exclude>
            </excludes>
        </resource>
        <resource>
            <!-- 处理文件时需要对文件进行变量替换 -->
            <filtering>true</filtering>
            <directory>src/main/resources</directory>
            <includes>
                <!-- 此处会动态替换${profileActive} -->
                <include>application-${profileActive}.properties</include>
                <include>application.properties</include>
            </includes>
        </resource>
    </resources>
</build>
(3)在配置文件中使用@符号引用来自maven配置的属性变量
spring.profile.active=@profileActive@
env.info=@profileActive@
Spring配置多种数据源
* 定义数据源 *
    # 主数据源,默认的
    spring.datasource.driver-class-name=com.mysql.jdbc.Driver
    spring.datasource.url=jdbc:mysql://localhost:3306/test
    spring.datasource.username=root
    spring.datasource.password=123456

    # 更多数据源
    custom.datasource.names=ds1,ds2
    custom.datasource.ds1.driver-class-name=com.mysql.jdbc.Driver
    custom.datasource.ds1.url=jdbc:mysql://localhost:3306/test1
    custom.datasource.ds1.username=root
    custom.datasource.ds1.password=123456

    custom.datasource.ds2.driver-class-name=com.mysql.jdbc.Driver
    custom.datasource.ds2.url=jdbc:mysql://localhost:3306/test2
    custom.datasource.ds2.username=root
    custom.datasource.ds2.password=123456
使用:在需要DataSource的地方使用注解
@Autowired
@Qualifier("ds1")
private DataSource dataSource1;

@Resource(name = "ds2")
private DataSource dataSource2;
数据库迁移
使用Hibernate
Hibernate提供了hibernate.hbm2ddl.auto选项,可选择none, create, create-drop,update三种策略用于数据库结构的创建与变更。
在Spring Boot环境中可为Hibernate配置spring.jpa.hibernate.ddl-auto属性。
这种由Hibernate提供的数据结构迁移方案,不太合适在生产环境中使用。其中create-drop相当危险,会导致已有数据全部删除。
定义schema.sql文件
(待完成)
使用数据库迁移库
- Flyway (http://flywaydb.org)
- Liquibase (www.liquibase.org)
Flyway使用简单,使用sql脚本定义数据库结构,因此不能兼容多个数据库
Liquibase使用自己的语法定义数据库结构,较繁琐,支持的文件结构包括xml、yaml、json、sql等。
Flyway
使用Flyway前,先禁用hibernate的dll-auto功能:spring.jpa.hibernate.ddl-auto=none
然后添加flyway依赖(以maven为例),Spring boot自动化配置会检测到它的存在,并启动它。
<dependency>
    <groupId>org.flywayfb</groupId>
    <artifactId>flyway-core</artifactId>
</dependency>再创建flyway的数据库迁移脚本(多个文件),将它放在classpath的/db/migration目录下(src/main/resource/db/migration)
Flyway的脚本命名规则,示例:V1_initialize.sql
字母V后的数字,表示版本号,每次执行都会记录每个文件的执行状态,下次执行就不会重复执行了。
第一次执行版本是v1,后面数据库结构有变化时,新建sql文件命名以v2,v3,…为前缀。
liquebase
添加依赖
<dependency>
    <groupId>org.liquibase</groupId>
    <artifactId>liquibase-core</artifactId>
</dependency>
Spring Boo自动化配置时检测到它的依赖时,会自动启用它。
默认查找在classpath根路径下找/db/changelog/db.changelog-master.yaml文件。


 231
231


 被折叠的 条评论
为什么被折叠?
被折叠的 条评论
为什么被折叠?
 到【灌水乐园】发言


