


0. 环境配置
要使用cython首先得有的她的环境 [ 废话,^_^ ],系统上有pip包管理环境的话直接:pip install cython 即可安装cython或者也可以源码安装:
https://github.com/cython/cython/wiki/Installing
1. 相关介绍:
- Cython 编译器把 Cython 代码(格式为XX.pyx)编译成 C/C++ 代码,然后把生成的C/C++代码编译成动态链接库(Linux上的XX.so动态库文件,Windows上对应的是XX.pyd文件),这个动态链接库可以被Python解释器直接加载使用,从而调用Cython相关模块,引用下官方文档的话:
Cython code must, unlike Python, be compiled. This happens in two stages: - A .pyx file is compiled by Cython to a .c file, containing the code of a Python extension module
- The .c file is compiled by a C compiler to a .so file (or .pyd on Windows) which can be import-ed directly into a Python session.
There are several ways to build Cython code: - Write a distutils setup.py. This is the normal and recommended way.
- Use pyximport, importing Cython .pyx files as if they were .py files (using distutils to compile and build in the background).
- Run the cython command-line utility manually to produce the .c file from the .pyx file, then manually compiling the .c file into a shared object library or DLL suitable for import from Python. (These manual steps are mostly for debugging and experimentation.)
- Use the [Jupyter] notebook or the [Sage] notebook, both of which allow Cython code inline.
2. cython使用示例:
一些基本概念:- Cython 程序的扩展名是 .pyx
- cimport 是 Cython 中用来引入 .pxd 文件的命令
- Cython 的函数使用 cdef 定义,并且他可以给所有参数以及返回值指定类型。
一个简单的Python计算方法,python_evaluate.py:
import math

def my_evaluate(a ,b):
    x = math.pi/180.0
    c = math.sin(a*x) + math.cos(b*x)
    r = math.sin(c*a) + math.cos(c*b)
    return r
python_evaluate.py对应的cython文件python_evaluate.pyx:
cimport cython

python_evaluate.pyx
cdef extern from "math.h":
    float cosf(float theta)
    float sinf(float theta)

cdef float _my_evaluate(float a,float b):
    cdef float pi = 3.14159265
    cdef float x = pi/180.0

    cdef float c = sinf(a*x) + cosf(b*x)
    cdef float r = sinf(c*a) + cosf(c*b)
    return r

def my_evaluate(float a,float b):
    cdef float x = _my_evaluate(a, b)
    return x
注意这里使用cdef extern 的方式使用从指定头文件声明函数(在此就是使用C标准库的math.h,而非Python库中math)。
Cython 程序需要先编译之后才能被 Python 调用,具体步骤是:
- Cython 编译器把 Cython 代码(格式为XX.pyx,这个文件可以调用Python或C\C++相关函数)编译成 C/C++ 代码;
- 把生成的代码编译成动态链接库(Linux XX.so or Windows XX.pyd )
- Python 解释器载入动态链接库
要完成前两步,linux和Windows上有点不太一样分别说明下吧[其实就是生成的最终文件不一样 ^_^]:
1. Linux
linux和Windows 都可以用下面的setup.py生成动态库供Python调用:
# setup.py
#python setup.py build_ext --inplace
from distutils.core import setup, Extension
from Cython.Build import cythonize
import numpy

setup(ext_modules = cythonize(Extension(
    'cython_evaluate',
    sources=['cython_evaluate.pyx'],
    language='c',
    include_dirs=[numpy.get_include()],
    library_dirs=[],
    libraries=[],
    extra_compile_args=[],
    extra_link_args=[]
)))
解释下相关参数:
- ‘cython_evaluate’ 是我们要生成的动态链接库的名字
- sources 里面可以包含 .pyx 文件,以及后面如果我们要调用 C/C++ 程序的话,还可以往里面加 .c / .cpp 文件
- language 其实默认就是 c,如果要用 C++,改成 c++
- include_dirs 这个就是传给 gcc 的 -I 参数(numpy.get_include()其实这个只是示例,本程序不需要)
- library_dirs 这个就是传给 gcc 的 -L 参数
- libraries 这个就是传给 gcc 的 -l 参数
- extra_compile_args 就是传给 gcc 的额外的编译参数,比方说你可以传一个 -std=c++11
- extra_link_args 就是传给 gcc 的额外的链接参数(也就是生成动态链接库的时候用的)
执行下面命令就可以把 Cython 程序编译成动态链接库:
python setup.py build_ext –inplace
当运行成功后,可以看到在当前目录多出来了 cython_evaluate.c (是cython根据cython_evaluate.pyx生成的 C 程序)和 cython_evaluate.so(一个动态链接库),还有一个build目录。
调用time_cmp.py 对Python和cython的计算时间进行对比。
import timeit

a, b = 30, 60
num = 8000000000

t_python = timeit.Timer("python_evaluate.my_evaluate(%f,%f)" % (a,b),"import python_evaluate")
t_cython = timeit.Timer("cython_evaluate.my_evaluate(%f,%f)" % (a,b),"import cython_evaluate")
print "python function", t_python.timeit(10000), "sec"
print "cython function", t_cython.timeit(10000), "sec"
运行结果:
python time_cmp.py
python function 0.0105509757996 sec
cython function 0.00193190574646 sec
可见,虽然这个Python模块计算模块比较简单,但是用cython重写下性能提升还是有的~~~
为了解释setup.py的原理,写了个用gcc分步骤编译的脚本build.sh:
#!/bin/bash

# This shell is used to explain how cython setup.py works.
#

if [ $# -ne 1 ];then
    echo "parameters error!!"
    echo "usage: $0 XXX { The name of XXX.pyx, exclude .pyx}"
    echo "e.g.:sh build.sh cython_evaluate"
    exit 1
fi

name=$1

python_inc=`ls /usr/include/ | grep python`

echo "python headers:$python_inc"

#  Will create a ${name}.c file
cython ${name}.pyx

# Compile the object file
gcc -c -fPIC -I/usr/include/${python_inc}/ ${name}.c

# Link it into a shared library
gcc -shared ${name}.o -o ${name}.so
这个脚本其是就是官方文档中所提到的第三种方法,“There are several ways to build Cython code:”
Run the cython command-line utility manually to produce the .c file from the .pyx file, then manually compiling the .c file into a shared object library or DLL suitable for import from Python. (These manual steps are mostly for debugging and experimentation.)
运行脚本:
sh build.sh cython_evaluate
同样也能生成供Python调用的动态链接库cython_evaluate.so。
2. Windows
其实Windows下和Linux下的基本差不多,cmd,运行如下命令:
d:\Python27\python setup.py build_ext –inplace
d:\Python27\python 这个是我的Windows上python可执行程序的绝对地址。最终生成俩文件:cython_evaluate.c,cython_evaluate.pyd,这个cython_evaluate.pyd文件和Linux上的XX.so文件相当,Python 解释器载入会载入这个文件从而找到我们的函数实现。
3. 写出高效的cython
Cython 中类型声明非常重要,但是我们不加类型标注它依然是一个合法的 Cython 程序(这样的又变成Python动态类型的问题,很多编译期间就能确定下来的事情被推到了运行时,性能会打折扣), Cython 提供了一个很好的工具,可以方便地检查 Cython 程序中哪里可能可以进一步优化。下面命令既可以对 XX.pyx 进行分析:
cython -a cython_evaluate.pyx
如果当前 Cython 程序用到了 C++,则需要加上 –cplus 参数。在成功运行完 cython -a 之后,会产生同名的 .html 文件,如下图:
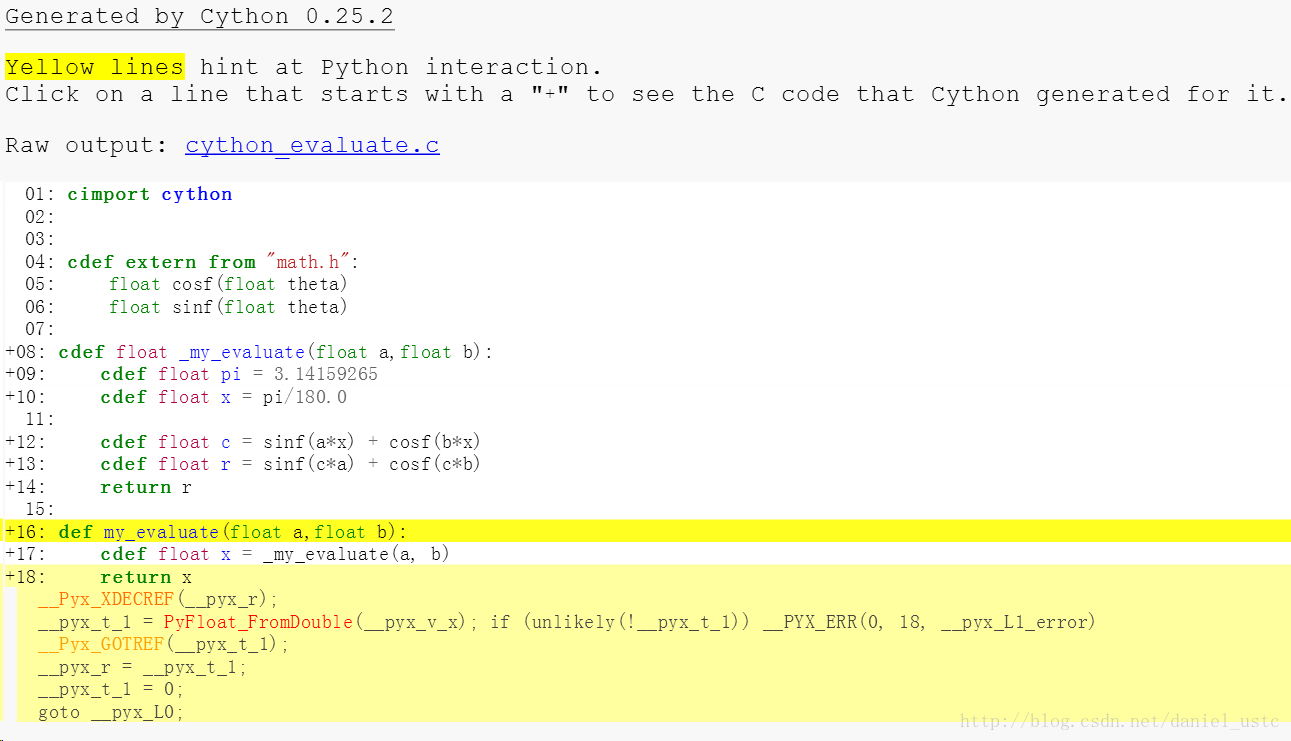
网页最上面与说明,黄色部分标识了和 Python 发生交互的地方,点击每一行可以查看相应的生成的 C/C++ 代码。本Bolg相关代码见:github。
参考
- https://github.com/cython
- https://github.com/cython/cython/wiki/Installing
- http://docs.cython.org/en/latest/src/quickstart/build.html
- https://zhuanlan.zhihu.com/p/24311879?utm_medium=social&utm_source=wechat_session&from=singlemessage&isappinstalled=1
- https://stackoverflow.com/questions/125367/dynamic-type-languages-versus-static-type-languages


 130
130

 被折叠的 条评论
为什么被折叠?
被折叠的 条评论
为什么被折叠?
 到【灌水乐园】发言


