


前言
Bitmap代表一个位图,通过BitmapDrawable的构造方法可以把Bitmap对象包装成BitmapDrawable。
如果需要获取 BitmapDrawable 所包装的 Bitmap 对象,则可以用 BitmapDrawable 的 getBitmap() 的方法
参考博客: https://blog.csdn.net/wanliguodu/article/details/84973846
Bitmap创建
通过其静态方法createBitmap创建,一共有13种,分三类
1.根据已有的Bitmap来创建新Bitmap
通过矩阵的方式,返回原始 Bitmap 中的一个不可变子集。新 Bitmap 可能返回的就是原始的 Bitmap,也可能还是复制出来的。新 Bitmap 与原始 Bitmap 具有相同的密度(density)和颜色空间;
/**
* @param source   原始 Bitmap
* @param x        在原始 Bitmap 中 x方向的其起始坐标(你可能只需要原始 Bitmap x方向上的一部分)
* @param y        在原始 Bitmap 中 y方向的其起始坐标(你可能只需要原始 Bitmap y方向上的一部分)
* @param width    需要返回 Bitmap 的宽度(px)(如果超过原始Bitmap宽度会报错)
* @param height   需要返回 Bitmap 的高度(px)(如果超过原始Bitmap高度会报错)
* @param m        Matrix类型,表示需要做的变换操作
* @param filter   是否需要过滤,只有 matrix 变换不只有平移操作才有效
*/
public static Bitmap createBitmap(@NonNull Bitmap source, int x, int y, int width, int height,
            @Nullable Matrix m, boolean filter)
2.通过像素点数组创建空的Bitmap
返回具有指定宽度和高度的不可变位图,每个像素值设置为colors数组中的对应值。其初始密度由给定的确定DisplayMetrics。新创建的位图位于sRGB 颜色空间中。
/**
     * @param display  显示将显示此位图的显示的度量标准
     * @param colors   用于初始化像素的sRGB数组
     * @param offset   颜色数组中第一个颜色之前要跳过的值的数量
     * @param stride   行之间数组中的颜色数(必须>= width或<= -width)
     * @param width    位图的宽度
     * @param height   位图的高度
     * @param config   要创建的位图配置。如果配置不支持每像素alpha(例如RGB_565),
     * 那么colors []中的alpha字节将被忽略(假设为FF)
     */
    public static Bitmap createBitmap(@NonNull DisplayMetrics display,
            @NonNull @ColorInt int[] colors, int offset, int stride,
            int width, int height, @NonNull Config config)
3.创建缩放的Bitmap
对Bitmap进行缩放,缩放成宽 dstWidth、高 dstHeight 的新Bitmap
public static Bitmap createScaledBitmap(@NonNull Bitmap src, int dstWidth, int dstHeight,boolean filter)
BitmapFactory
表示从各种源文件中创建Bitmap对象,包括文件、流和字节数组等
BitmapFactory创建Bitmap的方法
- decodeByteArray(byte[] data, int offset, int length, Options opts):从指定字节数组的 offset 位置开始,将长度 length 的字节数据解析成 Bitmap 对象。
- decodeFile(String pathName, Options opts):从 pathName 指定的文件中解析、创建 Bitmap 对象。
- decodeFileDescriptor(FileDescriptor fd, Rect outPadding, Options opts):用于从 FileDescriptor 对应的文件中解析、创建 Bitmap 对象。
- decodeResource(Resources res, int id, Options opts):用于给定的资源 ID 从指定资源中解析、创建 Bitmap 对象。
- .decodeStream(InputStream is, Rect outPadding, Options opts):用于从指定输入流中解析、创建 Bitmap 对象。
注意:decodeResource 在解析时会对 Bitmap 根据当前设备屏幕密度 densityDpi 的值进行缩放适配操作,使得解析出来的 Bitmap 与当前设备分辨率匹配,并且一般来说,这时 Bitmap 的大小将比原始的 Bitmap 大。
decodeFile、decodeStream 在解析时不会对 Bitmap 进行一系列的屏幕适配,解析出来的将是原始大小的图。
BitmapFactory.Options的属性
- 1.inJustDecodeBounds:只想知道bitmap的尺寸但又不想将其加载进内存则使用这个属性,为true,在解码的时候不返回bitmap对象,只返回bitmap尺寸
- outWidth和outHeight:表示这个 Bitmap 的宽和高,一般和 inJustDecodeBounds 一起使用来获得 Bitmap的宽高,但是不加载到内存。
- inSampleSize:压缩图片时采样率的值,如果这个值大于1,那么就会按照比例(1 / inSampleSize)来缩小 Bitmap 的宽和高。如果这个值为 2,那么 Bitmap 的宽为原来的1/2,高为原来的1/2,那么这个 Bitmap是所占内存像素值会缩小为原来的 1/4
- inDensity:表示这个 Bitmap 的像素密度
- inTargetDensity:表示要被新 Bitmap 的目标像素密度,对应的是 DisplayMetrics 中的 densityDpi
- inScreenDensity:表示实际设备的像素密度,对应的是 DisplayMetrics 中的 densityDpi
- inPreferredConfig:这个值是设置色彩模式,默认值是 ARGB_8888,这个模式下,一个像素点占用 4Byte 。RGB_565 占用 2Byte,ARGB_4444 占用 4Byte(已废弃)
- inPremultiplied:这个值和透明度通道有关,默认值是 true,如果设置为 true,则返回的 Bitmap 的颜色通道上会预先附加上透明度通道。
- inDither:这个值和抖动解码有关,默认值为 false,表示不采用抖动解码
- inScaled:设置这个Bitmap 是否可以被缩放,默认值是 true,表示可以被缩放。
- inPreferQualityOverSpeed:这个值表示是否在解码时图片有更高的品质,仅用于 JPEG 格式。如果设置为 true,则图片会有更高的品质,但是会解码速度会很慢。
- inBitmap:这个参数用来实现 Bitmap 内存的复用,但复用存在一些限制,具体体现在:在 Android 4.4 之前只能重用相同大小的 Bitmap 的内存,而 Android 4.4 及以后版本则只要后来的 Bitmap 比之前的小即可。使用inBitmap 参数前,每创建一个 Bitmap 对象都会分配一块内存供其使用,而使用了 inBitmap 参数后,多个 Bitmap可以复用一块内存,这样可以提高性能。
计算Bitmap的大小
一行图片所占的内存计算公式:
图片的占用内存 = 图片的长度(像素单位) * 图片的宽度(像素单位) * 单位像素所占字节数
Bitmap的缩放
质量压缩
不改变图片的像素点,即只减少图片存储在本地的大小,不改变Bitamap占用内存的大小
/**
     * 质量压缩方法,并不能减小加载到内存时所占用内存的空间,应该是减小的所占用磁盘的空间
     * @param image
     * @param compressFormat
     * @return
     */
    public static Bitmap compressbyQuality(Bitmap image, Bitmap.CompressFormat compressFormat) {

        ByteArrayOutputStream baos = new ByteArrayOutputStream();
        image.compress(compressFormat, 100, baos);//质量压缩方法,这里100表示不压缩,把压缩后的数据存放到baos中
        int quality = 100;

        while ( baos.toByteArray().length / 1024 > 100) { //循环判断如果压缩后图片是否大于100kb,大于继续压缩
            baos.reset();//重置baos即清空baos
            if(quality > 10){
                quality -= 20;//每次都减少20
            }else {
                break;
            }
            image.compress(Bitmap.CompressFormat.JPEG, quality, baos);//这里压缩options%,把压缩后的数据存放到baos中

        }
        ByteArrayInputStream isBm = new ByteArrayInputStream(baos.toByteArray());//把压缩后的数据baos存放到ByteArrayInputStream中

        BitmapFactory.Options options = new BitmapFactory.Options();
        options.inPreferredConfig = Bitmap.Config.RGB_565;
        Bitmap bmp = BitmapFactory.decodeStream(isBm, null, options);//把ByteArrayInputStream数据生成图片

        return bmp;
    }
采样压缩
主要用在图片资源本身较大,或者适当地采样并不会影响视觉效果的条件下,这时候我们输出的目标可能相对的较小,对图片的大小和分辨率都减小。减少Bitmap占用内存大小,但是图的尺寸也小
BitmapFactory.Options options = new Options();
options.inSampleSize = 2;
Bitmap bitmap = BitmapFactory.decodeResource(getResources(), resId, options);
使用矩阵
/**
     * 矩阵缩放图片
     * @param sourceBitmap
     * @param width 要缩放到的宽度
     * @param height 要缩放到的长度
     * @return
     */
    private Bitmap getScaleBitmap(Bitmap sourceBitmap,float width,float height){
        Bitmap scaleBitmap;
        //定义矩阵对象
        Matrix matrix = new Matrix();
        float scale_x = width/sourceBitmap.getWidth();
        float scale_y = height/sourceBitmap.getHeight();
        matrix.postScale(scale_x,scale_y);

        try {
            scaleBitmap = Bitmap.createBitmap(sourceBitmap,0,0,sourceBitmap.getWidth(),sourceBitmap.getHeight(),matrix,true);
        }catch (OutOfMemoryError e){
            scaleBitmap = null;
            System.gc();
        }
        return scaleBitmap;
    }
综合优化
获取采样的流程:
1.将 BitmapFactory.Options 的 inJustDecodeBounds 参数设置为 true 并加装图片。
2.从 BitmapFactory.Options 中取出图片的原始宽和高,它们对应于 outWidth 和 outHeight 参数。
3.根据采样率的规则并结合目标 View 的所需要大小计算出采样率 inSampleSize 。
4.将 BitmapFactory.Options 的 inJustDecodeBounds 参数设为 false ,然后重新加装图片。
/**
     * 采样率压缩,这个和矩阵来实现缩放有点类似,但是有一个原则是“大图小用用采样,小图大用用矩阵”。
     * 也可以先用采样来压缩图片,这样内存小了,可是图的尺寸也小。如果要是用 Canvas 来绘制这张图时,再用矩阵放大
     * @param image
     * @param compressFormat
     * @param requestWidth 要求的宽度
     * @param requestHeight 要求的长度
     * @return
     */
    public static Bitmap compressbySample(Bitmap image, Bitmap.CompressFormat compressFormat, int requestWidth, int requestHeight){
        ByteArrayOutputStream baos = new ByteArrayOutputStream();
        image.compress(compressFormat, 100, baos);//质量压缩方法,这里100表示不压缩,把压缩后的数据存放到baos中
        ByteArrayInputStream isBm = new ByteArrayInputStream(baos.toByteArray());//把压缩后的数据baos存放到ByteArrayInputStream中

        BitmapFactory.Options options = new BitmapFactory.Options();
        options.inPreferredConfig = Bitmap.Config.RGB_565;
        options.inPurgeable = true;
        options.inJustDecodeBounds = true;//只读取图片的头信息,不去解析真实的位图
        BitmapFactory.decodeStream(isBm,null,options);
        options.inSampleSize = calculateInSampleSize(options,requestWidth,requestHeight);
        //-------------inBitmap------------------
        options.inMutable = true;
        try{
            Bitmap inBitmap = Bitmap.createBitmap(options.outWidth, options.outHeight, Bitmap.Config.RGB_565);
            if (inBitmap != null && canUseForInBitmap(inBitmap, options)) {
                options.inBitmap = inBitmap;
            }
        }catch (OutOfMemoryError e){
            options.inBitmap = null;
            System.gc();
        }

        //---------------------------------------

        options.inJustDecodeBounds = false;//真正的解析位图
        isBm.reset();
        Bitmap compressBitmap;
        try{
            compressBitmap =  BitmapFactory.decodeStream(isBm, null, options);//把ByteArrayInputStream数据生成图片
        }catch (OutOfMemoryError e){
            compressBitmap = null;
            System.gc();
        }

        return compressBitmap;
    }

    /**
     * 采样压缩比例
     * @param options
     * @param reqWidth 要求的宽度
     * @param reqHeight 要求的长度
     * @return
     */
    private static int calculateInSampleSize(BitmapFactory.Options options, int reqWidth, int reqHeight) {

        int originalWidth = options.outWidth;
        int originalHeight = options.outHeight;

        int inSampleSize = 1;

        if (originalHeight > reqHeight || originalWidth > reqHeight){
            // 计算出实际宽高和目标宽高的比率
            final int heightRatio = Math.round((float) originalHeight / (float) reqHeight);
            final int widthRatio = Math.round((float) originalWidth / (float) reqWidth);
            // 选择宽和高中最小的比率作为inSampleSize的值,这样可以保证最终图片的宽和高
            // 一定都会大于等于目标的宽和高。
            inSampleSize = heightRatio < widthRatio ? heightRatio : widthRatio;

        }
        return inSampleSize;
    }
Bitmap的像素格式
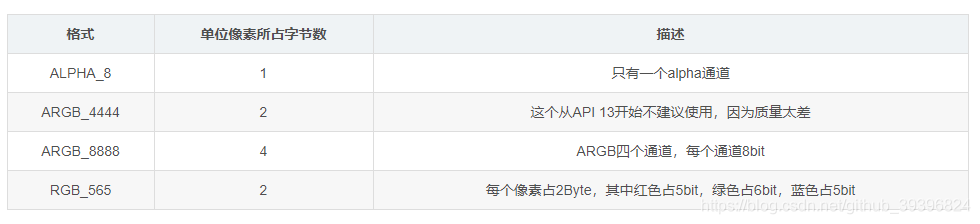
获取Bitmap的几种方式总结
(1) public Bitmap (int width,int height,int stride, PixelFormat format,IntPtr scan0)
用指定的大小、像素格式和像素数据初始化 Bitmap 类的新实例。
(2) LockBits():,就是把图像的内存区域根据格式锁定,拿到那块内存的首地址。这样就可以直接改写这段内存了。这个方法的设计是挺好,可惜都是C++作为源泉来的,.NET Framework里面根本就不推荐用指针,需要用Marshal.Copy把内容Copy到一个byte数组里面,然后处理完了再Copy回去。
(3) UnlockBits():从系统内存解锁此 Bitmap。
从获取方式分
(1)以文件流的方式
//假设在sdcard下有 test.png图片
FileInputStream fis = new FileInputStream("/sdcard/test.png");
Bitmap bitmap=BitmapFactory.decodeStream(fis);
(2)以R文件的方式
//假设 res/drawable下有 test.jpg文件
Bitmap bitmap =BitmapFactory.decodeResource(getResources(), R.drawable.test);
//或者
BitmapDrawable bitmapDrawable = (BitmapDrawable) getResources().getDrawable(R.drawable.test);
Bitmap bitmap = bitmapDrawable.getBitmap();
(3)以ResourceStream的方式,不用R文件
Bitmap bitmap=BitmapFactory.decodeStream(getClass().getResourceAsStream(“/res/drawable/test.png”));
(4)以文件流+R文件的方式
InputStream in = getResources().openRawResource(R.drawable.test);
Bitmap bitmap = BitmapFactory.decodeStream(in);
//或
InputStream in = getResources().openRawResource(R.drawable.test);
BitmapDrawable bitmapDrawable = new BitmapDrawable(in);
Bitmap bitmap = bitmapDrawable.getBitmap();
注意:openRawResource可以打开drawable, sound, 和raw资源,但不能是string和color。
从资源存放路径分
(1)图片放在sdcard中
Bitmap imageBitmap = BitmapFactory.decodeFile(path);// (path 是图片的路径,跟目录是/sdcard)
(2)图片在项目的res文件夹下面
ApplicationInfo appInfo = getApplicationInfo();
//得到该图片的id(name 是该图片的名字,"drawable" 是该图片存放的目录,appInfo.packageName是应用程序的包)
int resID = getResources().getIdentifier(fileName, "drawable", appInfo.packageName);
Bitmap imageBitmap2 = BitmapFactory.decodeResource(getResources(), resID);
(3)图片放在src目录下
String path = "com/xiangmu/test.png"; //图片存放的路径
InputStream in = getClassLoader().getResourceAsStream(path); //得到图片流
Bitmap imageBitmap3 = BitmapFactory.decodeStream(in);
(4)图片放在Assets目录
InputStream in = getResources().getAssets().open(fileName);
Bitmap imageBitmap4 = BitmapFactory.decodeStream(in);
总结
获取Bitmap的方法有很多,但是在实际开发中一定要注意图片的内存大小,即使获得了Bitmap也需要对它进行压缩等操作,防止出现内存过大导致系统crash。
注意:是的没错我是把上面这个https://blog.csdn.net/wanliguodu/article/details/84973846博客拿来粘贴复制了一些,虽然加了一点自己的话,但是基本都是复制的,菜鸟一枚,不要见怪。。。


 9805
9805


 被折叠的 条评论
为什么被折叠?
被折叠的 条评论
为什么被折叠?
 到【灌水乐园】发言


