


转载请标明出处:
http://blog.csdn.net/gj782128729/article/details/52374012;
本文出自:【高境的博客】
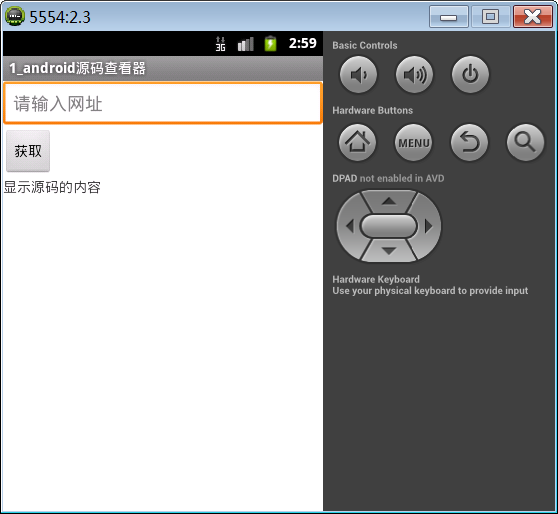
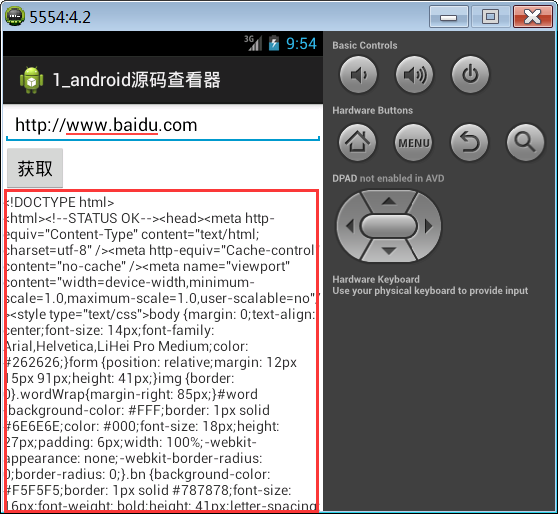
1. 网页源码查看器
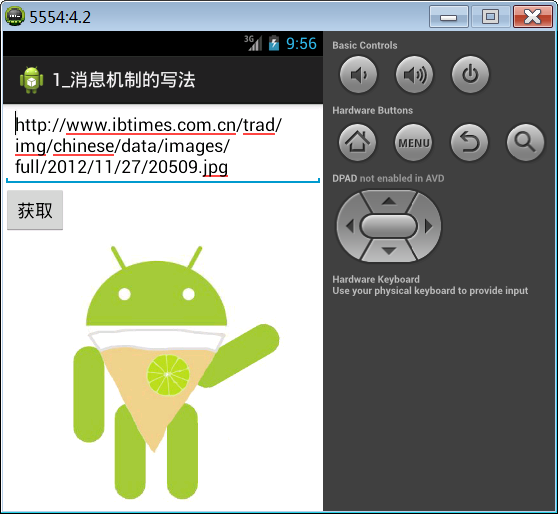
网页源码查看器案例实现在EditText中输入网址,点击按钮获取,获取到网页源码,显示在TextView上。
在IE浏览器中,快捷键Shift+F12可以调出httpwatch。用来查看发送请求的一些信息。
案例效果图:
使用api:HttpURLConnection ,用于发送或接收数据。
由于是网络请求,所以需要加入联网权限:
<uses-permission android:name="android.permission.INTERNET"/>源码查看器实现逻辑:
new Thread() {
    public void run() {
        try {
            //获取EditText中输入的网址路径
            String path = et_path.getText().toString().trim();
            //创建URL对象,参数传入我们需要访问的网址路径
            URL url = new URL(path);
            //通过URL的openConnection()方法获取一个HttpURLConnection对象,用来发送和接收网络数据;
            HttpURLConnection conn = (HttpURLConnection) url.openConnection();
            //设置发送的请求方式,GET要大写,固定写法
            conn.setRequestMethod("GET");
            //设置请求超时时间为5000ms就是5s
            conn.setConnectTimeout(5000);
            //获取服务器返回的状态码,200代表请求资源成功(206代表请求部分资源成功)
            int code = conn.getResponseCode();
            if (code == 200) {
                //调用HttpURLConnection的getInputStream()方法获取服务器返回的流对象
                InputStream in = conn.getInputStream();
                //StreamTools中的readStream方法,把InputStream转换成一个String
                String content = StreamTools.readStream(in);
                tv_reuslt.setText(content);
            }
        } catch (Exception e) {
            e.printStackTrace();
        }
    };
}.start();
StreamTools工具类,实现将输入流转换成String:
public static String readStream(InputStream in) throws Exception {
    ByteArrayOutputStream baos = new ByteArrayOutputStream();
    int len = -1;
    byte[] buffer = new byte[1024]; // 1kb
    while ((len = in.read(buffer)) != -1) {
        baos.write(buffer, 0, len);
    }
    in.close();
    String content = new String(baos.toByteArray());
    return content;
}
运行效果:
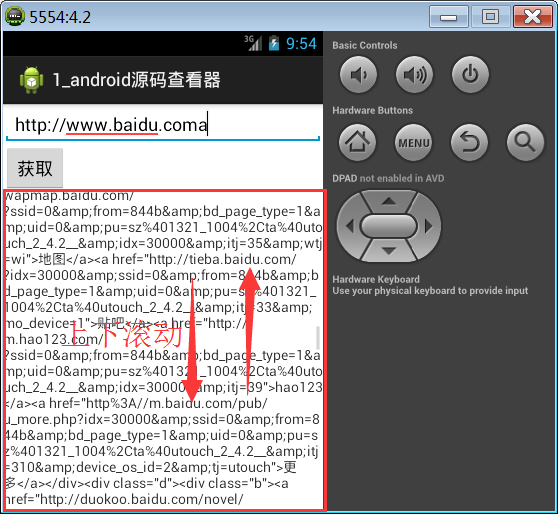
2. ScrollView控件
ScrollView控件能够滚动,只能包裹一个子布局。注意:ScrollView控件中只能有一个根布局。
3. ANR异常
(1) ANR 即Application Not Response,表示应用无响应,这里指的是主线程(UI线程)无响应;
(2) 如果在主线程中进行了耗时的操作(比如连接网络,拷贝大数据,调用Thread.sleep()方法)就会发生ANR异常;
(3) 避免ANR,可以把耗时操作放到子线程。
(4) 在4.0之后谷歌强制要求连接网络不能在主线程中进行访问。如果在主线程中连接网络会发生如下错误,错误日志如下:
09-26 01:49:03.818: W/System.err(1638):android.os.NetworkOnMainThreadException(5) 只有在主线程(UI线程)才可以更新UI,在子线程更新UI会发生以下错误,错误日志如下:
09-26 01:51:50.050: W/System.err(1708):android.view.ViewRootImpl$CalledFromWrongThreadException: Only the original thread that created a view hierarchy can touch its views.(6) 消息机制可以用来处理这种更新UI的情况。
4. Handler消息机制的使用
(1) 在主线程定义一个Handler
private Handler handler = new Handle();(2) 重写handler里面的handlemessage方法
public void handleMessage(android.os.Message msg) {}(3) 用我们在主线程创建的handler 去子线程发消息
handler.sendMessage(msg);(4) 当sendMessage(mgs)方法执行后,handlemessage方法就会执行,在这个方法里面更新UI
首先在主线程中创建Handler对象实例:
//创建Handler对象
private Handler handler = new Handler() {
    public void handleMessage(android.os.Message msg) {
        //msg.what是用户自定义的消息码
        switch (msg.what) {
        case REQUESTSUCESS:
            //msg.obj是message携带的数据
            String content = (String) msg.obj;
            tv_reuslt.setText(content);
            break;
        case REQUESTNOTFOUND:
            Toast.makeText(getApplicationContext(), "请求资源不存在",0).show();
            break;
        case REQUESTEXCEPTION:
            Toast.makeText(getApplicationContext(), "服务器忙 请稍后....",1).show();
            break;
        default:
            break;
        }
    };
};
在子线程中调用sendMessage方法:
new Thread(){
    @Override
    public void run() {
        //创建消息对象
        Message msg = new Message();
        //设置自定义的消息码
        msg.what = REQUESTSUCESS;
        //将数据添加到消息对象中
        msg.obj = content;
        //发送消息,调用该方法后,会调用Handler的handleMessage方法
        handler.sendMessage(msg);
    }
};
5. Handler的原理
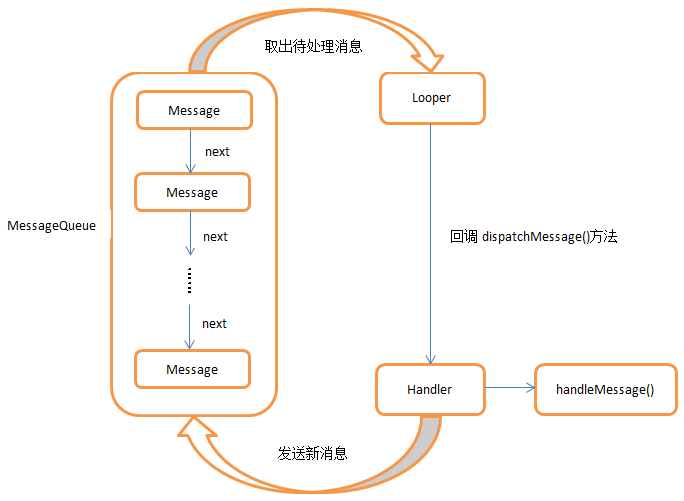
1.Message
Message是在线程之间传递的消息,它可以在内部携带少量的信息what字段,用于在不同线程之间交换数据。除此之外还可以使用arg1和arg2字段来携带一些整型数据,使用obj字段携带一个Object对象。
2.Handler
Handler顾名思义也就是处理者的意思,它主要是用于发送和处理消息的。发送消息一般是使用Handler的sendMessage()方法,而发出的消息经过一系列地辗转处理后,最终会传递到Handler的handleMessage()方法中。
3.MessageQueue
MessageQueue是消息队列的意思,它主要用于存放所有通过Handler发送的消息。这部分消息会一直存在于消息队列中,等待被处理。每个线程中只会有一个MessageQueue对象。
4.Looper
Looper是每个线程中的MessageQueue的管家,调用Looper的loop()方法后,就会进入到一个无限循环当中,然后每当发现MessageQueue中存在一条消息,就会将它取出,并传递到Handler的handleMessage()方法中。每个线程中也只会有一个Looper对象。
规则: 不管你什么版本的手机 只要做耗时的操作(比如连接网络 比如拷贝大的数据 等等) 就自己开一个子线程,获取数据后想要更新ui 就使用Handler就可以了。
6. 图片查看器
本案例实现在EditText中输入图片地址,点击获取,通过网络请求获取到图片数据,将图片数据转换成Bitmap对象,最终在下方的ImageView中显示。
图片查看器开发步骤:
(1)网络请求获取服务器资源;
(2)把流信息转换成bitmap对象;
(2)BitmapFactory.decodeStream(inputStream in)换成Bitmap对象
(3)记得加上网络访问权限
(4)对图片进行缓存
定义Handler处理更新UI:
private Handler hander = new Hander(){
    public void handlerMessage(Message msg){
       Bitmapbitmap = (Bitmap)msg.obj;
       iv_img.setImageBitmap(bitmap);
    }
};
获取网络图片:
public void click(View v) {
    new Thread() {
        public void run() {
            String path = et_path.getText().toString().trim();
            try {
                URL url = new URL(path);
                HttpURLConnection conn = (HttpURLConnection)url.openConnection();
                conn.setRequestMethod("GET");
                conn.setConnectTimeout(5000);
                int code = conn.getResponseCode();
                if (code == 200) {
                    InputStream inputStream = conn.getInputStream();
                    //利用BitmapFactory.decodeStream()方法将流转换成Bitmap对象
                    final Bitmap bitmap = BitmapFactory.decodeStream(inputStream);
                    //Message.obtain();该方法返回一个消息对象,如果有消息就复用消息池里的消息,如果没有消息就创建一个新的消息
                       Message msg = Message.obtain();
                       //msg.obg可以携带参数
                       msg.obj = bitmap;
                       handler.sendMessage(msg);
                }
            } catch (Exception e) {
                e.printStackTrace();
            }
        };
    }.start();
}
7. cache和files目录
cache和files目录会生成在应用程序包名目录下,如下图:

生成cache目录:
public void click1(View v) {
    try {
        File file = new File(getCacheDir(), "info.txt");
        FileOutputStream fos = new FileOutputStream(file);
        fos.write("hhehe".getBytes());
        fos.close();
    } catch (Exception e) {
        e.printStackTrace();
    }
}
成一个files目录:
public void click2(View v) {
    try {
        FileOutputStream fos = openFileOutput("info.txt", 0);
        fos.write("haha".getBytes());
        fos.close();
    } catch (Exception e) {
        e.printStackTrace();
    }
}
应用管理界面,清除缓存cache会被清除,files文件夹不会删除,如果清除数据,都会被清除。
一般做缓存数据,我们用cache目录,但是如果是重要的数据可以放到files目录。
8. runOnUiThread()使用
runOnUiThread(),顾名思义就是运行在UI线程,也就是主线程。
new Thread() {
    public void run() {
        try {
            // Thread.sleep(100);
              tv.setText("哈哈 我更新了ui");
        } catch (InterruptedException e) {
            e.printStackTrace();
        }
    };
}.start();
以上代码在子线程中直接更新UI,运行时并不会报错,但是如果将第4行代码注释打开继续运行,程序会运行报错。原因是,并不是在子线程当中不能更新UI,而是Android系统底层有一个审计机制,当阻塞达到一定时间,就不能更新UI。
(1) 如果仅仅就是更新UI,那么我们可以用runOnUiThread(),当中的代码都会在主线程中执行。
(2) 当我们需要传递参数的时候,这时候就需要使用handler来实现
runOnUiThread(new Runnable() {
    public void run() {
        iv.setImageBitmap(cacheBitmap);
    }
});
9. Handler常用的api
postDelayed();应用场景:手机应用打开Splash页面,过3秒跳转到主页面。
new Handler().postDelayed(new Runnable() {
    @Override
    public void run() {
        tv.setText("哈哈哈哈哈 ");
    }
}, 5000);
类似于定时器Timer类:
private Timer timer;
private TimerTask task;
//创建timer实例
timer = new Timer();
//创建任务实例,run方法是在子线程运行
task = new TimerTask() {
    @Override
    public void run() {
        runOnUiThread(new Runnable() {
                public void run() {
                tv.setText("呵呵呵呵 ");
            }
        });
    }
};
//调用timer.schedule()执行任务,参数1是任务对象,参数2是过多长时间开始执行任务,参数3是间隔多长时间执行一次任务
timer.schedule(task, 3000,1000);
取消任务:
timer.cancel();
task.cancel();
10. 新闻客户端案例
本案例,实现网易新闻客户端页面ListView展示复杂子条目。

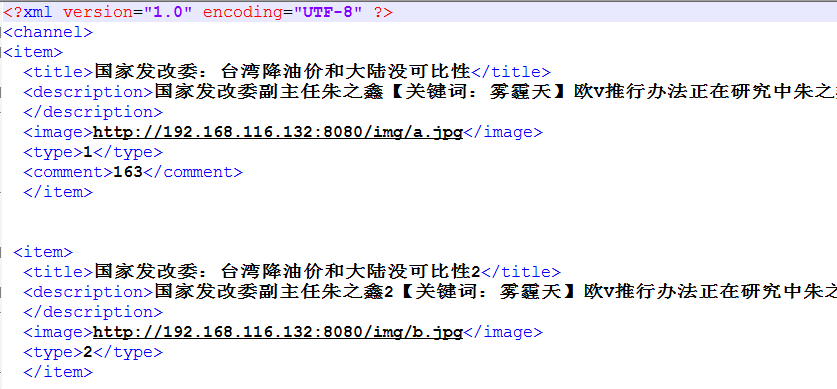
10.1. 服务器准备
在服务器tomcat目录下有一个news.xml文件,文件内容就是服务器返回来的新闻数据,如下图:
注意点:
(1) 启动tomcat服务器一闪而过,需要配置JAVA_HOME
(2) 图片访问地址必须是电脑的ip地址,不能是localhost,因为手机访问localhost是访问手机本机的地址,而不是访问电脑服务器的地址。
10.2. 创建界面
界面只有一个ListView用来展示新闻条目:
<RelativeLayout xmlns:android="http://schemas.android.com/apk/res/android"
    xmlns:tools="http://schemas.android.com/tools"
    android:layout_width="match_parent"
    android:layout_height="match_parent"
    tools:context=".MainActivity" >

    <ListView
        android:id="@+id/lv"
        android:layout_width="match_parent"
        android:layout_height="match_parent" />

</RelativeLayout>
子条目布局:
<?xml version="1.0" encoding="utf-8"?>
<RelativeLayout xmlns:android="http://schemas.android.com/apk/res/android"
    android:layout_width="match_parent"
    android:layout_height="80dp" >

    <com.loopj.android.image.SmartImageView
        android:id="@+id/iv_icon"
        android:layout_width="70dp"
        android:layout_height="70dp"
        android:src="@drawable/ic_launcher" />

    <TextView
        android:id="@+id/tv_title"
        android:layout_width="match_parent"
        android:layout_height="wrap_content"
        android:layout_marginTop="3dp"
        android:layout_toRightOf="@id/iv_icon"
        android:ellipsize="end"
        android:singleLine="true"
        android:text="新闻标题"
        android:textColor="#000000"
        android:textSize="22sp" />

  <TextView
        android:id="@+id/tv_content"
        android:layout_width="match_parent"
        android:layout_height="wrap_content"
        android:layout_below="@id/tv_title"
        android:layout_marginTop="3dp"
        android:layout_toRightOf="@id/iv_icon"
        android:ellipsize="end"
        android:maxLines="2"
        android:text="新闻的描述"
        android:textColor="#9e9e9e"
        android:textSize="18sp" />

 <TextView
        android:id="@+id/tv_type"
        android:layout_width="wrap_content"
        android:layout_height="wrap_content"
        android:layout_alignBottom="@id/iv_icon"
        android:layout_alignParentRight="true"
        android:layout_marginRight="3dp"
        android:text="跟帖"
        android:textColor="#ff0000"
        android:textSize="16sp" />

</RelativeLayout>
10.3. 准备ListView显示的数据
从服务器获取,将获取到的数据封装到javabean,存入集合中。
首先定义新闻实体类News:
public class News {
    private String title;
    private String description;
    private String image;
    private String type;
    private String comment;
    public String getTitle() {
        return title;
    }
    public void setTitle(String title) {
        this.title = title;
    }
    public String getDescription() {
        return description;
    }
    public void setDescription(String description) {
        this.description = description;
    }
    public String getImage() {
        return image;
    }
    public void setImage(String image) {
        this.image = image;
    }
    public String getType() {
        return type;
    }
    public void setType(String type) {
        this.type = type;
    }
    public String getComment() {
        return comment;
    }
    public void setComment(String comment) {
        this.comment = comment;
    }
}
从服务器获取数据:
private void initListData() {
    new Thread() {
        public void run() {
            try {
                String path = "http://192.168.11.86:8080/news.xml";
                URL url = new URL(path);
                HttpURLConnection conn = (HttpURLConnection) url
                        .openConnection();
                conn.setRequestMethod("GET");
                conn.setConnectTimeout(5000);
                int code = conn.getResponseCode();
                if (code == 200) {
                    InputStream in = conn.getInputStream();
                    //XmlParserUtils.parseXml()方法是用来解析服务器获取到的数据
                    newsLists = XmlParserUtils.parserXml(in);
                    System.out.println("newsLists:"+newsLists.size());
                    runOnUiThread(new  Runnable() {
                        public void run() {
                            //lv.setAdapter()方法需要在主线程中执行,不然会报错
                            lv.setAdapter(new MyAdapter());
                        }
                    });
                }
            } catch (Exception e) {
                e.printStackTrace();
            }
        };
    }.start();
}
下面解析从服务器获取的数据:
public static List<News> parserXml(InputStream in) throws Exception {
    List<News> newsLists = null;
    News news = null;
    XmlPullParser parser = Xml.newPullParser();
    parser.setInput(in, "utf-8");
    int type = parser.getEventType();
    while (type != XmlPullParser.END_DOCUMENT) {
        switch (type) {
        case XmlPullParser.START_TAG:
            if ("channel".equals(parser.getName())) {
                newsLists = new ArrayList<News>();
            } else if ("item".equals(parser.getName())) {
                news = new News();
            } else if ("title".equals(parser.getName())) {
                news.setTitle(parser.nextText());
            } else if ("description".equals(parser.getName())) {
                news.setDescription(parser.nextText());
            } else if ("image".equals(parser.getName())) {
                news.setImage(parser.nextText());
            } else if ("type".equals(parser.getName())) {
                news.setType(parser.nextText());
            } else if ("comment".equals(parser.getName())) {
                news.setComment(parser.nextText());
            }
            break;
        case XmlPullParser.END_TAG:
            if ("item".equals(parser.getName())) {
                newsLists.add(news);
            }
            break;
        }
        type = parser.next();
    }
    return newsLists;
}
10.4. 提供ListView数据适配器
创建ListView数据适配器,该类继承BaseAdapter。
private class MyAdapter extends BaseAdapter {
    @Override
    public int getCount() {
        return newsLists.size();
    }
    @Override
    public Object getItem(int position) {
        return null;
    }
    @Override
    public long getItemId(int position) {
        return 0;
    }
    @Override
    public View getView(int position, View convertView, ViewGroup parent) {
        View view;
        if (convertView == null) {
            view = View.inflate(getApplicationContext(), R.layout.item, null);
        } else {
            view = convertView;
        }
        SmartImageView iv_icon = (SmartImageView)
                                              view.findViewById(R.id.iv_icon);
        TextView tv_title = (TextView) view.findViewById(R.id.tv_title);
        TextView tv_desc = (TextView) view.findViewById(R.id.tv_desc);
        TextView tv_type = (TextView) view.findViewById(R.id.tv_type);
        String imageUrl = newsLists.get(position).getImage();
        iv_icon.setImageUrl(imageUrl, R.drawable.bg);
        tv_title.setText(newsLists.get(position).getTitle());
        tv_desc.setText(newsLists.get(position).getDescription());
        String typee = newsLists.get(position).getType();
        String comment = newsLists.get(position).getComment();
        int type = Integer.parseInt(typee);
        switch (type) {
        case 1:
            tv_type.setText(comment + "国内");
            break;
        case 2:
            tv_type.setText("跟帖");
            break;
        case 3:
            tv_type.setText("国外");
            break;
        default:
            break;
        }
        return view;
    }
}
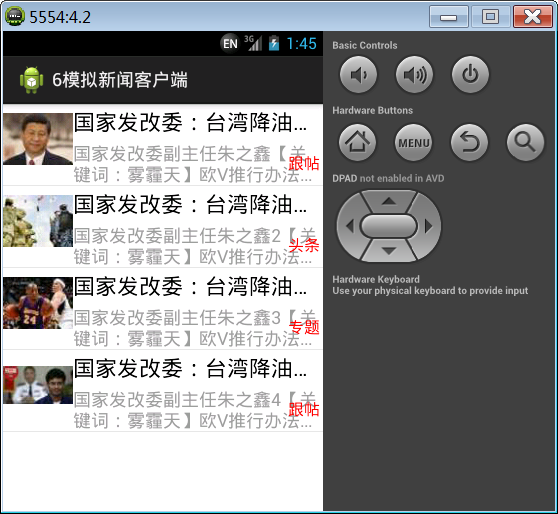
运行效果:
11. SmartImageView的使用
(1) 把com包,源码包拷贝到当前工程;
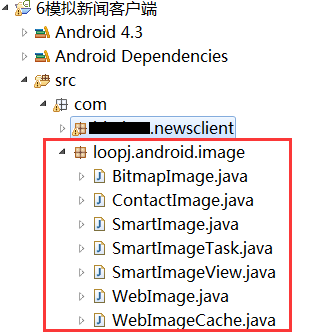
(2) 在布局里面定义,使用类的完整包名+类名。
<com.loopj.android.image.SmartImageView
     android:id="@+id/iv_icon"
     android:layout_width="70dp"
     android:layout_height="70dp"
     android:src="@drawable/ic_launcher" />
12. SmartImageView的原理
我们自己写一个类似SmartImageView的控件来实现快速加载图片,该类需要继承ImageView,原理就是在子线程当中获取图片数据转换成bitmap,利用handler显示数据。
public class MySmartImageView extends ImageView {
private Handler handler = new Handler() {
    public void handleMessage(android.os.Message msg) {
            switch (msg.what) {
            case 1:
                Bitmap bitmap = (Bitmap) msg.obj;
                MySmartImageView.this.setImageBitmap(bitmap);
                break;
            case 2:
                int resource =  (Integer) msg.obj;
                MySmartImageView.this.setBackgroundResource(resource);
                break;
            case 3:
                int resource1 =  (Integer) msg.obj;
                MySmartImageView.this.setBackgroundResource(resource1);
                break;
            default:
                break;
            }
        };
    };
    public MySmartImageView(Context context, AttributeSet attrs,
     int defStyle) {
        super(context, attrs, defStyle);
    }
    public MySmartImageView(Context context, AttributeSet attrs) {
        super(context, attrs);
    }
    public MySmartImageView(Context context) {
        super(context);
    }
    public void setImageUrl(final String path) {
        new Thread() {
            public void run() {
                try {
                    URL url = new URL(path);
                    HttpURLConnection conn = (HttpURLConnection)url.openConnection();
                    conn.setRequestMethod("GET");
                    conn.setConnectTimeout(5000);
                    int code = conn.getResponseCode();
                    if (code == 200) {
                        InputStream in = conn.getInputStream();
                        Bitmap bitmap = BitmapFactory.decodeStream(in);
                        Message msg = Message.obtain();
                        msg.obj = bitmap;
                        handler.sendMessage(msg);
                    }
                } catch (Exception e) {
                    e.printStackTrace();
                }
            };
        }.start();
    }
    public void setImageUrl(final String path, final int resource) {
        new Thread() {
            public void run() {
                try {
                    URL url = new URL(path);
                    HttpURLConnection conn = (HttpURLConnection)url.openConnection();
                    conn.setRequestMethod("GET");
                    conn.setConnectTimeout(5000);
                    int code = conn.getResponseCode();
                    if (code == 200) {
                        InputStream in = conn.getInputStream();
                        Bitmap bitmap = BitmapFactory.decodeStream(in);
                        Message msg = Message.obtain();
                        msg.what = 1;
                        msg.obj = bitmap;
                        handler.sendMessage(msg);
                    } else {
                        Message msg = Message.obtain();
                        msg.what = 2;
                        msg.obj = resource;
                        handler.sendMessage(msg);
                    }
                } catch (Exception e) {
                    e.printStackTrace();
                    Message msg = Message.obtain();
                    msg.what = 3;
                    msg.obj = resource;
                    handler.sendMessage(msg);
                }
            };
        }.start();
    }
}
(a)上面的handler,用来更新界面。由于获取网络数据是在子线程当中执行的,所以我们需要通过handler来实现在主线程当中更新UI。通过message携带参数,将bitmap对象传递给ImageView进行显示
(b)setImageUrl(final String path)方法,开启一个子线程网络获取图片信息,然后将流信息转换成bitmap对象,最后通过handler传递给ImageView显示
(c)setImageUrl(final String path, final int resource)方法,该方法多了一个参数resource,用来当请求失败或者发生异常时显示的图片。
13. Get和Post登录方式
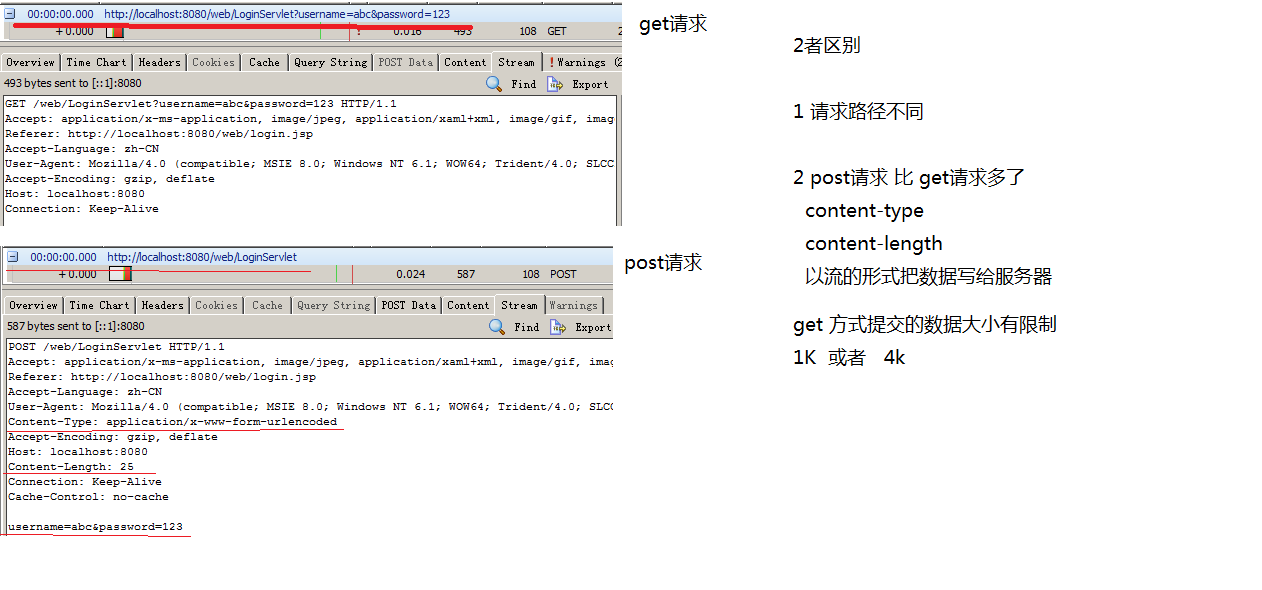
Get请求和Post请求的区别:
(1)请求路径不同;
(2)Post请求比get请求多了content-type和content-length两个请求头;
(3)Post请求是以流的形式把数据写给服务器;
(4)Get请求数据大小有限制,在IE中是1k,在其他浏览器中是4k。
Get请求登录代码:
public void click1(View v) {
        final String pwd = et_password.getText().toString().trim();
        final String name = et_username.getText().toString().trim();
        new Thread() {
            public void run() {
                try {
                    /将用户名和密码拼接成Url访问路径/
                    String path = "http://192.168.19.89:8080/web/LoginServlet?username=" + name + "&password=" + pwd ;
                    URL url = new URL(path);
                    HttpURLConnection conn = (HttpURLConnection)url.openConnection();
                    conn.setRequestMethod("GET");
                    conn.setConnectTimeout(5000);
                    int code = conn.getResponseCode();
                    if (code == 200) {
                        InputStream inputStream = conn.getInputStream();
                        String content = StreamUtils.readStream(inputStream);
                        showToast(content);

                    }
                } catch (Exception e) {
                    e.printStackTrace();
                }
            };
        }.start();
    }
public void showToast(final String content) {
    runOnUiThread(new Runnable() {
        @Override
        public void run() {
            Toast.makeText(getApplicationContext(), content, 1).show();
        }
    });
}
Post请求登录代码:
public void click2(View v) {
    final String pwd = et_password.getText().toString().trim();
    final String name = et_username.getText().toString().trim();
    new Thread() {
        public void run() {
            try {
                //拼接用户名和密码,作为参数体传递给服务器
                String path = "http://192.168.19.89:8080/web/LoginServlet";
                URL url = new URL(path);
                HttpURLConnection conn = (HttpURLConnection)url.openConnection();
                    //设置请求方式为POST
                    conn.setRequestMethod("POST");
                    conn.setConnectTimeout(5000);
                    String data = "username=" + name + "&password=" + pwd;
                    //设置Content-type头信息
                    conn.setRequestProperty("Content-Type", "application/x-www-form-urlencoded");
                    //Content-Length头信息,第二个参数是数据的字节数
                    conn.setRequestProperty("Content-Length", data.length() + "");
                    //setDoOutput(true)该方法设置一个标记,允许向服务器输出数据
                    conn.setDoOutput(true);
                    //调用getOutputStream()方法获取输出流,通过输出流向服务器写入数据
                    conn.getOutputStream().write(data.getBytes());
                    int code = conn.getResponseCode();
                    if (code == 200) {
                        InputStream inputStream = conn.getInputStream();
                        String content = StreamUtils.readStream(inputStream);
                        showToast(content);
                    }
                } catch (Exception e) {
                    e.printStackTrace();
                }
            };
        }.start();
    }


 2733
2733

 被折叠的 条评论
为什么被折叠?
被折叠的 条评论
为什么被折叠?
 到【灌水乐园】发言


