


Android USB Host使用详解之三:U盘操作实例
U盘命令传输流程参看:U盘bulk-only传输文档
Android中,在USB Host Mode下,U盘可以使用的传输数据(或命令)的函数有
bulkTransfer(UsbEndpoint endpoint, byte[] buffer,int length, int timeout)
controlTransfer(int requestType, int request, int value, int index, byte[] buffer, int length, int timeout) controlTransfer()用于传输控制命令(控制端点),包括reset和get max lnu等命令。
下面U盘操作实例进行讲解:
1)布局文件
<LinearLayout xmlns:android="http://schemas.android.com/apk/res/android"
    xmlns:tools="http://schemas.android.com/tools"
    android:layout_width="match_parent"
    android:layout_height="match_parent"
    android:paddingBottom="@dimen/activity_vertical_margin"
    android:paddingLeft="@dimen/activity_horizontal_margin"
    android:paddingRight="@dimen/activity_horizontal_margin"
    android:paddingTop="@dimen/activity_vertical_margin"
    android:orientation="vertical"
    tools:context="com.example.usbcom.MainActivity" >

    <Button
        android:id="@+id/btn_reset"
        android:layout_width="match_parent"
        android:layout_height="wrap_content"
        android:gravity="center"
        android:text="@string/reset" />
    <Button
        android:id="@+id/btn_get_max_lnu"
        android:layout_width="match_parent"
        android:layout_height="wrap_content"
        android:gravity="center"
        android:text="@string/get_max_lnu" />
    <Button
        android:id="@+id/btn_send_command"
        android:layout_width="match_parent"
        android:layout_height="wrap_content"
        android:gravity="center"
        android:text="@string/send_command" />
    <TextView
        android:id="@+id/tv_info"
        android:layout_width="match_parent"
        android:layout_height="wrap_content"
        android:text="@string/_null" />

</LinearLayout>2)AndroidManifest.xml和device_filter.xml
<?xml version="1.0" encoding="utf-8"?>
<manifest xmlns:android="http://schemas.android.com/apk/res/android"
    package="com.example.usbcom"
    android:versionCode="1"
    android:versionName="1.0" >

    <uses-sdk
        android:minSdkVersion="12"
        android:targetSdkVersion="21" />

    <uses-feature android:name="android.hardware.usb.host"/>

    <application
        android:allowBackup="true"
        android:icon="@drawable/ic_launcher"
        android:label="@string/app_name"
        android:theme="@style/AppTheme" >
        <activity
            android:name=".MainActivity"
            android:label="@string/app_name" >
            <intent-filter>
                <action android:name="android.intent.action.MAIN" />

                <category android:name="android.intent.category.LAUNCHER" />
            </intent-filter>

            <intent-filter>
                <action android:name="android.hardware.usb.action.USB_DEVICE_ATTACHED"/>
			</intent-filter>
			<meta-data android:name="android.hardware.usb.action.USB_DEVICE_ATTACHED"
			    android:resource="@xml/device_filter"/>

        </activity>
    </application>

</manifest>
<?xml version="1.0" encoding="utf-8"?>
<resources>
<usb-device vendor-id="3544" product-id="8199" />
<!--
<usb-device vendor-id="5251" product-id="4608" />
<usb-device vendor-id="3544" product-id="8199" />
-->
</resources>3)成员变量和控件初始化
<pre name="code" class="html">	private final String TAG = "++MainActivity++";

	private static final String ACTION_USB_PERMISSION =
		    "com.android.example.USB_PERMISSION";

	private Button mBtnReset;
	private Button mBtnGetMaxLnu;
	private Button mBtnSendCommand;
	private TextView mTvInfo;

	private UsbManager mUsbManager;
	private UsbDevice mUsbDevice;
	private UsbEndpoint mEndpointIn;
	private UsbEndpoint mEndpointOut;
	private UsbDeviceConnection mConnection = null;

	private final int mVendorID = 3544;
	private final int mProductID = 8199;

	private boolean mDetachedRegistered = false;

    @Override
    protected void onCreate(Bundle savedInstanceState) {
        super.onCreate(savedInstanceState);
        setContentView(R.layout.activity_main);

        mBtnReset = (Button)findViewById(R.id.btn_reset);
        mBtnGetMaxLnu = (Button)findViewById(R.id.btn_get_max_lnu);
        mBtnSendCommand = (Button)findViewById(R.id.btn_send_command);
        mTvInfo = (TextView)findViewById(R.id.tv_info);

        mBtnReset.setOnClickListener(this);
        mBtnGetMaxLnu.setOnClickListener(this);
        mBtnSendCommand.setOnClickListener(this);

        mUsbManager = (UsbManager)getSystemService(Context.USB_SERVICE);
} @Override
protected void onResume() {
super.onResume();
// 获取启动Activity的USB设备
Intent intent = getIntent();
String action = intent.getAction();
mUsbDevice = null;
if (UsbManager.ACTION_USB_DEVICE_ATTACHED.equals(action)) {
mUsbDevice = (UsbDevice)intent.getParcelableExtra(UsbManager.EXTRA_DEVICE);
if(mVendorID != mUsbDevice.getVendorId() || mProductID != mUsbDevice.getProductId()) {
mUsbDevice = null;
}
}
if(mUsbDevice == null) {
refreshDevice();
}
if(mUsbDevice == null) { // 插入设备自动启动应用程序,自动获取获取permission
Log.d(TAG, "Please insert USB flash disk!"); // 手机请使用Toast
Toast.makeText(this, "Please insert USB flash disk!", Toast.LENGTH_SHORT).show();
finish();
return;
}
// 判断是否拥有权限
if(!mUsbManager.hasPermission(mUsbDevice)) {
PendingIntent permissionIntent = PendingIntent.getBroadcast(this, 0, new Intent(ACTION_USB_PERMISSION), 0);
IntentFilter filter = new IntentFilter(ACTION_USB_PERMISSION);
registerReceiver(mPermissionReceiver, filter);
mUsbManager.requestPermission(mUsbDevice, permissionIntent);
} else {
Log.d(TAG, "Correct device!");
Toast.makeText(MainActivity.this, "Correct device!", Toast.LENGTH_SHORT).show();
makeConnection();
}
registerReceiver(usbDetachedReceiver, usbDetachedFilter); // 注册弹出通知
mDetachedRegistered = true;
}5)refreshDevice()
	// 启动程序前已经插入了设备,需要从设备列表中获取
	private void refreshDevice() {
		HashMap<String, UsbDevice> deviceList = mUsbManager.getDeviceList();
		Iterator<UsbDevice> deviceIterator = deviceList.values().iterator();
		while(deviceIterator.hasNext()){
		    mUsbDevice = deviceIterator.next();
		    if(mVendorID == mUsbDevice.getVendorId() && mProductID == mUsbDevice.getProductId()) {
        		break;
        	} else {
        		mUsbDevice = null;
        	}
		}
} private IntentFilter usbDetachedFilter = new IntentFilter(UsbManager.ACTION_USB_DEVICE_DETACHED);
private BroadcastReceiver usbDetachedReceiver = new BroadcastReceiver() {
@Override
public void onReceive(Context context, Intent intent) {
UsbDevice device = (UsbDevice)intent.getParcelableExtra(UsbManager.EXTRA_DEVICE);
if(device != null) {
// 确保弹出的设备为指定的
if(mVendorID == device.getVendorId() && mProductID == device.getProductId()) {
mUsbDevice = null;
finish();
}
}
}
}; private void makeConnection() {
if(mUsbDevice == null) {
Log.d(TAG, "Please insert USB flash disk!");
Toast.makeText(this, "Please insert USB flash disk!", Toast.LENGTH_SHORT).show();
finish();
return;
}
// U盘接口个数为1
if(mUsbDevice.getInterfaceCount() != 1) {
Log.d(TAG, "Not a USB flash disk!");
Toast.makeText(this, "Not a USB flash disk!", Toast.LENGTH_SHORT).show();
finish();
return;
}
UsbInterface intf = mUsbDevice.getInterface(0);
// U盘接口0可获取的端点数为2
if(intf.getEndpointCount() != 2) {
Log.d(TAG, "Not a USB flash disk!");
Toast.makeText(this, "Not a USB flash disk!", Toast.LENGTH_SHORT).show();
finish();
return;
} else {
mEndpointIn = intf.getEndpoint(0); // Bulk-In端点
mEndpointOut = intf.getEndpoint(1); // Bulk_Out端点
}
if (mUsbDevice != null) {
UsbDeviceConnection connection = mUsbManager.openDevice(mUsbDevice);
if (connection != null && connection.claimInterface(intf, true)) {
Log.d(TAG, "Make connection succeeded!");
Toast.makeText(this, "Make connection succeeded!", Toast.LENGTH_SHORT).show();
mConnection = connection;
} else {
Log.d(TAG, "Make connection failed!");
Toast.makeText(this, "Make connection failed!", Toast.LENGTH_SHORT).show();
mConnection = null;
finish();
}
}
} @Override
public void onClick(View v) {
switch(v.getId()) {
case R.id.btn_reset :
reset();
break;
case R.id.btn_get_max_lnu :
getMaxLnu();
break;
case R.id.btn_send_command :
sendCommand();
break;
default :
break;
}
} private void reset() {
synchronized (this) {
if (mConnection != null) {
String str = mTvInfo.getText().toString();
// 复位命令的设置有USB Mass Storage的定义文档给出
int result = mConnection.controlTransfer(0x21, 0xFF, 0x00, 0x00, null, 0, 1000);
if(result < 0) { // result<0说明发送失败
Log.d(TAG, "Send reset command failed!");
str += "Send reset command failed!\n";
} else {
Log.d(TAG, "Send reset command succeeded!");
str += "Send reset command succeeded!\n";
}
mTvInfo.setText(str);
}
}
}10)getMaxLnu()获取最大的LNU
	private void getMaxLnu() {
		synchronized (this) {
            if (mConnection != null) {
            	String str = mTvInfo.getText().toString();

            	// 接收的数据只有1个字节
            	byte[] message = new byte[1];
            	// 获取最大LUN命令的设置由USB Mass Storage的定义文档给出
                int result = mConnection.controlTransfer(0xA1, 0xFE, 0x00, 0x00, message, 1, 1000);
                if(result < 0) {
                	Log.d(TAG,  "Get max lnu failed!");
    				str += "Get max lnu failed!\n";
    			} else {
    				Log.d(TAG, "Get max lnu succeeded!");
    				str += "Get max lnu succeeded!\nMax LNU : ";
    				for(int i=0; i<message.length; i++) {
    					str += Integer.toString(message[i]&0x00FF);
    				}
    			}
                str += "\n";
                mTvInfo.setText(str);
            }
        }
}11)sendCommand()发送read format capacities命令
	private void sendCommand() {
		String str = mTvInfo.getText().toString();

		byte[] cmd = new byte[] {
			(byte) 0x55, (byte) 0x53, (byte) 0x42, (byte) 0x43, // 固定值
			(byte) 0x28, (byte) 0xe8, (byte) 0x3e, (byte) 0xfe, // 自定义,与返回的CSW中的值是一样的
			(byte) 0x00, (byte) 0x02, (byte) 0x00, (byte) 0x00, // 传输数据长度为512字节
			(byte) 0x80, // 传入数据
			(byte) 0x00, // LNU为0,则设为0
			(byte) 0x01, // 命令长度为1
			(byte) 0x23, (byte) 0x00, (byte) 0x00, (byte) 0x00, // READ FORMAT CAPACITIES,后面的0x00皆被忽略
			(byte) 0x00, (byte) 0x00, (byte) 0x00, (byte) 0x00,
			(byte) 0x00, (byte) 0x00, (byte) 0x00, (byte) 0x00,
			(byte) 0x00, (byte) 0x00, (byte) 0x00, (byte) 0x00
		};
		int result = mConnection.bulkTransfer(mEndpointOut, cmd, cmd.length, 1000);
		if(result < 0) {
        	Log.d(TAG,  "Send command failed!");
			str += "Send command failed!\n";
		} else {
			Log.d(TAG, "Send command succeeded!");
			str += "Send command succeeded!\n";
		}

		byte[] message = new byte[24];		//  需要足够的长度接收数据
		result = mConnection.bulkTransfer(mEndpointIn, message, message.length, 1000);
		if(result < 0) {
        	Log.d(TAG,  "Receive message failed!");
			str += "Receive message failed!\n";
		} else {
			Log.d(TAG, "Receive message succeeded!");
			str += "Receive message succeeded!\nFormat capacities : \n";
			for(int i=0; i<message.length; i++) {
				str += Integer.toHexString(message[i]&0x00FF) + " ";
			}
		}

		byte[] csw = new byte[13];
		result = mConnection.bulkTransfer(mEndpointIn, csw, csw.length, 1000);
		if(result < 0) {
        	Log.d(TAG,  "Receive CSW failed!");
			str += "\nReceive CSW failed!";
		} else {
			Log.d(TAG, "Receive CSW succeeded!");
			str += "\nReceive CSW succeeded!\nReceived CSW : ";
			for(int i=0; i<csw.length; i++) {
				str += Integer.toHexString(csw[i]&0x00FF) + " ";
			}
		}
		str += "\n";
		mTvInfo.setText(str);
}到这里就不得不提一下U盘发送命令的顺序
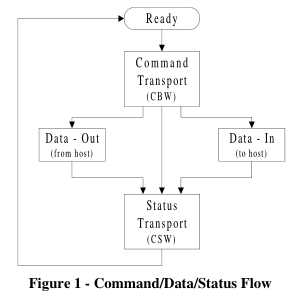
以Android手机和U盘举例,首先准备工作做好(已建立连接,bulk-in和bulk-out端点),然后Android手机发送一个CBW命令给U盘,告诉U盘要做什么:
(1)如果是发送数据给U盘,那么U盘准备好接收数据,紧接着Android手机发送数据,U盘接收数据后,返回一个CSW给Android手机,告诉接收数据是否成功,这种情况,对于开发者来说,首先发送CBW命令,判断是否发送成功,如果发送成功,紧接着发送数据(注意时间),发送数据后接收CSW,判断是否成功.......
(2)如果是要从U盘获取数据,那么U盘准备好数据发送给Android手机,Android手机从bulk-in端点接收数据,然后接收U盘发送CSW。
(3)如果是纯命令,即不用发数据,那么Android手机就接收CSW响应。
上面为先发送一个read format capacities的命令,然后接收format capacities,最后接收CSW。(没讲清楚,敬请原谅!)
最后来看一下结果吧:
接收的数据皆以16进制的形式给出,至于format capacities结果怎么计算的,我也没搞明白,我的U盘是4GB的(如果大神知道,告诉小弟呗),最后的CSW的值的前八个字节与CBW的前八个一样的,后面的请看文章开头给出的参考文档。


 628
628

 被折叠的 条评论
为什么被折叠?
被折叠的 条评论
为什么被折叠?
 到【灌水乐园】发言


