


In this tutorial, we will show you how to develop a JavaServer Faces (JSF) 2.0 hello world example, shows list of JSF 2.0 dependencies, basic annotations and configurations.
Project Environment
This JSF 2.0 example is built with following tools and technologies
- JSF 2.1.7
- Maven 3
- Eclipse 3.6
- JDK 1.6
- Tomcat 6.0.26
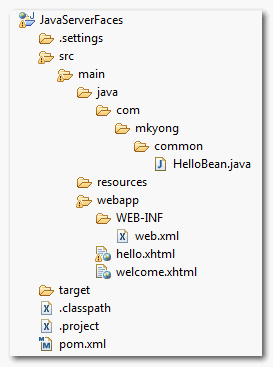
First, review the final project structure, in case you are confused about where should create the corresponding files or folder later.
1. JSF 2.0 Dependencies
Maven central repository has the JSF version up to 1.2 only, to get the JSF 2.0, you may need to download from Java.net repository.
The maven central repository is updated JSF library to 2.1.7. The previous Java.net repository is no longer required.
For Java EE Application Server like Glassfish
In most Java EE application servers, it has build-in support for JSF 2.0, so you need to download the single JSF API for development purpose.
...
<dependencies>
  <dependency>
    <groupId>javax.faces</groupId>
    <artifactId>jsf-api</artifactId>
    <version>2.0</version>
    <scope>provided</scope>
  </dependency>
</dependencies>
<repositories>
  <repository>
    <id>java.net.m2</id>
    <name>java.net m2 repo</name>
    <url>http://download.java.net/maven/2</url>
  </repository>
</repositories>
...
For simple servlet container like Tomcat
This is a bit troublesome, you need to download following dependencies.
File : pom.xml
<project xmlns="http://maven.apache.org/POM/4.0.0"
        xmlns:xsi="http://www.w3.org/2001/XMLSchema-instance"
    xsi:schemaLocation="http://maven.apache.org/POM/4.0.0
        http://maven.apache.org/maven-v4_0_0.xsd">
    <modelVersion>4.0.0</modelVersion>
    <groupId>com.mkyong.common</groupId>
    <artifactId>JavaServerFaces</artifactId>
    <packaging>war</packaging>
    <version>1.0-SNAPSHOT</version>
    <name>JavaServerFaces Maven Webapp</name>
    <url>http://maven.apache.org</url>

    <dependencies>

        <dependency>
            <groupId>com.sun.faces</groupId>
            <artifactId>jsf-api</artifactId>
            <version>2.1.7</version>
        </dependency>
        <dependency>
            <groupId>com.sun.faces</groupId>
            <artifactId>jsf-impl</artifactId>
            <version>2.1.7</version>
        </dependency>

        <dependency>
            <groupId>javax.servlet</groupId>
            <artifactId>jstl</artifactId>
            <version>1.2</version>
        </dependency>

        <dependency>
            <groupId>javax.servlet</groupId>
            <artifactId>servlet-api</artifactId>
            <version>2.5</version>
        </dependency>

        <dependency>
            <groupId>javax.servlet.jsp</groupId>
            <artifactId>jsp-api</artifactId>
            <version>2.1</version>
        </dependency>
                <!-- Tomcat 6 need this -->
        <dependency>
            <groupId>com.sun.el</groupId>
            <artifactId>el-ri</artifactId>
            <version>1.0</version>
        </dependency>

    </dependencies>

    <build>
        <finalName>JavaServerFaces</finalName>

        <plugins>
            <plugin>
                <groupId>org.apache.maven.plugins</groupId>
                <artifactId>maven-compiler-plugin</artifactId>
                <version>2.3.1</version>
                <configuration>
                    <source>1.6</source>
                    <target>1.6</target>
                </configuration>
            </plugin>
        </plugins>
    </build>
</project>
Warning
Theel-ri.jaris an arguable dependency in the Tomcat servlet container, even it’s not stated in the release note, but you need this library to solve the “JSP version of the container is older than 2.1…” error message.Updated – 21-10-2010
This “el-ri.jar” is too old, it’s recommended to use the latest “el-impl-2.2.jar”, fromJava.net
     <dependency>
      <groupId>org.glassfish.web</groupId>
      <artifactId>el-impl</artifactId>
      <version>2.2</version>
     </dependency>
Updated – 25-07-2012
Thisel-ri.jardependency is no longer required in Tomcat 7.
2. JSF 2.0 Managed Bean
A Java bean or JSF managed bean, with a name property to store user data. In JSF, managed bean means this Java class or bean can be accessed from a JSF page.
In JSF 2.0, use @ManagedBean annotation to indicate this is a managed bean.
HelloBean.java
package com.mkyong.common;

import javax.faces.bean.ManagedBean;
import javax.faces.bean.SessionScoped;
import java.io.Serializable;

@ManagedBean
@SessionScoped
public class HelloBean implements Serializable {

    private static final long serialVersionUID = 1L;

    private String name;

    public String getName() {
        return name;
    }
    public void setName(String name) {
        this.name = name;
    }
}
Note
In JSF 1.x, you had to declare beans in thefaces-config.xml, but this is no longer required in JSF 2.0.
3. JSF 2.0 Pages
In JSF 2.0, it’s recommended to create a JSF page in XHTML file format, a file with a .xhtml extension.
See following two JSF 2.0 pages :
Note
To use the JSF 2.0 components or features, just declared the JSF namespace at the top of the page.
<html xmlns="http://www.w3.org/1999/xhtml"
      xmlns:f="http://java.sun.com/jsf/core"
      xmlns:h="http://java.sun.com/jsf/html">
File : hello.xhtml – Renders a JSF text box and link it with the “helloBean” (JSF managed bean), “name” property, and also a button to display the “welcome.xhtml” page when it’s clicked.
<?xml version="1.0" encoding="UTF-8"?>
<!DOCTYPE html PUBLIC "-//W3C//DTD XHTML 1.0 Transitional//EN"
"http://www.w3.org/TR/xhtml1/DTD/xhtml1-transitional.dtd">
<html xmlns="http://www.w3.org/1999/xhtml"
      xmlns:f="http://java.sun.com/jsf/core"
      xmlns:h="http://java.sun.com/jsf/html">

    <h:head>

    </h:head>
    <h:body>
        <h2>JSF 2.0 Hello World Example - hello.xhtml</h2>
        <h:form>
           <h:inputText value="#{helloBean.name}"></h:inputText>
           <h:commandButton value="Welcome Me" action="welcome"></h:commandButton>
        </h:form>
    </h:body>
</html>
Note
In JSF 1.x, you had to declare the “navigation rule” in “faces-config.xml“, to tell which page to display when the button is clicked. In JSF 2.0, you can put the page name directly in the button’s “action” attribute. For simple navigation, it’s more than enough, but, for complex navigation, you are still advised to use the “navigation rule” in “faces-config.xml“.
File : welcome.xhtml – Display the submitted text box value.
<?xml version="1.0" encoding="UTF-8"?>
<!DOCTYPE html PUBLIC "-//W3C//DTD XHTML 1.0 Transitional//EN"
"http://www.w3.org/TR/xhtml1/DTD/xhtml1-transitional.dtd">
<html xmlns="http://www.w3.org/1999/xhtml"
      xmlns:h="http://java.sun.com/jsf/html">

    <h:head>

    </h:head>
    <h:body bgcolor="white">
        <h2>JSF 2.0 Hello World Example - welcome.xhtml</h2>
        <h2>Welcome #{helloBean.name}</h2>
    </h:body>
</html>
The #{…} indicate this is a JSF expression language, in this case, #{helloBean.name}, when the page is submitted, JSF will find the “helloBean” and set the submitted textbox value via the setName() method. When welcome.xhtml page is display, JSF will find the same session “helloBean” again and display the name property value via the getName() method.
4. JSF 2.0 Serlvet Configuration
Just like any other standard web frameworks, you are required to configure JSF stuffs in web.xml file.
File : web.xml
<?xml version="1.0" encoding="UTF-8"?>
<web-app xmlns:xsi="http://www.w3.org/2001/XMLSchema-instance"
    xmlns="http://java.sun.com/xml/ns/javaee"
        xmlns:web="http://java.sun.com/xml/ns/javaee/web-app_2_5.xsd"
    xsi:schemaLocation="http://java.sun.com/xml/ns/javaee
    http://java.sun.com/xml/ns/javaee/web-app_2_5.xsd"
    id="WebApp_ID" version="2.5">

    <display-name>JavaServerFaces</display-name>

    <!-- Change to "Production" when you are ready to deploy -->
    <context-param>
        <param-name>javax.faces.PROJECT_STAGE</param-name>
        <param-value>Development</param-value>
    </context-param>

    <!-- Welcome page -->
    <welcome-file-list>
        <welcome-file>faces/hello.xhtml</welcome-file>
    </welcome-file-list>

    <!-- JSF mapping -->
    <servlet>
        <servlet-name>Faces Servlet</servlet-name>
        <servlet-class>javax.faces.webapp.FacesServlet</servlet-class>
        <load-on-startup>1</load-on-startup>
    </servlet>

    <!-- Map these files with JSF -->
    <servlet-mapping>
        <servlet-name>Faces Servlet</servlet-name>
        <url-pattern>/faces/*</url-pattern>
    </servlet-mapping>
    <servlet-mapping>
        <servlet-name>Faces Servlet</servlet-name>
        <url-pattern>*.jsf</url-pattern>
    </servlet-mapping>
    <servlet-mapping>
        <servlet-name>Faces Servlet</servlet-name>
        <url-pattern>*.faces</url-pattern>
    </servlet-mapping>
    <servlet-mapping>
        <servlet-name>Faces Servlet</servlet-name>
        <url-pattern>*.xhtml</url-pattern>
    </servlet-mapping>

</web-app>
Define a “javax.faces.webapp.FacesServlet” mapping, and map to those well-known JSF file extensions (/faces/*, *.jsf, *.xhtml,*.faces).
In this case, the below 4 URLs are pointing to the same hello.xhtml.
    http://localhost:8080/JavaServerFaces/hello.jsf
    http://localhost:8080/JavaServerFaces/hello.faces
    http://localhost:8080/JavaServerFaces/hello.xhtml
    http://localhost:8080/JavaServerFaces/faces/hello.jsf
In JSF 2.0 development, it’s recommended to set the “javax.faces.PROJECT_STAGE” to “Development“, it will provide many useful debugging information to let you track the bugs easily. For deployment, just change it to “Production“, you just do not want your customer to look at this annoying debugging information :).
5. Demo
A long article end with a project demo :)
URL : http://localhost:8080/JavaServerFaces/hello.jsf
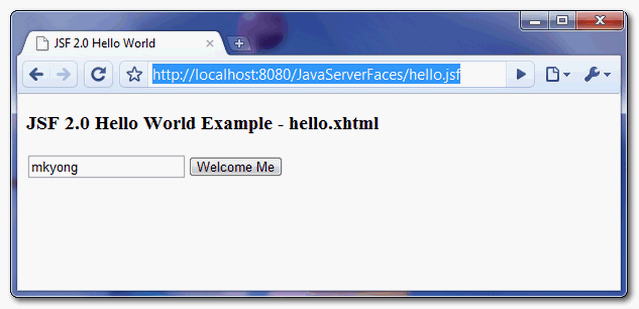
A simple JSF page, with a text box and a button.
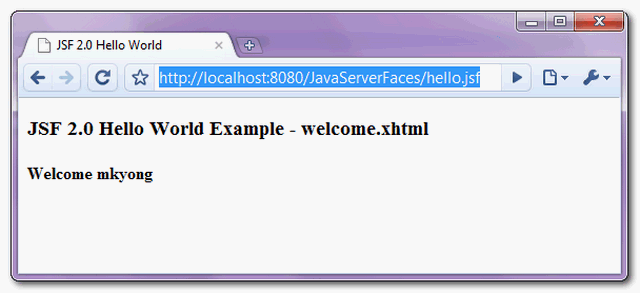
When the button is clicked, displays the submitted text box value.


 1万+
1万+

 被折叠的 条评论
为什么被折叠?
被折叠的 条评论
为什么被折叠?
 到【灌水乐园】发言


