


一 安装nividia驱动
安装显卡驱动和CUDA可以参考这里
1.1 删除旧的显卡驱动
似乎这一步可以不用做,但是在显卡装怀了情况下需要这么做。
sudo apt-get remove --purge nvidia*1.2 添加ppa源,并更新软件库
sudo add-apt-repository ppa:graphics-drivers/ppa
sudo apt-get update
1.3 安装驱动
sudo apt-get install nvidia-367
sudo apt-get install mesa-common-dev
sudo apt-get install freeglut3-dev
1.4. 重启后想卡驱动生效
安装成功后可以搜索到invidia的软件。
二 安装CUDA
从nvidia官网上下载cuda_7.5.18_linux.run,或者别的版本也是可以得。
2.1 安装gcc4.8和g++4.8
sudo apt-get install gcc-4.8
sudo apt-get install g++-4.8
2.2 设置gcc和g++
sudo update-alternative --install  /usr/bin/gcc gcc /usr/bin/gcc-4.8 50
sudo update-alternative --install  /usr/bin/gcc gcc /usr/bin/gcc-5 100
sudo update-alternative --install  /usr/bin/g++ g++ /usr/bin/g++-4.8 50
sudo update-alternative --install  /usr/bin/g++ g++ /usr/bin/g++-5 100
2.3 选择4.8的编译器
如果不选这这个版本可能在编译CUDA的时候报编译器不匹配的错误
sudo update-alternatives --config g++
sudo update-alternatives --config gcc
2.4 查看编译器的版本,确认为4.8
gcc -v
g++ -v
2.5 Ctrl+Alt+F1进入tty1
关闭X Server,不关闭会报X Server的错误。
sudo service lightdm stop 2.6 修改cuda_7.5.18_linux.run的权限
sudo chmod 764 cuda_7.5.18_linux.run2.7 运行cuda.run
注意不要安装NVIDIA Accelerated Graphics Driver for Linux… ,也就是这输入n 。其余都输入y。因为这个驱动已经唉第一步骤已经安装了,而且如果使用CUDA提供的显卡驱动会存在很多的问题。我装过两个机子,一个是gtx750和gtx1060,前者适合CUDA7.5,后者我装CUDA7.5没装上,后来装了CUDA8.0
sudo sh cuda_7.5.18_linux.run --overrode三 安装cudnn
从官网上下载 cuDNN v4 Library for Linux,网址是这里。下载需要注册。
sudo tar -vxf cudnn-7.0-linux-x64-v4.0-prod.tgz
sudo cp cuda/include/cudnn.h  /usr/local/cuda/include/
sudo cp cuda/lib64/libcudnn* /usr/local/cuda/lib64/
sudo chamod a+x /usr/local/cuda/include/cudnn.h
sudo chamod a+x /usr/local/cuda/lib64/libcudnn*
四 安装opencv
4.1 添加依赖包
sudo apt-get install --assume-yes libopencv-dev build-essential cmake git libgtk2.0-dev pkg-config python-dev python-numpy libdc1394-22 libdc1394-22-dev libjpeg-dev libpng12-dev libtiff5-dev libjasper-dev libavcodec-dev libavformat-dev libswscale-dev libxine2-dev libgstreamer0.10-dev libgstreamer-plugins-base0.10-dev libv4l-dev libtbb-dev libqt4-dev libfaac-dev libmp3lame-dev libopencore-amrnb-dev libopencore-amrwb-dev libtheora-dev libvorbis-dev libxvidcore-dev x264 v4l-utils unzip4.2 解压编译
unzip opencv-3.1.0.zip
cd opencv-3.1.0
mkdir build
cd build/
cmake -D CMAKE_BUILD_TYPE=RELEASE -D CMAKE_INSTALL_PREFIX=/usr/local -D WITH_TBB=ON -D WITH_V4L=ON -D WITH_QT=ON -D WITH_OPENGL=ON -DCUDA_NVCC_FLAGS="-D_FORCE_INLINES" ..
make 问题:如果在安装的过程中自动下载的速度太慢,而导致报错。可以手动下载,ippicv下载地址。下载完成后,需要包ippicv_linux_20151201.tgz拷贝到OpenCV-3.1.0/3rdparty/ippicv/downloads/Linux-808b791a6eac9ed78d32a7666804320e 目录下
4.3 安装
1 sudo make install
2 sudo /bin/bash -c ‘echo “/usr/local/lib” > /etc/ld.so.conf.d/opencv.conf’
3 sudo ldconfig
4 sudo apt-get update
五 安装caffe
主要是csdn和github这两个网站的caffe安装部分。
5.1 安装依赖,有些依赖可能已经安装了,不过没有关系,如果安装了,安装命令就不会再一次执行
sudo apt-get update

sudo apt-get upgrade

sudo apt-get install -y build-essential cmake git pkg-config

sudo apt-get install -y libprotobuf-dev libleveldb-dev libsnappy-dev libhdf5-serial-dev protobuf-compiler

sudo apt-get install -y libatlas-base-dev

sudo apt-get install -y --no-install-recommends libboost-all-dev

sudo apt-get install -y libgflags-dev libgoogle-glog-dev liblmdb-dev

# (Python general)
sudo apt-get install -y python-pip

# (Python 2.7 development files)
sudo apt-get install -y python-dev
sudo apt-get install -y python-numpy python-scipy

# (or, Python 3.5 development files)
sudo apt-get install -y python3-dev
sudo apt-get install -y python3-numpy python3-scipy
5.2 修改配置文件
cp Makefile.config.example Makefile.config #生成配置文件

sudo gedit
下面的部分需要修改:
    PYTHON_INCLUDE := /usr/include/python2.7 /usr/lib/python2.7/dist-packages/numpy/core/include

    (For ways to create an isolated Python environment, explore the topic of virtual environments here: http://docs.python-guide.org/en/latest/dev/virtualenvs/)

    WITH_PYTHON_LAYER := 1

    INCLUDE_DIRS := $(PYTHON_INCLUDE) /usr/local/include /usr/include/hdf5/serial

    LIBRARY_DIRS := $(PYTHON_LIB) /usr/local/lib /usr/lib /usr/lib/x86_64-linux-gnu /usr/lib/x86_64-linux-gnu/hdf5/serial

   PENCV_VERSION := 3    #取消注释符号#,应用opencv3
5.3 执行下面的命令
find . -type f -exec sed -i -e 's^"hdf5.h"^"hdf5/serial/hdf5.h"^g' -e 's^"hdf5_hl.h"^"hdf5/serial/hdf5_hl.h"^g' '{}' \;

cd /usr/lib/x86_64-linux-gnu

sudo ln -s libhdf5_serial.so.8.0.2 libhdf5.so

sudo ln -s libhdf5_serial_hl.so.8.0.2 libhdf5_hl.so
5.4 下载caffe进入到caffe-master文件
cd python

for req in $(cat requirements.txt); do pip install $req; done
5.5 回到caffe-master文件夹下
make all

make test

make runtest

make pycaffe   -should be finished already, so you can omit this one

make distribute
在make all的时候可能会出现很多问题
第一个问题
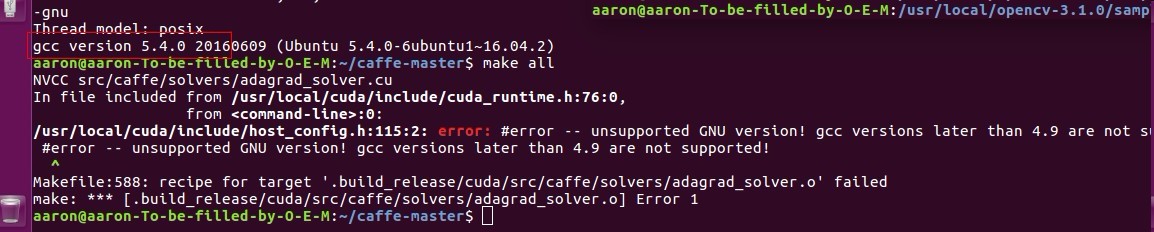
解决方法:/usr/local/cuda/include/host_comfig.h 115行,#error之前用//注释掉
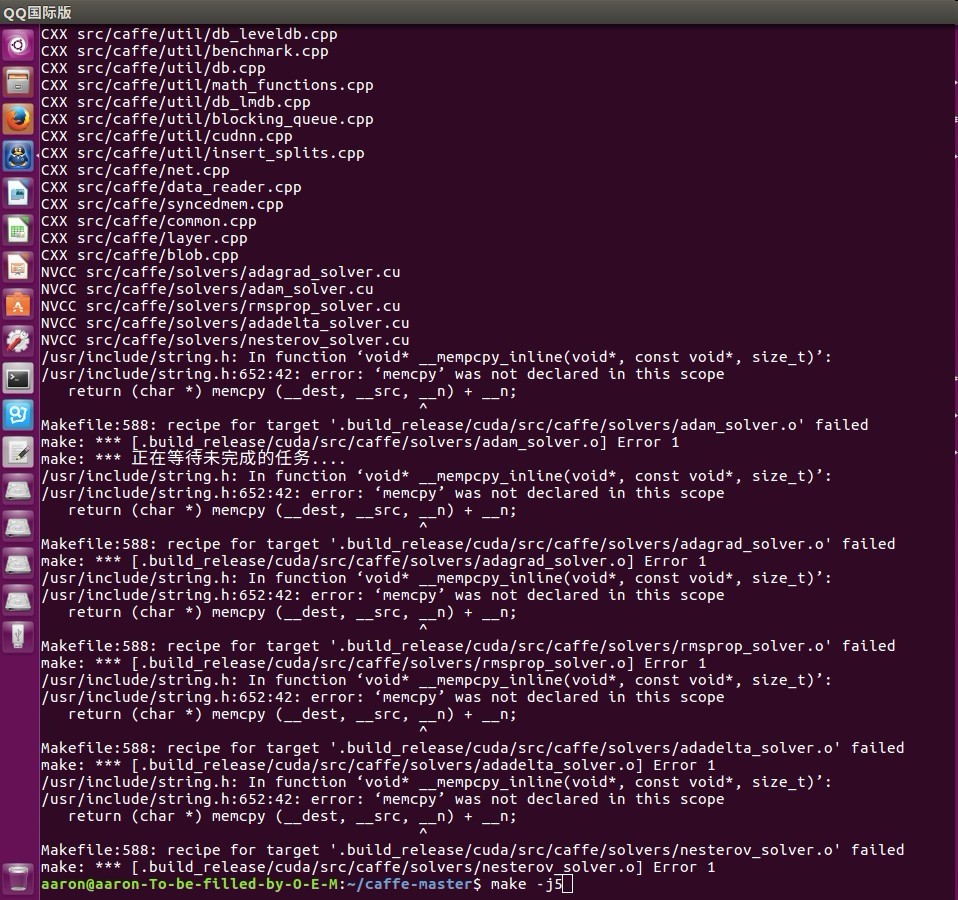
第二个问题

解决方法:修改gcc和g++的版本为5.4。
第三个问题
解决方法:
Makefile里面加上COMMON_FLAGS += NVCCFLAGS += -D_FORCE_INLINES#
Makefile里面加上COMMON_FLAGS += -D_FORCE_INLINES
第四个问题
ImportError: libcudart.so.7.5: cannot open shared object file: No such file or directory 或
OSError: libcudart.so.7.5: cannot open shared object file: No such file or directory
错误说明:在ubuntu16.04-64-bit环境下,配置完caffe后,在anaconda3或Python导入caffe库出现如题错误。
解决方法:
32-bit: sudo ldconfig /usr/local/cuda/lib
64-bit: sudo ldconfig /usr/local/cuda/lib64


 5754
5754

 被折叠的 条评论
为什么被折叠?
被折叠的 条评论
为什么被折叠?
 到【灌水乐园】发言


