


健康检测
被代理的服务器出现宕机的情况,如果被 Nginx 发现,那么 Nginx 就会将其自动标识为不可用,并且在一段时间内会禁止入站的请求访问到该服务器上。
而这个发现服务器宕机的过程就是健康检测的功能了。Nginx 的健康检测分为两种类型,主动检测和被动检测,默认的非商用 Nginx 采用的是被动检测。
被动检测
所谓的被动检测是指只有访问了该服务器之后发现服务器不可用了,才会将其标识为不可用,并且在一定时间内禁止请求分发到该服务器上,而不是主动以一定的频率去检查服务器是否可用。
健康检测有两个重要参数 max_fails 和 fail_timeout。
fail_timeout 定义了健康检查的执行时长,而 max_fails 表示服务不可用的最大尝试次数,当一定时间内(此时间由 fail_timeout 定义),发生了一定次数的服务器不响应的事件(此次数由 max_fails 定义),那么 Nginx 就会将该服务器标识为不可用的服务器,并且在一定时间内禁止请求分发到该服务器。默认情况下 max_fails 设置为 1,当它设置为 0 时表示禁用此服务器的运行状况检查,它的配置示例如下:
upstream cluster{
    server srv1.example.com max_fails=2 fail_timeout=10s;
    server srv2.example.com max_fails=2 fail_timeout=10s;
}
以上配置表示,如果 10s 内发生了两次服务不可用的情况就会将该服务器标识为不可用的状态。
当服务器被标识为不可用时,只有达到了 fail_timeout 定义的时间后,才会进行再一次的健康请求检测。
主动健康检测
nginx对后台服务健康检查有几种方式,但是最可靠的是采用阿里巴巴的nginx_upstream_check_module模块。其原理是检测后方realserver的健康状态,如果后端服务器不可用,则会将其踢出upstream,所有的请求不转发到这台服务器。当期恢复正常时,将其加入upstream。
1. 下载Nginx及nginx_upstream_check_module模块
下载Nginx及模块到root目录。
wget https://nginx.org/download/nginx-1.14.2.tar.gz
wget https://github.com/yaoweibin/nginx_upstream_check_module/archive/master.zip
2.编译Nginx
- 新建Nginx安装目录
/usr/local/nginx_upstream_check - 在Nginx的解压目录/root/nginx-1.14.2下执行以下命令进行编译。
patch -p1 < …/nginx_upstream_check_module-master/check_1.14.0+.patch
./configure --prefix=/usr/local/nginx_upstream_check/ --add-module=/root/nginx_upstream_check_module-master/
make
make install
至此已经编译完成。
3.配置Nginx及隐藏版本号
#user  nobody;
worker_processes  1;

events {
    worker_connections  1024;
}

http {
    include       mime.types;
    default_type  application/octet-stream;

    sendfile        on;
    #隐藏NG的版本
    server_tokens off;
    #keepalive_timeout  0;
    keepalive_timeout  65;

    include vhost/*.conf;

    upstream test.zd.com {
      server 127.0.0.1:8080;
      server 127.0.0.1:3333;
      # 健康检查
      check interval=3000 rise=2 fall=5 timeout=1000 type=http;
      check_keepalive_requests 100;
      check_http_send "HEAD / HTTP/1.1\r\nConnection: keep-alive\r\n\r\n";
      check_http_expect_alive http_2xx http_3xx;
    }

    server {
        listen       80;
        server_name  localhost;


        location / {
            root   html;
            index  index.html index.htm;
        }

        error_page   500 502 503 504  /50x.html;
        location = /50x.html {
            root   html;
        }

    }

}
根据以上内容,可知需要在目录下新建文件。
mkdir -p /usr/local/nginx_upstream_check/conf/vhost
touch test.zd.com.conf
test.zd.com.conf文件内容如下。
server {

        listen 80;
        client_max_body_size 10M;

        server_name test.zd.com;
        charset utf-8;
        index index.html index.htm;
        location / {
                proxy_pass http://test.zd.com;
                proxy_connect_timeout 500s;
                proxy_read_timeout 500s;
                proxy_send_timeout 500s;
                proxy_redirect off ;
                proxy_set_header Host $host;
                proxy_set_header X-Real-IP $remote_addr;
                proxy_set_header REMOTE-HOST $remote_addr;
                proxy_set_header X-Forwarded-For $proxy_add_x_forwarded_for;
                proxy_buffer_size 256k;
                proxy_buffers 4 256k;
                proxy_busy_buffers_size 256k;
                proxy_temp_file_write_size 256k;
                proxy_next_upstream error timeout invalid_header http_500 http_503 http_404;
                proxy_max_temp_file_size 128m;
                #proxy_cache mycache;
                #proxy_cache_valid 200 302 60m;
                #proxy_cache_valid 404 1m;
       }

       location /nstatus {
         check_status;
         access_log off;
       }
}
4.启动Nginx
#先测试下配置是否正确
/usr/local/nginx/sbin/nginx -t
#启动
/usr/local/nginx/sbin/nginx
5.检查服务
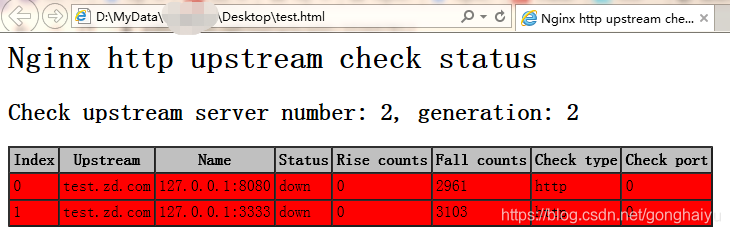
curl 127.0.01:80/nstatus
我将返回内容拷贝到了test.html文件,用浏览器打开该html文件,内容如下。
Nginx缓存
我们可以开启 Nginx 的静态资源缓存,将一些不变的静态文件,比如图片、CSS、JS 等文件进行缓存,这样在客户端访问这些资源时就不用去访问服务器了,因此响应的速度就可以大幅提升,并且节省了宝贵的服务器资源。
Nginx 开启缓存需要在 http 节点中配置 proxy_cache_path 信息,以及 server 节点中配置要缓存资源的后缀名,它的配置示例如下:
http {
  // 忽略其他的配置信息......
  proxy_cache_path  /data/cache levels=1:2 keys_zone=nuget-cache:20m max_size=50g inactive=1d;
  include nginx_proxy.conf;
  server {
    listen  80;
    server_name  srv1.example.com;
    location ~ .*\.(gif|jpg|png|css|js)(.*) { # 要缓存的文件的后缀
      access_log off;
      add_header Cache-Control "public,max-age=24*3600";
      proxy_pass http://localhost:8080;
    }
  }
}
其中,proxy_cache_path 配置的是缓存的目录信息,以及缓存的保存时间 inactive,还有缓存的大小等信息;而“access_log off”表示关闭日志功能,proxy_pass 表示当第一次没有缓存时的请求地址,之后便会将访问到的资源缓存起来。
nginx reload不生效的解决办法
[已解决]nginx reload不生效的问题如果已经用-t参数验证了配置正确无误,则说明当前请求量过高nginx无法平滑的将老进程关闭。
解决办法
使用操作系统应用重启命令,以CentOS 7重启nginx应用为例:
systemctl restart nginx
NGINX获取真实IP
java代码层:
IpUtils.getIpAddr(request)
IpUtils
   /**
     * 获取访问用户的客户端IP(适用于公网与局域网).
     */
    public static final String getIpAddr(final HttpServletRequest request)
            throws Exception {
        if (request == null) {
            throw (new Exception("getIpAddr method HttpServletRequest Object is null"));
        }
        String ipString = request.getHeader("x-forwarded-for");
        if (StringUtils.isEmpty(ipString) || "unknown".equalsIgnoreCase(ipString)) {
            ipString = request.getHeader("Proxy-Client-IP");
        }
        if (StringUtils.isEmpty(ipString) || "unknown".equalsIgnoreCase(ipString)) {
            ipString = request.getHeader("WL-Proxy-Client-IP");
        }
        if (StringUtils.isEmpty(ipString) || "unknown".equalsIgnoreCase(ipString)) {
            ipString = request.getRemoteAddr();
        }

        // 多个路由时,取第一个非unknown的ip
        final String[] arr = ipString.split(",");
        for (final String str : arr) {
            if (!"unknown".equalsIgnoreCase(str)) {
                ipString = str;
                break;
            }
        }

        return ipString;
    }
Nginx层:
location / {
    proxy_set_header            Host $host;
    set $Real $proxy_add_x_forwarded_for;
    if ( $Real ~ (\d+)\.(\d+)\.(\d+)\.(\d+),(.*) ){
        set $Real $1.$2.$3.$4;
    }
    proxy_set_header            X-real-ip $Real;
    proxy_set_header            X-Forwarded-For $proxy_add_x_forwarded_for;
}


 2876
2876


 被折叠的 条评论
为什么被折叠?
被折叠的 条评论
为什么被折叠?
 到【灌水乐园】发言


