


vue3学习(续篇)
默认有vue3基础并有一定python编程经验。
chrome浏览器安装vue.js devtools拓展。
文章目录
1. element-ui使用
安装
# 选择一个你喜欢的包管理器

# NPM
$ npm install element-plus --save

# Yarn
$ yarn add element-plus

# pnpm
$ pnpm install element-plus
main.js
import { createApp } from 'vue'
import ElementPlus from 'element-plus'
import 'element-plus/dist/index.css'
import App from './App.vue'

const app = createApp(App)

app.use(ElementPlus)
app.mount('#app')
App.vue
<template>
<el-table
:data="tableData"
style="width: 100%"
:row-class-name="tableRowClassName"
>
<el-table-column prop="date" label="Date" width="180" />
<el-table-column prop="name" label="Name" width="180" />
<el-table-column prop="address" label="Address" />
</el-table>
</template>
<script lang="ts" setup>
interface User {
date: string
name: string
address: string
}
const tableRowClassName = ({
row,
rowIndex,
}: {
row: User
rowIndex: number
}) => {
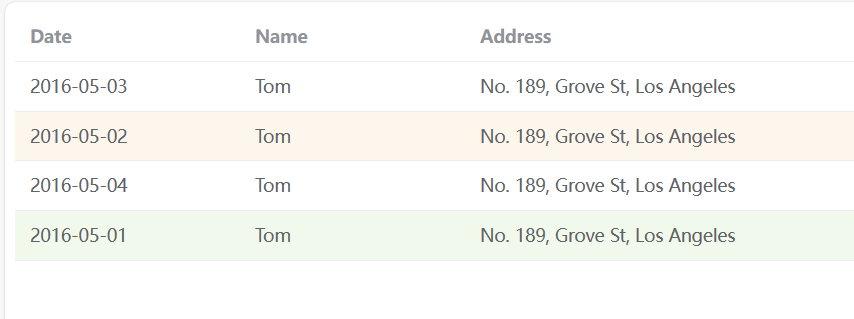
if (rowIndex === 1) {
return 'warning-row'
} else if (rowIndex === 3) {
return 'success-row'
}
return ''
}
const tableData: User[] = [
{
date: '2016-05-03',
name: 'Tom',
address: 'No. 189, Grove St, Los Angeles',
},
{
date: '2016-05-02',
name: 'Tom',
address: 'No. 189, Grove St, Los Angeles',
},
{
date: '2016-05-04',
name: 'Tom',
address: 'No. 189, Grove St, Los Angeles',
},
{
date: '2016-05-01',
name: 'Tom',
address: 'No. 189, Grove St, Los Angeles',
},
]
</script>
<style>
.el-table .warning-row {
--el-table-tr-bg-color: var(--el-color-warning-light-9);
}
.el-table .success-row {
--el-table-tr-bg-color: var(--el-color-success-light-9);
}
</style>
2. axios 网络请求
1. 简介
Axios是一个基于promise的网络请求库,作用于node.js和浏览器中。Axios能自动完成JSON数据的转换。
安装npm install axios
执行GET请求
// 为给定 ID 的 user 创建请求
axios.get('/user?ID=12345')
  .then(function (response) {
    //处理成功情况
    console.log(response);
  })
  .catch(function (error) {
    //处理失败情况
    console.log(error);
  })
  .then(function(){
    //总是会执行
  });

// 上面的请求也可以这样做
axios.get('/user', {
    params: {
      ID: 12345
    }
  })
  .then(function (response) {
    console.log(response);
  })
  .catch(function (error) {
    console.log(error);
  });
执行POST请求
axios.post('/user', {
    firstName: 'Fred',
    lastName: 'Flintstone'
  })
  .then(function (response) {
    console.log(response);
  })
  .catch(function (error) {
    console.log(error);
  });
与vue整合
//配置请求根路径
axios.defaults.baseURL='http://api.com'

//将axios作为全局的自定义属性,每个组件可以在内部直接访问(vue3)
app.config.globalProperties.$http=axios
//之后就可以this.$http.get(...)
2. 操作
App.vue
<template>
    <Demo1/>
</template>
<script>
import Demo1 from "./components/Demo1.vue"
import axios from 'axios'
export default{
    data(){
        return{
        }
    },
    created(){//详见组件生命周期
      axios.get('https://www.baidu.com').then((response)=>{console.log(response.data);})
      //箭头函数使this指向vue实例
    },
    components:{
        Demo1
    }
}
</script>

很明显,我们的get请求被阻止了,因为这涉及了跨域问题,后面会说。
3. flask-cors解决跨域问题
1. 简介
跨域是因为出于浏览器的同源策略限制。同源策略(Sameoriginpolicy)是一种约定,它是浏览器最核心也最基本的安全功能,如果缺少了同源策略,则浏览器的正常功能可能都会受到影响。可以说Web是构建在同源策略基础之上的,浏览器只是针对同源策略的一种实现。同源策略会阻止一个域的javascript脚本和另外一个域的内容进行交互。
我们可以在服务器端使用flask-cors解决这个问题。
详见 flask—— flask-cors 解决跨域问题 @红@旗下的小兵
pip install -U flask-cors
全局解决-使用CORS类
from flask import Flask, request
from flask_cors import CORS
app = Flask(__name__)
CORS(app)
#CORS(app, supports_credentials=True)
#服务器允许用户跨源发出cookie或经过身份验证的请求
使用@cross_origin装饰器(适用于配置特定的api接口)
from flask import Flask
from flask_cors import CORS, cross_origin
app = Flask(__name__)

# 只允许路径为'/login'跨域!
@app.route('/login')
@cross_origin()
def data():
    return jsonify({'name':'lxc'})
2. 操作
打开pycharm,进以前用过的python项目
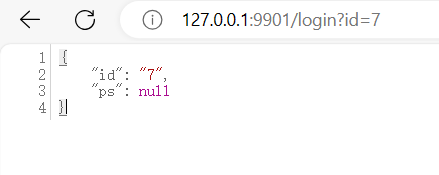
输入以下代码,在http://127.0.0.0:9901起一个接口
from flask import Flask,url_for,request,render_template,make_response,redirect,jsonify
from flask_cors import CORS,cross_origin
app = Flask(__name__) # 用本脚本名实例化Flask对象
cors = CORS(app)

@app.route('/login',methods=['GET','POST'])
def login():
    user={'id':request.args.get('id'),'ps':request.args.get('ps')}
    return jsonify(user)

if __name__ == '__main__':
    app.run(host='0.0.0.0',port=9901,debug=1)
App.vue 发送get请求调用上述接口
<template>
  <Demo1/>
</template>
<script>
import Demo1 from "./components/Demo1.vue"
import axios from 'axios'
export default{
  data(){
      return{
      }
  },
  created(){
    axios.get('http://127.0.0.1:9901/login?id=admin&ps=123456').then((response)=>{console.log(response.data);})
  },
  components:{
      Demo1
  }
}
</script>

4. 前端路由 vue-router
npm install vue-router@4
1. 简单使用
main.js
import { createApp } from 'vue'
import App from './App.vue'
import ElementPlus from 'element-plus'
import 'element-plus/dist/index.css'
import router from './router'

const app = createApp(App)
app.use(ElementPlus)

//5. 确保 _use_ 路由实例使整个应用支持路由。
app.use(router)
app.mount("#app")
src/router/index.js
import { createRouter, createWebHistory } from 'vue-router'

// 1. 定义一些路由,每个路由都需要映射到一个组件。
const routes=[
    {path:'/',component:()=>import("../components/Demo1.vue")}, // 2.导入路由组件
    {path:'/demo2',component:()=>import("../components/Demo2.vue")}
]

// 3. 创建路由实例并传递`routes`配置
const router=createRouter({
    // 4. 内部提供了 history 模式的实现
  history: createWebHistory(),
  routes, // `routes: routes` 的缩写
})

export default router
App.vue
<template>
  <router-view /><!--6. 通过router-view使用路由-->
</template>
<script>
</script>
2. 配置路径别名@和vscode路径显示
vscode下载插件别名路径跳转。
vite.config.js 修改对应部分
resolve: {
    alias: {
      '@': fileURLToPath(new URL('./src', import.meta.url)),
      'cop':fileURLToPath(new URL('./src/components', import.meta.url))
    }
  }
/src/router/index.js 修改对应部分
const routes=[
    {path:'/',component:()=>import("@/components/Demo1.vue")}, // 2.导入路由组件
    {path:'/demo2',component:()=>import("cop/Demo2.vue")}
]
此时,vscode里对路径ctrl+左键不能跳转到Demo2.vue,需要修改jsconfig.json
{
  "compilerOptions": {
    "paths": {
      "@/*": ["./src/*"],
      "cop/*":["./src/components/*"]
    }
  },
  "exclude": ["node_modules", "dist"]
}
3. 路由查询参数与路径传参
$router是VueRouter的实例,是全局路由对象,用户可以在任何地方使用,包含了所有路由对象,包含了许多关键对象和属性。
$route代表了正在跳转的路由对象,是一个局部对象。每一个路由都有一个$route对象。
| $route常见属性 | 说明 |
|---|---|
| .path | 字符串,对应当前路由的路径,总是解析为绝对路径,如 "/foo/bar"。 |
| .params | 一个 key/value 对象,包含了动态片段和全匹配片段,如果没有路由参数,就是一个空对象。 |
| .query | 一个 key/value 对象,表示 URL 查询参数。例如,对于路径 /foo?user=1,则有 $route.query.user == 1,如果没有查询参数,则是个空对象。 |
| .hash | 当前路由的 hash 值 (带 #) ,如果没有 hash 值,则为空字符串。 |
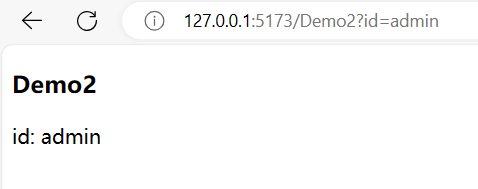
修改Demo2.vue
<template>
    <h3>Demo2</h3>
    <p>id: {{this.$route.query.id}}</p>
    <router-view />
    </template>
index.js 修改对应部分
const routes=[
{path:'/',component:()=>import("@/components/Demo1.vue")}, // 2.导入路由组件
{path:'/demo2',component:()=>import("cop/Demo2.vue")},
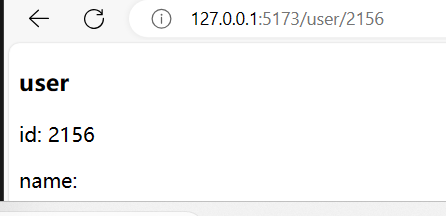
{path:'/user/:id/:name?',component:()=>import("cop/user.vue")}
//加?表示name值不是必须
]
./components/user.vue
<template>
    <h3>user</h3>
<p>id: {{$route.params.id}}</p>
<p>name: {{$route.params.name}}</p>
</template>
<script>
</script>
4. router-link,定义别名,定义路由名称,编程式导航
在index.js里 修改对应部分
const routes=[
    {
      path:'/',
      alias:["/home","/index"],
        //定义别名为home或index,可以xxx/home访问
      component:()=>import("@/components/Demo1.vue")
    },
    {path:'/demo2',component:()=>import("cop/Demo2.vue")},
    {
      path:'/user/:id/:name?',
      name:"member",//定义路由名称,路径显示还是path或alias
      component:()=>import("cop/user.vue")}
    //加?表示name值不是必须
]
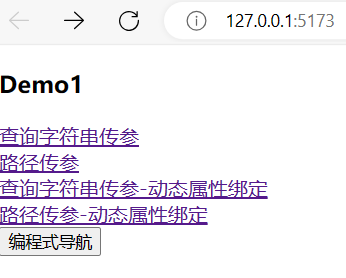
Demo1.vue
<template>
    <h3>Demo1</h3>
    <router-link to="/Demo2?id=999">查询字符串传参</router-link><br>
    <router-link to="/user/007/tom">路径传参</router-link><br>
    <router-link :to="{path:'/Demo2',query:{id:333}}">查询字符串传参-动态属性绑定</router-link><br>
    <router-link :to="{name:'member',params:{id:334,name:'tim'}}">路径传参-动态属性绑定</router-link><br>
    <button @click="goTo()">编程式导航</button>
    </template>

    <script setup>
    import {useRouter} from 'vue-router'
    const router=useRouter()
    const goTo=()=>router.push('/Demo2?id=888')
    </script>
5. 嵌套路由结合共享组件
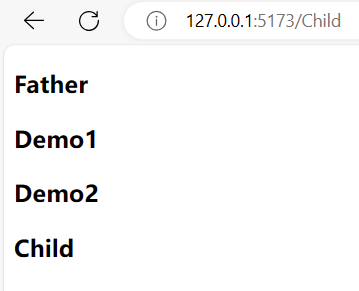
index.js 修改对应部分
const routes=[
    {
      path:'/',// xxx/
      alias:["/home","/index"],//定义别名为home,可以xxx/home访问
      component:()=>import("cop/Father.vue"),
      children:[//实现路由嵌套
        {
          path:'Child',// xxx/Child或xxx/index/Child
          component:()=>import("cop/Child.vue")
        }
      ]
    }
]
Demo1.vue,Demo2.vue和Child.vue参照下面格式
<template>
    <h3>Demo1</h3>
    </template>
Father.vue
<template>
    <h3>Father</h3>
    <Demo1 />
    <Demo2 />
    <router-view />
</template>
<script setup>
import Demo1 from './Demo1.vue' //共享组件
import Demo2 from './Demo2.vue'
</script>
6. 重定向
index.js 修改对应部分
const routes=[
    {
      path:'/',
      component:()=>import("cop/Demo1.vue"),
    },
    {
      path:'/demo1',
      redirect:"/" // xxx/demo1重定向到xxx/
      //redirect:{name:'member',params:{id:334,name:'tim'}}
      //还可以传编程式导航对象
    }
]
7. 全局前置守卫 router.beforeEach
main.js里
import { createApp } from 'vue'
import App from './App.vue'
import ElementPlus from 'element-plus'
import 'element-plus/dist/index.css'
import router from './router'

const app = createApp(App)
app.use(ElementPlus)
app.use(router)

//全局前置守卫
router.beforeEach((to,from,next)=>{
    console.log('to:',to)
    console.log('from:',from)

    if(to.name=='member'){
        next(false)//拦截访问路由
    }else{
        next()//继续
    }
})

app.mount("#app")
5. vuex
Vuex 是一个专为 Vue.js 应用程序开发的状态管理模式 + 库。它采用集中式存储管理应用的所有组件的状态,并以相应的规则保证状态以一种可预测的方式发生变化。
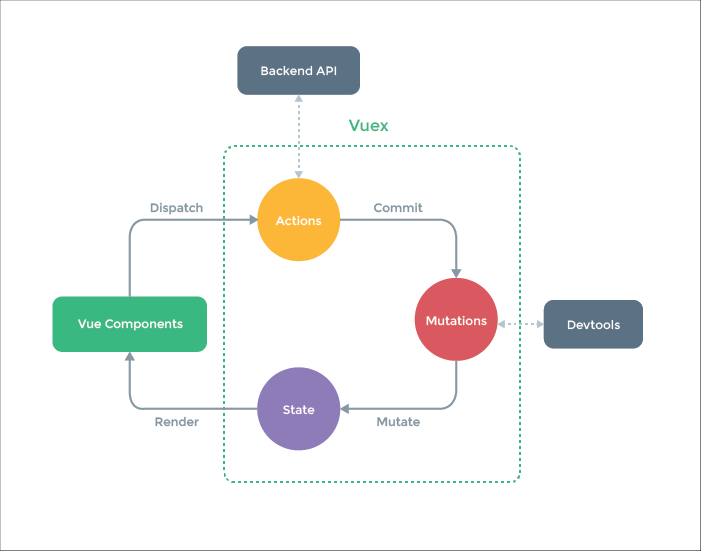
| 状态 | 说明 |
|---|---|
| state | 在vuex中state中定义数据,可以在任何组件中进行调用。this.$store.state.属性名称 |
| getters | 计算属性 |
| mutations | 更改 Vuex 的 store 中的状态的唯一方法是提交(this.$store.commit('func')) mutation |
| actions | 异步操作 ,this.$store.dispatch('func')触发函数 |
| modules | 将store分割成模块,每个模块都有自己的state,mutation,action,getters |
npm install vuex@next --save
main.js
import { createApp } from 'vue'
import App from './App.vue'
import ElementPlus from 'element-plus'
import 'element-plus/dist/index.css'
import router from './router'
import store from './store'

const app = createApp(App)
app.use(ElementPlus)
app.use(store)
app.mount("#app")
/src/store/index.js
import { createStore } from 'vuex'
const store=createStore({
    state(){//状态管理器中定义的数据源
        return{
            heave:'举起',
            count:0
        }
    },
    getters:{//相当于计算属性
        len(state){
            return state.heave.length
        }
    },
    mutations:{//同步操作
        changeCount(state,num){
            state.count+=num
            console.log('count的值为 ',state.count)
        }
    },
    actions:{//异步操作
        delayChangeCount(store,num){
            setTimeout(()=>{
                store.commit('changeCount',num)
            },3000);//延时3秒执行
        }
    },
    modules:{

    }
})
export default store
App.vue 添加
<template>
  <p>{{ $store.state.heave }}</p>
  <button @click="handler">点我</button>
</template>
<script>
import Demo1 from "./components/Demo1.vue"
import axios from 'axios'
export default{
  data(){
      return{
      }
  },
  created(){
    this.handler()
  },
  methods:{
    handler(){
      this.$store.commit('changeCount',1)//mutations
      this.$store.commit('changeCount',2)
      this.$store.commit('changeCount',3)
      this.$store.dispatch('delayChangeCount',10)//actions
      console.log(this.$store.getters.len)//getters
    }
  }
}
</script>
可以在devtools看到vuex的执行。

至于modules的使用,需要使比如moduleA.js成为命名空间模块
const moduleA ={
    namespaced:true,
//开启namespace:true,该模块就成为命名空间模块了
    state:{
        count:10,
        countA:888
    },
    getters:{...},
    mutations:{...},
    actions:{...}
}
然后在store/index.js里使用如下方法引入,之后使用this.$store.moduleA.state.count访问count
import moduleA from './module/moduleA.js'
import { createStore } from 'vuex'
const store = createStore({
  modules:{
    moduleA
  }
})
export default store
6. mock.js 模拟后台接口
使用 mock.js,前端调试可以模拟后台接口调用,返回我们定义的数据,解放了前后端开发的屏障。
详见:Mock.js 超全 超详细总结 保姆级别的教程 不喜欢码农的码农
npm install mockjs --save-dev

./src/mock/mock.js
// 引用 Mock
import Mock from 'mockjs'
Mock.mock("/data/list", "get", {
  data:{
    'age':23,
    'name':"@cname"
  },
  code: 200,
  message: 'ok',
});
main.js 加上
import './mock/mock.js'
App.vue
<template>
  <button @click="handler">点我</button>
</template>
<script>
//import Demo1 from "./components/Demo1.vue"
import axios from 'axios'

export default{
  data(){
      return{
      }
  },
  created(){
    axios.get('/data/list').then(res=>{console.log(res)})
  },
  methods:{
    handler(){}
  }
}
</script>
参考
30分钟学会Vue之VueRouter&Vuex 吴悠讲编程
20分钟学会Vue Router4(路由) 邓瑞编程
1天搞定SpringBoot+Vue全栈开发 刘老师教编程


 被折叠的 条评论
为什么被折叠?
被折叠的 条评论
为什么被折叠?
 到【灌水乐园】发言


