


UILable
展示一行或者多行只读文字的视图
text //文本内容
font //字体设置:大小、粗体、斜体
textColor //文本颜色
textAlignment //对齐方式:居左、居右、居中
numberOfLines //最大展示行数
lineBreakMode //文字间截断方式(NSLineBreakByClipping、NSLineBreakTruncatingMiddle 、NSLineBreakByTruncatingTail、NSLineBreakTruncatingHead)
-(void)sizeToFit; // 1.固定大小,通过展示行数阶段;
// 2.可变大小使用sizeToFit确定大小;
// 3.从固定方向顺序逐一布局;
替换UITableViewCell中的默认布局样式,使用自定义UILable进行复杂布局
//
//  GSCNormalTableViewCell.m
//  GSCApp1
//
//  Created by gsc on 2024/5/15.
//

#import "GSCNormalTableViewCell.h"

@interface GSCNormalTableViewCell()

@property(nonatomic,strong, readwrite) UILabel *titleLable;
@property(nonatomic,strong, readwrite) UILabel *sourceLable;
@property(nonatomic,strong, readwrite) UILabel *commentLable;
@property(nonatomic,strong, readwrite) UILabel *timeLable;

@end


@implementation GSCNormalTableViewCell

- (void)awakeFromNib {
    [super awakeFromNib];
    // Initialization code
}

- (void)setSelected:(BOOL)selected animated:(BOOL)animated {
    [super setSelected:selected animated:animated];

    // Configure the view for the selected state
}

- (instancetype)initWithStyle:(UITableViewCellStyle)style reuseIdentifier:(nullable NSString *)reuseIdentifier {
    self = [super initWithStyle:style reuseIdentifier:reuseIdentifier];
    if(self){
        [self.contentView addSubview:({
            self.titleLable = [[UILabel alloc] initWithFrame:CGRectMake(20, 15, 300, 50)];
//            self.titleLable.backgroundColor = [UIColor lightGrayColor];
            self.titleLable.font = [UIFont systemFontOfSize:16];
            self.titleLable.textColor = [UIColor blackColor];
            self.titleLable;
                })];

        [self.contentView addSubview:({
            self.sourceLable = [[UILabel alloc] initWithFrame:CGRectMake(20, 80, 50, 20)];
//            self.sourceLable.backgroundColor = [UIColor grayColor];
            self.sourceLable.font = [UIFont systemFontOfSize:12];
            self.sourceLable.textColor = [UIColor lightGrayColor];
            self.sourceLable;
                })];

        [self.contentView addSubview:({
            self.commentLable = [[UILabel alloc] initWithFrame:CGRectMake(100, 80, 50, 20)];
//            self.commentLable.backgroundColor = [UIColor grayColor];
            self.commentLable.font = [UIFont systemFontOfSize:12];
            self.commentLable.textColor = [UIColor lightGrayColor];
            self.commentLable;
                })];

        [self.contentView addSubview:({
            self.timeLable = [[UILabel alloc] initWithFrame:CGRectMake(200, 80, 50, 20)];
//            self.timeLable.backgroundColor = [UIColor grayColor];
            self.timeLable.font = [UIFont systemFontOfSize:12];
            self.timeLable.textColor = [UIColor lightGrayColor];
            self.timeLable;
                })];
    }
    return self;
}

-(void) layoutTableViewCell{
    self.titleLable.text = @"GSC的IOS学习日记";

    self.sourceLable.text = @"GSC";
    [self.sourceLable sizeToFit];

    self.commentLable.text = @"1888 comments";
    [self.commentLable sizeToFit];
    self.commentLable.frame = CGRectMake(
                                         self.sourceLable.frame.origin.x + self.sourceLable.frame.size.width + 15,
                                         self.commentLable.frame.origin.y,
                                         self.commentLable.frame.size.width,
                                         self.commentLable.frame.size.height);

    self.timeLable.text = @"10 min ago";
    [self.timeLable sizeToFit];
    self.timeLable.frame = CGRectMake(
                                         self.commentLable.frame.origin.x + self.commentLable.frame.size.width + 15,
                                         self.commentLable.frame.origin.y,
                                         self.timeLable.frame.size.width,
                                         self.timeLable.frame.size.height);
}

@end
UIImage&UIImageView的应用
UIImage使用场景:
1.通过UIImageView视图展示;
2.系统封装视图的图片展示;
3.上下文中绘制;
在IOS中的图片数据都会被封装成UIImage
+ (nullable UIImage *)imageNamed:(NSString *)name;    //load from main bundle
+ (nullable UIImage *)imageWithContentsOfFile:(NSString *)path;
+ (nullable UIImage *)imageWithData:(NSData *)data;
+ (UIImage *)imageWithCGImage:(CGImageRef)cgImage;
展示静态图片:
UIImageView.image = UIImage展示一组静态图片成为动图
/*
1.UIImageView.animationImages = @[UIImage1,UIImage2,...];
2.UIImageView.animationDuration = 1;
3.[UIImageView startAnimating];
*/
UIViewContentMode
当图片尺寸和UIImageView尺寸不符时,可选择自定义填充方式。
替换UITableViewCell中默认布局样式,使用自定义UIImageView进行复杂布局。
[self.contentView addSubview:({
            self.rightImageView = [[UIImageView alloc] initWithFrame:CGRectMake(300, 15, 70, 70)];
            self.rightImageView.backgroundColor = [UIColor whiteColor];
            self.rightImageView.contentMode = UIViewContentModeScaleAspectFit;
            self.rightImageView;
        })];

self.rightImageView.image = [UIImage imageNamed:@"icon.bundle/eason1@2x"];
UIButton
可以展示文字、图片,除静态展示的功能外还增加了用户交互功能。
1.默认的UIButton提供imageView和titleLabel的基本布局;
2.通过设置enabled/selected/highlighted改变基本状态;
3.每种状态下都有对应的视图;
4.可以忽略默认视图,直接自定义subView;
-(void)setTitle:(nullable NSString *)title
       forState:(UIControlState)state;
添加UIButton实现基础功能:
[self.contentView addSubview:({
            self.deletButton = [[UIButton alloc] initWithFrame:CGRectMake(290, 80, 30, 20)];
            [self.deletButton setTitle:@"X" forState:UIControlStateNormal];
            [self.deletButton setTitle:@"V" forState:UIControlStateHighlighted];
            self.deletButton.backgroundColor = [UIColor blueColor];
            self.deletButton;
        })];
Target-Action
当某个事件触发时,调用对应target对象的相应方法;
传值的限制较多;
[self.button addTarget:self
                action:@selector(clickButton)
      forControlEvents:UIControlEventTouchUpInside];
UIButton通过Target-Action的模式处理点击逻辑;
系统封装用户操作事件;
对应事件开发者实现自定义的方法;
-(void)deleteButtonClicked{
    NSLog(@"deleteButtonClicked");
}


[self.contentView addSubview:({
            self.deletButton = [[UIButton alloc] initWithFrame:CGRectMake(290, 80, 30, 20)];
            [self.deletButton setTitle:@"X" forState:UIControlStateNormal];
            [self.deletButton setTitle:@"V" forState:UIControlStateHighlighted];
            self.deletButton.backgroundColor = [UIColor blueColor];
            [self.deletButton addTarget:self action:@selector(deleteButtonClicked) forControlEvents:UIControlEventTouchUpInside];
            self.deletButton;
        })];
UIControl作为弗雷,继承了所有子类可能用到的事件;
系统级封装的可交互视图,都继承自UIControl;
UIView(渲染绘制/子视图管理) -> UIControl(处理交互) -> UIButton、UISwitch、UISlider...(特殊场景的布局)
UIGestureRecognizer
用于识别用户在屏幕中的触摸
/*
UITapGestureRecognizer
UIPinchGestureRecognizer
UIRotationGestureRecognizer
UISwipeGestureRecognizer
UIPanGestureRecognizer
UILongPressGestureRecognizer
*/
可以在任何视图上,增加一个或者多个手势,系统自动识别手势,开发者自定义响应逻辑
采用Target- Action的方式进行管理
1.创建手势;
2.设置响应处理;
3.在视图中添加;
UIGestureRecognizerDelegate
手势的不同阶段
通过delegate的方式扩展在手势识别过程中的自定义操作:
1.是否响应手势;
2.是否支持多手势;
3.多个手势冲突时如何处理;
UIAlertView(deprecated)
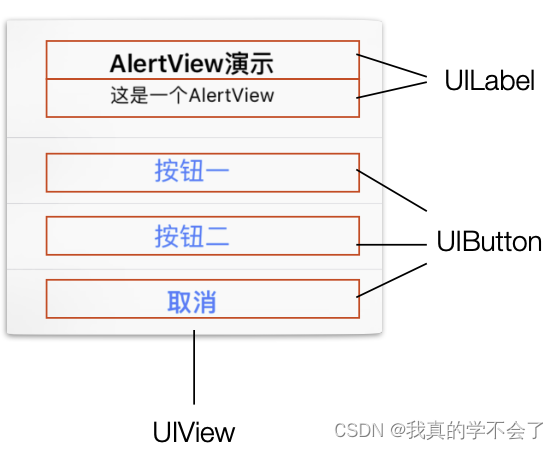
通过UIView/UILable/UIButton可以组装成任何复杂的支持交互的视图组件
组件内封装基本逻辑,开发者提供需要展示的数据,将基本逻辑中的可定制业务封装Delegate
组件内封装基本逻辑:
1.创建View、Lable、Button以及分割线
2.设置基本的样式、字体大小等
3.内置Button点击手势,取消隐藏
开发者提供需要展示的数据
1.主题文字、副标题文字
2.按钮文字
将基本逻辑中的可定制业务,封装Delegate
1.点击按钮之后的业务逻辑
2.展示AlertView前后的处理逻辑
UIKit的使用
提供构建App最核心的模块:主要提供处理视图展示内容,以及和用户的交互
基于MVC的设计模式:系统封装视图和逻辑,开发者提供数据驱动
交互:通过Delegate方式或者Target-Action方式


 被折叠的 条评论
为什么被折叠?
被折叠的 条评论
为什么被折叠?
 到【灌水乐园】发言


