


正文共:1666 字 16 图,预估阅读时间:2 分钟
我们现在已经了解了基于策略的IPsec VPN(Policy-Based IPsec VPNs)的WEB配置方式(配置Juniper虚墙vSRX基于策略的IPsec VPN(WEB方式))和CLI配置方式(配置Juniper虚墙vSRX基于策略的IPsec VPN(CLI方式)),也学习了基于路由的VPN(Route-Based IPsec VPNs)的WEB配置方式(配置Juniper虚墙vSRX基于路由的IPsec VPN(WEB方式))。
通过比较,我们可以看到基于策略的IPsec VPN和基于路由的IPsec VPN可以提供相同的功能,但后者只有一组IKE SA和IPsec SA在起作用,能节省系统资源。在具体实现上,基于路由的VPN通过将VPN隧道和VPN隧道安全隧道接口(st0.x)进行绑定,系统在查找路由表转发时,就可以将流量转发到VPN隧道了。
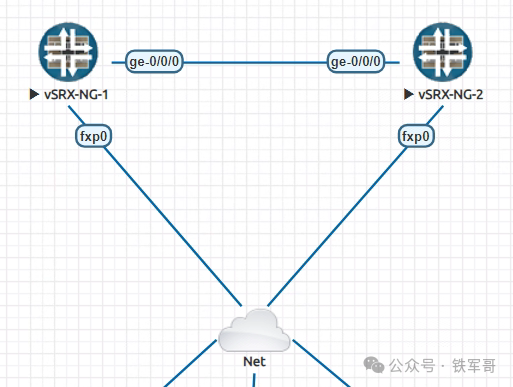
我们还是沿用之前的实验拓扑,用命令行配置一下。
关于命令行的简单介绍,可以之前的文章(配置Juniper虚墙vSRX基于策略的IPsec VPN(CLI方式))。

1、配置系统管理
登录设备命令行,配置设备名称和root账户密码,开启root账户的SSH远程登录,并配置管理口IP地址。
cli
configure
set system host-name vSRX1
set system root-authentication plain-text-password
set system services ssh root-login allow
set interfaces fxp0 unit 0 family inet address 192.168.1.75/24
commit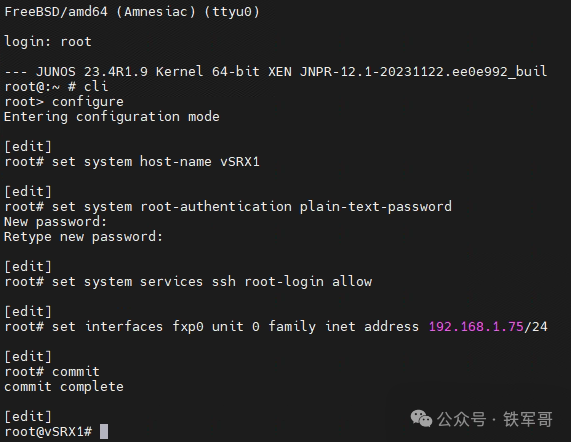

2、配置流量接口及转发路由
配置互联接口ge-0/0/0、内网接口ge-0/0/1和ge-0/0/2,同时创建一个安全隧道接口(secure tunnel interface,st)st0,并配置IP地址;为去往对端的流量添加静态路由,指定出接口为st0.0。
set interfaces ge-0/0/0 unit 0 family inet address 12.1.1.1/24
set interfaces ge-0/0/1 unit 0 family inet address 11.1.1.1/24
set interfaces ge-0/0/2 unit 0 family inet address 10.11.1.1/24
set interfaces st0 unit 0 family inet address 10.12.1.1/24
set routing-options static route 22.1.1.0/24 next-hop st0.0
set routing-options static route 10.22.1.0/24 next-hop st0.0
commit

3、配置接口加入到安全域
将逻辑接口ge-0/0/0.0、ge-0/0/1.0、ge-0/0/2.0和st0.0都加入到trust安全域,配置trust安全域的策略为允许所有流量和服务。
set security zones security-zone trust interfaces ge-0/0/0.0
set security zones security-zone trust interfaces ge-0/0/1.0
set security zones security-zone trust interfaces ge-0/0/2.0
set security zones security-zone trust interfaces st0.0
set security zones security-zone trust host-inbound-traffic system-services all
set security zones security-zone trust host-inbound-traffic protocols all
commit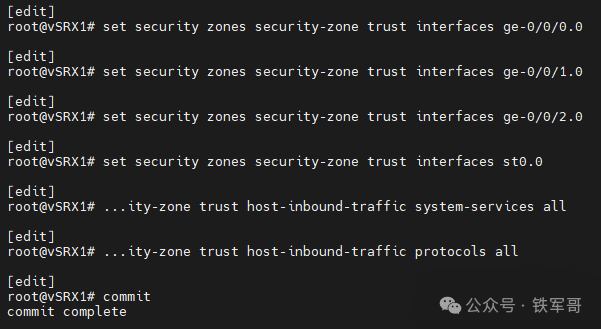
此时,两个安全隧道接口st0之间是不通的,与之对应的子网之间也不通。


4、创建安全策略
正常来讲是不需要创建地址组的;在安全策略配置中,为了省事,配置匹配所有源地址、所有目的地址、所有应用,执行动作为允许。
set security policies from-zone trust to-zone trust policy default-permit match source-address any
set security policies from-zone trust to-zone trust policy default-permit match destination-address any
set security policies from-zone trust to-zone trust policy default-permit match application any
set security policies from-zone trust to-zone trust policy default-permit then permit
commit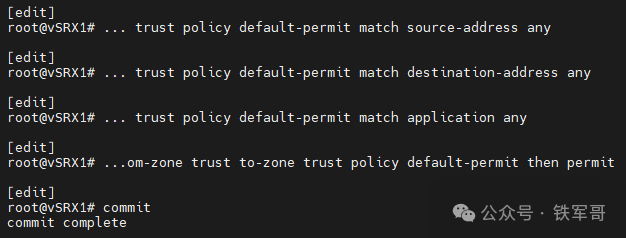

5、配置一阶段IKE策略
配置IKE提议,认证方式为预共享密钥,DH组、加密算法使用和页面侧的默认配置相同;配置IKE策略,默认使用主模式,引用IKE提议ike,并配置预共享密钥;配置IKE网关信息,需要包含本端和对端网关配置,以及IKE版本等信息。
set security ike proposal ike authentication-method pre-shared-keys
set security ike proposal ike dh-group group19
set security ike proposal ike encryption-algorithm aes-256-gcm
set security ike policy ike proposals ike
set security ike policy ike pre-shared-key ascii-text qweasd123
set security ike gateway gw address 12.1.1.2
set security ike gateway gw remote-identity inet 12.1.1.2
set security ike gateway gw external-interface ge-0/0/0
set security ike gateway gw local-address 12.1.1.1
set security ike gateway gw local-identity inet 12.1.1.1
set security ike gateway gw version v2-only
set security ike gateway gw ike-policy ike
commit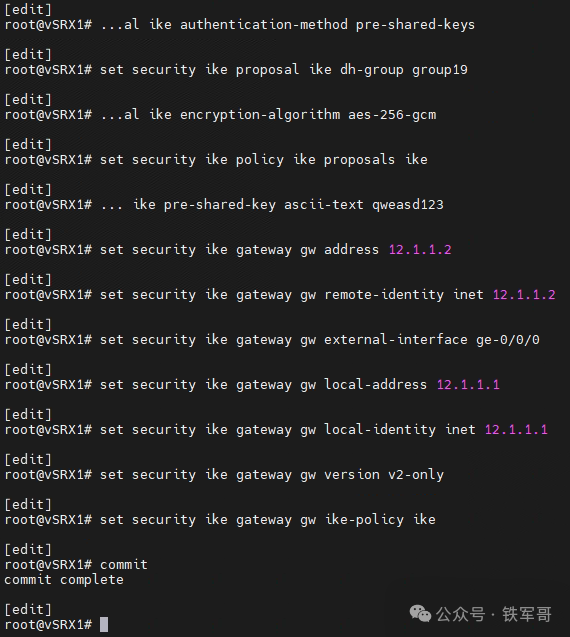

6、配置二阶段IPsec策略
配置IPsec提议,指定加密协议为ESP,并指定加密算法;配置IPsec策略,引用IPsec提议,配置PFS使用group19;配置VPN,指定IKE网关信息和IPsec策略,绑定隧道接口st0.0;不再指定流量策略,此时配置的就是基于路由的IPsec VPN;最后配置隧道立即协商。
set security ipsec proposal ipsec protocol esp
set security ipsec proposal ipsec encryption-algorithm aes-256-gcm
set security ipsec policy ipsec proposals ipsec
set security ipsec policy ipsec perfect-forward-secrecy keys group19
set security ipsec vpn ipsec ike gateway gw
set security ipsec vpn ipsec ike ipsec-policy ipsec
set security ipsec vpn ipsec bind-interface st0.0
set security ipsec vpn ipsec establish-tunnels immediately
commit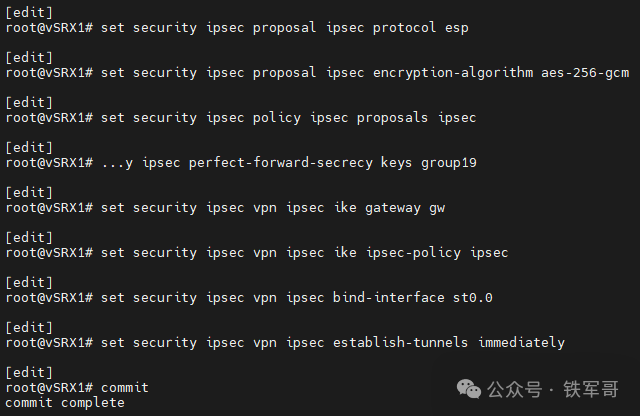

vSRX2配置
对应的,vSRX2与IPsec VPN相关的配置如下:
set interfaces ge-0/0/0 unit 0 family inet address 12.1.1.2/24
set interfaces ge-0/0/1 unit 0 family inet address 22.1.1.1/24
set interfaces ge-0/0/2 unit 0 family inet address 10.22.1.1/24
set interfaces st0 unit 0 family inet address 10.12.1.2/24
set routing-options static route 11.1.1.0/24 next-hop st0.0
set routing-options static route 10.11.1.0/24 next-hop st0.0
set security zones security-zone trust interfaces ge-0/0/0.0
set security zones security-zone trust interfaces ge-0/0/1.0
set security zones security-zone trust interfaces ge-0/0/2.0
set security zones security-zone trust interfaces st0.0
set security zones security-zone trust host-inbound-traffic system-services all
set security zones security-zone trust host-inbound-traffic protocols all
set security policies from-zone trust to-zone trust policy default-permit match source-address any
set security policies from-zone trust to-zone trust policy default-permit match destination-address any
set security policies from-zone trust to-zone trust policy default-permit match application any
set security policies from-zone trust to-zone trust policy default-permit then permit
set security ike proposal ike authentication-method pre-shared-keys
set security ike proposal ike dh-group group19
set security ike proposal ike encryption-algorithm aes-256-gcm
set security ike policy ike proposals ike
set security ike policy ike pre-shared-key ascii-text qweasd123
set security ike gateway gw address 12.1.1.1
set security ike gateway gw remote-identity inet 12.1.1.1
set security ike gateway gw external-interface ge-0/0/0
set security ike gateway gw local-address 12.1.1.2
set security ike gateway gw local-identity inet 12.1.1.2
set security ike gateway gw version v2-only
set security ike gateway gw ike-policy ike
set security ipsec proposal ipsec protocol esp
set security ipsec proposal ipsec encryption-algorithm aes-256-gcm
set security ipsec policy ipsec proposals ipsec
set security ipsec policy ipsec perfect-forward-secrecy keys group19
set security ipsec vpn ipsec ike gateway gw
set security ipsec vpn ipsec ike ipsec-policy ipsec
set security ipsec vpn ipsec bind-interface st0.0
set security ipsec vpn ipsec establish-tunnels immediately
commit
验证配置

查看接口,通过命令行创建的安全隧道接口st0.0是不带IPv6地址的。

查看IKE SA信息。
show security ike security-associations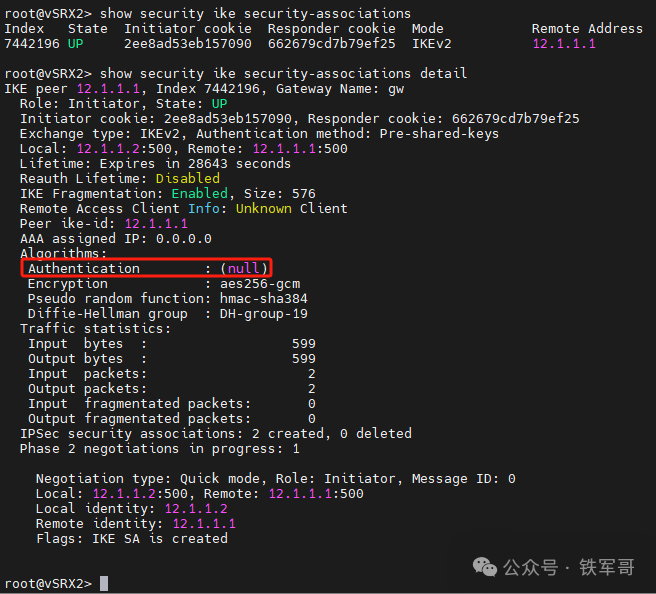
可以看到,虽然没有配置IKE的认证算法,但是不影响双方进行协商;而且页面也没有进行配置的地方,只有在命令行可以配置。
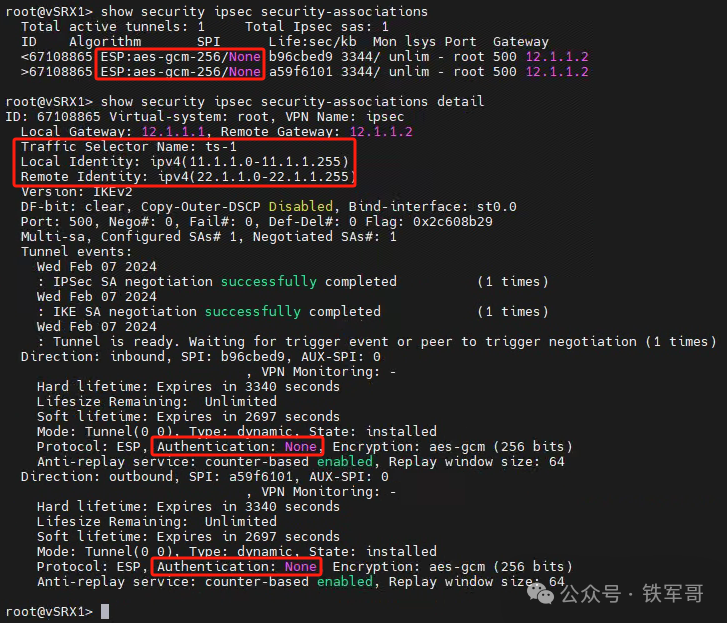
查看IPsec SA信息。
show security ipsec security-associations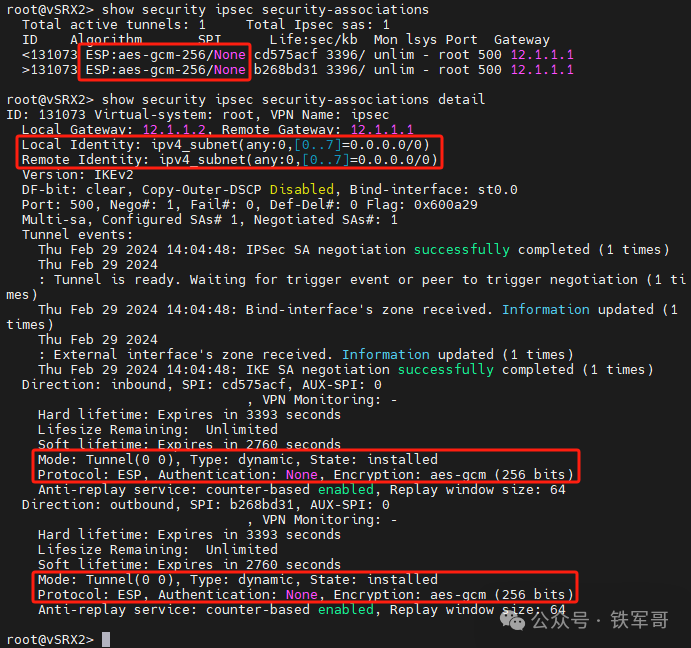
与基于策略的IPsec VPN相比,缺少了Traffic Selector部分,本端和对端的标识都是any。
查看IPsec统计信息。
show security ipsec statistics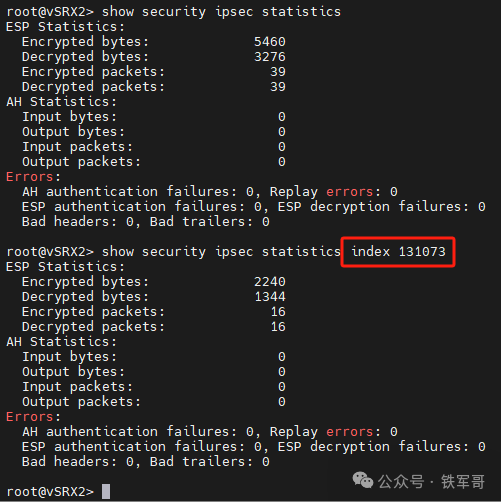
注意,如果有多个IPsec SA,则需要通过指定index编号进行筛选,可以在IPsec SA中查看。
接下来,让我们去页面看一眼展示是否正常。
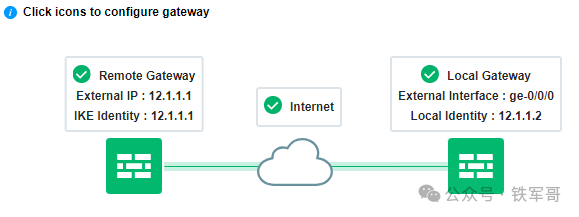
可以看到,协商成功之后,链路的颜色也变成绿色的了。
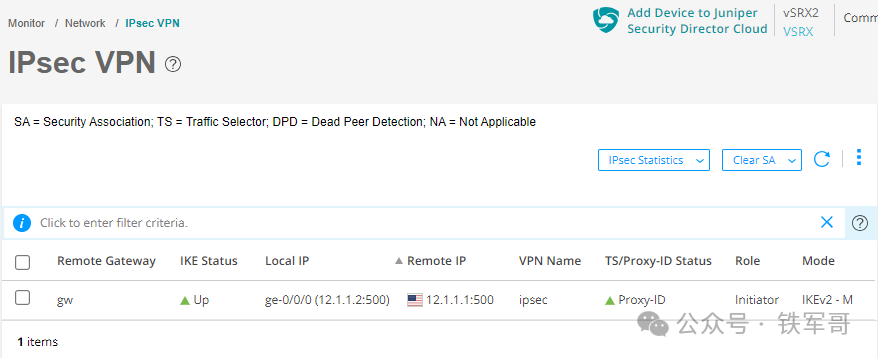
检查IPsec VPN的监控信息,也是正常的,没有问题。
看一眼地址组的问题。
真神奇,他又把匹配的流量自动配置上去了。

总结

1、和大多数厂商一样,vSRX在命令行配置IPsec VPN能实现更完整的功能配置,虽然配置效率和直观性不如WEB页面,但命令行配置完整性和效果更胜一筹;
2、命令行区分基于策略还是基于路由的方式很明显,在IPsec策略中绑定了接口的就是基于路由的,要结合静态路由使用;在IPsec策略中指定了感兴趣流的就是基于策略的,也要结合静态路由,只是下一跳不同;(怎么感觉官方手册基于策略的IPsec VPN的配置指导又写错了?)
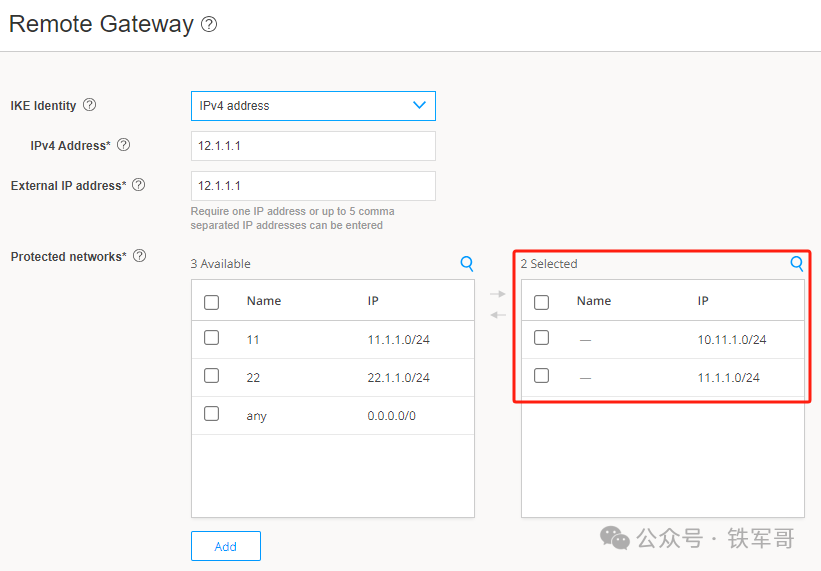
3、跟上次一样,WEB页面配置中出现了很多多余的配置,比如地址组对象等,在实际使用中可能会误导用户,需要注意。

长按二维码
关注我们吧


配置Juniper虚墙vSRX基于路由的IPsec VPN(WEB方式)
配置Juniper虚墙vSRX基于策略的IPsec VPN(WEB方式)
配置Juniper虚墙vSRX基于策略的IPsec VPN(CLI方式)
CentOS 7.9安装Tesla M4驱动、CUDA和cuDNN
复制成功!GTX1050Ti换版本安装Pytorch、CUDA和cuDNN
成了!Tesla M4+Windows 10+Anaconda+CUDA 11.8+cuDNN+Python 3.11
Ubuntu 23.10通过APT安装Open vSwitch
轻轻松松达到1.8 Gbps,果然HCL还是搭配高档电脑更好使


 8403
8403


 被折叠的 条评论
为什么被折叠?
被折叠的 条评论
为什么被折叠?
 到【灌水乐园】发言


