


node 生成word ,调研的技术有3种,下面分别说明优缺点:
应用场景:根据模板生成word文件,需要有页眉页脚,最好可以像模块一样,导入多个文件,生成一个文件
1.art-template + html-docx-js
优点:语法简单,使用方便,可以给每个art文件导入样式,支持多文件拼接,拼接内容之间无间隙,预览很方便,可以直接使用模板里的HTML
缺点:因为每个art文件的内容不固定,所以没办法设置页眉页脚
使用方式如下:
npm install art-template
art模板文件的语法可以参照官网,官网有详细说明
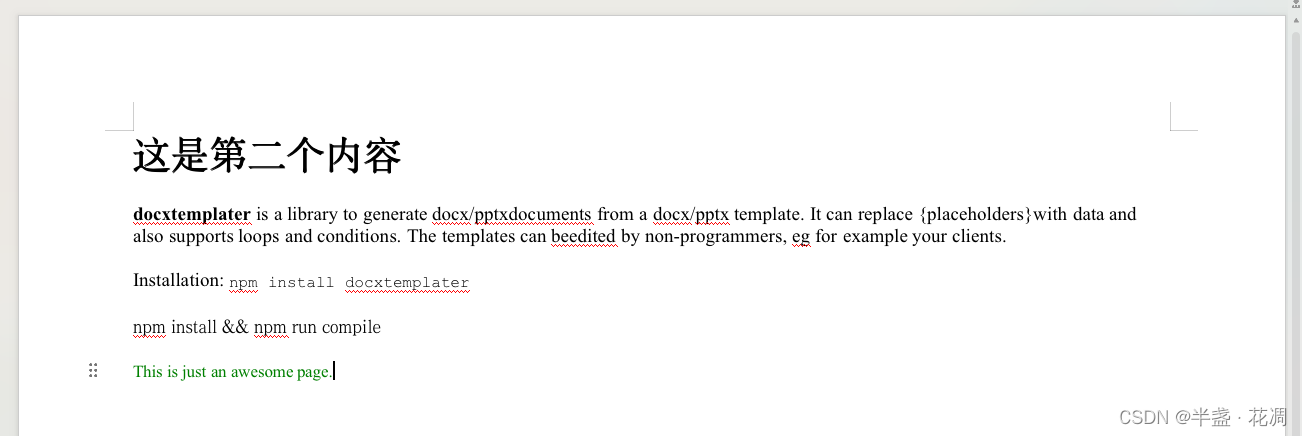
art1.art文件内容
<h1>{{title}}</h1>

<p><strong>docxtemplater</strong> is a library to generate docx/pptx
documents from a docx/pptx template. It can replace {placeholders}
with data and also supports loops and conditions. The templates can be
edited by non-programmers, eg for example your clients.</p>

<p>Installation: <code>npm install docxtemplater</code></p>


<code> npm install && npm run compile </code>
art2.art文件内容:
<style>
{{include './custom2.css'}}
</style>
<p class='title2'>This is just an awesome page.</p>
custom2.css
.title2{
  color:green
}
index.js文件内容
const template = require("art-template");
const path = require("path");
const htmlDocx = require("html-docx-js");
const fs = require("fs");
const stream = require("stream");
// 用于存储文件数量,可以让每次生成文件的名称不一样
const LocalStorage = require("node-localstorage").LocalStorage;
const localStorage = new LocalStorage("./scratch");
let count = localStorage.getItem("count") || 0;


// 获取模板
function getTemplate(artFileName) {
  const views = path.join(__dirname, "../views", artFileName + ".art"); // 模板路径
  const htmlStr = template(views, {
    title: "这是第二个内容",
  });
  return htmlStr;
}

// 拼接模板 生成word
async function jointTemplate(templateArr) {
  let htmlStr = "";
  templateArr.forEach((item) => {
    htmlStr += getTemplate(item);
  });
  count = count - 0 + 1;
  localStorage.setItem("count", count);
  const fileName = `测试Demo${count}`;
  const htmlBlob = htmlDocx.asBlob(htmlStr, { orientation: "landscape" }); //buffer
  const docxPath = path.join(__dirname, "../views", fileName + ".docx");

  // 创建一个bufferstream
  const bufferStream = new stream.PassThrough();
  //将Buffer写入
  bufferStream.end(htmlBlob);
   //创建文件流写入文件
  var out = await fs.createWriteStream(docxPath);
  //创建文件流写入文件
  bufferStream.pipe(out);
  //读取文件流
  // const fileContent = fs.readFileSync(docxPath, "binary");
  return new Promise((resolve, reject) => {
    resolve("");
  });
}

 const params = ['art1','art2']
 jointTemplate(params).then((result) => {
    res.json(result);
 });
结果如下所示:
2.officegen
这个很类似给Html添加子元素一样。创建一个元素,给元素添加内容,设置样式
官网:没有官网
gitHub:https://github.com/Ziv-Barber/officegen#readme
优点:语法简单,使用方便,可以设置页眉页脚
缺点:页脚不能动态的设置页码,不能多文件拼接,无法适应复杂需求,预览需要word转html
使用方式如下:
npm install officegen
const path = require("path");
const fs = require("fs");
const officegen = require("officegen");
const LocalStorage = require("node-localstorage").LocalStorage;
const localStorage = new LocalStorage("./scratch");
let count = localStorage.getItem("count") || 0;


async function jointTemplate() {
  count = count - 0 + 1;
  localStorage.setItem("count", count);
  const fileName = `测试Demo${count}`;
  const docxPath = path.join(__dirname, "../views", fileName + ".docx");

  var docx = officegen("docx");
  var out = await fs.createWriteStream(docxPath); // 文件写入
  //修改文字大小字体等
  let pObj = docx.createP();

  pObj.addText("Simple");
  pObj.addText(" with color", { color: "000088" });
  pObj.addText(" and back color.", { color: "00ffff", back: "000088" });

  pObj = docx.createP();

  pObj.addText("Since ");
  pObj.addText("officegen 0.2.12", {
    back: "00ffff",
    shdType: "pct12",
    shdColor: "ff0000",
  }); // Use pattern in the background.
  pObj.addText(" you can do ");
  pObj.addText("more cool ", { highlight: true }); // Highlight!
  pObj.addText("stuff!", { highlight: "darkGreen" }); // Different highlight color.

  pObj = docx.createP();

  pObj.addText("Even add ");
  pObj.addText("external link", { link: "https://github.com" });
  pObj.addText("!");
  // pObj.addText(fileContent, { font_face: "仿宋", font_size: 18 });
  // 添加页眉
  var header = docx.getHeader().createP();
  header.addText("这是页眉你来添加内容");
  // 添加页脚
  var footer = docx.getFooter().createP();
  footer.addText("这是页脚你来添加内容", {
    align: "center",
  });
  docx.generate(out);

  return new Promise((resolve, reject) => {
    resolve("");
  });
}


  jointTemplate().then((result) => {
    res.json(result);
  });
生成效果如下:

3.docxtemplater
以word文件为模板,读取之后填充变量的内容,再写入文件
官网:Documentation | docxtemplater
优点:语法还好,使用方便,可以设置页眉页脚,可以动态设置变量,如果购买了的话,就可以支持html,这样预览很方便,可以直接使用插入的html,或者art-template和docxtemplate结合使用
缺点:不支持文件拼接,但可以使用docx-merger 来拼接文件,这个拼接文件有一点缺陷,样式可能会丢失(其他文章说的,暂无发现,可能我的例子比较简单),拼接的内容会重起一页进行拼接,不会直接接在上一个文件内容的下面,docx-merge会在补充里说到
这个插件支持xml,html,以及table,image等等,具体可以研究官方文档。
xml是免费的,docx模板的语法是{@rawXml},rawXml是变量。在index.js中赋值就可以。
但是html是收费的,docx模板的语法是{~~html},html是变量,在index.js中赋值就可以
使用方式如下:
npm install docxtemplater
docx模板:不知道怎么上传,就截图吧
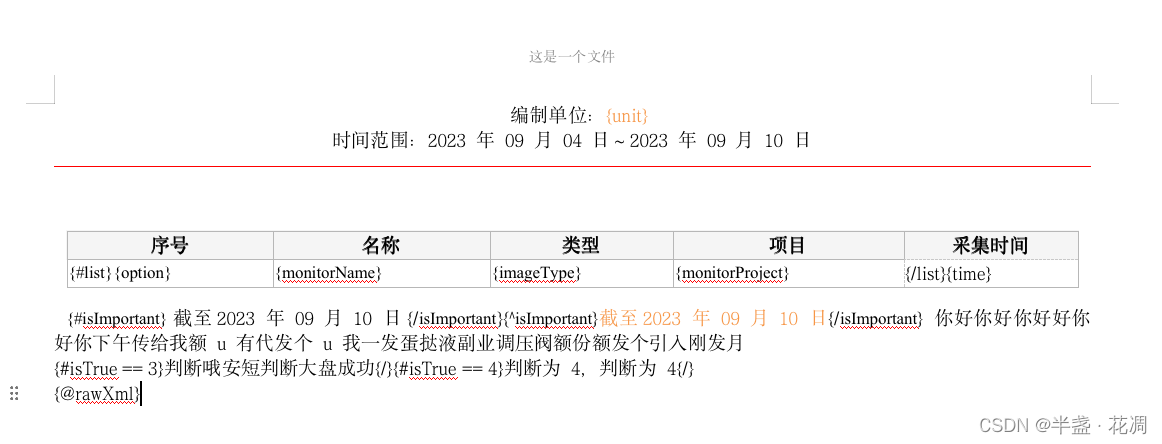
index.js
const path = require("path");
const fs = require("fs");
const expressionParser = require("docxtemplater/expressions.js");
var PizZip = require("pizzip");
const Docxtemplater = require("docxtemplater");
const libre = require("libreoffice-convert");
libre.convertAsync = require("util").promisify(libre.convert);
const LocalStorage = require("node-localstorage").LocalStorage;
const localStorage = new LocalStorage("./scratch");
let count = localStorage.getItem("count") || 0;
// 拼接模板 生成word
async function jointTemplate() {
// let htmlStr = getTemplate(templateArr[0]);
count = count - 0 + 1;
localStorage.setItem("count", count);
const fileName = `测试Demo${count}`;
const docxPath = path.join(__dirname, "../views", fileName + ".docx");
const docxPath2 = path.resolve(__dirname, "../views/template3.docx");
// const pdfPath = path.join(__dirname, "../views", fileName + ".pdf");
const content = fs.readFileSync(docxPath2, "binary");
var zip = new PizZip(content);
var doc = new Docxtemplater(zip, { parser: expressionParser });
doc.setData({
unit: "xxx单位",
list: [
{
option: 1,
monitorName: "11111",
imageType: "图像",
monitorProject: "视频",
time: "2023-09-09 09:09:09",
},
{
option: 2,
monitorName: "222222",
imageType: "图像2",
monitorProject: "视频2",
time: "2023-09-09 09:09:09",
},
],
isImportant: false,
testIf: true,
isTrue: 4,
});
try {
// render the document (replace all occurences of {first_name} by John, {last_name} by Doe, ...)
doc.render();
} catch (error) {
var e = {
message: error.message,
name: error.name,
stack: error.stack,
properties: error.properties,
};
console.log(JSON.stringify({ error: e }));
// The error thrown here contains additional information when logged with JSON.stringify (it contains a property object).
throw error;
}
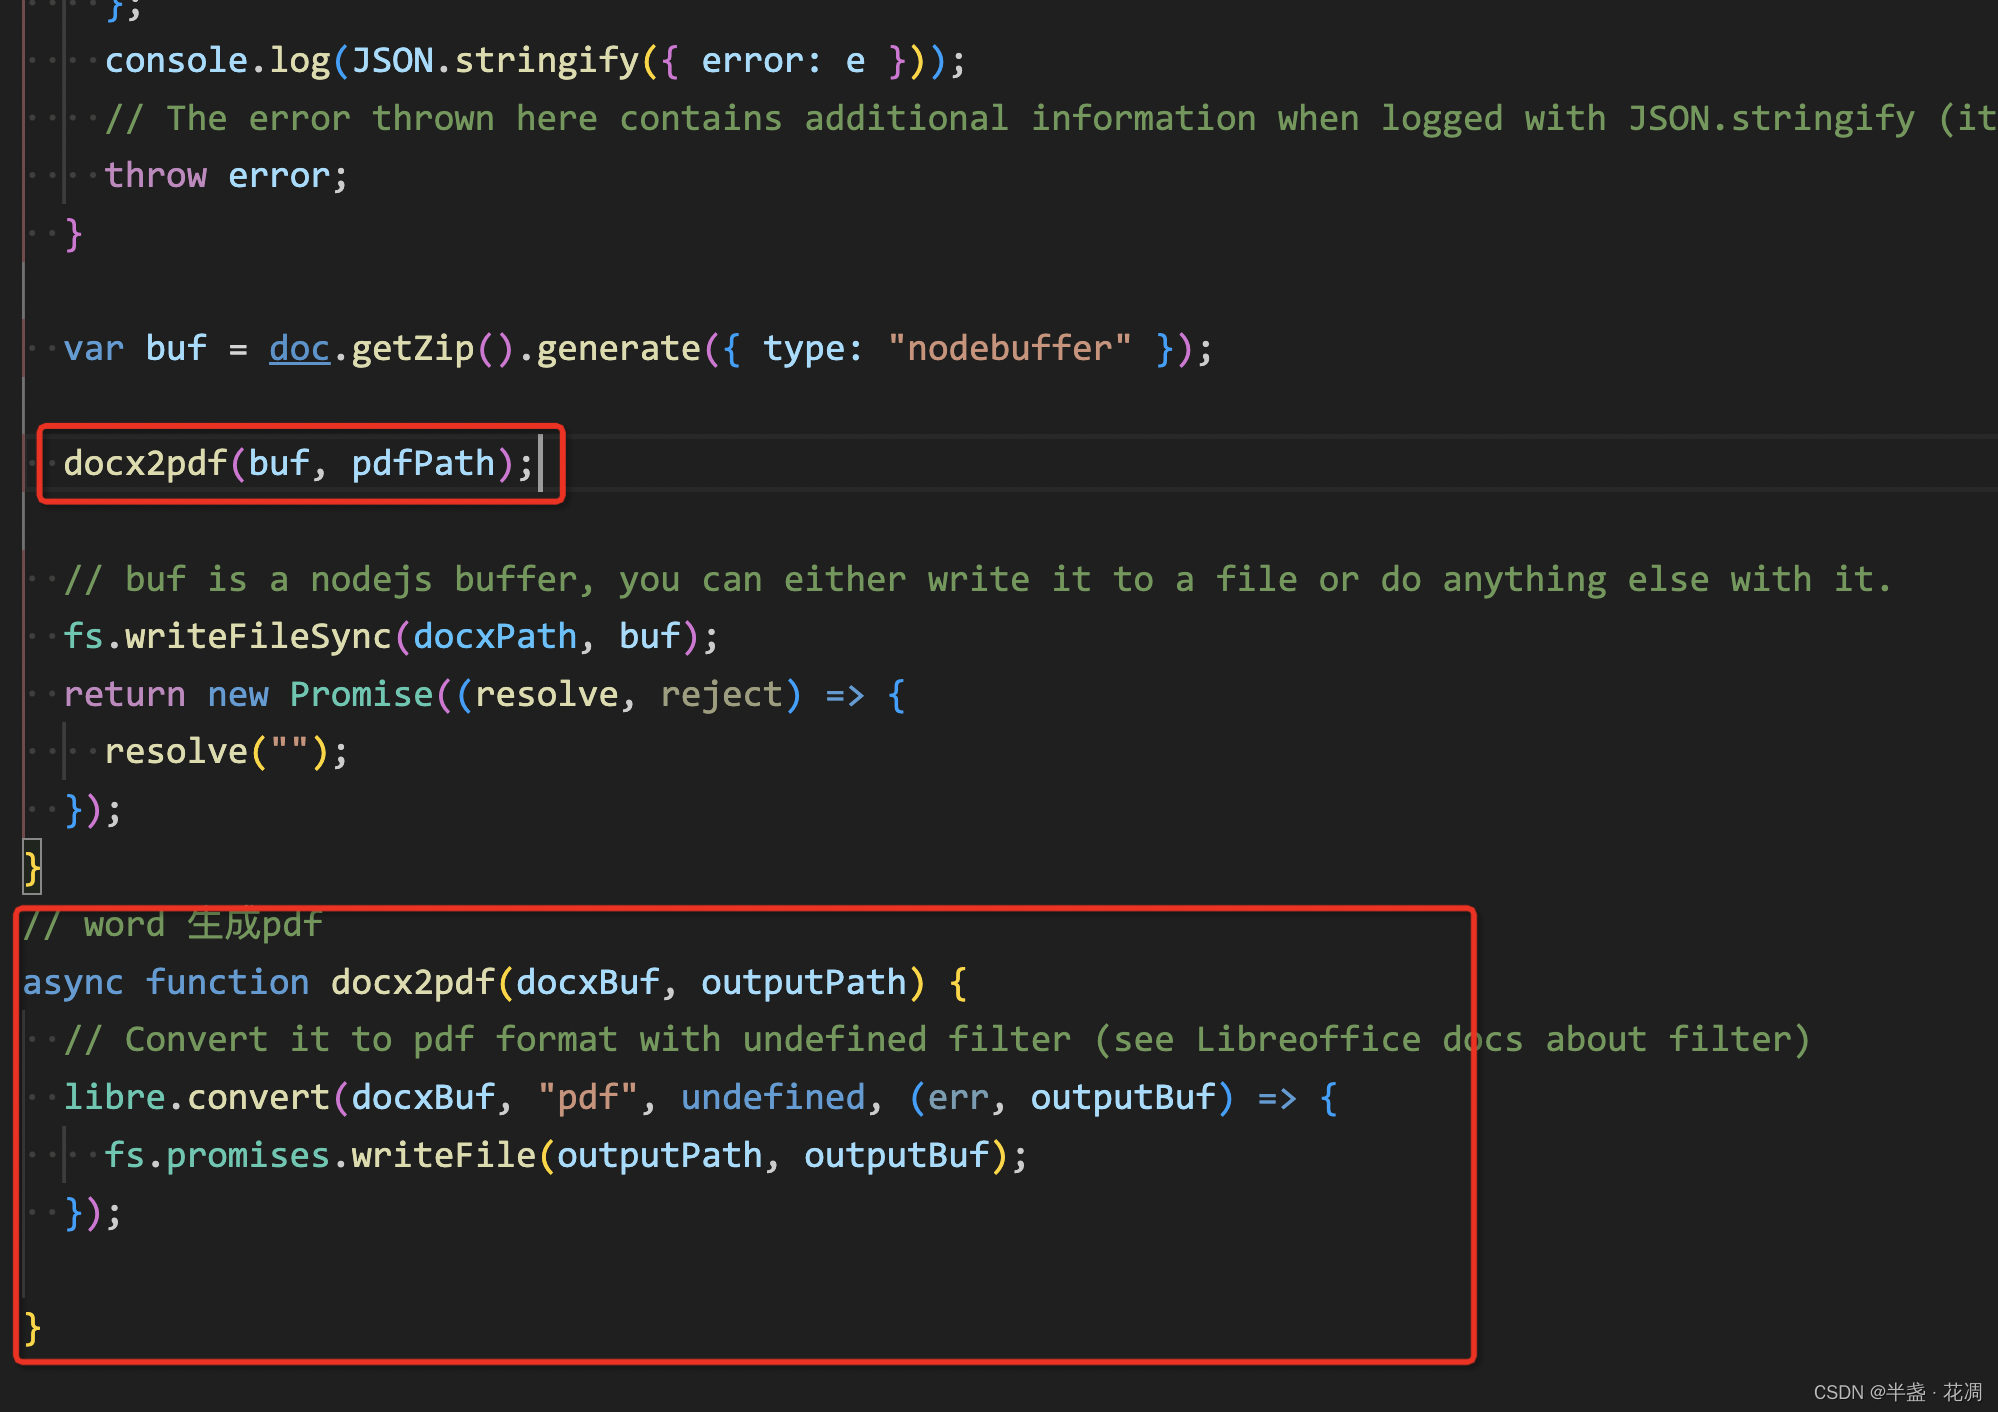
var buf = doc.getZip().generate({ type: "nodebuffer" });
// docx2pdf(buf, pdfPath);
// buf is a nodejs buffer, you can either write it to a file or do anything else with it.
fs.writeFileSync(docxPath, buf);
return new Promise((resolve, reject) => {
resolve("");
});
}
// word 生成pdf
async function docx2pdf(docxBuf, outputPath) {
// Convert it to pdf format with undefined filter (see Libreoffice docs about filter)
libre.convert(docxBuf, "pdf", undefined, (err, outputBuf) => {
fs.promises.writeFile(outputPath, outputBuf);
});
}
可以看到代码里有用到libreoffice-convert,这个是word转pdf的,补充里会说到
代码里还用到了这个,docxtemplater/expressions.js,条件语法需要用到这个来解析
生成的效果如下:
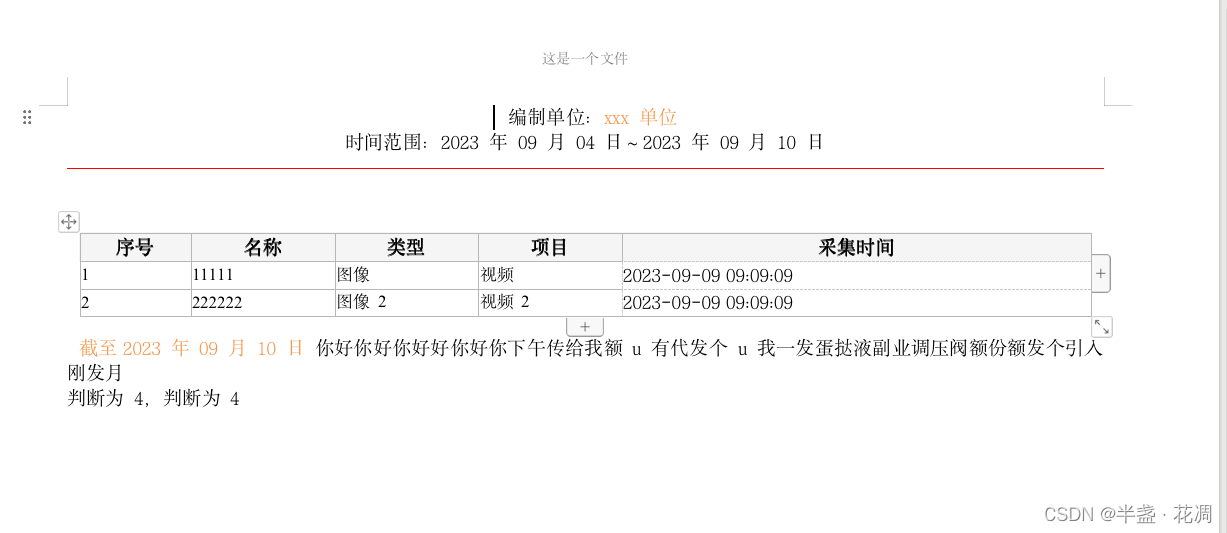
根据需求最后选择了docxtemplater,这个可以最大程度的满足需求,且模板使用方便
补充:
因为需求还要生成pdf,考虑到word可以转pdf,就用了libreoffice-convert这个插件
1.libreoffice-convert
官网:没找到官网
gitHub:GitHub - elwerene/libreoffice-convert
使用这个插件之前需要安装 软件:libreoffice,地址:Home | LibreOffice - Free Office Suite - Based on OpenOffice - Compatible with Microsoft
如果是mac:直接下载安装
window:下载msi文件
linux:用包管理器安装
翻了下源码,他的原理大概就是读取文件,用libreoffice软件转成pdf,再写入,然后我们再读取,再写入到设置的目录中,所以需要安装libreoffice软件
报错解决:
如果遇到这个报错:Could not find soffice binary
是因为没有安装软件libreoffice
安装一下可能会遇到下一个报错:
[Error: ENOENT: no such file or directory, open '/var/folders/jb/lj7y6n2107q7zk47582wds6h0000gn/T/libreofficeConvert_-26532-dgbge6muCOJX/source.pdf'] {
errno: -2,
code: 'ENOENT',
syscall: 'open',
path: '/var/folders/jb/lj7y6n2107q7zk47582wds6h0000gn/T/libreofficeConvert_-26532-dgbge6muCOJX/source.pdf'
}
这个报错是因为文件没有写入成功,找不到文件。可以检查下我们的代码,官方的写法是
// Convert it to pdf format with undefined filter (see Libreoffice docs about filter)
    let pdfBuf = await libre.convertAsync(docxBuf, ext, undefined);

// Here in done you have pdf file which you can save or transfer in another stream
    await fs.writeFile(outputPath, pdfBuf);
可以改成下面这种写法试一下:
const pdfPath = path.join(__dirname, "../views", "123.pdf");
const docxPath5 = path.resolve(__dirname, "../views/template3.docx");
const docxBuf = fs.readFileSync(docxPath5);
libre.convert(docxBuf, "pdf", undefined, (err, outputBuf) => {
fs.promises.writeFile(pdfPath, outputBuf);
});
用法如下所示,接着上面docxtemplater中index.js 的代码:
2.docx-merge
可以参考这篇文章
https://blog.csdn.net/CHANCE_wqp/article/details/131275952
使用如下
const path = require("path");
const fs = require("fs");
var PizZip = require("pizzip");
const Docxtemplater = require("docxtemplater");
const DocxMerger = require("docx-merger");
const LocalStorage = require("node-localstorage").LocalStorage;
const localStorage = new LocalStorage("./scratch");
let count = localStorage.getItem("count") || 0;

// 拼接模板
// templateArr - 文件名称列表
async function jointTemplate() {
  count = count - 0 + 1;
  localStorage.setItem("count", count);
  const fileName = `测试Demo${count}`;

  const docxPath = path.join(__dirname, "../views", fileName + ".docx");
  const docxPath2 = path.resolve(__dirname, "../views/template3.docx"); // 模板文件
  const docxPath4 = path.resolve(__dirname, "../views/testDoc.docx"); // 需要合并的文件(获取需要合并的模板文件)

  const fileContent = fs.readFileSync(docxPath4, "binary");
  const content = fs.readFileSync(docxPath2, "binary");
  var zip = new PizZip(content);
  var doc = new Docxtemplater();
  doc.loadZip(zip);
  doc.setData({
    unit: "xxx单位",
    list: [
      {
        option: 1,
        monitorName: "1监测点",
        imageType: "图像",
        monitorProject: "视频",
        time: "2023-09-09 09:09:09",
      },
      {
        option: 2,
        monitorName: "2监测点",
        imageType: "图像2",
        monitorProject: "视频2",
        time: "2023-09-09 09:09:09",
      },

    ],
    isImportant: false,
    testIf: true,
  });
  const zip2 = new PizZip(fileContent);
  var doc2 = new Docxtemplater();
  doc2.loadZip(zip2);

  try {
    // render the document (replace all occurences of {first_name} by John, {last_name} by Doe, ...)
    doc.render();
  } catch (error) {
    var e = {
      message: error.message,
      name: error.name,
      stack: error.stack,
      properties: error.properties,
    };
    console.log(JSON.stringify({ error: e }));
    // The error thrown here contains additional information when logged with JSON.stringify (it contains a property object).
    throw error;
  }
  var buf = doc.getZip().generate({ type: "nodebuffer" });
  const buf2 = doc2.getZip().generate({ type: "nodebuffer" });
  // content 不是buffer
  var docx = new DocxMerger({}, [buf,buf2 ]);
  docx.save("nodebuffer", function (data) {
    fs.writeFile(docxPath, data, function (err) {
      console.log(err);
    });
  });
  return new Promise((resolve, reject) => {
    resolve('');
  });
}

 jointTemplate().then((result) => {
    res.json(result);
  });


 被折叠的 条评论
为什么被折叠?
被折叠的 条评论
为什么被折叠?
 到【灌水乐园】发言


