


我们都了解ChatGPT,是Openai推出的基于GPT模型的新一代 AI助手,可以帮助解决我们在多个领域的问题。但是你会发现,在某些问题上,ChatGPT 需要经过不断的调教与沟通,才能得到接近正确的答案。对于你不太了解的领域领域,有时候连prompt都不知道怎么写。所以,在一个不熟悉的领域,要怎么向 ChatGPT 正确提问,得到正确答案呢?
哎,在你想到这个问题之前,已经有人想到了。既然ChatGPT是单次的人和模型的交互,那我能不能搞个自动化的工具,他能自主决策,根据模型的输出结果自动进行调教,知道输出一个比较准确的结果。
隆重推出Auto-GPT,它的官方简介:是一个实验性的开源应用程序,展示了GPT-4语言模型的能力。这个程序由GPT-4驱动,将LLM“思想”连接在一起,以自主地实现您设置的任何目标。作为GPT-4完全自主运行的最早示例之一,Auto-GPT突破了人工智能的极限,将AI进程推向了新高度 -- 自主人工智能。【来源:https://autogpt.cn/】
既然是这么好用的东西,那我们就赶紧把它部署到本地,用起来看看效果吧。使用官方推荐的docker方案进行部署,意思是直接使用官方的docker镜像了。
一、环境准备
1、docker-compose安装
使用docker部署autogpt需要使用docker-compose,要求最低的docker-compose版本是1.29的。如果没有安装docker-compose,可以参考我的这篇文章处理
Ubuntu22.04安装docker和docker-compose-CSDN博客
2、创建AutoGPT的文件夹,名字可以自己随意起
mkdir Auto-GPT
cd Auto-GPT
3、创建docker-compose.yml
在刚才创建的目录下,比如Auto-GPT下创建docker-compose.yml
touch docker-compose.yml
vi docker-compose.yml
然后复制以下内容到docker-compose.yml
如果你想运行<=0.47版本的AutoGPT,使用如下的配置
version: "3.9"
services:
  auto-gpt:
    image: significantgravitas/auto-gpt
    env_file:
      - .env
    profiles: ["exclude-from-up"]
    volumes:
      - ./auto_gpt_workspace:/app/auto_gpt_workspace
      - ./data:/app/data
      ## allow auto-gpt to write logs to disk
      - ./logs:/app/logs
      ## uncomment following lines if you want to make use of these files
      ## you must have them existing in the same folder as this docker-compose.yml
      #- type: bind
      #  source: ./azure.yaml
      #  target: /app/azure.yaml
      #- type: bind
      #  source: ./ai_settings.yaml
      #  target: /app/ai_settings.yaml
      #- type: bind
      #  source: ./prompt_settings.yaml
      #  target: /app/prompt_settings.yaml
如果想运行>0.47版本(包括master分之)的AutoGPT,使用下边的配置
version: "3.9"
services:
  auto-gpt:
    image: significantgravitas/auto-gpt
    env_file:
      - .env
    ports:
      - "8000:8000"  # remove this if you just want to run a single agent in TTY mode
    profiles: ["exclude-from-up"]
    volumes:
      - ./data:/app/data
      ## allow auto-gpt to write logs to disk
      - ./logs:/app/logs
      ## uncomment following lines if you want to make use of these files
      ## you must have them existing in the same folder as this docker-compose.yml
      #- type: bind
      #  source: ./ai_settings.yaml
      #  target: /app/ai_settings.yaml
      #- type: bind
      #  source: ./prompt_settings.yaml
      #  target: /app/prompt_settings.yaml
4、配置.env文件
在Auto-GPT目录下创建.env文件,或者直接下载github上的.env.template.文件后改名也可以。以.开头的文件在linux系统中默认是隐藏文件,ls -a就可以看到了
配置openapi的可以,在env文件中搜索OPENAI_API_KEY,把你在openai官网上申请的apikey保存到这里,注意=后边不要留空格
OPENAI_API_KEY=“你的openai的key”
5、下载官方镜像
如果下载镜像失败,可以参考我的这篇文章如何给docker配置一个镜像源
Ubuntu22.04安装docker和docker-compose-CSDN博客
需要拉取2个镜像,一个是autogpt官方的镜像,这样就不用在本地自己编了。
另一个是redis的镜像(可选,因为步骤3时默认没有依赖redis的镜像),autogpt运行的时候需要往redis中存储一些内容
# 拉取autogpt镜像
docker pull significantgravitas/auto-gpt

Using default tag: latest
latest: Pulling from significantgravitas/auto-gpt
648e0aadf75a: Pull complete
...........................
Digest: sha256:3d3de45fbb11ae09cd2fa9aa58e1529bdbfd2b487719b34b1462471e7c01a1ae
Status: Downloaded newer image for significantgravitas/auto-gpt:latest
docker.io/significantgravitas/auto-gpt:latest


# 拉取最新的redis镜像
docker pull redis/redis-stack-server:latest

latest: Pulling from redis/redis-stack-server
e0e7083ec54f: Download complete
.............
latest: Pulling from redis/redis-stack-server
........................
0f8da92db12c: Pull complete
Digest: sha256:92f0d6f0d2eb2582511f907f5bffbbedf10970e2427f4433ae2d3bec7e409c8b
Status: Downloaded newer image for redis/redis-stack-server:latest
docker.io/redis/redis-stack-server:latest

# 查看本地镜像
docker images
REPOSITORY                                              TAG                    IMAGE ID       CREATED         SIZE
significantgravitas/auto-gpt                            latest                 b84b958a693d   3 months ago    1.87GB
redis/redis-stack-server                                latest                 ebee26a6f063   5 weeks ago     462MB
二、启动服务
1、启动镜像
docker compose run --rm auto-gpt但是你大概率会遇到如下报错

2、连接openai超时问题处理
如何解决呢,可以打开env文件,你会看到一个配置项“OPENAI_API_BASE_URL”,可以配置代理,关于怎么配置openapi的代理,可以参考我的这篇文章
使用Cloudflare创建openai的反向代理-CSDN博客
修改我的OPENAI_API_BASE_URL的地址

修改完之后再次启动,终于成功了
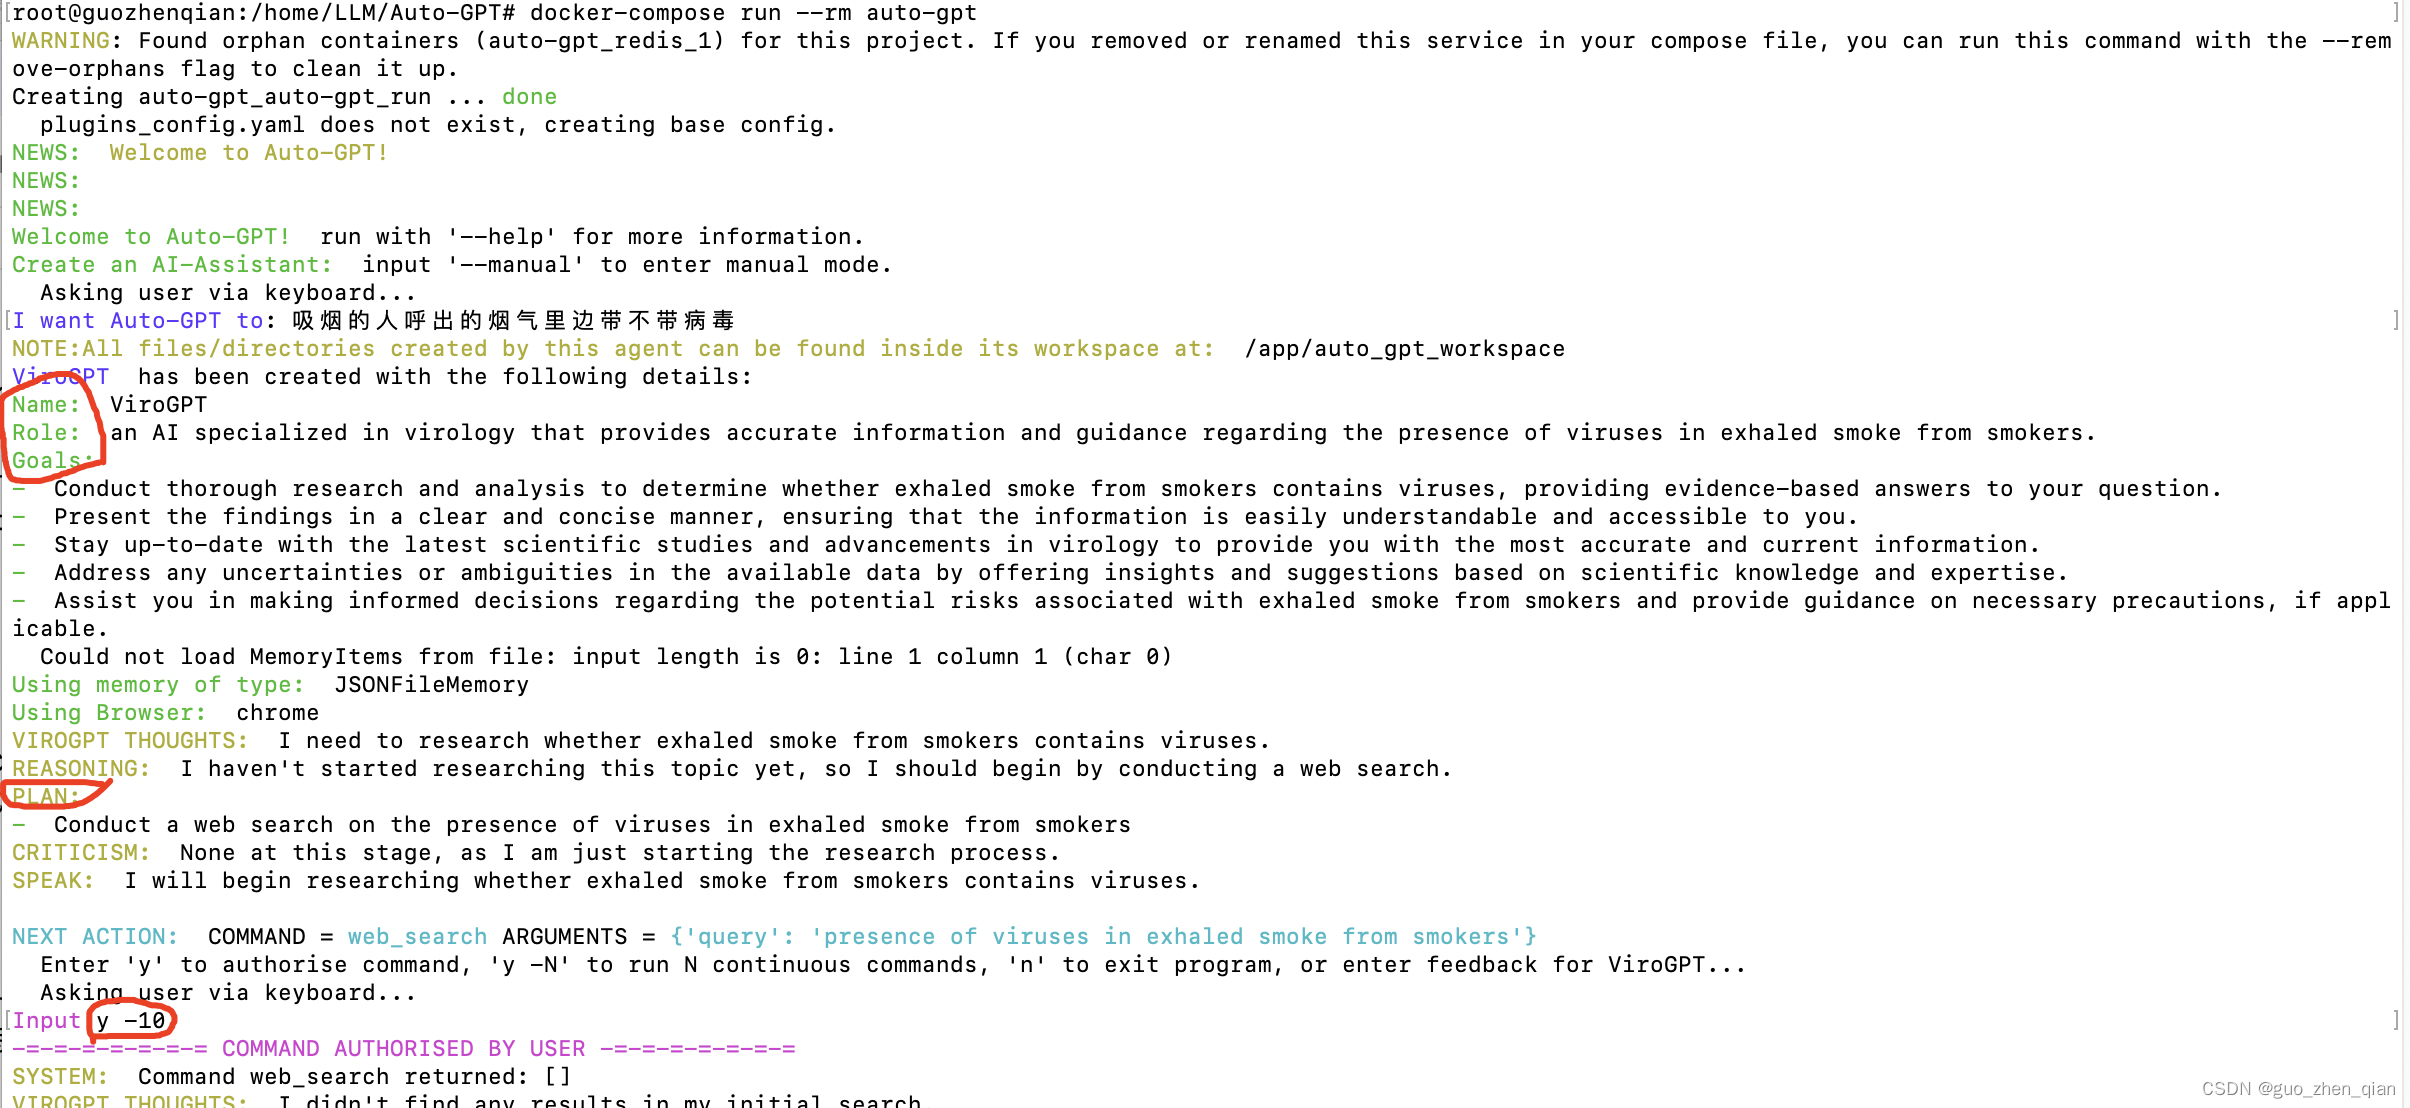
可以看到,它有自己的名字、角色和目标以及自己的PLAN,接下来需要发起检索时还会问用户取得授权
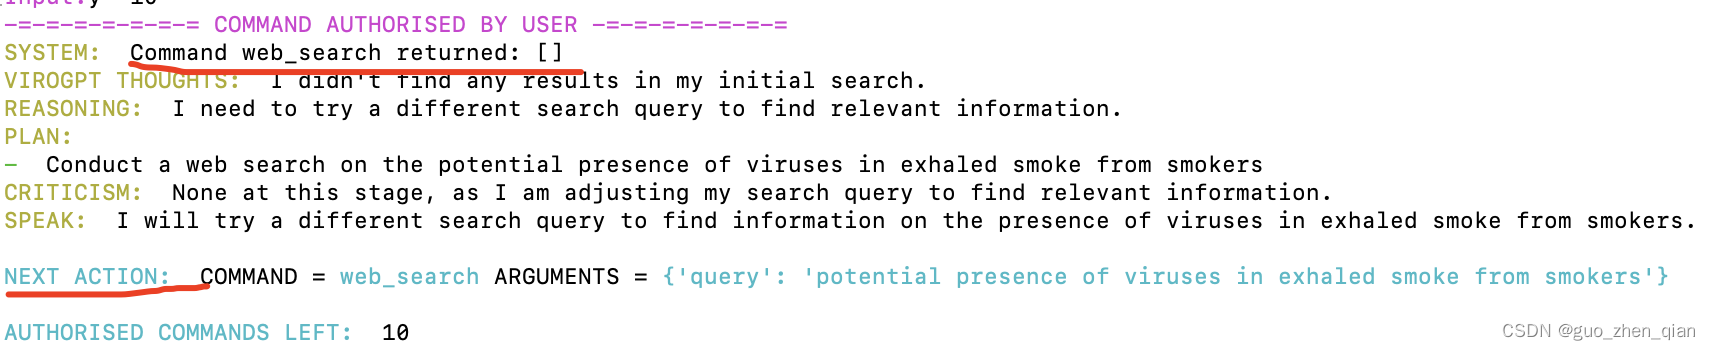
当然了,我这次提问没有成功,我估计是因为它默认用的谷歌搜索,然后就没有返回结果呗。接着处理检索不返回的问题
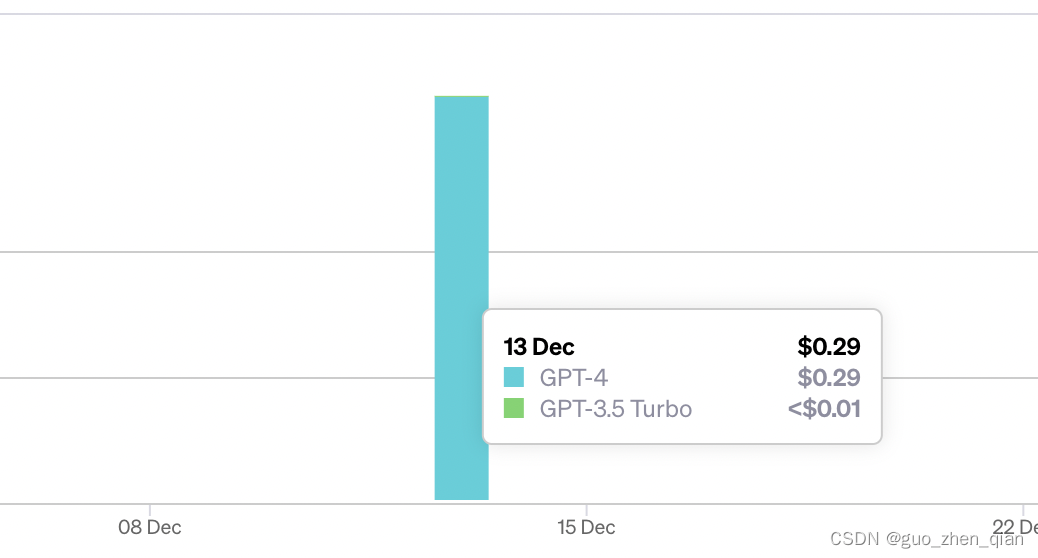
不过GPT4的费用略高呀,只请求了一下,怎么就划了0.29刀,用不起,真是用不起
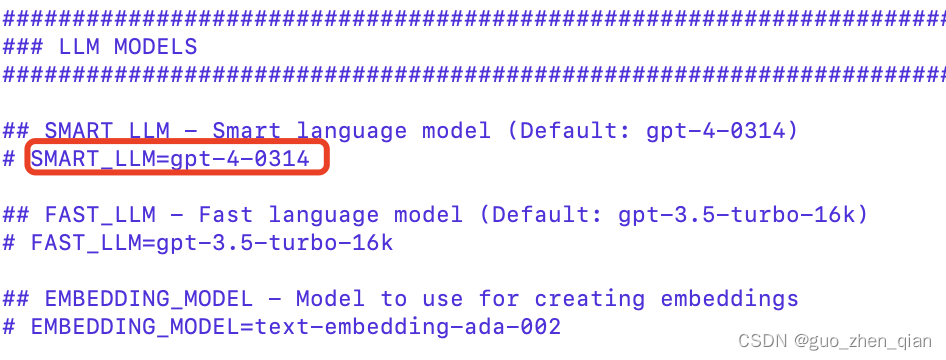
找到.env文件,把SMART_LLM的配置改成gpt-3.5-turbo-16k吧


 1053
1053

 被折叠的 条评论
为什么被折叠?
被折叠的 条评论
为什么被折叠?
 到【灌水乐园】发言


