MS COCO数据集介绍以及pycocotools使用

1、MS COCO数据集简介

在这里插入图片描述
在这里插入图片描述

2、MS COCO数据集目录结构

在这里插入图片描述

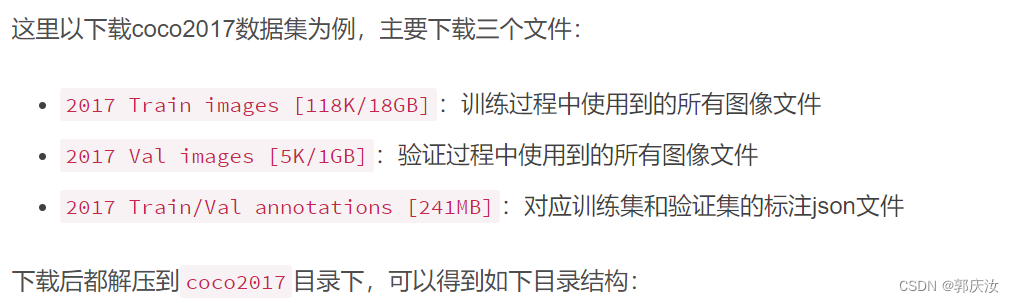
├── coco2017: 数据集根目录
     ├── train2017: 所有训练图像文件夹(118287)
     ├── val2017: 所有验证图像文件夹(5000)
     └── annotations: 对应标注文件夹
     		  ├── instances_train2017.json: 对应目标检测、分割任务的训练集标注文件
     		  ├── instances_val2017.json: 对应目标检测、分割任务的验证集标注文件
     		  ├── captions_train2017.json: 对应图像描述的训练集标注文件
     		  ├── captions_val2017.json: 对应图像描述的验证集标注文件
     		  ├── person_keypoints_train2017.json: 对应人体关键点检测的训练集标注文件
     		  └── person_keypoints_val2017.json: 对应人体关键点检测的验证集标注文件夹
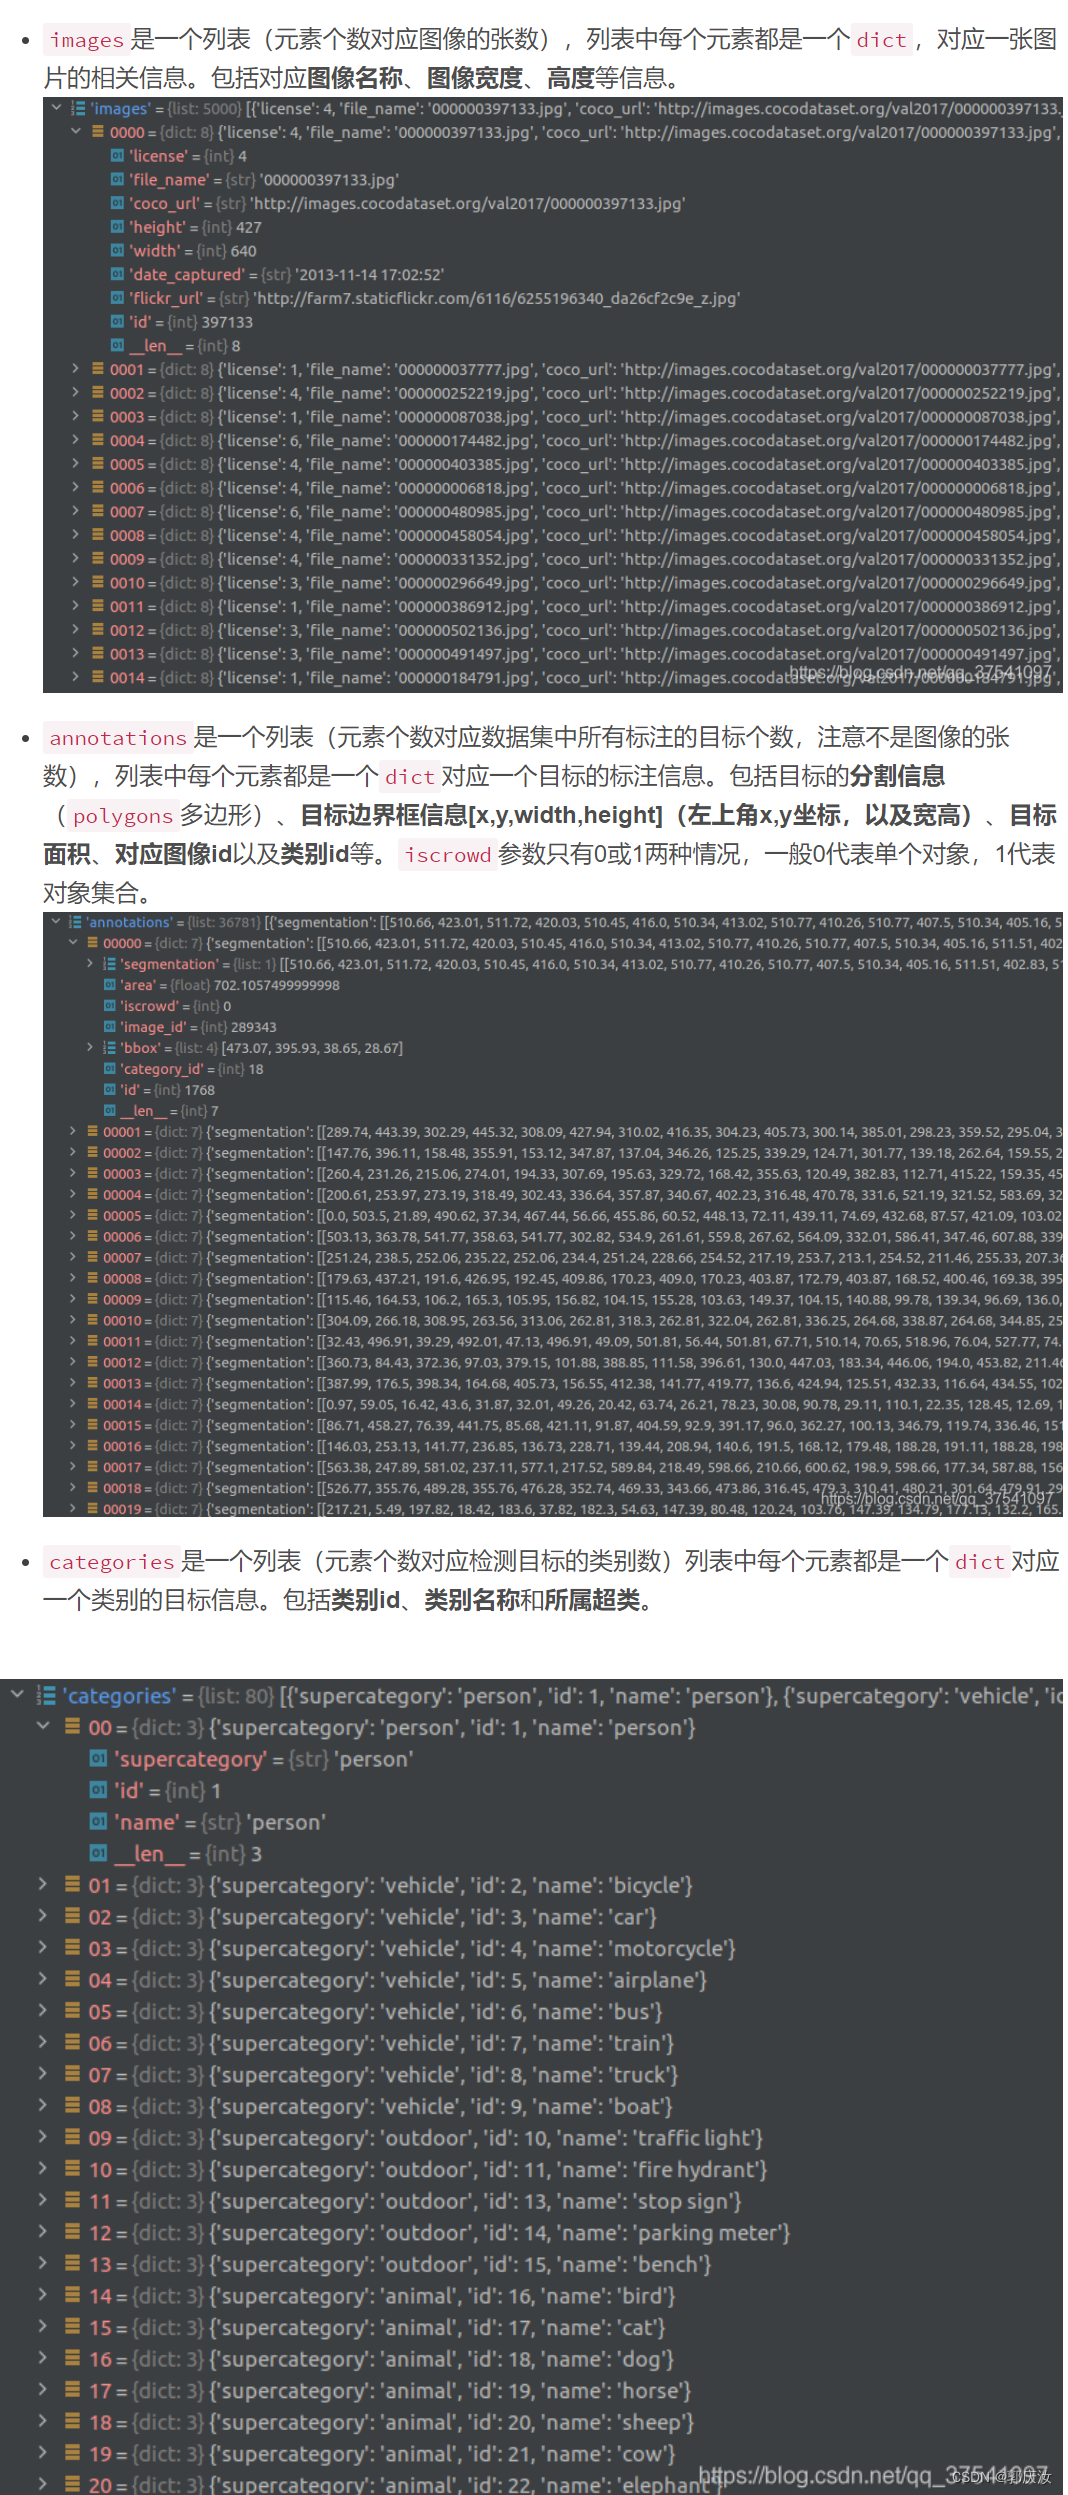
     		  

3、 MS COCO标注文件格式

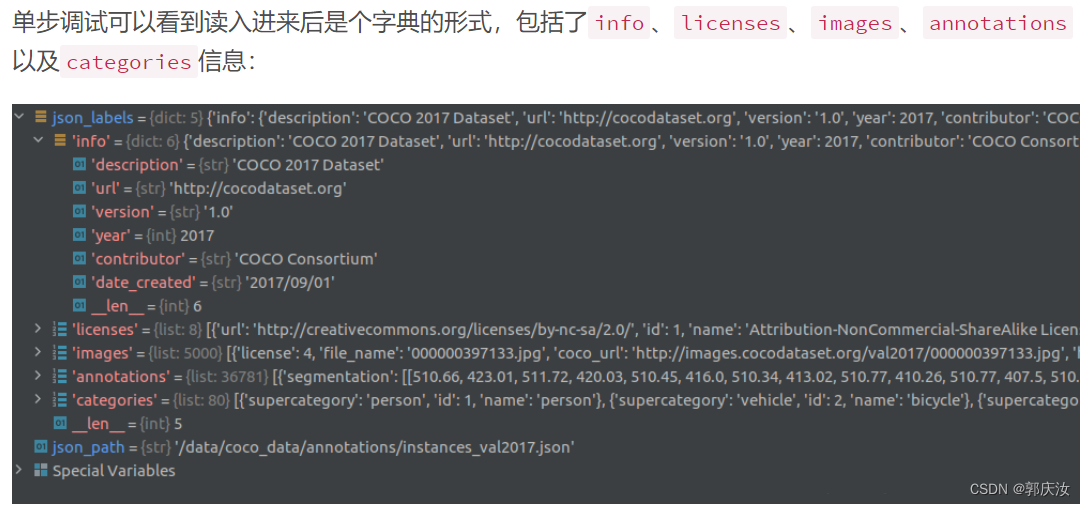
3.1 使用Python的json库查看

在这里插入图片描述

import json

json_path = "/data/coco2017/annotations/instances_val2017.json"
json_labels = json.load(open(json_path, "r"))
print(json_labels["info"])

在这里插入图片描述
在这里插入图片描述

3.2 使用官方cocoAPI查看

安装:

# ubuntu
pip install pycocotools  
# Windows
pip install pycocotools-windows

读取每张图片的bbox信息
下面是使用pycocotools读取图像以及对应bbox信息的简单示例:

import os
from pycocotools.coco import COCO
from PIL import Image, ImageDraw
import matplotlib.pyplot as plt

json_path = "/data/coco2017/annotations/instances_val2017.json"
img_path = "/data/coco2017/val2017"

# load coco data
coco = COCO(annotation_file=json_path)

# get all image index info
ids = list(sorted(coco.imgs.keys()))
print("number of images: {}".format(len(ids)))

# get all coco class labels
coco_classes = dict([(v["id"], v["name"]) for k, v in coco.cats.items()])

# 遍历前三张图像
for img_id in ids[:3]:
    # 获取对应图像id的所有annotations idx信息
    ann_ids = coco.getAnnIds(imgIds=img_id)

    # 根据annotations idx信息获取所有标注信息
    targets = coco.loadAnns(ann_ids)

    # get image file name
    path = coco.loadImgs(img_id)[0]['file_name']

    # read image
    img = Image.open(os.path.join(img_path, path)).convert('RGB')
    draw = ImageDraw.Draw(img)
    # draw box to image
    for target in targets:
        x, y, w, h = target["bbox"]
        x1, y1, x2, y2 = x, y, int(x + w), int(y + h)
        draw.rectangle((x1, y1, x2, y2))
        draw.text((x1, y1), coco_classes[target["category_id"]])

    # show image
    plt.imshow(img)
    plt.show()

通过pycocotools读取的图像以及对应的targets信息,配合matplotlib库绘制标注图像如下:
在这里插入图片描述
读取每张图像的segmentation信息
在这里插入图片描述

下面是使用pycocotools读取图像segmentation信息的简单示例:


import os
import random

import numpy as np
from pycocotools.coco import COCO
from pycocotools import mask as coco_mask
from PIL import Image, ImageDraw
import matplotlib.pyplot as plt

random.seed(0)

json_path = "/data/coco2017/annotations/instances_val2017.json"
img_path = "/data/coco2017/val2017"

# random pallette
pallette = [0, 0, 0] + [random.randint(0, 255) for _ in range(255*3)]

# load coco data
coco = COCO(annotation_file=json_path)

# get all image index info
ids = list(sorted(coco.imgs.keys()))
print("number of images: {}".format(len(ids)))

# get all coco class labels
coco_classes = dict([(v["id"], v["name"]) for k, v in coco.cats.items()])

# 遍历前三张图像
for img_id in ids[:3]:
    # 获取对应图像id的所有annotations idx信息
    ann_ids = coco.getAnnIds(imgIds=img_id)
    # 根据annotations idx信息获取所有标注信息
    targets = coco.loadAnns(ann_ids)

    # get image file name
    path = coco.loadImgs(img_id)[0]['file_name']
    # read image
    img = Image.open(os.path.join(img_path, path)).convert('RGB')
    img_w, img_h = img.size

    masks = []
    cats = []
    for target in targets:
        cats.append(target["category_id"])  # get object class id
        polygons = target["segmentation"]   # get object polygons
        rles = coco_mask.frPyObjects(polygons, img_h, img_w)
        mask = coco_mask.decode(rles)
        if len(mask.shape) < 3:
            mask = mask[..., None]
        mask = mask.any(axis=2)
        masks.append(mask)

    cats = np.array(cats, dtype=np.int32)
    if masks:
        masks = np.stack(masks, axis=0)
    else:
        masks = np.zeros((0, height, width), dtype=np.uint8)

    # merge all instance masks into a single segmentation map
    # with its corresponding categories
    target = (masks * cats[:, None, None]).max(axis=0)
    # discard overlapping instances
    target[masks.sum(0) > 1] = 255
    target = Image.fromarray(target.astype(np.uint8))
	# 使用putpalette()函数,而且我们可以自定义各个类别区域的颜色。
	# putpalette给对象加上调色板,相当于上色:R,G,B
    # 三个数一组,对应于RGB通道,可以自己定义标签颜色
    target.putpalette(pallette)
    plt.imshow(target)
    plt.show()

通过pycocotools读取的图像segmentation信息,配合matplotlib库绘制标注图像如下:
在这里插入图片描述
读取人体关键点信息
在MS COCO任务中,对每个人体都标注了17的关键点,这17个关键点的部位分别如下:

["nose","left_eye","right_eye","left_ear","right_ear","left_shoulder","right_shoulder","left_elbow","right_elbow","left_wrist","right_wrist","left_hip","right_hip","left_knee","right_knee","left_ankle","right_ankle"]

在这里插入图片描述

[427, 170, 1, 429, 169, 2, 0, 0, 0, 434, 168, 2, 0, 0, 0, 441, 177, 2, 446, 177, 2, 437, 200, 2, 430, 206, 2, 430, 220, 2, 420, 215, 2, 445, 226, 2, 452, 223, 2, 447, 260, 2, 454, 257, 2, 455, 290, 2, 459, 286, 2]

下面是使用pycocotools读取图像keypoints信息的简单示例:


import numpy as np
from pycocotools.coco import COCO

json_path = "/data/coco2017/annotations/person_keypoints_val2017.json"
coco = COCO(json_path)
img_ids = list(sorted(coco.imgs.keys()))

# 遍历前5张图片中的人体关键点信息(注意,并不是每张图片里都有人体信息)
for img_id in img_ids[:5]:
    idx = 0
    img_info = coco.loadImgs(img_id)[0]
    ann_ids = coco.getAnnIds(imgIds=img_id)
    anns = coco.loadAnns(ann_ids)
    for ann in anns:
        xmin, ymin, w, h = ann['bbox']
        # 打印人体bbox信息
        print(f"[image id: {img_id}] person {idx} bbox: [{xmin:.2f}, {ymin:.2f}, {xmin + w:.2f}, {ymin + h:.2f}]")
        keypoints_info = np.array(ann["keypoints"]).reshape([-1, 3])
        visible = keypoints_info[:, 2]
        keypoints = keypoints_info[:, :2]
        # 打印关键点信息以及可见度信息
        print(f"[image id: {img_id}] person {idx} keypoints: {keypoints.tolist()}")
        print(f"[image id: {img_id}] person {idx} keypoints visible: {visible.tolist()}")
        idx += 1

在这里插入图片描述

4、目标检测验证任务mAP

在这里插入图片描述
在这里插入图片描述
在这里插入图片描述

import json

results = []  # 所有预测的结果都保存在该list中
# write predict results into json file
json_str = json.dumps(results, indent=4)
with open('predict_results.json', 'w') as json_file:
    json_file.write(json_str)

数据准备:

COCO2017验证集json文件instances_val2017.json
链接: https://pan.baidu.com/s/1ArWe8Igt_q0iJG6FCcH8mg 密码: sa0j
自己训练的Faster R-CNN(VGG16)在验证集上预测的结果predict_results.json(刚刚上面生成的)
链接: https://pan.baidu.com/s/1h5RksfkPFTvH82N2qN95TA 密码: 8alm
示例代码:

from pycocotools.coco import COCO
from pycocotools.cocoeval import COCOeval


# accumulate predictions from all images
# 载入coco2017验证集标注文件
coco_true = COCO(annotation_file="/data/coco2017/annotations/instances_val2017.json")
# 载入网络在coco2017验证集上预测的结果
coco_pre = coco_true.loadRes('predict_results.json')

coco_evaluator = COCOeval(cocoGt=coco_true, cocoDt=coco_pre, iouType="bbox")
coco_evaluator.evaluate()
coco_evaluator.accumulate()
coco_evaluator.summarize()

结果:

loading annotations into memory...
Done (t=0.43s)
creating index...
index created!
Loading and preparing results...
DONE (t=0.65s)
creating index...
index created!
Running per image evaluation...
Evaluate annotation type *bbox*
DONE (t=21.15s).
Accumulating evaluation results...
DONE (t=2.88s).
 Average Precision  (AP) @[ IoU=0.50:0.95 | area=   all | maxDets=100 ] = 0.233
 Average Precision  (AP) @[ IoU=0.50      | area=   all | maxDets=100 ] = 0.415
 Average Precision  (AP) @[ IoU=0.75      | area=   all | maxDets=100 ] = 0.233
 Average Precision  (AP) @[ IoU=0.50:0.95 | area= small | maxDets=100 ] = 0.104
 Average Precision  (AP) @[ IoU=0.50:0.95 | area=medium | maxDets=100 ] = 0.262
 Average Precision  (AP) @[ IoU=0.50:0.95 | area= large | maxDets=100 ] = 0.323
 Average Recall     (AR) @[ IoU=0.50:0.95 | area=   all | maxDets=  1 ] = 0.216
 Average Recall     (AR) @[ IoU=0.50:0.95 | area=   all | maxDets= 10 ] = 0.319
 Average Recall     (AR) @[ IoU=0.50:0.95 | area=   all | maxDets=100 ] = 0.327
 Average Recall     (AR) @[ IoU=0.50:0.95 | area= small | maxDets=100 ] = 0.145
 Average Recall     (AR) @[ IoU=0.50:0.95 | area=medium | maxDets=100 ] = 0.361
 Average Recall     (AR) @[ IoU=0.50:0.95 | area= large | maxDets=100 ] = 0.463
  • 2
    点赞
  • 3
    收藏
    觉得还不错? 一键收藏
  • 0
    评论

“相关推荐”对你有帮助么?

  • 非常没帮助
  • 没帮助
  • 一般
  • 有帮助
  • 非常有帮助
提交
评论
添加红包

请填写红包祝福语或标题

红包个数最小为10个

红包金额最低5元

当前余额3.43前往充值 >
需支付:10.00
成就一亿技术人!
领取后你会自动成为博主和红包主的粉丝 规则
hope_wisdom
发出的红包
实付
使用余额支付
点击重新获取
扫码支付
钱包余额 0

抵扣说明:

1.余额是钱包充值的虚拟货币,按照1:1的比例进行支付金额的抵扣。
2.余额无法直接购买下载,可以购买VIP、付费专栏及课程。

余额充值