


数据源自动配置剖析
数据源配置方式
首先我们需要选择数据库驱动的库文件
<dependency>
  <groupId>mysql</groupId>
  <artifactId>mysql-connector-java</artifactId>
  <version>8.0.33</version>
</dependency>
配置数据库连接
spring:
  datasource:
    driver-class-name: com.mysql.cj.jdbc.Driver
    url: jdbc:mysql://localhost:3307/springboot
    username: root
    password: 123456
配置spring-boot-start-jdbc
<dependency>
  <groupId>org.springframework.boot</groupId>
  <artifactId>spring-boot-starter-jdbc</artifactId>
</dependency>
编写测试类
    @Autowired
    private DataSource dataSource;

    @Test
    public void contextLoads()throws SQLException{
        Connection connection =dataSource.getConnection();
        System.out.println(connection);

    }
连接池配置方式
SpringBoot提供了三种连接池:
- HikariCP
- Commons DBCP2
- Tomcat JDBC Connection Pool
其中SpringBoot默认使用HikariCP
<dependency>
  <groupId>org.springframework.boot</groupId>
  <artifactId>spring-boot-starter-jdbc</artifactId>
</dependency>
要使用其他两个要改为
<dependency>
  <groupId>org.apache.commons</groupId>
  <artifactId>commons-dbcp2</artifactId>
</dependency>
<dependency>
  <groupId>org.springframework.boot</groupId>
  <artifactId>spring-boot-starter-jdbc</artifactId>
  <exclusions>
    <exclusion>
      <groupId>com.zaxxer</groupId>
      <artifactId>HikariCP</artifactId>
    </exclusion>
  </exclusions>
</dependency>
<dependency>
  <groupId>org.apache.tomcat</groupId>
  <artifactId>tomcat-jdbc</artifactId>
</dependency>
<dependency>
  <groupId>org.springframework.boot</groupId>
  <artifactId>spring-boot-starter-jdbc</artifactId>
  <exclusions>
    <exclusion>
      <groupId>com.zaxxer</groupId>
      <artifactId>HikariCP</artifactId>
    </exclusion>
  </exclusions>
</dependency>
数据库自动配置
为什么前面我们说SpringBoot默认使用HikariCP?这是在哪里指定的?
首先我们需要找到DataSourceAutoConfiguration这个类
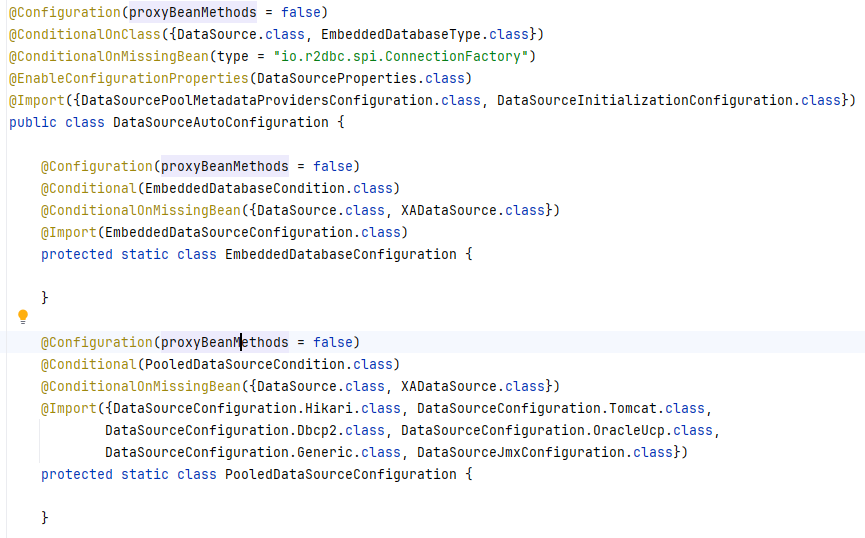
@Conditional(PooledDataSourceCondition.class)这个告诉我们指定的配置文件中,必须要有type属性。

现在我们进入DataSourceConfiguration这个里面
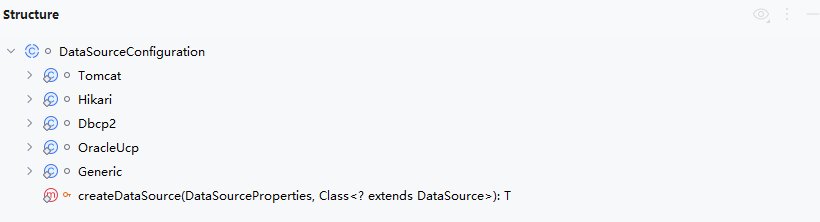
里面配置类SpringBoot启动的连接池。
private static final String[] DATA_SOURCE_TYPE_NAMES = new String[]
{"com.zaxxer.hikari.HikariDataSource",
"org.apache.tomcat.jdbc.pool.DataSource",
"org.apache.commons.dbcp2.BasicDataSource"};
所以我们可以看出来在没有指定Type时,默认就是HikariDataSource。
Druid连接池的配置
首先么要整合druid数据源
        <dependency>
            <groupId>com.alibaba</groupId>
            <artifactId>druid-spring-boot-starter</artifactId>
            <version>1.1.10</version>
        </dependency>
在application.yml中引入druid的相关配置
spring:
  datasource:
    driver-class-name: com.mysql.cj.jdbc.Driver
    url: jdbc:mysql://localhost:3307/springboot
    username: root
    password: 123456
    type: com.alibaba.druid.pool.DruidDataSource
整合的配置类
public class DruidConfig {

    @ConfigurationProperties(prefix = "spring.datasource")
    @Bean
    public DataSource druidDataSource(){
        return new DruidDataSource();
    }
}
SpringBoot整合Mybatis
首先我们要添加maven依赖
        <dependency>
            <groupId>org.mybatis.spring.boot</groupId>
            <artifactId>mybatis-spring-boot-starter</artifactId>
            <version>1.3.2</version>
        </dependency>
        <dependency>
            <groupId>org.projectlombok</groupId>
            <artifactId>lombok</artifactId>
            <optional>true</optional>
        </dependency>
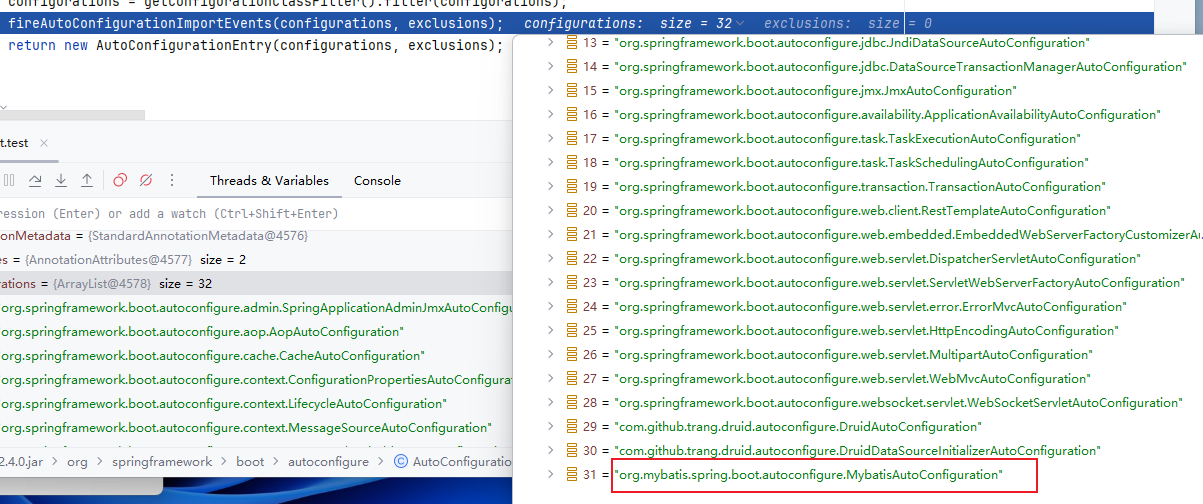
所以我们需要打开MybatisAutoConfiguration这个类

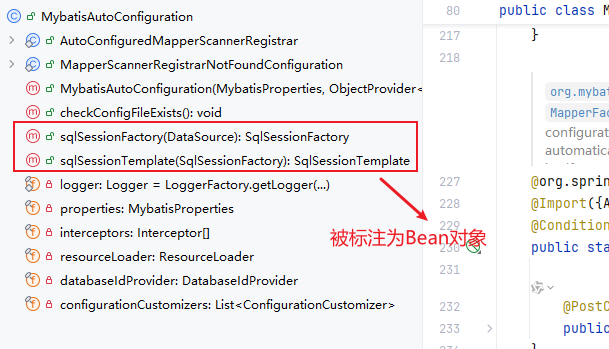
Mybatis自动配置源码剖析
- springBoot项目最核心的就是自动加载配置,该功能依赖的是一个注解
@SpringBootApplication中的@EnableAutoConfiguration; @EnableAutoConfiguration主要是通过@Import(AutoConfigurationImportSelector.class)类来加载的;- MybatisAutoConfiguration
-
- 其中有个MybatisProperties,该类是对应mybatis的配置文件
- 有个SqlSessionFactory方法,作用是创建SqlSession类,Configuration类(mybatis最主要的类,保存着与mybatis相关的东西)
- SqlSessionTemplate,作用是mapperProoxy代理类有关
然后我们要看MapperScan注解
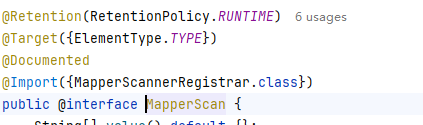
通过进一步分析源码我们可以得出以下结论
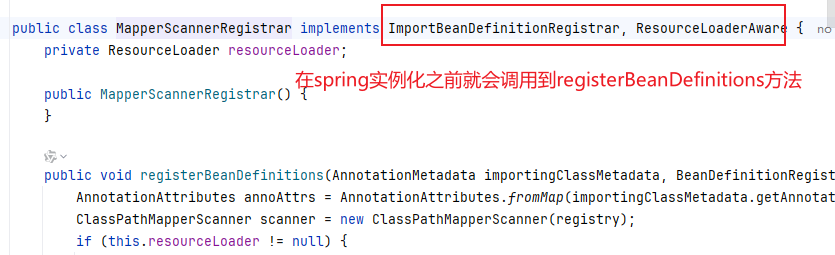
@MapperScan这个定义,是扫描指定包下面的mapper接口,然后设置每个mapper接口的beanClass属性为MapperFactoryBean类型并加入到spring的bean容器中。
MapperFactoryBean实现了FactoryBean接口,所以当spring从待实例化的bean容器中变量到这个bean并开始执行实例化使返回的对象实际上就是getObject方法中返回的对象。
最后我们看一下MapperFactoryBean的getObject方法,实际上返回的就是mybatis中通过getMapper拿到的对象,熟悉mybatis源码的就应该清楚,这个就是mybatis通过动态代理生成的mapper接口实现类。
到此,mapper接口现在也通过动态代理生成了实现类,并且注入到spring的bean容器中了,之后使用者就可以通过@Autowired或者getBean等方法,从spring容器中获取到了。
Spring+Mybatis实现动态数据源切换
动态数据源介绍
现在我们的项目中订单模块氛围正向和逆向两个部分;
- 正向模块中记录了订单的基本信息,包括订单基本信息,订单商品信息,优惠卷信息,发票信息,账期信息,结算信息,订单备注信息,收货人信息等;
- 逆向模块主要包含了商品退货信息和维修信息;
- 当我们数据量超过500万时就需要考虑分库分表和读写分类,需要动态切换到对应的数据库中。
解决思路
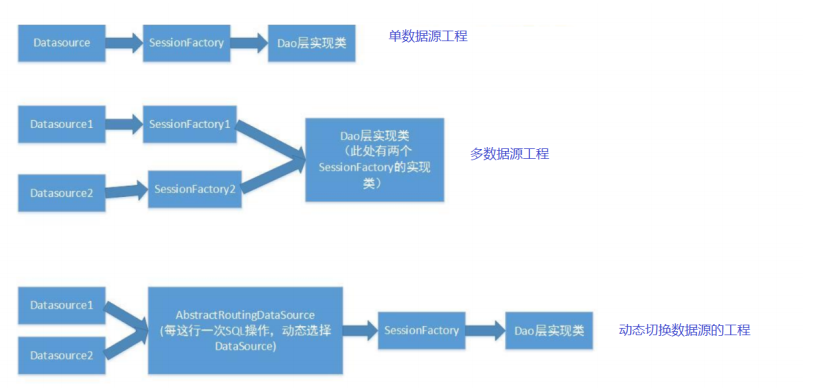
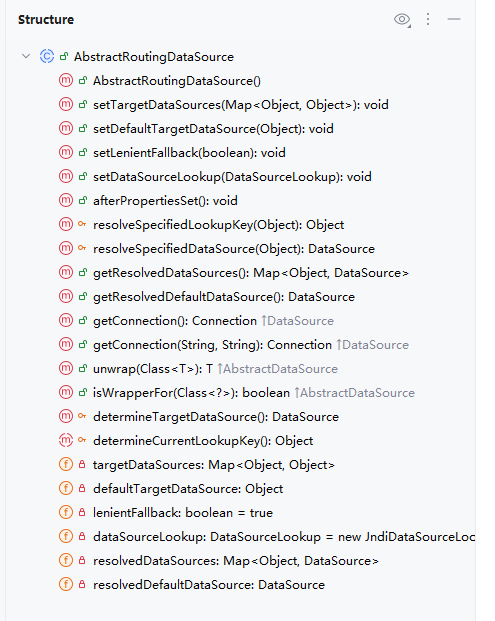
Spring内置了一个AbstractRoutingDataSource,它可以把多个数据源配置为一个Map,然后根据不同的key返回不同的数据源。
编码实战
首先我们需要准备基础的环境
@Data
public class Product {

    private Integer id ;
    private String name;
    private Double price;
}
@Mapper
public interface ProductMapper {

    //查询主数据库
    @Select("select * from product")
    public List<Product> getAllProductsM();

    //查询从数据库
    @Select("select * from product")
    public List<Product> getAllProductsS();
}
@Service
public class ProductServiceImpl implements ProductService {

    @Autowired
    private ProductMapper productMapper;

    @Override
    public void getAllProductsM() {
        List<Product> products = productMapper.getAllProductsM();
        System.out.println("MyBatis查询结果:"+products);
    }

    @Override
    public void getAllProductsS() {
        List<Product> products = productMapper.getAllProductsS();
        System.out.println("MyBatis查询结果:"+products);
    }
}
@RestController
@RequestMapping("/product")
public class ProductController {

    @Autowired
    private ProductService productService;

    @GetMapping("/getAllProductsM")
    public String getAllProductsM() {
        productService.getAllProductsM();
        return "master";
    }

    @GetMapping("/getAllProductsS")
    public String getAllProductsS() {
        productService.getAllProductsS();
        return "slave";
    }
}
配置类
@Configuration
@Slf4j
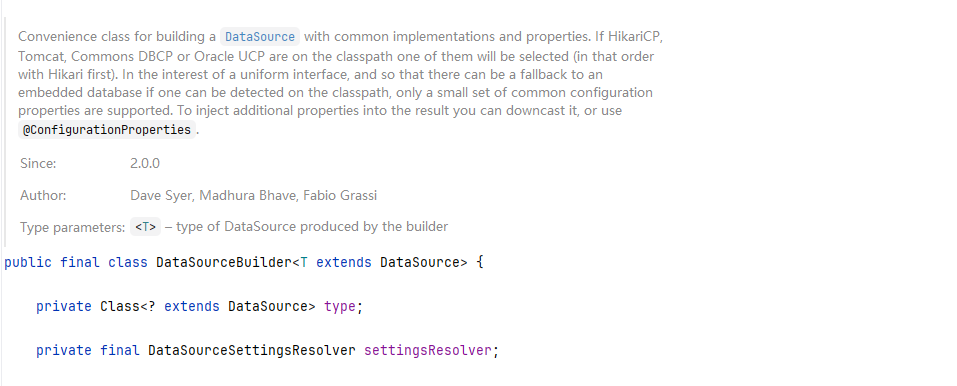
public class MyDataSourceConfiguration {
@Bean(name = "dataSourceM")
DataSource dataSourceM(){
log.info("主数据库");
return DataSourceBuilder.create().build();
}
@Bean(name = "dataSourceS")
DataSource dataSourceS(){
log.info("从数据库");
return DataSourceBuilder.create().build();
}
}
配置文件
spring:
  druid:
    datasource:
      master:
        url: jdbc:mysql://localhost:3307/product_m
        username: root
        password: 123456
        type: com.alibaba.druid.pool.DruidDataSource
        driver-class-name: com.mysql.cj.jdbc.Driver
      slave:
        url: jdbc:mysql://localhost:3307/product_s
        username: root
        password: 123456
        type: com.alibaba.druid.pool.DruidDataSource
        driver-class-name: com.mysql.cj.jdbc.Driver
其次需要编写RoutingDataSource,把两个真实的数据源代理为一个动态数据源:
@Slf4j
public class RoutingDataSource extends AbstractRoutingDataSource {

    @Override
    protected Object determineCurrentLookupKey() {
        return "master数据库";
    }

    @Bean
    @Primary
    DataSource primaryDataSource(@Autowired @Qualifier("dataSourceM")DataSource dataSourceM,
                                 @Autowired @Qualifier("dataSourceS")DataSource dataSourceS){

        log.info("正在动态创建数据库");
        Map<Object, Object> map = new HashMap<>();
        map.put("master数据库", dataSourceM);
        map.put("slave数据库", dataSourceS);
        RoutingDataSource routingDataSource = new RoutingDataSource();
        routingDataSource.setTargetDataSources(map);
        routingDataSource.setDefaultTargetDataSource(dataSourceM);
        return routingDataSource;
    }
}
现在RoutingDataSource配置好了,但是路由的选择是写死的,永远返回master数据库。
现在问题来了,我们该如何存储动态选择的key已经在哪里设置key?
使用ThreadLocal存储key最合适。
public class RoutingDataSourceContext {

    static final ThreadLocal<String> threadLocalDataSourceKey = new ThreadLocal<>();

    public static String getDataSourceKey() {
        String key = threadLocalDataSourceKey.get();
        return key == null ? "master数据库" : key;
    }

    public RoutingDataSourceContext(String key) {
        threadLocalDataSourceKey.set(key);
    }

    public  void close() {
        threadLocalDataSourceKey.remove();
    }
}
现在我们修改RoutingDataSource,获取key的代码
    @Override
    protected Object determineCurrentLookupKey() {
        return RoutingDataSourceContext.getDataSourceKey() ;
    }
@RestController
@RequestMapping("/product")
public class ProductController {

    @Autowired
    private ProductService productService;

    @GetMapping("/getAllProductsM")
    public String getAllProductsM() {
        RoutingDataSourceContext routingDataSourceContext = new RoutingDataSourceContext("master数据库");
        productService.getAllProductsM();
        return "master";
    }

    @GetMapping("/getAllProductsS")
    public String getAllProductsS() {
        RoutingDataSourceContext routingDataSourceContext = new RoutingDataSourceContext("salve数据库");
        productService.getAllProductsS();
        return "slave";
    }
}
测试结果
2025-12-12 14:07:48.541 [http-nio-8080-exec-3] DEBUG com.guslegend.mapper.ProductMapper.getAllProductsS - ==>  Preparing: select * from product
2025-12-12 14:07:48.541 [http-nio-8080-exec-3] DEBUG com.guslegend.mapper.ProductMapper.getAllProductsS - ==> Parameters:
2025-12-12 14:07:48.543 [http-nio-8080-exec-3] DEBUG com.guslegend.mapper.ProductMapper.getAllProductsS - <==      Total: 1
MyBatis查询结果:[Product(id=1, name=桌子, price=100.0)]
2025-12-12 14:07:50.442 [http-nio-8080-exec-4] DEBUG com.guslegend.mapper.ProductMapper.getAllProductsM - ==>  Preparing: select * from product
2025-12-12 14:07:50.442 [http-nio-8080-exec-4] DEBUG com.guslegend.mapper.ProductMapper.getAllProductsM - ==> Parameters:
2025-12-12 14:07:50.443 [http-nio-8080-exec-4] DEBUG com.guslegend.mapper.ProductMapper.getAllProductsM - <==      Total: 1
MyBatis查询结果:[Product(id=1, name=桌子, price=100.0)]
优化
上面需要读取数据库的地方就要加上这样的一段话,是否太过于复杂了?
RoutingDataSourceContext routingDataSourceContext = new RoutingDataSourceContext();
我们可以使用声明式事务管理,或者自定义注解来解决
首先我们要添加aop的依赖
        <dependency>
            <groupId>org.springframework.boot</groupId>
            <artifactId>spring-boot-starter-aop</artifactId>
        </dependency>
自定义注解
@Target(ElementType.METHOD)
@Retention(RetentionPolicy.RUNTIME)
public @interface RoutingWith {

    String value() default "master";
}
切面类
@Aspect
@Component
public class RoutingAspect {

    @Around("@annotation(routingWith)")
    public Object routingWithDataSource(ProceedingJoinPoint proceedingJoinPoint,RoutingWith routingWith)throws Throwable{
        String key =routingWith.value();
        RoutingDataSourceContext routingDataSourceContext = new RoutingDataSourceContext(key);
        return proceedingJoinPoint.proceed();
    }

}
改造controller方法
@RestController
@RequestMapping("/product")
public class ProductController {

    @Autowired
    private ProductService productService;

    @RoutingWith("master")
    @GetMapping("/getAllProductsM")
    public String getAllProductsM() {
//        RoutingDataSourceContext routingDataSourceContext = new RoutingDataSourceContext("master数据库");
        productService.getAllProductsM();
        return "master";
    }

    @RoutingWith("slave")
    @GetMapping("/getAllProductsS")
    public String getAllProductsS() {
//        RoutingDataSourceContext routingDataSourceContext = new RoutingDataSourceContext("salve数据库");
        productService.getAllProductsS();
        return "slave";
    }
}
至此,我们实现了注解动态选择数据源功能。


 912
912

 被折叠的 条评论
为什么被折叠?
被折叠的 条评论
为什么被折叠?
 到【灌水乐园】发言


