


上一篇利用Terracotta实现了最简单的Tomcat集群,只用到一台Terracotta服务器、一台nginx服务器,在实际应用中都可能发生单点故障。nginx可以通过keepalived配置为热备;Terracotta内置了热备,可以在每台Tomcat主机部署一个Terracotta,需要配置tc-config.xml,具体可参见官方文档。
配置Terracotta双机热备
1、配置terracotta(tc-config.xml)
<?xml version="1.0" encoding="UTF-8" ?>
<tc:tc-config xmlns:tc="http://www.terracotta.org/config"
  xmlns:xsi="http://www.w3.org/2001/XMLSchema-instance"
  xsi:schemaLocation="http://www.terracotta.org/schema/terracotta-6.xsd">
  <servers>
    <!-- Sets where the Terracotta server can be found.
     Replace the value of host with the server's IP address. -->
    <server host="server.1.ip.address" name="Server1">
      <data>%(user.home)/terracotta/server-data</data>
      <logs>%(user.home)/terracotta/server-logs</logs>
      <statistics>%(user.home)/terracotta/server-statistics</statistics>

      <!--监听客户端连接的端口-->
      <dso-port>9510</dso-port>
      <!--监听Terracotta Developer Console连接的端口-->
      <jmx-port>9520</jmx-port>
      <!--Terracotta之间通信的端口-->
      <l2-group-port>9530</l2-group-port>

      <!-- Configuration data for DSO that's specific to the DSO server. -->
      <dso>
        <client-reconnect-window>120</client-reconnect-window>
        <persistence>
          <mode>temporary-swap-only</mode>
        </persistence>

        <garbage-collection>
          <enabled>true</enabled>
          <verbose>false</verbose>
          <interval>3600</interval>
        </garbage-collection>
      </dso>
    </server>

    <!-- If using a standby Terracotta server, also referred to as
     an ACTIVE-PASSIVE configuration, add the second server here. -->
    <server host="server.2.ip.address" name="Server2">
      <data>%(user.home)/terracotta/server-data</data>
      <logs>%(user.home)/terracotta/server-logs</logs>
      <statistics>%(user.home)/terracotta/server-statistics</statistics>

      <dso-port>9510</dso-port>
      <jmx-port>9520</jmx-port>
      <l2-group-port>9530</l2-group-port>

      <dso>
        <client-reconnect-window>120</client-reconnect-window>
        <persistence>
          <mode>temporary-swap-only</mode>
        </persistence>

        <garbage-collection>
          <enabled>true</enabled>
          <verbose>false</verbose>
          <interval>3600</interval>
        </garbage-collection>
      </dso>
    </server>

    <ha>
      <mode>networked-active-passive</mode>
      <networked-active-passive>
         <election-time>5</election-time>
      </networked-active-passive>
    </ha>
  </servers>

  <!-- Sets where the generated client logs are saved on clients. -->
  <clients>
    <logs>%(user.home)/terracotta/client-logs</logs>
  </clients>
</tc:tc-config>
将tc-config.xml放到${TERRACOTTA_HOME}/bin目录下,启动命令:
/usr/local/terracotta/start-tc-server.sh -n Server1/usr/local/terracotta/start-tc-server.sh -n Server2也将tc-config.xml可放到其他目录下,启动时指定文件位置即可:
/usr/local/terracotta/start-tc-server.sh -f /usr/local/terracotta/tc-config.xml -n Server1/usr/local/terracotta/start-tc-server.sh -f /usr/local/terracotta/tc-config.xml -n Server22、配置Tomcat集群
复制/usr/local/terracotta/sessions/terracotta-session-1.3.5.jar、/usr/local/terracotta/common/terracotta-toolkit-1.6-runtime-5.5.0.jar这两个jar到Tomcat下lib目录。
编辑$Tomcat_Home/conf/context.xml
<Context>
    <Valve className="org.terracotta.session.TerracottaTomcat60xSessionValve" tcConfigUrl="192.168.1.88:9510,192.168.1.102:9510" />
</Context>
tcConfigUrl指定多个Terracotta服务器的地址和端口,多个则用逗号分隔。
3、分别启动Terracotta、Tomcat、nginx(参照之前文章)
4、打开Terracotta开发工具dev-consol(参照之前文章)
a)只启动Server1中的Terracotta,可以看到Server1处于Active状态,Server2处于停机状态:
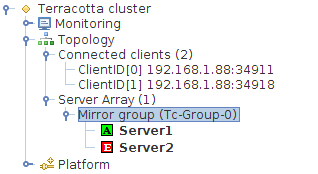
b)启动Server2中的Terracotta,可以看到Server2处于Passive-Standby状态:

c)当Server1出现故障,立即failover,Server2变为Active状态:

从测试页面的显示来看,整个过程session始终没有丢失。
参考:
http://terracotta.org/documentation/4.0/terracotta-server-array/configuration-guide
http://terracotta.org/documentation/4.0/terracotta-server-array/server-arrays
http://blog.163.com/comfort_122/blog/static/48904409201131145149530/
http://juson.blog.51cto.com/1010256/733467


 6335
6335

 被折叠的 条评论
为什么被折叠?
被折叠的 条评论
为什么被折叠?
 到【灌水乐园】发言


